
Note:
Close all instances of Eclipse before commencing with the upgrade
process. After the upgrade process has been completed, reopen Eclipse and
refresh the project.
 To upgrade an existing web application:
In the ApplinX Explorer, right-click on the relevant application and select .The Web Application Manager Wizard is displayed.
Select Upgrade an existing Web application. Click . The Web Application Folder screen is displayed.
Locate and select the folder of the Web application to be upgraded, or the Eclipse project where the application is located. It is highly recommended to backup the Web application before upgrading. Click .
The Wizard Summary screen is displayed.
Click . The Console area indicates whether the process succeeded or failed.
To deploy the Web application:
Right-click on the relevant application and select . The Deployment Manager wizard is displayed.
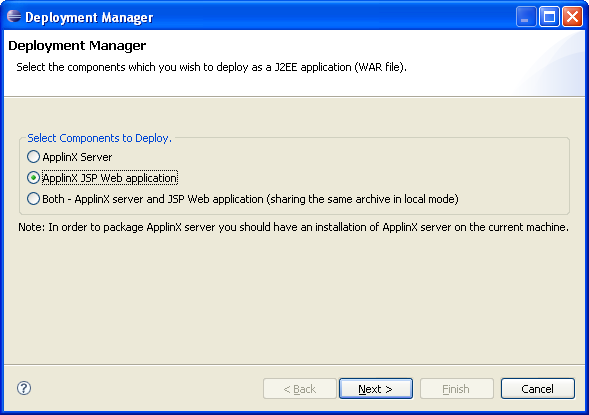
Ensure that the ApplinX Web application option is selected.
Click Next. The Select ApplinX Application screen is displayed.
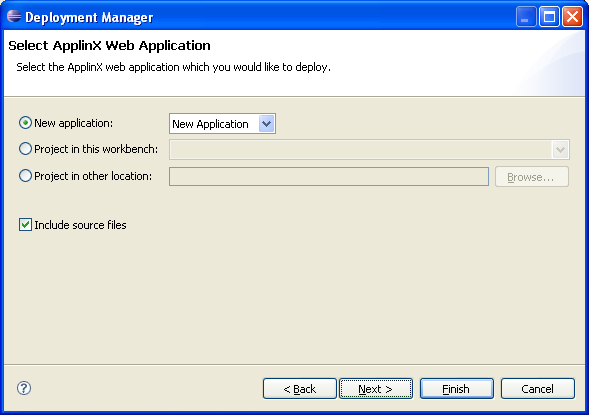
Select whether to deploy a new application or HTML emulation, or a project from within the workbench, or a project from a different location.
Select Include source files to include the Java files as well as the compiled classes. Click . The Select Package Parameters screen is displayed.
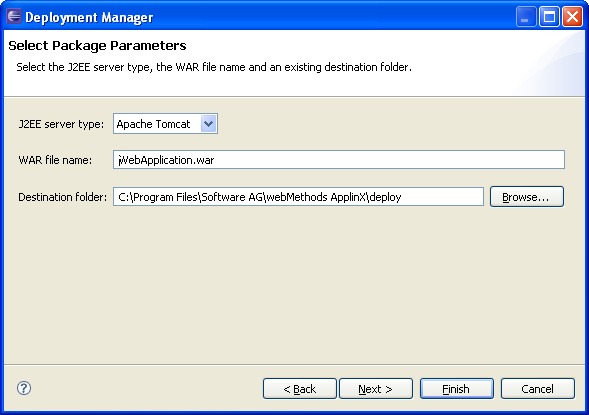
Select the J2EE server type, the WAR file name and the destination folder where the output file will be placed.
Click Next. The Select Target ApplinX Server screen is displayed.
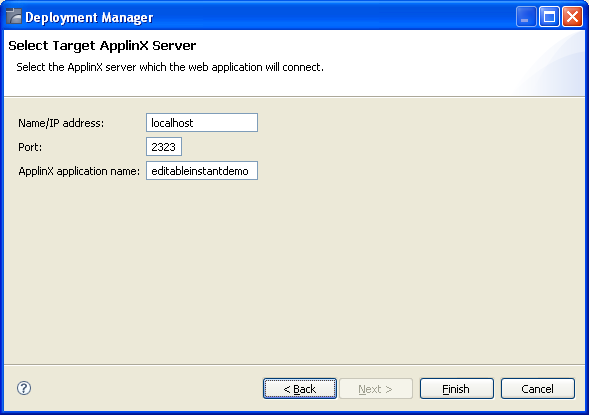
In this screen, Enter the ApplinX server and the port with which the Web application will connect. Also enter the ApplinX application name.
Click .
In the console area, it is possible to see whether the process succeeded or failed. The WAR file created should be placed in your Web server directory.
Consider changing the following for production use:
Change the framework logging according to your needs either by accessing the "Framework Configuration Editor" or in config/gx_logConfig.xml file. For example:
<category additivity="false" name="com.sabratec">
          <level value=" ERROR"/> <!-- Sets the log to Errors only -->
           <appender-ref ref="FRAMEWORK_LOG"/>
</category>
Possible values are:
INFO - Normal
WARN - Warnings
ERROR - Errors only
DEBUG - Debug
Disable the Performance monitor either by accessing the "Framework Configuration Editor" or in config/gx_appConfig.xml file set the WritePerformanceLog to false (this is the default configuration).
Disable the Javascript log using the config/gx_clientConfig.xml by setting LogLevel to 0 and ShowLogConsole to false (this is the default configuration).
Remove "Framework Configuration Editor" link from index page: delete the folder z_admin and remove the link to "configuration editor" from the index page.
To upgrade an existing Web application:
In the ApplinX Explorer, right-click on the relevant application and select .The Web Application Manager Wizard is displayed.
Select Upgrade an existing Web application. Click . The Web Application Folder screen is displayed.
Locate and select the folder of the Web application to be upgraded. It is highly recommended to backup the Web application before upgrading. Click .
The Wizard Summary screen is displayed.
Click . The Console area indicates whether the process succeeded or failed.
When deploying an ApplinX application that also consists of a Web application, for example when moving from the development environment to the production environment, the deployment consists of two parts: deploying the ApplinX application and entities and deploying the Web application.
Note:
ApplinX Framework supports .NET clustering in a Web farm
environment.
To deploy the Web application:
Copy the entire Web application into a temporary working folder.
In the config/gx_logConfig.xml file edit the Logger settings according to your needs (enable/disable the log, target path and log level). For example:
<logger name="com.sabratec">
          <level value="INFO"/> <!"sets the log to normal mode
          <appender-ref ref="FRAMEWORK_LOG"/>
</logger>
When you do not require the performance log, ensure that the last two category nodes in the XML file are commented.
Change the definition of designMode in
config/gx_appConfig.xml to
"false".
Change the definition of the serverURL and applicationName in config/gx_appConfig.xml to the target server.
Copy the updated folder to the relevant Web server.
Map this folder as a virtual directory under the server.
When running the Web application in a browser there are times (such as when closing a tab, terminating a browser process etc.) that the browser close function is not triggered. Therefore, one cannot assume that when clicking the "X" close window button that the session will be disconnected. To assure disconnecting the session, it is recommended to set a timeout (in the ApplinX Designer>Host configuration tab, Connection timeout field) that will automatically disconnect the session after the predefined amount of time passes.
It is highly recommended to train the user to logoff from the application using the Logoff link. Optionally, In both .NET and JSP, it is possible to configure an event class which notifies when a session ends.
To customize the logoff process from the code:
JSP: See HttpSessionListener .
.NET: See usage of global.asax in ASP.NET
documentation