
This document covers the following topics:
Ajax Developer requires a web container such as Tomcat as its runtime environment.
If NaturalONE is installed, an Apache Tomcat is already included and all required configuration has automatically been done. In this case, you can immediately enable a project for Ajax Developer (see below).
If NaturalONE is not installed, you must first enter the settings for your own local web container environment in the Ajax Developer preferences. For further information, see Setting the Ajax Developer Preferences.
You can customize memory and port settings of the Tomcat in the file <SoftwareAG Installation Directory>/naturalone/njx/tomcat.properties.
| Property name | Value | Explanation |
|---|---|---|
|
host |
localhost | Do not change this. |
|
minconnectorport |
28080 | The Tomcat tries to find a free port starting with this value. You can change this vaue. If you change it, you usually must also change the minshutdownport. |
|
minshutdownport |
28005 | Tomcat shutdown port corresponding to minconnectorport. |
|
numconnectorports |
20 | Number of ports the Tomcat will try to find a free port. |
|
numshutdownports |
20 | Corresponding to numconnectorports. |
|
webcontext |
cisnatural | Do not change this. |
|
javaopts |
Example value: -Xmn128m -Xms512m -Xmx1024m |
Java Options for the Java VM running in the Tomcat. If you have really huge Ajax layouts you may want to increase the memory settings. |
NaturalONE updates may include updates to the runtime environment. Runtime environment updates can be:
Tomcat updates: the folder <SoftwareAG Installation Directory>/naturalone/apache-tomcat will be updated.
Natural Ajax Runtime updates: the file <SoftwareAG Installation Directory>/naturalone/njx/naturalajax.war will be updated.
The Tomcat version of the NaturalONE installation must always match the Tomcat version of an Eclipse workspace.
When you start Software AG Designer after an update, the workspace will be updated correspondingly. Per default a dialog will pop up to confirm the workspace update. You must confirm the update if you want to work with the workspace.
If you never want to be prompted to confirm the workspace update:
Open the file <SoftwareAG Installation Directory>/Designer/eclipse/configuration/.settings/org.eclipse.ui.ide.prefs in a text editor
Add as the last line: WARN_ABOUT_WORKSPACE_INCOMPATIBILITY=false
Now after every NaturalONE upgrade, your workspace will also be automatically updated without bothering you with dialogs.
In the same NaturalONE installation you can have multiple workspaces with different Natural Ajax Runtime versions. When you start Software AG Designer after an update, a dialog will pop-up to ask you if the Natural Ajax Runtime should be updated in the workspace. Making this upgrade is optional. However, we strongly recommend updating the workspace because newer Natural Ajax Runtime versions also contain fixes for security vulnerabilities.
You can customize the update behavior by setting the property upgradenjx in the file <SoftwareAG Installation Directory>/naturalone/njx/tomcat.properties:
| Value | Explanation |
|---|---|
| always | The Natural Ajax Runtime in the workspace will automatically be updated if required without bothering you with dialogs |
| never | The Natural Ajax Runtime in the workspace will not be updated and no dialog will pop up |
| ifnewer | The Natural Ajax Runtime in the workspace will only be updated if the version in Software AG Designer is newer than the version in the workspace. |
Note:
If a workspace has been updated, you need to rebuild your
projects.
The web application configuration in the Ajax Developer preferences is normally only required if you use your own local web container environment, that is, when NaturalONE is not installed.
 To set the Ajax Developer preferences
From the menu, choose .
In the tree of the resulting dialog box, expand the Software AG node and then select the Ajax Developer node.
If you want to use your own web container environment, choose the Custom tab on the resulting Ajax Developer page and specify all required information. For information on the available options, see Enabling a Project for Ajax Developer.
It is important that you set the web application folder to <webcontainerinstalldir>/webapps/cis. Example:
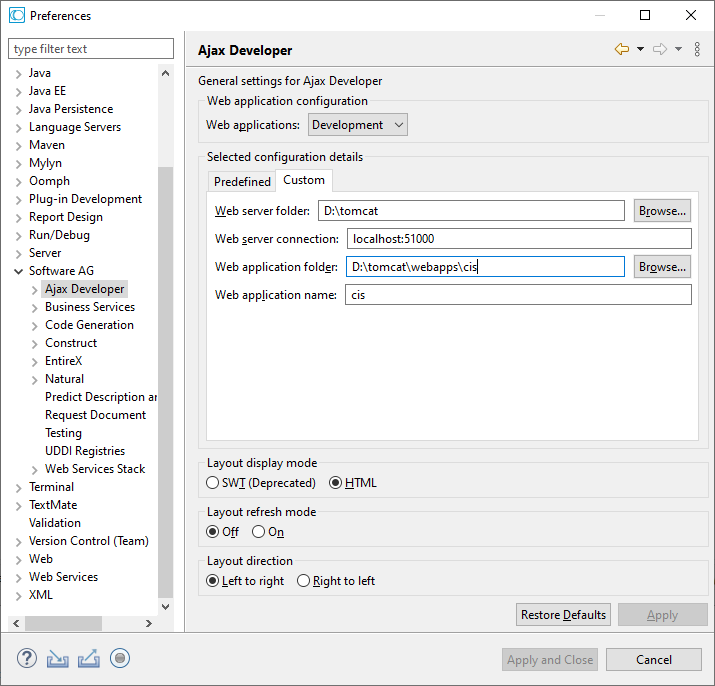
The options under Layout display mode allow you to control how the page layouts are rendered by default in the Layout Painter preview window. If you choose SWT, the layout will be rendered by default as SWT (Standard Widget Toolkit) pages, that is, with Java means. If you choose HTML, the layout will be rendered by default as HTML pages.
Note:
You can also change the display mode directly in the
Layout Painter, using a menu command. See
Changing the Display
Mode.
The options under Layout refresh mode allow you to enable or disable automatic refreshing of the Layout Painter's preview area.
The options under Layout direction allow you to design your page layout in either left-to-right (LTR) or right-to-left (RTL) direction. The specified direction is then used in the preview area of the Layout Painter.
Choose the button to save your changes and to close the dialog box.
You can customize the layout errors and warnings in the following preference page.
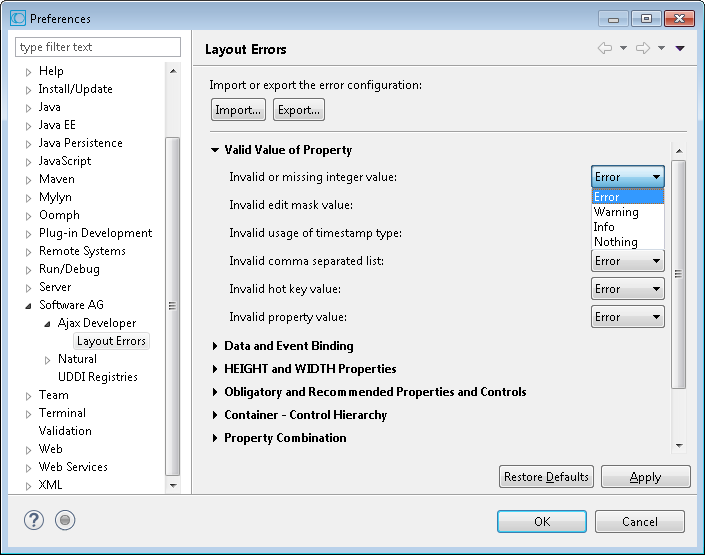
For more information on the problem groups see Configuration of Page Layout Errors/Warnings.
To keep your own settings when creating a new workspace you need to export the settings and import them in the new workspace.
The following topics are covered below:
With Ajax Developer, page layouts can be developed in Natural or Java projects. You create your Natural or Java project as usual and then enable this project for Ajax Developer. When a project has been enabled for Ajax Developer, the settings for a specific web container environment are applied to the project. These settings are used to develop and run page layouts.
You can have multiple projects which are enabled for different web container environments.
In a NaturalONE installation, you will usually always enable a project for the preconfigured Tomcat environment. This is the so-called "Development" environment which is automatically installed and configured with NaturalONE.
When NaturalONE is not installed, you have the following choices for the location of your Java projects:
Choose a project location outside the web container environment. This is recommended for development, especially for working with version control systems such as CVS or Subversion.
Choose the web application root folder named cis as the project location. This is only recommended for testing and debugging layouts in a production environment or test environment.
Before you can define layout pages for a project, you have to enable the project for Ajax Developer.
To enable a project for Ajax Developer
In the ProjectExplorer view, select the project that you want to enable.
Invoke the context menu and choose .
The following dialog box appears:

Specify the following information:
- Web applications
Select one of the following options from the drop-down list box:
Development
If NaturalONE is installed, select this option. No further steps are required (the configuration options in this dialog box are disabled in this case).Note:
This option is only available when NaturalONE is installed.Custom
If NaturalONE is not installed, select this option. In this case, the configuration options in the dialog box are enabled and you can define your own settings for your web container environment. See below.- Web server folder
The root folder of the local web container environment.
- Web server connection
Host name and port number of the local web container environment.
- Web application folder
The folder of the Application Designer web application. For NaturalONE installations, this is the root folder of the cisnatural web application. If NaturalONE is not installed, this is the root folder of the cis web application (<webcontainerinstalldir>/webapps/cis).
- Web application name
For NaturalONE, this is cisnatural. If NaturalONE is not installed, this is cis.
- Layout display mode
Select the display mode for the Layout Painter and Layout Tester:
HTML
This mode makes use of the ActiveX plug-in of Eclipse in which Internet Explorer is running.SWT
This mode makes use of SWT controls which are shown in an SWT client.- Layout refresh mode
Enable or disable automatic refreshing of the Layout Painter's preview area:
Off
The preview area is not automatically refreshed when the layout is changed. It is only refreshed when the changes are saved. It is recommended that you use this mode if you are working with complex controls such as ROWTABAREA.On
The preview area is automatically refreshed when the layout changes, even if the changes have not yet been saved.- Create root folder
When selected, all user interface components of the project are created within a folder which has the fixed name "User-Interface-Components".
When not selected, all user interface components of the project are created directly in the project directory.
When NaturalONE is installed, the default for this setting can be defined under .
- Use workspace relative paths
This option is read-only.
In a NaturalONE installation, the Development web application is part of your Eclipse workspace. Ajax Developer automatically uses relative paths to access this web application. When relative paths are used, the workspace can be renamed or moved on the file system.
If you are not working with NaturalONE and you are using the Custom web application, the web application is usually not located within your Eclipse workspace. In this case, Ajax Developer uses absolute paths. If you move your web application or your Tomcat on the file system, you must adapt the settings.
Choose the Finish button.
The icon for the project changes to indicate that Ajax Developer has been enabled for the project.
The context menu for the project now provides the additional cascading menu which provides for selection a number of tools which are helpful when defining layouts.
If you are working with NaturalONE, you can change the layout display mode that is defined for the project, for example, from SWT mode to HTML mode. If NaturalONE is not installed, you can also change the settings for your web container environment.
To change the properties
In the ProjectExplorer view or in the Natural Navigator view, select the project which has been enabled for Ajax Developer.
Invoke the context menu and choose Properties.
In the tree of the resulting dialog box, select Ajax Developer.
The resulting page contains the same information as the dialog box which appears when you enable a project for Ajax Developer. See Enabling a Project for Ajax Developer for further information.
If you decided to remove all user interface components from a project, it makes sense to entirely disable this project for Ajax Developer. Then, the Ajax Developer functionality is no longer available for the project.
The user interface components are not deleted physically from the disk. Thus, it is possible to re-enable the same project for Ajax Developer later.
To disable a project
In the ProjectExplorer view, select the project that you want to disable.
Invoke the context menu and choose .
The following topics are covered below:
After a project has been enabled for Ajax Developer, you can add user interface components. A user interface component is a container for a set of layout pages and additional artifacts such style sheets, images or language files.
A user interface component is also connected to the corresponding Natural or Java sources which implement the business logic. A single Java or Natural project may contain several user interface components.
The name of the user interface component must be unique across the Eclipse workspace.
To create a user interface component
In the ProjectExplorer view or in the Natural Navigator view, select the project in which you want to create a user interface component.
From the menu or context menu, choose .
The following dialog box appears:
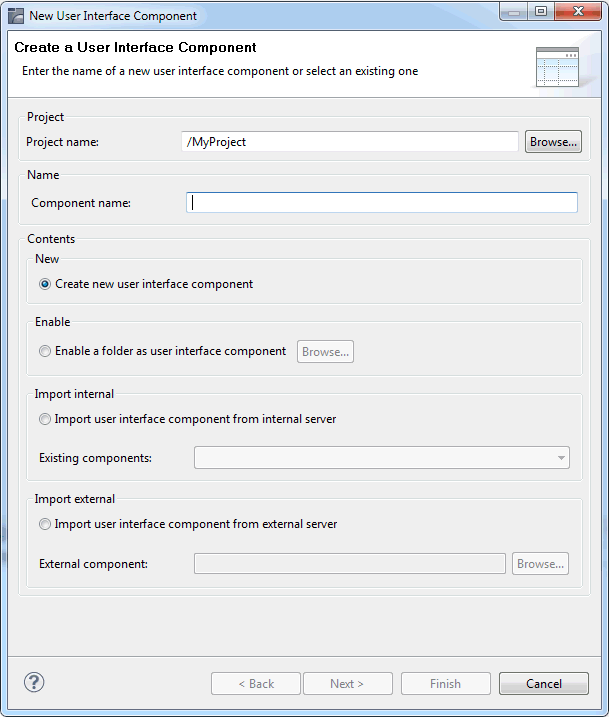
In the Component name text box, enter a name for your user interface component (for example "MyFirstUI").
Select one of the following option buttons:
- Create new user interface component
This option creates a new user interface component from scratch. The location of the new user interface component is a subfolder of your Natural or Java project folder.
- Enable a folder as user interface component
This option converts an existing subfolder of the project to a user interface component folder. In this case, you have to choose the button to select the folder to be converted from a dialog box.
The internal web container environment is then used for further development.
- Import user interface component from internal server
This option moves an existing Application Designer project from the internal web container environment to your Eclipse workspace. The internal web container environment is the environment configured for this Natural or Java project. In this case, you have to select a component from the Existing components drop-down list box.
In a NaturalONE environment, the components "njxdemos" and "njxmapconverter" are provided in the drop-down list box.
If NaturalONE is not installed, the component "cisdemos" is provided, and any existing Application Designer projects in your cis web application. If you have chosen the cis web application folder as your project location, the selected Application Designer projects will not be moved. If you have chosen a different project location, the selected Application Designer projects will be physically moved to a subfolder of your Java project folder.
- Import user interface component from external server
This option copies an existing Application Designer project from an external web container environment to your Eclipse workspace. An external web container environment is an environment other than the environment which is configured for the Natural or Java project. In this case, you have to choose the button to select an external component from a dialog box.
The internal web container environment is then used for further development. The original sources in the external web container environment are no longer updated.
Choose the Next button.
The following page appears:
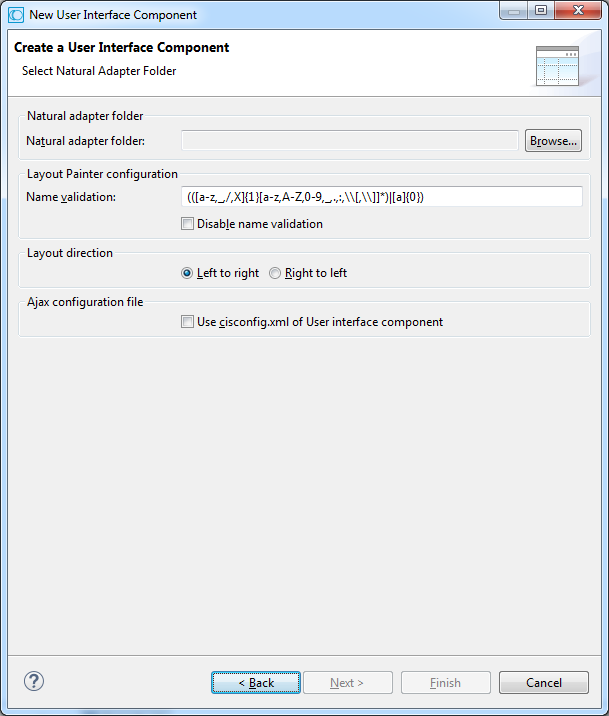
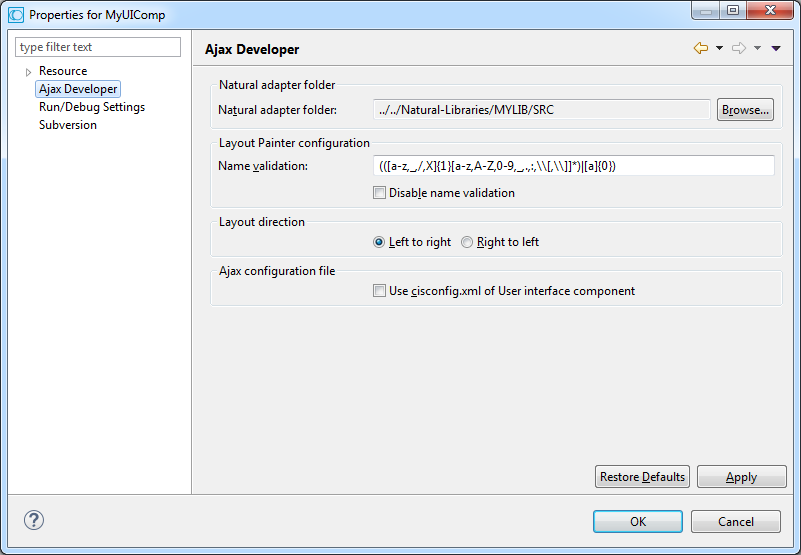
Choose the button to select from a dialog box the folder into which the adapters are to be generated. Usually, you will select the SRC folder of a Natural library.
The Name validation text box shows all regular expressions that are used for the validation of properties and methods.
To switch off the validation, select the Disable name validation check box.
Select either the Left to right or Right to left option button. The specified layout direction is then used in the preview area of the Layout Painter. The selected layout direction applies for all layouts in this user interface component.
Note:
The default layout direction for new user interface
components is specified in the Ajax Developer
preferences.
Choose the Finish button.
A new folder with the component name that you have defined is now shown in the ProjectExplorer view or Natural Navigator view.
After the creation of a user interface component, the following folders are visible in the ProjectExplorer view:
| Folder Name | Description |
|---|---|
| xml | Contains the page layouts. |
| multilanguage | Contains text files for the language support. These files are maintained with the Literal Translator. |
In addition, a user interface component contains folders such as accesspath, wsdl or protocol. These folders contain generation results which are automatically changed when a layout is modified. The files in these folders are not intended to be viewed or modified directly, and are therefore filtered in the ProjectExplorer view.
In the properties of a user interface component, you can change the path to the Natural adapter folder, you can change the regular expressions that are used for the validation of properties and methods, you can disable the name validation, or you can change the layout direction.
To change the properties of a user interface component
Select the user interface component in the ProjectExplorer view or in the Natural Navigator view.
Invoke the context menu and choose .
In the tree of the resulting dialog box, expand the Ajax Developer node.
This displays the same information which is also shown on the second page when you create a user interface component.
Change all required information.
Choose the OK button to save your changes and to close the dialog box.
It is often required that you often put certain components such as
layout templates
configuration files
custom controls
style sheets
Java extensions (such as adapter listeners)
images
etc.
into a global user interface component and just use them from within your other user interface component.
These global user interface components will not contain page layouts for which Natural adapters are generated. Still, when creating a user interface component you must specify a Natural adapter folder.
For global user interface components we recommend the following:
Create a folder in your project and give this folder a name which you might want to filter from version control check-ins. Example: zzztemp.
When creating your global user interface component, specify this zzztemp folder as Natural adapter folder.
You can export a user interface component to an external web container environment. This is useful if a user interface component is to be tested in an environment other than the development environment.
To export a user interface component
In the ProjectExplorer view, select the user interface component that you want to export
Invoke the context menu and choose .
The standard Eclipse functionality for exporting to the file system is used; see the Eclipse online help for further information.
Specify all required information.
Choose the button.
When a user interface component is no longer required, you can remove it from the internal server.
After removing a user interface component, the files still exist physically on the disc and are still accessible in the ProjectExplorer view or Natural Navigator view, but the files are no longer accessible from within the web application. If you also want to delete the files, use the command which is available in the context menu.
To remove a user interface component
In the ProjectExplorer view, select the user interface component that you want to remove.
Invoke the context menu and choose .
A dialog appears, indicating that the user interface component has been removed from the web application.
When you clean a user interface component, files such as *.html, *.access and *.NS8, which have been generated for the layouts in the selected user interface component, are removed.
To clean a user interface component
In the ProjectExplorer view, select the user interface component that you want to clean.
Invoke the context menu and choose .
When you build a user interface component, HTML files are generated for the XML layout definitions. For pages of type NATPAGE, the adapters (*.NS8 files) are also generated. This is helpful, for example, if you have previously cleaned the user interface component.
When an HTML file does not exist, it is generated. When an HTML file already exists, it is regenerated using the latest information from the XML layout definition.
Note:
When you save a layout with the Layout Painter for the first time,
an HTML file is automatically generated (in addition to the XML file).
To build a user interface component
In the ProjectExplorer view, select the user interface component that you want to build.
Invoke the context menu and choose .
In rare situations, it may happen that the configuration files of the web application are not in sync with the existing user interface components in your project. This may happen, for example, when a user interface component is created in a new workspace before the initialization of the Development web application is finished.
In these cases, you can refresh the user interface components to synchronize the configuration files of the web application with the user interface components. If the user interface components are already in sync, the commands described below will not apply any changes.
To refresh all user interface components in a project
In the ProjectExplorer view, select the project in which you want to refresh the user interface components.
Invoke the context menu and choose .
To refresh a single user interface component
In the ProjectExplorer view, select the user interface component that you want to refresh.
Invoke the context menu and choose .
You can execute pages of type PAGE and MFPAGE (workplace). Execution means that the page with the real application (Natural or Java) is started in the browser.
For workplace applications (MFPAGE) which contain pages implemented with Natural, you can debug the corresponding Natural programs.
For NaturalONE, see also Executing and Debugging Workplace Applications in the Natural for Ajax documentation.
To execute a page
In the ProjectExplorer view, select a page of type PAGE or MFPAGE.
Invoke the context menu and choose Ajax Developer > Execute.
To debug Natural programs in a workplace application
(MFPAGE)
In the ProjectExplorer view, select a page of type MFPAGE.
Invoke the context menu and choose Ajax Developer > Debug.
Notes:
This section covers the following topics:
How Can I Create a cisconfig.xml File in My User Interface Component?
How Can I Modify the cisconfig.xml in My User Interface Component?
The Ajax configuration file cisconfig.xml contains settings for building an application and settings for runtime configuration. Put your specific cisconfig.xml into the predefined subfolder cisconfig of exactly one user interface component of your workspace. If you switch on the setting Use cisconfig.xml of user interface component in the properties of a user interface component, the cisconfig.xml file will be used for
building all user interface components of your workspace and
running all Natural for Ajax applications in your workspace.
The cisconfig.xml file will also be automatically packaged when using the War Ant deployment.
Activate the setting Use cisconfig.xml of user interface component in the properties of your user interface component. This will create a subfolder cisconfig and copy a default cisconfig.xml to this subfolder.
Use an XML editor to open the file. Adapt the settings and save it.
Then click on Refresh in the Ajax Developer context menu of your user interface component.
Deactivate the setting Use cisconfig.xml of user interface component in the properties of your user interface component. Now the default cisconfig.xml will be used again.
Eclipse provides fully integrated support for version control systems such as CVS or Subversion (SVN) via corresponding plug-ins.
The following topics are covered below:
You have to check in the following Ajax Developer-specific files and folders of a project:
The file com.softwareag.cis.ide.prefs which is stored in the .settings directory of your project.
This file contains the Ajax Developer-specific settings for this project (for example, whether this project has a root folder for the user interface components). To be able to simply check out a project into a new workspace and be able to work with the project immediately without having to reenter any configuration settings, you have to check in this file.
The following files in the individual user interface components:
| File Type | Description |
|---|---|
| Page Layouts | The page layouts are stored in the xml subdirectory of your user interface component. |
| Translation Information | If using the standard multi language management, literal translations are stored in comma-separated files in the multilanguage subdirectory of your user interface component. |
| Help Texts | If using the standard online help management, help texts are stored in the help subdirectory of your user interface component. |
| Other Web Resources | Images, style sheets or additional HTML pages are often used in user interface components. For example, your user interface component may have an images subdirectory which contains all GIF and JPG files. |
| Configuration Files | The file .cisapplication and, if it exists, the file ciseditorconfig.xml. |
Do not check in the following files and folders (you can see them, for example, when you switch to the Resource perspective):
Do not check in the *.html files which are stored in the root directory of your user interface component.
Do not check in any ZZZZZZ* files (that is, any files which start with "ZZZZZZ"). These are temporary files that are used by the Layout Painter.
Do not check in derived folders. Some folders of a user interface component such as accesspath, wsdl and protocol are marked as "derived" in the folder properties. Version control systems such as CVS and Subversion automatically ignore derived folders during check-in. This is important because these files are automatically generated when you build your project.
To ignore the first two file categories listed above, you can either add them to .cvsignore or svn:ignore (depending on the version control system you are using), or you can simply clean the user interface component before you synchronize with your repository.
If you have checked in all files and folders described above, you can simply check out the project, including the user interface components, into a new workspace. The user interface components are automatically added to the internal Tomcat of this workspace.
After a check-out, it is recommended that you rebuild the project using the command from the menu. If the command in the menu is currently not active, make sure that Start a build immediately is switched on in the Clean dialog box.
Ajax Developer provides its own perspective which contains the views which are important for editing layouts. The positions and sizes of the views are optimized for developing and testing the layout pages.
Note:
When NaturalONE is installed, it is not mandatory to use the
Ajax Developer perspective. You can also use the
NaturalONE
perspective. However, with the Ajax Developer perspective, the
Properties view for modifying the properties of a page
layout, for example, is shown with a convenient size and position.
To open the Ajax Developer perspective
From the menu, choose .
The corresponding icon is then shown on the perspective bar.
![]()
Note:
By clicking the corresponding icon in the perspective
bar, you can quickly switch between the NaturalONE perspective and the Ajax
Developer perspective.
For some advanced functionality such as writing adapter listeners, advanced custom controls or advanced workplace enhancements, the development of Java extensions is supported.
If you want to develop Java extensions in NaturalONE, proceed as follows:
Enable your Natural project for Java. For detailed information on how to enable projects for Java, see the Eclipse documentation.
Add the files cis.jar and sdo.jar to the build path of the project. These files are located in the folder cisnatural/WEB-INF/libs.
Create a subfolder src in the user interface component. Example: <myui>/src. Be sure to use this predefined folder name as Java source folder. Only then your Java files will be automatically compiled and packaged into a .war file for deployment.
As output folder for the .class files use the subfolder appclasses/classes of your user interface component. Example: <myui>/appclasses/classes.
Add the Javadoc location to the cis.jar. A corresponding zip file with the name cisjavadoc.zip can be found in the folder cisnatural.
Note:
The folder cisnatural is located in your
Eclipse workspace under
\.naturalone\apache-tomcat\webapps.