
Natural Studio commands are often issued via context menus as explained in this section. Several important context menus are shown in this section, and copying and moving via drag-and-drop is explained.
Natural Studio also provides a command line in which you can directly
enter Natural system commands. The prerequisite is that a certain logical
context is given. For example, the SAVE command can
only be executed when a source is currently shown in the editor.
A graphical user interface is not provided for all system commands that are available in a remote development environment. When you issue such a command in the command line, terminal emulation will be started in a separate window, showing the corresponding character screen. You can then work in the same way as, for example, on the mainframe.
Certain system commands (for example, the mainframe command
EDT) are not available in Natural Studio and can
therefore not be executed from the command line. See also the section
SPoD-Specific Limitations and Considerations in your
Natural Development Server documentation.
For further information on system commands, refer to Natural's System Commands documentation.
This document covers the following topics:
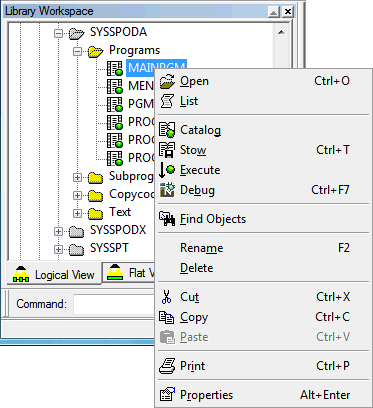
Context menus are invoked using either the right mouse button or by pressing SHIFT+F10. The commands provided in the context menu depend on the object or the position within the Natural Studio window that has been selected.
Note:
The menu bar at the top of the Natural Studio window can be
customized. Thus when a specific menu is not shown in the menu bar, you can still issue
the commands that apply to the selected object from the context menu.
When you select an element in a tree and invoke the context menu, all valid commands for this element are shown.
The following example shows a context menu that has been invoked for a selected a Natural object.
A different context menu is shown when you select a library. For example:
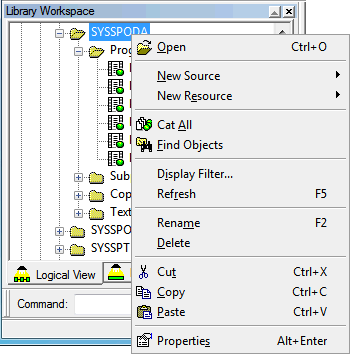
When you click any other position outside the library workspace with the right mouse button, different commands are shown in the context menu.
The following example shows a context menu that has been invoked by selecting the menu bar or the workspace with the right mouse button:

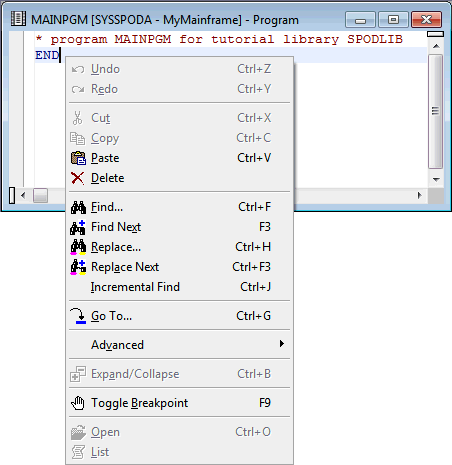
A different context menu is shown in a program editor window. For example:
Note:
When a toolbar button or shortcut key is available, this information
is shown in the context menu. Commands that are dimmed, are currently not
available.
You will now create the following user libraries that will be used later in this tutorial:
SPODLIB
SPODADD
SPODTEST
Make sure to create these libraries in an environment in which a Natural development server has been installed.
 To create the user libraries
Depending on the current view, select one of the following (below the node of the development server to which you have previously connected):
| Logical view: | "User Libraries" |
| Flat view: | "FUSER" |
| File view: | the name of the database |
From the menu, choose .
Or:
Select the node, invoke the context menu and choose
.
A new library with the default name USRNEW is now shown
in the tree.
![]()
The default name is selected so that you can immediately enter a new name. Any text you enter automatically deletes the selection.
Specify SPODLIB as the name of the library.
Press ENTER.
Or:
Click any other position in the library workspace.
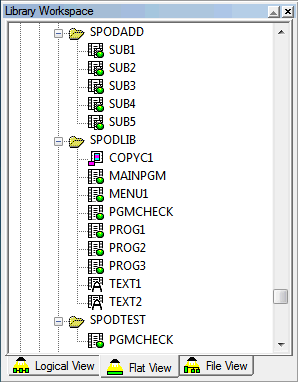
Create the libraries SPODADD and SPODTEST
as described above.
With the following exercises, you will
copy the contents of the system library SYSSPODA to your
user library SPODLIB,
move all subprograms from library SPODLIB to library
SPODADD,
copy the program PGMCHECK from library
SPODLIB to library SPODTEST.
These objects will be used later in this tutorial.
Different methods can be used to copy and move objects:
menu commands (see and in the first exercise in this section)
shortcut keys (see CTRL+C and CTRL+V the first exercise in this section)
toolbar buttons (see
![]() and
and
![]() in the first exercise in this section)
in the first exercise in this section)
drag-and-drop (see the last two exercises in this section)
To copy the contents of the system library SYSSPODA to
the user library SPODLIB
Select the system library SYSSPODA.
Invoke the context menu and choose .
Or:
Press CTRL+C.
Or:
Choose the following toolbar button:
![]()
You can now paste the contents of the library to your user library.
Scroll to the user library SPODLIB that you have
previously created.
Select the user library SPODLIB.
Invoke the context menu and choose .
Or:
Press CTRL+V.
Or:
Choose the following toolbar button:
![]()
All objects from the system library SYSSPODA are now
copied to your user library SPODLIB.
To move all subprograms from the library SPODLIB to the
library SPODADD using drag-and-drop
Make sure that the logical view is active.
Click the plus sign next to the library SPODLIB to
expand the tree.
Click the "Subprograms" node and hold down the mouse button.
Drag the selected object onto the name of the node
SPODADD.
Release the mouse button.
All subprograms are now moved to the library
SPODADD.
To copy the program PGMCHECK from the library
SPODLIB to the library SPODTEST using
drag-and-drop
Make sure that the flat view is active. Thus you need not open the folder containing all programs which is provided in the logical view.
Under the node FUSER, click the plus sign next to the
library SPODLIB to expand the tree.
Click the program PGMCHECK and hold down the mouse
button.
Hold down CTRL.
Drag the selected object onto the name of the node
SPODTEST.
Release the mouse button and then CTRL. The program is now copied to the library SPODTEST.
Note:
When you move an object, you cut it at its original position and
paste it at a new position. To copy an object, press CTRL while
dragging. This does not cut the object at its original position.
Since you have copied the program PGMCHECK in the previous
exercise, it is available in two libraries. You will now delete this program
from the library SPODLIB.
To delete the program PGMCHECK from the library
SPODLIB
This exercise assumes that the flat view is still active.
Under the node for the library SPODLIB, select the
program PGMCHECK.
Invoke the context menu and choose .
A dialog box appears, asking whether you really want to delete the program.
Choose the button to delete the program.
Note:
You can switch off the display of the delete messages. From the
menu, choose . In
the resulting dialog box, display the Workspace tab,
deselect the Display delete messages check box and choose
the button.
With all nodes expanded in the flat view, your new libraries should now look as follows:
CATALL is one of the Natural system commands
for which a graphical user interface is provided in Natural Studio.
You will now catalog the objects of the libraries you have just created.
To catalog all objects in a library
Select the library SPODLIB.
From the menu, choose .
Or:
Invoke the context menu and choose .
The Catalog Objects in Library: libraryname dialog box appears.
Make sure that the option button Apply action to all sources is selected. Leave the check boxes in the Object Types group box with their default settings.
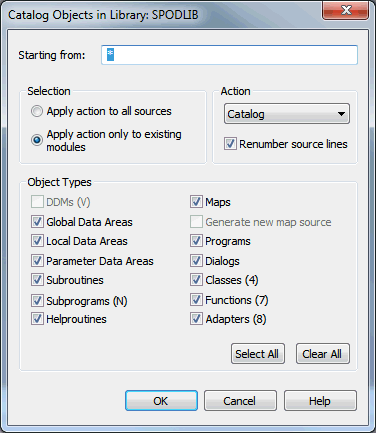
Choose the button.
A dialog box appears with statistics about the performed command.
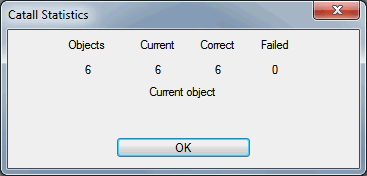
Choose the button to close the dialog box.
A dialog box appears, informing you that cataloging was successful.
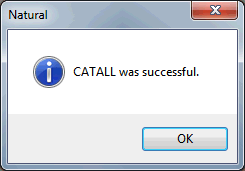
Choose the button to close the dialog box.
Notes:
Repeat the above steps for the libraries SPODADD and
SPODTEST.
Natural commands can be executed from the drop-down list box of the command line.
Natural Studio saves each character string you enter in the command line for the current session. The drop-down list box contains your last entries. You can select an entry and press ENTER to execute it once more.
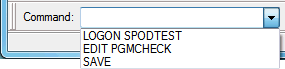
When you enter the first character of a command that you have previously entered, the corresponding command is automatically copied to the command line. In this case, you just have to press ENTER to execute it.
When the mouse pointer is positioned on the command line, you can invoke a context menu. Using the commands from this context menu, you can, for example, paste a text string into the command line.
The system command LAST * is an example of a
Natural command for which a menu command is not provided with Natural Studio.
In contrast to the commands that you enter in the command line, the
LAST * command displays all system commands in the
order in which they were entered in a dialog box. It considers all Natural
commands that were issued during a session: for example, when you select a
library to log on to it, or when you execute a program using a menu command,
toolbar button or shortcut key. Furthermore, it allows you to select several
commands to be executed one after the other (see below).
If the command line is not shown in the Natural Studio window, display it as described previously in Displaying the Command Line.
To execute the LAST * command from the
command line
Enter the following command in the command line and press ENTER:
LAST *
The following dialog box is now shown:
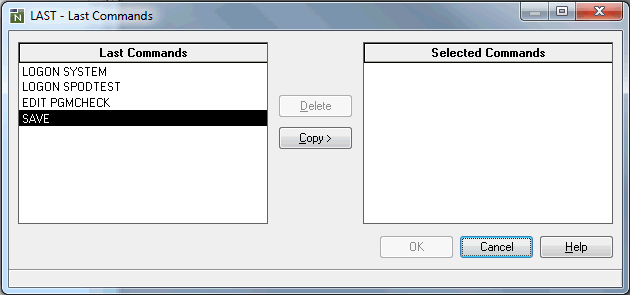
On the left, select the first command that you want to execute.
Choose the button.
The selected command is now shown on the right.
Optionally. Modify the command on the right (for example, specify
another library name with the LOGON command).
Repeat the above steps to copy all commands that you want to execute to the right. The commands will be executed in the same sequence in which they appear in the list.
Choose the button to execute all selected commands one after the other.
You will now list the objects contained in one of the libraries you have previously created. You can do this in two different ways:
choose from the context menu, or
enter the LIST * command in the command
line
When using the command, the content of the window depends on the current view. For example, in the logical view, all folders are shown, and in the flat view all objects are shown.
When entering LIST * in the command line, all
objects of a library are shown. The content of the resulting window is always
the same. The current view is not considered. An advantage of the
LIST command is that you can also specify that only objects
starting with a specific letter are shown (e.g. LIST
P*).
To list all objects in a library with the
command
Make sure that the logical view is active for this exercise.
Select the library SPODLIB in the library workspace.
Invoke the context menu and choose .
The following window appears displaying a list of folders.
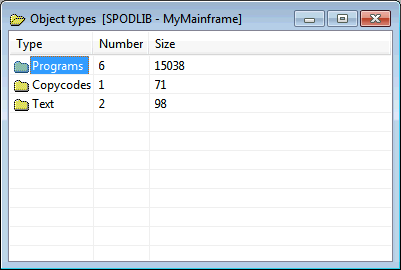
Select the "Programs" folder and press ENTER to display its contents.
Or:
Double-click the "Programs" folder.
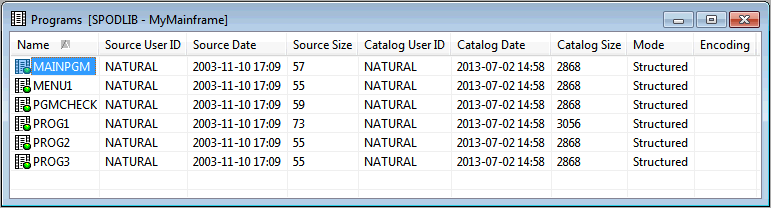
To change the display sequence, for example, by the source date, click the column header Source Date.
An arrow is now shown in this column header indicating the current display sequence.
Click the column header Source Date once more.
This toggles between ascending and decending display sequence.
Close each of these two windows by choosing the standard close button at the top right of a window.
SYSBPM is a Natural mainframe utility for which a graphical
user interface is not provided in Natural Studio. When you invoke this utility,
its character-based mainframe screen is shown either in a terminal emulation
window or in a window of the Web I/O Interface.
Both the terminal emulation window and the Web I/O Interface are used in a remote development environment to display non-GUI information. This is different from the local environment where the output is shown in an output window.
The terminal emulation window is not Unicode-enabled. The Web I/O Interface is able to display information which contains Unicode characters. The window which will appear at your site depends on the parameters which have been set on the Natural development server.
This section assumes that your remote development environment has been set up to use the terminal emulation window.
Note:
As long as the terminal emulation window is active, you cannot work
with Natural Studio.
To invoke the SYSBPM utility in a terminal emulation
window
Enter the following command in the command line:
SYSBPM
The terminal emulation window appears.

You can now use the utility in the same way as on the mainframe. Command buttons are provided for frequently-used PF keys. When they are not shown, you can display them as described with the following step.
From the menu, choose a PF-key set (for example, ) to display the command buttons for the PF keys.
To exit terminal emulation, issue the EXIT
command (either by issuing it in the command line of the mainframe screen or by
pressing the corresponding PF key).
You can now proceed with the next exercise: Handling Programs.