Managing Associations and Links
This document covers the following topics:
Selecting the Navigation Model
Navigation models are defined in Predict. They can be defined for predefined objects and user-defined objects.
Note:
In Predict, the name "retrieval model" is
used instead of navigation model.
In the tree view window with the name Documentation Objects, all active associations are shown. When a navigation model is used, the display is limited so that only the associations specified in the model are shown. An additional advantage of a navigation model is that it may also show passive associations.
![]() To select a navigation model
To select a navigation model
-
Select the documentation object for which you want to select a navigation model.
Tip:
If you want to select a navigation model for several objects, you have to open the list view window. See Opening the List View Window.Or:
Select a Natural object or library in the library workspace or application workspace.In this case, a navigation model can only be used when a documentation for the selected Natural object or library does already exist. When a documentation object does not yet exist and you issue the command described below, an appropriate warning is shown in the result window.
-
From the menu, choose .
Or:
Invoke the context menu and choose .Or:
Choose the following toolbar button:
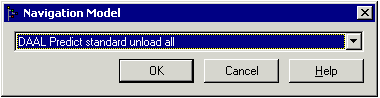
The Navigation Model dialog box appears. The drop-down list box contains all navigation models defined in Predict for objects of the selected type.
-
Select the desired navigation model from the drop-down list box.
-
Choose the button.
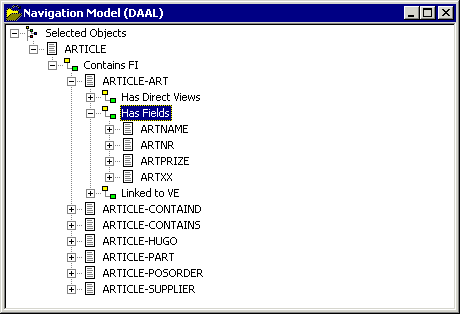
The Navigation Model window appears. The name of the selected navigation model is shown in the title bar. This tree view window displays the node Selected Objects. When you expand this node, all documentation objects that you have selected are shown. You can further expand the nodes to check the associations. Example:
Displaying the Links for an Association
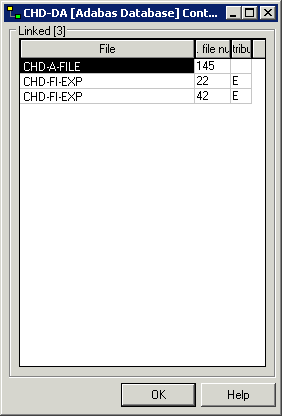
You can invoke a window listing all linked objects contained in a node for an association. This window provides more information than the tree view window. For example, for an Adabas database, it shows the physical file number of a file and the physical distribution type.
![]() To display the links for an association
To display the links for an association
-
Select the node for the desired association in the tree view window for the documentation objects.
-
Invoke the context menu and choose .
A window appears displaying a list of linked objects (children). The name and type of the parent object and the name of the association are shown in the title bar.
-
Choose the button to close the window.
Linking and Unlinking Objects
You can link more objects to a parent object or remove linked objects. You can also modify the sequence of the linked objects.
![]() To link and unlink objects
To link and unlink objects
-
Select the node for the desired association in the tree view window for the documentation objects.
-
Invoke the context menu and choose .
Note:
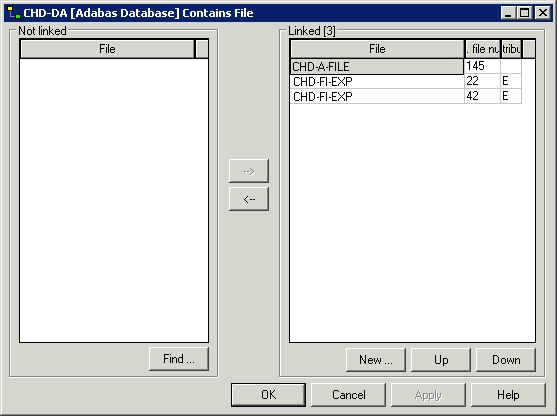
There are several associations for which it is not possible to change the list of linked objects. The command is dimmed in these cases. An example of such an association is "Has Fields"; fields can only be maintained via the object type-specific windows which appear for files and fields.A window appears. The name and type of the parent object and the name of the association are shown in the title bar. A list of linked objects (children) is shown on the right side of the window.
-
Use the following command buttons to link/unlink objects:
Command Button Description Invoke the Find Documentation Objects dialog box in which you can specify the search criteria for the objects that are to be shown on the left side of the window. Found objects can then be moved to the list of linked objects. For information on the Find Documentation Objects dialog box, see Finding Documentation Objects. Move the objects that are currently selected on the left side of the window to the list of linked objects on the right side of the window. See also the description of the button. Remove the linked objects that are currently selected on the right side of the window. When a linked object has been removed, it is shown in the list on the left side of the window. Add a new object to the list of linked objects. A dialog box appears in which you have to enter the name for the new object. Move the selected linked object one position up in the list. Move the selected linked object one position down in the list. -
Choose the button to saves all changes and to close the window.
Modifying/Displaying the Attributes of a Link
This function is only available for links where attributes have been defined for the corresponding association in the metastructure of the Predict data dictionary. With the predefined associations this is the case, for example, for the links "Has Files" of an Adabas database, and for the links "Defined in Server" of a DB2 database or file. With user-defined associations, attributes may also be defined. When such attributes have been defined, it is possible to add or modify their values for a link.
Two different commands are available for invoking a window in which you can view and/or modify the attributes of a link:
| Command | Description |
|---|---|
| With this command it is possible to add or modify the attributes of a link. | |
| With this command it is only possible to view the attributes of a link. |
![]() To modify/display the attributes of a
link
To modify/display the attributes of a
link
-
Open the node for the desired association in the tree view window for the documentation objects.
-
Select the desired documentation object.
-
Invoke the context menu and choose either or .
- Adabas databases and files only:
-
When the logical distribution type "Expanded" or "Partitioned" has been defined, the following Link dialog box appears in which you have to select the link to be modified. A number in the drop-down list box stands for the physical file number.
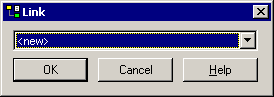
When the Link dialog box has been invoked using the command, it is also possible to add a new link by selecting <new> from the drop-down list box. Choose the button to proceed to the association-specific window (see below).
The tabs that are shown in the resulting window depend on the type of association. See the reference documentation Predefined Object Types in Predict for further information.
The following is an example of an association-specific window in which the attributes of the link can be modified.
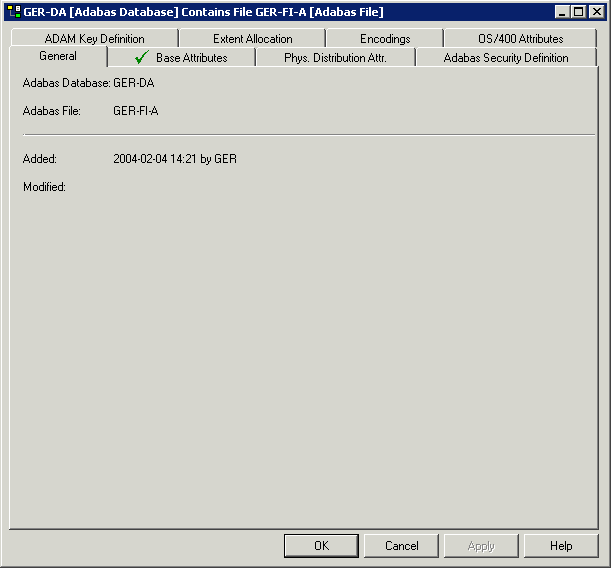
When the attributes cannot be modified, "read-only" is shown in the title bar. In this case, only the command buttons and are available.
Printing and Saving a Report for the Attributes of a Link
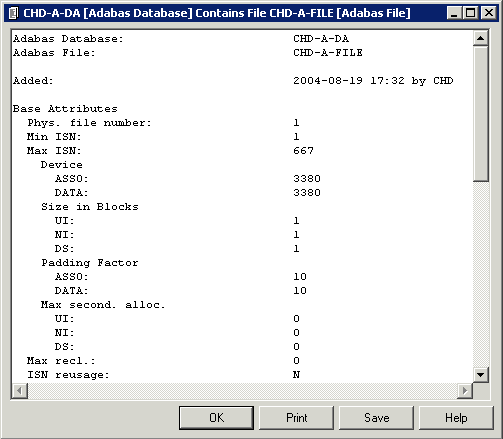
The information shown in an association-specific window (which can be invoked with the or command) can also be shown as a report in simple text format. It is possible to print and save this report.
![]() To print and save a report
To print and save a report
-
Open the node for the desired association in the tree view window for the documentation objects.
-
Select the desired documentation object.
-
Invoke the context menu and choose .
A window such as the following appears.
-
Choose the desired command button:
Command Button Description The Print Setup dialog box appears. Specify all required information (for example, a different printer or text orientation) and choose the button. The Save Report dialog box appears. Select the folder in which you want to store the report, specify a report name and choose the button. -
To close the window in which the report is shown, choose the button.