
This document covers the following topics:
![]() To list all functions available for a Symbol Table Master node
To list all functions available for a Symbol Table Master node
In the object workspace, select the Symbol Table Master metanode from an Owner instance and open the context menu.
The following functions are available:
| Function | Shortcut | Description |
|---|---|---|
| List | F8 | See Listing Objects. |
| New | CTRL+N | See Adding a Symbol Table Master. |
| Refresh | F5 | See Refreshing Object Lists. |
| Filter | F3 | See Filtering Objects. |
| Paste data | CTRL+V | See Pasting Objects. |
| Export | --- | See Exporting Objects in the Import/Export Functions documentation. |
| Set Drag And Drop Function | --- | See Drag & Drop. |
![]() To list all functions available for a symbol table master
To list all functions available for a symbol table master
From the Symbol Table Master node, select an instance and open the context menu.
The following functions are available:
| Function | Shortcut | Description |
|---|---|---|
| Open | CTRL+O | See Modifying a Symbol Table Master. |
| Display | CTRL+D | See Displaying a Symbol Table Master. |
| Where used | --- | See Listing Jobs and Networks that use a Symbol Table Master. |
| Delete | DELETE | See Deleting a Symbol Table Master. |
| Copy data | CTRL+C | See Copying Objects. |
| Version Usage | --- | See Maintaining the Usage of Symbol Table Versions. |
| Export | --- | See Exporting Objects in the Import/Export Functions documentation. |
| Add to Workplan | --- | See Add to Workplan. |
| Save as File | --- | See Saving Symbol Tables as Files. |
| Set Drag And Drop Function | --- | See Drag & Drop. |
![]() To list all master symbol tables of an owner
To list all master symbol tables of an owner
In the object workspace, select the Symbol Table Master node of an owner and choose from the context menu, or press F8.
A Symbol Table Master List window similar to the example below opens:
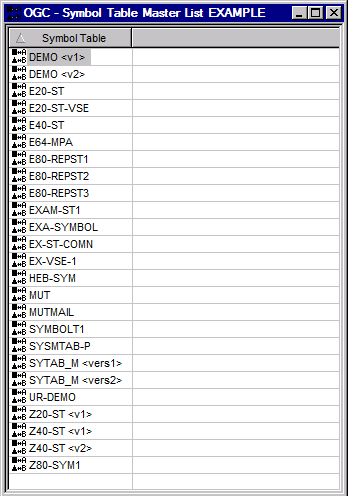
This window lists master symbol tables already defined to Entire
Operations. You see only the symbol tables that belong to your owner (here:
EXAMPLE). If no master symbol tables have been defined for your
owner, the list is empty.
The functions available from the context menu are explained in Available Functions: Symbol Table Master List.
This section covers the following:
When you select a symbol table from the Symbol Table Master List window, you can open a context menu and perform the following functions:
| Function | Shortcut | Description |
|---|---|---|
| Open | CTRL+O | See Modifying a Symbol Table Master. |
| Display | CTRL+D | See Displaying a Symbol Table Master. |
| New | CTRL+N | See Adding a Symbol Table Master. |
| Refresh | F5 | See Refreshing Object Lists. |
| Where used | --- | See Listing Jobs and Networks that use a Symbol Table Master. |
| Delete | DELETE | See Deleting a Symbol Table Master. |
| Copy data | CTRL+C | See Copying Objects - Copy Data Function. |
| Paste data | CTRL+V | See Pasting Objects. |
| Version Usage | --- | See Maintaining the Usage of Symbol Table Versions. |
| Export | --- | See Exporting Objects in the Import/Export Functions documentation. |
| Add to Workplan | --- | See Add to Workplan. |
| Save as File | --- | See Saving Symbol Tables as Files. |
![]() To display a symbol table master
To display a symbol table master
In the object workspace, select a Symbol Table Master instance.
Choose Display from the context menu, or press
CTRL+D.
A Display Symbol Table Master window similar to the Maintenance Symbol Table Master window opens.
The window contains a table with a list of all symbols defined for the symbol table master.
The fields and table columns contained in the window are explained in Fields and Columns: Symbol Table Master.
If you want to view additional information on a listed symbol, select the required symbol from the table and choose .
A Display Symbol Master window similar to the Maintenance Symbol Master window opens.
You can view all symbol definitions on the tabbed pages of the window. The fields on the pages are described in Fields: Master and Active Symbols.
You can add a symbol table master by either copying an existing table (see the Copy data/Paste data functions of a symbol table instance/master node) or creating a new symbol table with the New function. This requires that you define at least one symbol master along with the table.
This section provides instructions for using the New function.
![]() To add a symbol table master
To add a symbol table master
In the object workspace, select the Symbol Table Master metanode.
From the context menu choose , or press CTRL+N.
A Create new Symbol Table Master window opens.
The fields and columns contained in the window correspond to the field and columns in the Maintenance Symbol Table Master window. They are explained in Fields and Columns: Symbol Table Master.
Enter a name for the symbol table and symbol table version and choose .
A Create new Symbol Master window opens.
The fields and tabbed pages contained in the window correspond to the fields and tabbed pages in the Maintenance Symbol Master window. They are explained in Fields: Master and Active Symbols.
If required, enter a different symbol table name and version and make your definitions on the tabbed pages Main, Multiple Symbol Values and Value Check.
Choose OK when you are finished.
The symbol table master is created and now ready to use in the active network.
This section covers the following topics:
The fields on the tabbed pages Main, Multiple Symbol Values and Value Check (symbol masters only) of a Symbol Master or Symbol Active window are explained in the following table.
The fields are either write-protected or available for input depending on whether you view or modify the symbols. The table indicates when a field does not apply to active symbols.
| Main Page: | |||
|---|---|---|---|
| Symbol | Name of the symbol to be used as a variable. | ||
| Format | Format of the symbol (variable). Possible values: | ||
| A | Alphanumeric (including special characters) | ||
| D | Date | ||
| H | Alphanumeric; hidden
|
||
| L | Alphanumeric; conversion to lower case | ||
| N | Numeric
See Value for the numeric field format. |
||
| U | Alphanumeric; conversion to upper case | ||
| Value | Value of the symbol to be
substituted. To enter a fixed length or an empty string, include the value in
quotes. Use two apostrophes to get a quote within a string.
Example: Notes:
See also Defining Multiple Symbol Values and Specifying a Range Check for Numeric Symbol Values. |
||
| Prompting
(list box) |
Specifies whether the user is to
be prompted for this symbol during manual activation of the job network. See
also Symbol
Prompting during Network or Job Activation.
Possible selection options: |
||
| A | Prompt for symbol at each activation. | ||
| E | Prompt only if no value is specified in the table. | ||
| N | Never prompt for symbol. | ||
| Prompting
(check box) |
Write back modified active symbol
to the master table as well.
Note: |
||
| Prompt Text | Optional text to be displayed when symbol prompting is performed, to help the user specify the correct value. | ||
| Multiple Symbol Values Page: | |||
| Values 1 to 100 | Assign multiple values to a
symbol.
These can be used in subsequent replacements of the same symbol. See also Defining Multiple Symbol Values and Specifying a Range Check for Numeric Symbol Values. You can enter up to 100 values here. The maximum (internal) value length is 80. These values are used for subsequent substitutions. Note: |
||
| Value Check Page: | |||
| Not applicable to active symbols
Used to define a range of numbers to be checked for valid input of either numeric symbol values or a user exit. You cannot use both options. See also Specifying a Range Check for Numeric Symbol Values and User Exit for Validating Symbol Values. |
|||
| None | Select this button (default) if you neither use Range check nor User exit. | ||
| Select this button if you want to define and/or activate a range of numbers to be checked during input of numeric symbol values. | |||
| Value from | Start
(from) and end (to) number of the
range of numbers to be checked.
Valid input values: |
||
| Value to | |||
| User exit | Select this button if you want to specify and/or activate a user exit. | ||
| Library | Name of the library in which the
user exit resides
Note: |
||
| User Exit | Name of the user exit
If the name of a valid library is entered in Library, you can select a user exit from the drop-down list box. |
||
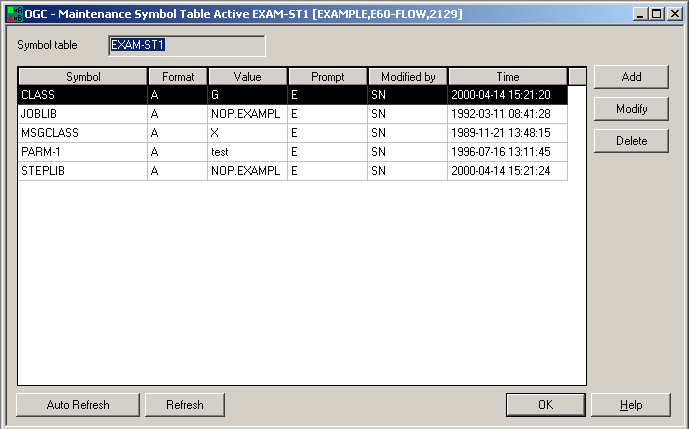
Modifying a master symbol table or an active symbol table consists of adding, modifying or deleting symbols and their current values.
![]() To modify a symbol table master
To modify a symbol table master
In the object workspace, select a Symbol Table Master instance.
Invoke the context menu and choose the function.
Or:
Press CTRL+O.
A Maintenance Symbol Table Master window similar to the example below opens:
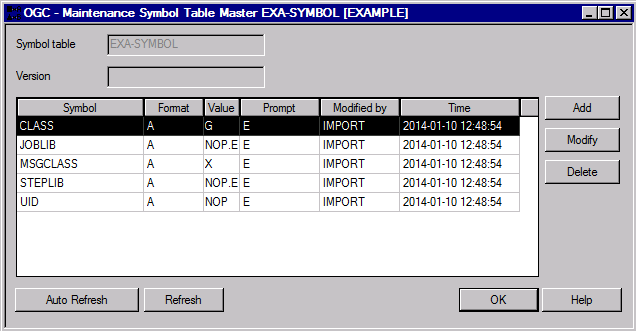
You can modify a selected symbol (here: CLASS) by
choosing , add a new symbol by choosing
, or delete a selected symbol by choosing
.
The fields and columns contained in the window are explained in Fields and Columns: Symbol Table Master.
If you choose Delete, a window prompts you to delete the selected symbol.
If you choose Modify or Add, a Maintenance Symbol Master window similar to the example below opens:
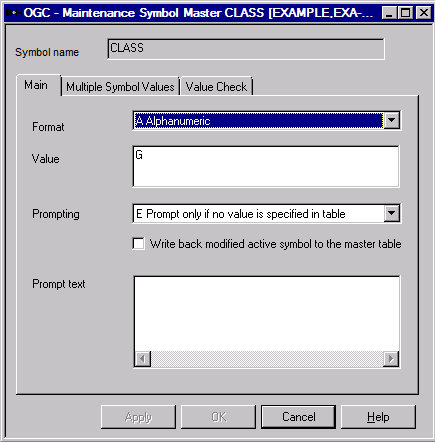
Make the required definitions in the fields of the tabbed pages Main, Multiple Symbol Values and Value Check. They are explained in Fields: Master and Active Symbols.
Choose when you are finished.
The symbol table master is changed and now ready to use in the active network.
This section covers the following topics:
The fields and columns in the Create new Symbol Table Master, Display Symbol Table Master or Maintenance Symbol Table Master window are explained in the following table:
| Field/Column | Description | |
|---|---|---|
| Symbol | Name of the symbol used as a variable. | |
| Format | Format of the variable.
Possible values: |
|
A
|
||
| Alphanumeric (including special characters) | ||
D
|
Date | |
L
|
Alphanumeric; conversion to lower-case letters | |
N
|
Numeric | |
U
|
Alphanumeric; conversion to upper-case letters | |
| Prompt | Prompting.
The user is prompted for this symbol during manual activation of the job network. Possible values: |
|
A
|
Prompted for symbol at each activation. | |
E
|
Prompted only if no value is specified in table. | |
N
|
Never prompted for symbol. | |
| Value | Current value of the variable,
i.e., the string or number substituted in dynamically generated JCL.
Possible entries: |
|
| empty column | No value is defined for the variable. | |
*** n multiple values ***
|
One or more values (n) are
defined for the variable.
Select the Multiple Symbol Values tab to view or change the values. |
|
| Modified by | User who last modified the symbol. | |
| Time | Date and time when a user last modified the symbol. | |
You can determine a period (from/to date range) during which a particular symbol table version is used as the current symbol table for all scheduled job activations.
The Version Usage function is used to define the maintenance of date ranges, in which symbol table versions are to be used for scheduled activations.
Note:
You cannot use the Version Usage function to add
a symbol table version. You can define a symbol table version when you create
or copy a symbol table master.
This section covers the following topics:
Object Versioning in the Concepts and Facilities documentation
This section provides instructions for listing, defining and deleting version usage definitions for symbol table versions.
![]() To list version usage definitions
To list version usage definitions
In the object workspace, select a symbol table master.
Open the context menu and choose Version Usage.
A Version Usage Symbol Table Master window similar to the example below opens:
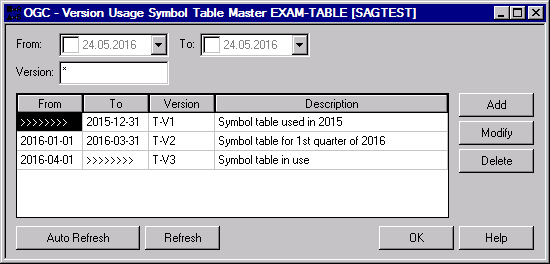
The window lists the version usage defined for the selected symbol table master version (the table is empty if no definition exists).
If you enter an asterisk (*) in the
Version field, all version usages defined for all versions
of the symbol table master are listed in the window as shown in the example
above. The fields and columns are explained in
Fields and Columns:
Version Usage Definition.
The following functions are available:
| Function | Description |
|---|---|
| Add | See To add or modify a version usage definition. |
| Modify | Modifies the usage definition selected in the table row. See To add or modify a version usage definition. |
| Delete | Deletes the usage definition selected in the
table row.
A window prompts you to confirm the deletion with Yes or cancel the action with No. |
| Auto Refresh/Refresh | See Refreshing Object Lists. |
![]() To add or modify a
version usage definition
To add or modify a
version usage definition
In the Version Usage Symbol Table Master window, choose Add to create a new definition.
Or:
In the Version
Usage Symbol Table Master window, select the table row
that contains the definition you want to modify, and choose
.
The input fields that appear in the window are shown in the following example:
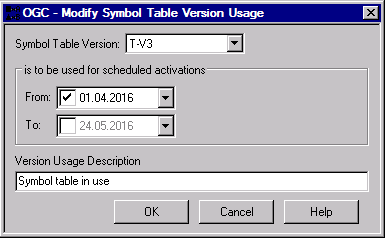
Enter the required values or select a value from the drop-down list boxes. Activate or deactivate a From or To field by selecting the check box next to it. Deactivated fields are ignored and not processed. For additional information, see Fields and Columns: Version Usage Definition.
Choose OK when you are finished.
| Field/Column | Description |
|---|---|
| From
(column or input field) |
Start date of a default usage period of a
network version.
Possible value for an input field: A start date or no value (check box of field not selected) for no start date. You can open the drop-down list box to select a date from a calendar. Default: start date is not defined. Note: |
| To
(column or input field) |
End date of a default usage period of a network
version.
Possible value for an input field: An end date or no date (check box of field not selected) for an unlimited (infinite) time. You can open the drop-down list box to select a date from a calendar. Note: Default: end date is not defined. |
| Version
(column) |
Symbol table version for which version usage is defined. |
| Description
(column) |
Description of the defined version usage. |
| Symbol Table Version | Input field for the symbol table version to be
used as the current version during the period specified in the
From/To fields.
Enter the required version or select a version from the the drop-down list box. |
| Version Usage Description | Input field for a description of the version
usage.
Maximum input: 70 characters. |
![]() To save a master symbol table as a file
To save a master symbol table as a file
In the object workspace, select a Symbol Table Master instance and choose from the context menu.
Specify the file format and type as described in Report Output Options and choose .
An output file similar to the example below is created:
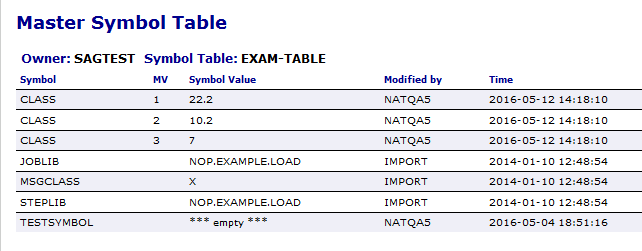
This output displays the selected symbol table master and all related information.
![]() To save an active symbol
table as a file
To save an active symbol
table as a file
In a Symbol Prompting window, select Save active symbol table as file and choose Continue.
Specify the file format and type as described in Report Output Options and choose .
An output file similar to the example below is created:

This output displays the active symbol table and all related information.
This section covers the following topics:
![]() To list all functions available for a symbol table active node
To list all functions available for a symbol table active node
In the object workspace, select a Symbol Table Active node and open the context menu.
The following functions are available:
| Function | Shortcut | Description |
|---|---|---|
| List | F8 | See Listing Objects. |
| Refresh | F5 | See Refreshing Object Lists. |
| Filter | F3 | See Filtering Objects. |
| Set Drag And Drop Function | --- | See Drag & Drop. |
![]() To list all functions available for a symbol table active
To list all functions available for a symbol table active
In the object workspace, select an instance of a Symbol Table Active node and open the context menu.
The following functions are available:
| Function | Shortcut | Description |
|---|---|---|
| Open | CTRL+O | See Modifying a Symbol Table Active. |
| Display | CTRL+D | See Displaying Objects. |
| Active Usage | --- | See Listing Active Jobs Using a Symbol Table Active. |
| Add to Workplan | --- | See Add to Workplan. |
| Save as File | --- | See Saving Symbol Tables as Files. |
![]() To modify an active symbol table
To modify an active symbol table
In the object workspace, select a Symbol Table Active instance.
Open the context menu and choose , or press CTRL+O.
A Maintenance Symbol Table Active window similar to the example below opens:
Here, you can add, modify or delete a symbol of the symbol table without affecting the master symbol table definition.
The fields, columns and functions available in the window correspond to the fields, columns and functions of the Maintenance Symbol Table Master window. They are explained in the following sections:
Make your definitions and choose OK when you are finished.
This function is used to display all active jobs using an active symbol table.
![]() To list all active jobs using an active symbol table
To list all active jobs using an active symbol table
In the object workspace, select a Symbol Table Active instance.
Open the context menu and choose .
An Active Usage Symbol Table Active window similar to the example below opens:

The window lists all active jobs used by the active symbol table. The columns contained in the window correspond to the columns in the Where used Symbol Table Master. They are explained in Columns: Symbol Table Usage
- Restrictions:
You cannot delete a master symbol table that is still used by one or more jobs. In this case, the error message
EOR1859 - Symbol Table
                                              ... used in Definitions
occurs. You can only delete the symbol table if you either specify another symbol table for these jobs or delete them. Proceed as described in Listing Jobs and Networks that use a Symbol Table Master to find the jobs that use the symbol table.You cannot delete a master symbol table with a symbol table version that is still defined in the version usage of the symbol table. In this case, the error message
EOR2691 - Version ... - current usage
                                              found
occurs. You then need to delete the usage defined for the version as described in Maintaining the Usage of Symbol Table Versions.
![]() To delete a symbol table master
To delete a symbol table master
In the object workspace, select a Symbol Table Master instance.
Choose Delete from the context menu, or press DELETE.
A confirmation window opens.
Choose Yes to confirm the deletion or No to cancel the action.