
Exporting an object can invoke the transformation of records from the Entire Operations database into an external format.
Exporting objects via Entire Operations is only possible if your monitor is running. The execution of all imports and exports is performed asynchronously.
You can export objects with the Export function provided for a node or node item. Alternatively, you can use the Import/Export function of the General node. This section provides instruction for both functions.
![]() To export single or multiple node items
To export single or multiple node items
In the object workspace, select a node or a node instance and choose from the context menu.
An Export Objects window similar to the example below opens:
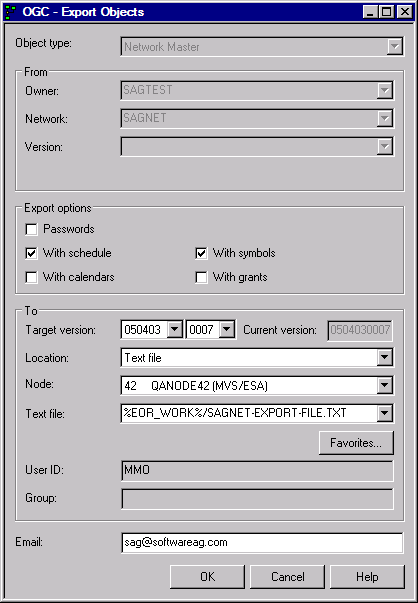
Depending on the node or node instance selected, the From section contains different output fields that indicate the source objects used for the export.
All input fields and options that can be available in this window section are described in Fields and Options: Export Objects Window.
Select the location where you want to export the object(s). Depending on the location selected, additional fields appear in the To section of the window.
All input fields and options that can be available in this window section are described in Fields and Options: Export Objects Window.
When you are finished, choose .
A user-specific Import/Export window opens.
The window contains a list of all processing requests submitted for the objects to be exported (or imported). If you selected a node in Step 1, requests for all objects contained in this node are listed.
The list indicates the current processing status and whether a request has been completed successfully.
The functions available in the Import/Export window are described in Functions: Import/Export Window.
When you are finished, choose .
All objects listed in the Import/Export window are exported in the previously specified format.
If the export process is successful, the data collected for the listed objects is output in the specified export file.
The syntax that applies to the entries in the export file is explained in Syntax in Import/Export Files and Object Processing Rules.
![]() To export objects from the General node
To export objects from the General node
In the object workspace, select the General node and choose Import/Export from the context menu.
In the Import/Export window, choose Add Export.
(All functions available in the window are described in Functions: Import/Export Window.)
In the Export Objects window, define the object you want to export.
The fields contained in the window are described in Fields and Options: Export Objects Window.
This document covers the following topics:
The fields and options provided in the Export Objects window are described in the following table.
| Field/Option | Description | ||
|---|---|---|---|
| From: | |||
| Depending on the Object type selected, owner, network, network version and job used for the export are displays as output fields in the From section. | |||
| Object type | An output field that displays the object type previously specified. See also Object Type to be Exported: Key Fields of the Objects. | ||
| ... | The remaining From fields differ according to the object type selected. See also Object Type to be Exported: Key Fields of the Objects. | ||
| To: | |||
| Location | The location of the file that
contains the export data.
Select either of the following options: |
||
| Natural source | Export to a Natural text object. | ||
| Text file | Export to a text file. See also Using Favorites for Text Files. | ||
| Node | Only for Text
file locations.
Enter the name of the node through which the specified text file can be accessed. The text file must exist. |
||
| Text file | Only for Text
file locations.
Enter the name of the text file to be used for the export. See also Using Favorites for Text Files. |
||
| Favorites | This option button is only available if Text file is selected: see Using Favorites for Text Files. | ||
| User ID | Only for Text
file locations.
Enter the default user ID if defined for the specified node. |
||
| Group | Only for Text
file locations.
Enter the UNIX group or Windows domain (optional) if defined for the specified node. |
||
| Library | Only for Natural
source locations.
Enter the name of the library that contains the Natural text object used for export. |
||
| Member | Only for Natural
source locations.
Enter the prefix (maximum is 5 alphanumeric characters) of the Natural text object that contains the export data. Single or multiple text objects with the specified prefix can exist depending on the amount of data to be exported. For example: The prefix
|
||
| Append/New/Replace | Only for Natural
source locations.
Determine how to handle the export data contained in the Natural text object(s) specified with the prefix in the Member field. Possible option settings are: |
||
| Append |
Select this option to append the data to be exported to the specified text object. Text object with the specified prefix must exist. |
||
| New |
Select this option to save the data in a new text object. If a text object with the specified prefix already exists, an appropriate message is returned. This is the default setting. |
||
| Replace | Select this option to replace the data in the specified text object. | ||
| Passwords | Only for object types which
contain passwords (e.g. password of a protected data set).
Possible radio button settings: |
||
| selected | Export passwords. | ||
| not selected | Do not export passwords. | ||
| with Schedules | If you also export the schedules,
the imported networks will get the same schedule definitions as the exported
networks. (They can be modified after the import.)
Possible radio button settings: |
||
| selected | Export schedules (default). | ||
| not selected | Do not export schedules. | ||
| with Calendars | If you export object(s) with
calendars, all referenced calendars will be exported after objects, each
calendar once.
Possible radio button settings: |
||
| selected | Export calendars. | ||
| not selected | Do not export calendars (default). | ||
| with Symbols | If you export object(s) with
symbols, all referenced symbol tables will be exported after objects, each
symbol table once.
Possible radio button settings: |
||
| selected | Export symbols. | ||
| not selected | Do not export symbols (default). | ||
| with Grants | If you export networks, you can
determine whether access rights granted to users/owners in the source
environment are also exported.
Possible radio button settings: |
||
| selected | Export granted access rights. | ||
| not selected | Do not export granted access rights (default). | ||
The key fields you have to specify for any Object name you want to export are described in the following table.
| Object Type | Key Field 1 | Key Field 2 | Key Field 3 | Key Field 4 | Remark |
|---|---|---|---|---|---|
| OWNER | Owner | This exports all objects which belong to a specific owner. | |||
| NETWORK-MASTER | Owner | Network | Version | ||
| NETWORK-VERSION-USAGE | Owner | Network | |||
| JOB-MASTER | Owner | Network | Version | Job | |
| JCL-MASTER | Owner | Network | Version | Job | |
| EOJ-CHECK-MASTER | Owner | Network | Version | Job | |
| DESCRIPTION | Owner | Network | Version | Job | A hyphen (-) used instead of a job name
exports the description of the network.
|
| SCHEDULE | Owner | Schedule | Schedule = Network | ||
| CALENDAR | Owner | Calendar | |||
| TO-ACTIVATE | Owner | Network | Version | Job | Job is optional. |
| SYMBOL-MASTER | Owner | Symbol table | |||
| SYMBOL-VERSION-USAGE | Owner | Symbol table | |||
| MAILBOX-DEFINITION | Mailbox | ||||
| MAILBOX-ENTRY | Mailbox | ||||
| NODE-DEFINITION | Node | ||||
| RESOURCE-DEFINITION | Resource | ||||
| RESOURCE-PREREQ | Owner | Network | Version | Job | |
| USER-DEFINITION | User ID | ||||
| DEFAULTS | Library | ||||
| CONDITION-ACTIVE | Owner | Network | Version | The export will be performed for all active runs of the condition. | |
| GLOBAL-EXIT | All global exits will be exported. |