
This document covers the following topics:
This section describes how to list all master jobs defined for a network.
Listing Active Jobs in the section Active Job Networks
 To list all jobs defined for a network
On the Network Maintenance
screen, type L in the line command field
of the network for which you wish to list all jobs, and press
ENTER.
Or:
Use the direct command
LIST
                                      JOBS
as described in the Direct Commands
documentation.
If several network versions exist, a Network Version Selection window similar to the example below opens first:
 16-11-21                ***** Entire Operations *****                13:39:27
 Owner SA +-------------------------------------------------------------------+
 Selectio !                                                                   !
--------- !                     Network Version Selection                     !
 Cmd #Run !  Owner SAGTEST    Network SAGNET                                  !
          !       Version     Usage                                           !
 _ P    4 !   _   V2          16-07-01 - 16-12-31 - current at 16-11-21       !
 _        !   _   (unnamed)   unnamed version (without name)                  !
 _        !   _   V1          16-01-01 - 16-06-30                             !
 l      8 !                                                                   !
 _      4 !                                                                   !
 _        !                                                                   !
 _      3 !                                                                   !
 _      1 !                                                                   !
 _      2 !                                                                   !
 _ P   25 !                                                                   !
 _ P      !                                                                   !
 ******** !                                                                   !
  A Activ !       ** Bottom **                                                !
  P Descr !  ----------PF3-----------PF7---PF8-----------------------------   !
 Command  !            End           Up    Down                               !
          +-------------------------------------------------------------------+


Enter-PF1---PF2---PF3---PF4---PF5---PF6---PF7---PF8---PF9---PF10--PF11--PF12---
Help Add End Save Up Down NxtSt Menu |
The window shows a list of the versions defined for a
network.
If a current version exists for the current date, it will be
presented in the first line.
The other versions appear in alphabetical order after the
current version.
If necessary, use PF7 to scroll up or PF8
to scroll down.
Select the required network version by marking it with any character and press ENTER.
A Job Maintenance screen similar to the example below appears:
 17-03-29                ***** Entire Operations *****                18:04:06
 Job Maintenance         Owner SAGTEST    Network B60-FLOW   Version
 ------------------------------------------------------------------------------
 Cmd C R PU Job       Type Loc Description           File or Library   Member
            *--------- ---
 _   C1R1   JOB-01     SRV     Where it all starts
 _     R1P  JOB-012    JOB BS2 Depending on Job-01   $NOP.SYSEORU
 _   C1     JOB-013    JOB MAC Depending on JOB-012  SYSEORU           B60-M01
 _          JOB-015    DUM     Depending on JOB-014
 _   C1     JOB-019    JOB MAC Depending on JOB-01   SYSEORU           B60-M01
 _   C2     JOB-02     JOB MAC Dep. JOB-15, JOB-19   SYSEORU           B60-M02
 _   C1     JOB-03     NAT NAT Depending on JOB-02   SYSEORU           B60-P01
 _   C1R1   JOB-04     JOB MAC Depending on JOB-03   SYSEORU           B60-M01
 _   C1     JOB-05     DUM     Depending on JOB-04
 _          JOB-06     JOB MAC Where it all ends     SYSEORU           B60-M02
 _   C1     J2-SUB     NET     Subnetwork Job for Su SAGTEST/SAGNETSUB (D)
 _   C1     SUBNETJOB1 NET     Subnetwork job for su SAGTEST/SAGNETSUB (D)
 ******************************* Bottom of Data *******************************
 A Depend. C Copy D Delete E Edit G Pregen. I Input Cond. J JCL L Resources
 M Mod. O EOJ Chk + Act P Prose R Activate S Sched.Parms U Ext.Log Z Subnet
 Command => ____________________________________________________________


Enter-PF1---PF2---PF3---PF4---PF5---PF6---PF7---PF8---PF9---PF10--PF11--PF12---
Help Add End Save Up Down Menu |
This screen displays all jobs defined for the selected network.
The screen columns are described in Columns: Job Maintenance.
This section covers the following topics:
The following table explains the columns of the Job Maintenance screen.
| Column | Description | |
|---|---|---|
| Cmd | One-character line command input field. Possible commands are described in Line Commands: Job Maintenance. | |
| C | If input conditions have been defined for the job listed,
C appears here followed by the number of conditions defined. For
example: C4 indicates that four input conditions exist.
For more than nine conditions, a plus sign ( |
|
| R | If resources have been defined for the job listed, R
appears here followed by the number of resources defined for the job. For
example: R4 indicates that four resources are defined for the job.
For more than nine resources, a plus sign ( |
|
| P | If a description is available for
the job listed, P appears here.
|
|
| Special job type.
The column between Cmd and C indicates special job types. Possible indicators are: |
||
C |
Cyclic execution. | |
D |
This is a dummy job. For more information, see the section Job Types. | |
G |
Pregenerated JCL exists (see
line command
G).
|
|
P |
(Started tasks) This job ends a started task. | |
R |
This is a recovery job. For more information, see Defining Recovery Action in the section End-of-Job Checking and Actions. | |
| U | If
extended logging has been
defined for the job listed, U appears here.
|
|
| Job | User-defined job name.
In the input field of the Job column, you can make a preselection using a wildcard. The preselection is kept until you switch to another network. |
|
| Type | Job type. They are described in
the section Job
Types.
See also the field Job Type described in Fields: Job Definition (Master). In the input field of the Type
column, you can enter a job type (for example, |
|
| Loc | JCL location.
(Empty if no JCL is defined, or if no JCL is required for the job type.) For possible JCL locations, see List of JCL Locations. |
|
| Description | The short description of the job.
Note: |
|
| File or Library | Physical storage of JCL according
to the JCL location.
For a job of the type |
|
| Member | The member which contains the
JCL. This refers to the JCL
location.
For possible members, see List of JCL Locations. For a job of the type |
|
You can perform several functions on any job listed on the Job Maintenance screen using line commands. The following line commands are available:
| Line Command | Description |
|---|---|
A
|
Display job dependencies (previous and following jobs). Includes connection and disconnection of jobs. See Displaying Job Dependencies and Connecting or Disconnecting Jobs. |
C
|
Copy a job definition to a new job, including all associated definitions. |
D
|
Delete a job definition, including its input conditions and End-of-Job checking and actions. |
E
|
Edit JCL or Natural program (editor). |
G
|
Pregenerate active JCL. |
I
|
List input conditions for the job. |
J
|
Define the JCL for the job. |
L
|
Handle prerequisite resources for the job. |
M
|
Modify a job definition. See Displaying and Modifying a Job Definition. |
O
|
Define End-of-Job checking and actions. |
P |
Invoke the editor to write a long description for the job. See Writing and Viewing Online Documentation for a Job. |
R
|
Activate a single job. |
S
|
Define scheduling parameters for the job. See Maintaining Schedule Dependencies for a Job. |
U
|
Define extended logging. See Defining Job-Specific Log Information. |
Z
|
List jobs in subnetwork (for jobs of type
NET only). See
Listing Jobs of a
Subnetwork.
|
The PF keys of the job maintenance screen have the standard behavior, except the following:
| PF Key | Description |
|---|---|
| PF3 | Leave the job maintenance screen.
If the job maintenance screen has been invoked by the line command
|
The following sections give detailed descriptions of the functions you can perform on each job using line commands.
To view and modify a job definition
On the Job
Maintenance screen, type M in the line
command input field next to the job you want to view or modify.
Press ENTER.
A Job Definition (Master) window opens containing the current values for the job:
 12.11.15                ***** Entire Operations *****                18:01:52
 Job Maintenance         Owner EXAMPLE    Network B60-FLOW   Version
 ------------------------------------------------------------------------------
  +------------------------------------------------------------------------+
  |                                                                        |
  |                        Job Definition (Master)                         |
  |                                                                        |
  |  Job Name       ==> JOB-01____        Mod ==> SAG      24.02.15 12:16  |
  |  Description    ==> Where it all starts_______________________________ | 2
  |  Job Type       ==> JOB                                                | 1
  |  Execution Node ==> N0082 MVS/ESA                                      | 1
  |                                                                        | 1
  |  Special Type   ==> ________              Symbol Table ==> EXAM-ST1__  |
  |  Restartable    ==> _             Symbol Table Version ==> __________  | 1
  |            Suffix Symbol ==> ________________________________________  | 2
  |                                Escape Characters:    Activation ==> @  | 1
  |                                                      Submit     ==> $  | 1
  |  End-of-Job Action Errors set 'not ok' Conditions ==> _                | **
  |                                                                        |
  | Enter-PF1---PF2--PF3--PF4---PF5---PF6---PF7---PF8---PF9---------PF12-  |
  |       Help  Add  End  Edit  Save  Spec  Symb  Net   JCL         Menu   |
  +------------------------------------------------------------------------+


Enter-PF1---PF2---PF3---PF4---PF5---PF6---PF7---PF8---PF9---PF10--PF11--PF12---
Help Add End Save Up Down Menu |
You can change the values in the fields described in the section Fields: Job Definition (Master).
Note:
Depending on your job type or operating system, you may have to
define additional parameters. Press PF6 (Specials) to open a window
with the additional parameters. For further information, see
Displaying Job
Dependencies and Connecting or Disconnecting Jobs.
Press PF5 (Save) to save all changes.
Press PF3 (End) to return to the Job Maintenance screen.
This section covers the following topics:
The fields in the Job Definition (Master) window are described in the following table.
Note:
The fields and tabbed pages available depend on the Job
Type, the Special Type and the operating system
of the Execution Node specified for the job.
| Field | Description | |
|---|---|---|
| Job Name | Job name.
Entire Operations recognizes a job by this name. It can, but need not be the same name as the JCL source used by the job (the operating system recognizes a job by its JCL name). Note: |
|
| Description | Short description of the job.
The maximum input is 50 characters. This text appears in the list of jobs on the Job Maintenance screen. Note: You can add a long description for the job: see Writing and Viewing Online Documentation for a Job. |
|
| Job Type | The job type as defined to Entire Operations. For further information, see the section Job Types. | |
| Special Type | Leave this
field empty if this is a normal job or enter one of the following values:
|
|
| Execution Node | The job is submitted on the node
specified in this case. The default is the value specified in the job network
definition. You can enter a different node for the job in this case. The name of the operating system appears after
the node
number.
Note: |
|
| Symbol Table | Name of the symbol table to be
referenced for substitution of variables in dynamic JCL.
Enter an asterisk ( Note: |
|
| Symbol Table Version | Version of the symbol table to be
used.
Reserved names (will be replaced). |
|
current |
Current version for the activation date or determination date. | |
nv |
Version of the using network. | |
svn |
Symbol table version of the using network. | |
| Suffix Symbol (optional) | If several instances of the job
are to be activated in parallel, this field must contain a symbol name which is
in the defined symbol table. The symbol itself must contain the suffixes to be
appended to active job names and output conditions. The sum of the lengths
(prefix+suffix) must not exceed the maximum field lengths for job names or
conditions.
For example, if the master job name is If Suffix Symbol does not contain any values, the job is activated as a temporary dummy job. For information about the definition of multiple symbol values, see Defining Multiple Symbol Values in the section Symbol Table and Symbol Maintenance. For information about the assignment of multiple symbol values to Suffix Symbol, see Symbol Replacement with Multiple Symbol Values. |
|
| Restartable | Only
applies to BS2000.
The job can be restarted automatically. Possible values:
Additional Restart Criteria:
Job submission time must be before the last IPL time and the job
must not be terminated. The field MonJV must
contain |
|
| Mod | User ID, date and time of the last modification of the job definition. | |
| End-of-Job Action Errors set 'not ok' Conditions | Job output conditions. Possible
values:
|
|
| Milestones |
You can set single or multiple milestone attributes (types) for a job that performs an important task within a job network, such as tracking significant events or controlling the successful completion of other jobs. Possible values for user-defined milestones:
Possible values for system milestones dynamically set by Entire Operations during job submission (applies to active jobs only):
You can use the application programming interface
For further information on milestone jobs, see the section Event Store Milestones in the System Automation Tools documentation. |
|
| Escape Characters: | This is the
activation escape
character. It is a prefix for Natural code lines and symbols to be
replaced at activation time. If you change this character, dynamic JCL can
become invalid.
See also Symbol Escape Characters (Symbol Maintenance) and Notes about Escape Characters. |
|
| Escape Characters: | This is the
submission escape character.
It is a prefix for symbols to be replaced at submission time. If you change
this character, dynamic JCL can become invalid.
Default is the dollar sign ( See also Symbol Escape Characters (Symbol Maintenance) and Notes about Escape Characters. |
|
- Note about Escape Characters
The job escape characters will always be used for symbol replacements and macro JCL.
When a job is created or when an escape character is reset, the default value is taken in the following order from:
Network defaults (operating system specific) if defined for the current operating system;
Network definition if non-blank;
Global operating system specific defaults for z/OS and z/VSE, BS2000, UNIX and Windows (Administration documentation).
See also Symbol Escape Characters in the section Symbol Maintenance.
You can perform the following functions using these PF keys in the Job Definition (Master) window:
| PF Key | Name | Function |
|---|---|---|
| PF4 | Edit | Edit the JCL.
You can edit the job's JCL directly from here. Make sure that you have defined JCL in advance. The JCL definition can be invoked with PF9 from this screen. |
| PF6 | Spec |
Define job execution features. Depending on whether you press PF6 in the Specials for Job Type window or in the Specials, Execution window, you can define job execution features specific to the job type or operating system. The input fields available are described in Fields: Job Type Specific Execution Features and Fields: Operating System Specific Execution Features. |
| PF7 | Symb | Open the Usable Symbol Tables window, and select a symbol table for browsing or modification. See also Listing Usable Symbol Tables in the section Symbol Table and Symbol Maintenance. |
| PF8 | Net | Job type NET:
See Defining a
Subnetwork.
|
| PF9 | JCL | Define the JCL for a job. |
When defining a new job, you can either enter all required attributes individually, or copy all attributes from an existing job definition.
To add a job definition
On the Network Maintenance screen, type
L in the line command field of the network for which
you wish to add a job and press ENTER.
Or:
Use the direct command
ADD JOB
as described in Direct Commands documentation.
The Job Maintenance screen appears.
Press PF2 (Add).
A Job Definition (Master) window similar to the example below opens:
 24.11.16                ***** Entire Operations *****                11:38:03
 Job Maintenance         Owner EXAMPLE    Network B60-FLOW   Version
 ------------------------------------------------------------------------------
  +------------------------------------------------------------------------+
  | EOR1080 - Job Network Defaults inserted                                |
  |                        Job Definition (Master)                         |
  |                                                                        |
  |  Job Name       ==> __________        Mod ==> SAG      24.11.16 11:38  |
  |  Description    ==> __________________________________________________ | 2
  |  Job Type       ==> ___                                                | 1
  |  Execution Node ==> N0082 MVS/ESA                                      | 1
  |                                                                        | 1
  |  Special Type   ==> ________              Symbol Table ==> EXAM-ST1__  |
  |  Milestones     ==> ________      Symbol Table Version ==> __________  | 1
  |  Restartable    ==> N                                                  | 2
  |            Suffix Symbol ==> ________________________________________  | 1
  |                                Escape Characters:    Activation ==> @  | 1
  |                                                      Submit     ==> $  | **
  |  End-of-Job Action Errors set 'not ok' Conditions ==> N                |
  |                                                                        |
  | Enter-PF1---PF2--PF3--PF4---PF5---PF6---PF7---PF8---PF9---------PF12-  |
  |       Help  Add  End  Edit  Save  Spec  Symb  Net   JCL         Menu   |
  +------------------------------------------------------------------------+


Enter-PF1---PF2---PF3---PF4---PF5---PF6---PF7---PF8---PF9---PF10--PF11--PF12---
Help Add End Save Up Down Menu |
Enter values for the fields described in Fields: Job Definition (Master).
Note:
Depending on your operating system, you may have to define
additional parameters. Press PF6 (Spec) to open a window with the
additional parameters. For further information, see
Displaying Job
Dependencies and Connecting or Disconnecting Jobs.
Type C in the line command field of the selected job in
the Job Maintenance
screen.
Press ENTER.
A Job Master Definition Copy window opens with the job, network and owner name of the job you wish to copy, and an input field for a new job.
17.12.13                ***** Entire Operations *****                16:59:26
 Job Maintenance         Owner SN         Network A-1        Version v20131217
 ------------------------------------------------------------------------------
 Cmd C R PU Job       Type Loc Description           File or Library,Member
            *---------
 c   C5  PU A-1        JOB PDS missing member test   SN.SYSF.SRCE      QQQQQQQ
 _   C5     A-2        DUM     ic def test
 _          BBBBB      JOB
 _        +-------------------------------------------------------------+
 _        !                                                             ! SS-T0
 _        !                  Job Master Definition Copy                 ! SS-T1
 _ C      !                                                             !
 _        !      From                        To                         ! DL001
 _        !      Owner     ==> SN________    Owner    ==> SN            !
 _        !      Network   ==> A-1_______    Network  ==> A-1           ! 0990A
 _        !      Version   ==> v20131217_    Version  ==> v20131217     ! 0990B
 _        !      Job       ==> A-1_______    Job      ==> __________    !
 ******** !      Alt. File ==> N (Y/N)                                  ! *****
 A Depend !                                                             ! s
 M Mod. O !  PF3 End                                                    ! t
 Command  +-------------------------------------------------------------+
Enter-PF1---PF2---PF3---PF4---PF5---PF6---PF7---PF8---PF9---PF10--PF11--PF12---
Help Add End Save Up Down Menu |
You can copy the job under another name from the same or another network or network version defined for the same or another owner. You can only specify another owner if you are authorized to access the networks of the owner.
Press ENTER to save the new definition and close the window.
The new job appears in the list of jobs in the Job Maintenance screen for the owner specified for the new job.
Note:
Copying a job does not include the definitions made at job level
via the Job Maintenance
screen, such as input conditions and End-of-Job handling. Use the
available line commands to create these definitions for each new job.
You can add a short description of a job when defining a job in the Job Definition (Master) window. This short description appears in the list of jobs on the Job Maintenance screen.
If you wish to add more online documentation for a job, proceed as described in the following instruction.
To create, view or modify a long job description
On the Job
Maintenance screen, type P in
the line command input field next to the required job.
Press ENTER.
The description is displayed on an editor screen similar to the example below:
Edit Description Jb: ABC3A Nw: EORACCT------------------------------ Columns 001 072 ====> SCROLL===> CSR ***** ****************************** top of data ***************************** 00001 Job 'ABC3A' 00002 ----------- 00003 This job forces a defined event at end-of-job time and executes the 00004 program 'EORCONTI' which resides on the installation library 00005 'EORnnn.LOAD'. The necessary JCL which is named 'EORE*' is stored in 00006 the installation library 'EORnnn.SRCE'. ***** **************************** bottom of data **************************** |
The example above shows the screen with 6 lines of text.
(If no documentation exists for the selected job, the editor screen appears without text.)
Write new or replace existing text using editor commands which are briefly described in the online help. For detailed descriptions of all editor functions, see Software AG Editor in the Natural documentation.
Press PF3 when you are finished.
The text is saved and the editor window closes.
On the Job Maintenance screen, the letter
P in the P column next to the modified job
indicates that a long description exists for this job.
Once online documentation is written, it can be read by any user who is
authorized to access the network to which the job belongs.
Use the line command P to display the current
text.
You can also display or print online documentation by using the Reports facility described in the section Reporting. If long job descriptions exist, they are included in the Network Description (detailed) report as shown under item 5 of the Example of Network Description (detailed).
Note:
Deleting a job definition also deletes all definitions made at the
job level, including its input conditions and End-of-Job checking and actions.
The original JCL is not deleted.
To delete a job definition
On the Job
Maintenance screen, type D in
the line command input field next to the job you want to delete.
Press ENTER.
A window prompts you to confirm the deletion by entering the job name.
Press ENTER to delete the job definition.
Just as you can perform an ad-hoc manual activation of a job network at any time to allow it to run outside of its scheduled times, you can also manually activate any job at any time, regardless of its position within a job network.
The activated job is assigned its own run number (in sequence with the network run number) and, if you do not change the date or time, is submitted immediately by the Entire Operations Monitor. If the job contains symbols as placeholders for variables, symbol prompting takes place as described in the section Symbol Prompting during Network or Job Activation. If other symbol tables are required, they will be prompted too.
The differences between the manual activation of a single job and the manual activation of a job network are that when a single job is activated:
no check for defined input conditions for the job is performed;
no output conditions are set by the job.
All other End-of-Job actions defined for the job are executed.
To activate a job manually
Type R in the line command input field for
the selected job in the Job
Maintenance screen.
Press ENTER.
A Job Activation window similar to the example below opens:
 06.06.16                ***** Entire Operations *****                18:18:36
 Job Maintenance         Owner EXAMPLE    Network B60-FLOW   Version
 ------------------------------------------------------------------------------
 Cmd C R PU Job       Type Loc Description           File or Library,Member
            *--- +-----------------------------------------+
 _       P  ABC3 |                                         |
 _          HEB- |             Job Activation              |
 _   C1     HEB- |                                         |
 r   C1     JOB- |                    Owner ==> EXAMPLE    |           B60-M02
 _   C1  P  JOB- |                  Network ==> B60-FLOW   |           B60-M01
 _   C1     JOB- |                  Version ==>            |           B60-M01
 _   C1  P  JOB- |                      Job ==> JOB-01     |           B60-M01
 _   C1     JOB- |                                         |
 _   C1     JOB- |     Preferred Run Number ==> ______     |           B60-M01
 _   C3     JOB- |   Use Time from Schedule ==> N  (Y/N)   |           B60-M02
 _   C4     JOB- |      or activate at Date ==> 06.06.16__ |           B60-P01
 _   C1     JOB- |                     Time ==> 18:19:04   |           B60-M01
 *************** |           JCL Check only ==> N  (Y/N)   | ******************
 A Depend. C Cop |   Enter----PF1---PF3------------------- | CL L Resources
 M Mod. O EOJ Ch |   Activate Help  End                    | t.Log Z Subnet
 Command => ____ +-----------------------------------------+ ___________


Enter-PF1---PF2---PF3---PF4---PF5---PF6---PF7---PF8---PF9---PF10--PF11--PF12---
Help Add End Save Up Down Menu |
This section covers the following topics:
The fields of the Job Activation window are described in the following table:
| Field | Description |
|---|---|
| Owner | Owner of network in which job is to be activated. |
| Network | Network of the job that is to be activated. |
| Version | Network version of the job that is to be activated. |
| Job | Job to be activated. |
| Preferred Run Number | If input is allowed for this field, you can
enter the run number you want to be used for the activated job. Run numbers for
further job activations increment from this number.
If the requested run number is in use, Entire Operations assigns the next free number. If this field contains a zero ( Field input is allowed or not allowed (default) in the network default settings: see the option Activation: Allow run number setting in the section Default Setting (4) in the Administration documentation. |
| Use Time in Schedule | Enter Y (yes)
here to activate the job
within the defined time
frames (earliest start, latest start, deadline), even if the current
date is not a scheduled date for this network. With this option, you can force
the same time dependencies as if the network was scheduled and activated
automatically.
For more information on network time frames, see Activating a Job Network Manually in the section Network Maintenance. |
| or activate at Date/Time | Shows the current date and time. You can modify date and time to
force activation at any time on any date. There is no limitation for future
date and time settings.
See also Date and Time Formats. Note: |
| JCL Check only | If set to Y
(yes):
Only a JCL check is performed for the job network or job. The required commands are automatically inserted:
z/OS, JES2: Notes:
|
If set to N
(no):
Normal job submission is used for network activation. An actual JCL check is not performed. This is the default. |
The Job Maintenance facility allows you to see which jobs must run before a specific job can start, and which jobs run after it.
You can trace job dependencies through whole networks and display cross-network job links.
You can connect or disconnect jobs from the same or different networks.
Note:
An overview of the job flow for the whole network is available from
the Network Maintenance screen described in
Displaying the Job Flow within a
Network.
This section covers the following topics:
To display job dependencies for a specific job
On the Job
Maintenance screen, type A in
the line command input field next to the required job.
Press ENTER. A Job Dependencies window opens:
23.10.08 ***** Entire Operations ***** 15:35:15 Owner SN Job Maintenance Network BIG-1 +--------------------------------------------------------------------------+- ! ! ! Predecessors Job Dependencies Successors ! ! --------------------------+ +--------------------------- ! ! M Network Job Output Condition ! ! Input Condition Network Job M ! ! _ BIG-1 JOB-013 => E60-J014-O ! ! E60-J013-O => BIG-1 JOB-015 _ ! ! _ +---------------+=> ! ! => Ow SN _ ! ! _ Nw BIG-1 => ! ! => Job JOB-014 _ ! ! _ +---------------+=> ! ! => _ ! ! _ => ! ! => _ !* ! --------------------------+ +--------------------------- ! ! X Chain D Disconnect X Chain D Disconnect ! ! Enter----PF1---PF2------PF3-------PF5---------PF7---PF8--------------- ! E ! Help Connect End Save Up Down !- +--------------------------------------------------------------------------+ |
The selected job name and network name appear in the middle of the window with its dependencies displayed in the two smaller windows on either side of the selected job name:
The Predecessors window on the left of the selected job contains the job and network names of the jobs that must run before the selected job can run. Directly beneath these are the linking conditions.
The Successors window on the right of the selected job contains the job and network names of the jobs for which the selected job is a prerequisite. Directly above these are the linking conditions.
You can scroll both lists by using PF7 (Up) and PF8 (Down).
In the M column of the Job Dependencies window, you can enter the following line commands to perform the described functions on any job displayed in the window:
| Line Command | Description |
|---|---|
D
|
Disconnect the job from a predecessor or successor job.
See also Disconnecting Jobs. |
X
|
Chain. Move the selected job into the center of the window and display its dependencies. |
You can perform the following function from the Job Dependencies window using this PF key:
| PF Key | Name | Function |
|---|---|---|
| PF2 | Connect | Connect the job to a
predecessor job. For the standard case, event Job OK.
See Connecting Jobs from the Same or Different Networks. |
You can connect two jobs within the same or different networks without defining logical conditions for them by using the Entire Operations default condition.
This function is also useful to link jobs across networks. In this
case, you should check the input condition reference of the successor job. Use
a reference different from RUN.
Note:
After connecting jobs within a network, a loop check is performed
for the affected network. The same conditions apply as described in
Checking for a Loop in a Job
Network in the section Network
Maintenance, with one exception: if a loop is detected in the job
flow, no corresponding message appears.
To connect two jobs
Press PF2 (Connect) in the Job Dependencies window of the job you wish to connect.
A Job Connection window opens in which you can define a job which must precede the selected job:
10.02.10 ***** Entire Operations ***** 16:31:28 Owner SN Job Maintenance Network A-1 +--------------------------------------------------------------------------+ ! EOR1141 - No Dependencies found ! ! Predecessors Job Dependencies Successors ! ! --------------------------+ +--------------------------- ! ! M Network Job I I Output Condition ! ! Input Condition I I Network Job M ! ! _ I I=> ! ! =>I I _ ! ! _ +-------------------------------------------------------+ ! ! ! ! _ ! ! _ ! Job Connection ! ! ! ! ! _ ! ! _ ! from Owner: SN________ to Owner: SN ! ! ! ! Network: A-1_______ Network: A-1 ! _ ! ! _ ! Job: __________ Job: D1 ! ! ! ! Event: OK ! _ ! ! ---- ! ! ------- ! ! X Ch ! PF3 End ! ct ! ! Ente +-------------------------------------------------------+ ------- ! E ! Help Connect End Save Up Down ! +--------------------------------------------------------------------------+ |
The identifiers of the selected job appear in the protected fields on the right in the window.
This section covers the following topics:
The input fields in the Job Connection window have the following meaning:
| Field | Description | |
|---|---|---|
| from/ Owner | Enter owner of job to run as predecessor. | |
| from/ Network | Enter network name of job to run as predecessor. | |
| from/ Job | Enter name of job to run as predecessor. | |
| Event | OK |
Job ended ok
The condition
|
NO |
Job ended not ok
The condition
If an output condition already exists for a mentioned event, it is used for the linkage (instead of creating a new condition). |
|
To disconnect two jobs linked by conditions
In the Job
Dependencies window, type D in
the line command input field of the second job in the sequence.
Press ENTER.
A confirmation window opens:
23.10.08 ***** Entire Operations ***** 15:35:41 Owner SN Job Maintenance Network BIG-1 +--------------------------------------------------------------------------+- ! NOP1457 - Several Predecessor Jobs ! ! Predecessors Job Dependencies Successors ! ! --------------------------+ +--------------------------- ! ! M Network Job Output Condition ! ! Input Condition Network Job M ! ! _ BIG-1 JOB-012 => E60-J013-O ! ! E60-J0 +----------------------------------------------+JOB-014 d ! ! _ BIG-1 ! ! ! ! E60-JO ! Please confirm ! _ ! ! _ ! the Disconnection from JOB-014 ! ! ! ! by entering 'Y' ===> _ ! _ ! ! _ ! ! ! ! ! PF3 End ! _ ! ! _ +----------------------------------------------+ ! ! => _ !* ! --------------------------+ +--------------------------- ! ! X Chain D Disconnect X Chain D Disconnect ! ! Enter----PF1---PF2------PF3-------PF5---------PF7---PF8--------------- ! E ! Help Connect End Save Up Down !- +--------------------------------------------------------------------------+ |
Enter Y.
Press ENTER to perform the disconnection and close the window. You can disconnect any two jobs linked by conditions using this function. There is no need to delete any defined conditions.
Note:
No disconnection is performed if the use of the conditions is
not unique, for example:
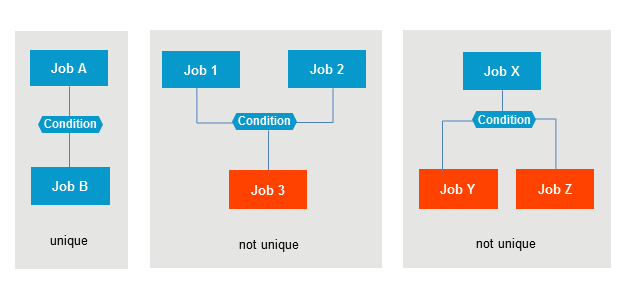
Note:
Remove the condition definitions manually if the link is not
unique.
- Disconnection from a Predecessor Job
When disconnecting from a predecessor job, the linking input condition definition of the job displayed in the center (of the Job Dependencies window) is deleted.
- Disconnection from a Successor Job
When disconnecting from a successor job, the linking output condition definition of an event definition of the job displayed in the center (of the Job Dependencies window) is deleted.
Note:
The input condition definitions of the successor job remain unchanged. After the output condition definition is deleted, the successor job can wait for a condition which is never satisfied.
- Restrictions:
A linking condition is deleted, only if it links no more than two jobs.
If the
Xline command (Chain) was invoked for jobs in different networks, a disconnection of this type is not possible.
Entire Operations allows you to define which information is to be logged in addition to the Entire Operations default system log.
This information is defined at the job level and can be job SYSOUT, JCL or selected operating system messages from the SYSOUT.
This section covers the following topics:
To specify extended log information
Type U in the line command input field of
the selected job on the Job
Maintenance screen and press ENTER.
An Extended Log screen opens in which you can specify the information to be logged:
16.01.14                ***** Entire Operations *****                15:00:28
                                 Extended Log
 Owner SN         Network A-1        Version V00003     Job IEFBR14
 ------------------------------------------------------------------------------
             Log SYSOUT ==> Y      (Y/N)
                  Files ==> ___ ___ ___ ___ ___ ___ ___ ___ ___ ___

                Log JCL ==> Y      (Y/N)


    Log System Messages     M Code     M Code     M Code     M Code
                            _ IEF403I    _______    _______    _______
                            _ IEF404I    _______    _______    _______
                              _______    _______    _______    _______
                              _______    _______    _______    _______
                              _______    _______    _______    _______

                            S Message Contents Selection

 Command=> ____________________________________________________________
Enter-PF1---PF2---PF3---PF4---PF5---PF6---PF7---PF8---PF9---PF10--PF11--PF12---
Help End Save Menu |
Specify the information to be logged.
The input fields and options are explained in Fields: User-Defined/Extended Log.
Press PF5 (Save) to save your entries.
Press PF3 (End) to return to the Job Maintenance screen.
The logged information can be viewed after job termination using the Log Information facility described in the section Log Information.
The input fields of the Extended Log screen are described in the following table:
| Field/Column | Description | |
|---|---|---|
| Log SYSOUT | Specifies logging of job SYSOUT files after job termination. Possible values: | |
Y |
Logs SYSOUT. | |
N |
No SYSOUT files are logged. | |
| SYSOUT logging can also be
defined as SYSOUT action as
described in the section End-of-Job Checking and Actions.
If the SYSOUT file or spool data set exceeds a given line limit, the log display will be truncated: see SYSOUT Line Limit in Default Setting (2) in the Administration documentation. |
||
| Files | (z/OS only)
Input valid only if Log SYSOUT is specified. Enter number(s) of SYSOUT file(s) to be logged. If left blank and Log SYSOUT is specified, all files are logged. |
|
| Log JCL | Specifies logging of JCL after job termination. This is useful for dynamically generated JCL or if JCL is frequently modified for different job runs. Possible values: | |
Y |
Logs JCL. | |
N |
No JCL is logged. | |
| See also JCL Log. | ||
| Log System Messages: | Specifies operating system
messages to be logged. Enter a message code in a field under the
Code column.
If you enter The message will be logged if no additional string is specified, or if at least one specified string will be found in the message. |
|
- Message Contents Selection
System messages will be logged if they are selected by their message code, and one of the following conditions is true:
No message contents selection is specified. (No selection strings defined.)
A message contents selection is specified, and at least one of the strings is found within the pre-selected message.
- JCL Log
The JCL log is generated from the following sources:
BS2000 From the ENTER file. (The ENTER file is deleted after copying into the Entire Operations Log.)
z/OS If Entire Operations runs on a mainframe: from the SYSOUT.
If Entire Operations does not run on a mainframe: from the active JCL.
z/VSE From the active JCL. UNIX From the effectively submitted shell script. Windows From the effectively submitted BAT file.