This section explains how to define logical printers. It covers the following topics:
Prerequisite: To define logical printers, you must first have defined at least one physical printer for your system. For information on physical printers, see the section Defining a Physical Printer in the System Administration documentation.
Logical printers are used to print reports or bundles.
A logical printer refers to printing on a physical printer such as a VTAM printer, a system printer or a DASD sequential dataset by applying a set of printing characteristics, such as FORM, CHARS, FCB, etc.
Different logical printers can print on the same physical printer but with different characteristics.
The following figure illustrates the relation between logical printers and physical printers:
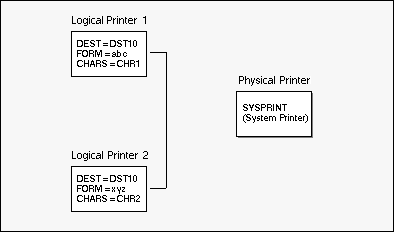
In this example, two Logical Printers 1 and 2 with different parameters are assigned to the same physical printer: SYSPRINT, the system printer.
![]() To list all defined logical printers:
To list all defined logical printers:
Enter 3 in the command line of the "Main
Menu".
The "Printer Maintenance" screen is displayed:
   12:32:12             **** ENTIRE OUTPUT MANAGEMENT ****            2008-01-17
  User ID XYZ                - Printer Maintenance -

  Cmd Printer  Authoriz Description          Physical S  Location
  ___ ________ ________ ____________________ ________ _ ________________________
   __ AAAAAA   ADMIN    Aaaaaaaaaaaaaaaaa    HUGO-14
   __ AAANEU   ADMIN    AAAAAAAAAAAAAAAAAAAA HUGO-14
   __ BDE-LOGP ADMIN    test of XML printer  UKSJUXML
   __ BDE-MXL2 ADMIN    SS                   BDE-PXML
   __ BHHHHH1  ADMIN                         HUGO-14
   __ BRY-PRIN ADMIN                         CON-NECT
   __ BRY-TEST ADMIN                         CON-NECT
   __ DAEFPR09 ADMIN    vka host printer     DAEFPR09   VKA host printer
   __ DAUPRTED ADMIN    u9 support           DAUPRTED
   __ DDDDDD1  ADMIN    Test only            CON-NECT
   __ DEFAULTA ADMIN    Default values for S SGGRLP1    test unixlp printer
   __ DEFAULTB ADMIN    Default values for S SGGRLP2    test unixlp printer
   __ DERBY    ADMIN                         CSG4100S   SagUK Development
   __ DISKGGR  ADMIN    xsetggr test disk pr DISKGGR  S
   __ DISKMVS  ADMIN                         DISKMVS
 Top Of Data
  Command => ___________________________________________________________________
 Enter-PF1---PF2---PF3---PF4---PF5---PF6---PF7---PF8---PF9---PF10--PF11--PF12---
       Help  Add   Exit  Flip               -     +                      Menu
|
The screen lists, in alphabetical order, the logical printers defined to Entire Output Management.
| Key | Name | Function |
|---|---|---|
| PF2 | Add | Add a logical printer. |
| Command | Function |
|---|---|
| AU | Authorize users. |
| CO | Copy logical printer definition (*). |
| DE | Delete logical printer definition (*). |
| DI | Display logical printer definition. |
| LO | Display log information regarding maintenance activity on a logical printer. |
| MO | Modify logical printer definition. |
| RN | Rename logical printer (*). |
(*) These commands cannot be used for DEFAULT printers.
For all fields marked with an asterisk (*) below, you can enter selection criteria (prefix *) in the field directly beneath the heading.
| Field | Explanation |
|---|---|
| Printer * | Enter the logical printer ID or selection criteria for the ID. |
| Authoriz * | Access to Entire Output Management objects can be granted to a user ID, a group of users or to all users. To list authorized objects enter a user ID, a distribution list or PUBLIC here. |
| Description | A short description of the logical printer. |
| Physical * | The name of the physical printer. |
| S |
The status of the physical printer:
|
| Location | The physical location of the printer, taken from the definition of the physical printer. |
![]() To add a logical printer definition:
To add a logical printer definition:
Press PF2 (Add) on the "Printer Maintenance" screen.
The "Logical Printer > General Attributes" screen, appears:
  12:30:13             **** ENTIRE OUTPUT MANAGEMENT ****            28/05/2008
  User ID XYZ        - Logical Printer >General Attributes -

  Logical Printer
     Name ............. ________
     Description ...... ______________________________
  Physical Printer
     Name ............. ________
     Location .........

  Copies .............. ___
  Priority ............ __
  Printer Exit
     Member ........... ________
     Library .......... ________               Restrict Usage ......... _

  Jobcards
     ________________________________________________________________________
     ________________________________________________________________________
     ________________________________________________________________________

  Command => ___________________________________________________________________
 Enter-PF1---PF2---PF3---PF4---PF5---PF6---PF7---PF8---PF9---PF10--PF11--PF12---
       Help  Add   Exit  Flip  Do    Undo              Attrb Edit        Menu
|
On this screen, you add a new logical printer definition or modify an existing one.
| Key | Name | Function |
|---|---|---|
| PF2 | Add | Add another logical printer. |
| PF9 | Attrib | Modify special printer attributes. |
| PF10 | Edit | If you have entered a Printer Exit Member, edit the member. For more information, see the section User Routines and Separator Pages in the System Administration documentation. |
| Field | Explanation |
|---|---|
| - Name | If you are adding a logical printer, you must enter its ID before proceeding. If you are modifying an existing printer, this field is protected. The ID must be unique. |
| - Description | Enter a short description for the logical printer. |
| Physical Printer | |
| - Name | Enter the ID for the physical printer where reports are to be printed. For further information, see the section Selecting a Physical Printer for a Logical Printer. |
| - Location | (output field) The location of the physical printer appears here when a printer has been selected. |
| Copies | Enter the number of copies to be printed. |
| Priority | Enter the print priority. This is passed to the spooling system when using system printers, or used internally when referring to VTAM printers. |
| Printer Exit | |
| - Member | Enter the name of the exit to be executed for each line before it is printed. You can edit the exit by pressing PF10 (Edit). For more information, see the section User Routines and Separator Pages in the System Administration documentation. |
| - Library | (output field) The name of the library where the printer exit is located. |
| - Restrict Usage | By default, a general user may select any logical printer for which the user or PUBLIC is authorized (even if all authorization options are set to "N"). Also, when printing an active report, the user may select any printer defined in the master report definition. If you specify "Y" here, only administrators and users with at least one authorization option set to "Y" may select this printer. |
| Enter the job cards used when printing with a batch job. If you leave these lines blank, the specifications made for the Monitor Standard Definitions are used for printing with a batch job. | |
![]() To select a physical printer for a logical printer:
To select a physical printer for a logical printer:
Enter an asterisk (*) in the Physical Printer Name field on the "Logical Printer > General Attributes" screen.
A printer selection window is displayed.
Select a printer by entering any character in the field preceding the printer name.
The printer name is written to the Physical Printer Name field on the "Logical Printer > General Attributes" screen. The logical printer prints on the physical printer selected.
![]() To modify special attributes for a logical printer:
To modify special attributes for a logical printer:
Press PF9 (Attrib) on the "Logical Printer > General Attributes" screen.
The "Logical Printer > Special Attributes" screen appears:
   08:30:44             **** Entire Output Management ****            08/10/2008
  User ID XYZ       - Logical Printer >Special Attributes -

  Logical Printer
     Name ............. SYSPRPWR
     Description ...... ______________________________

  Attributes

    Burst .............
    Chars .............
    Class .............
    Cmpact ............
    Destination .......
    Delt ..............
    Disp ..............
    Fcb ...............
    Flash .............
    Form ..............
    Jsep ..............
 Top Of Data
  Command => ___________________________________________________________________
 Enter-PF1---PF2---PF3---PF4---PF5---PF6---PF7---PF8---PF9---PF10--PF11--PF12---
       Help  Add   Exit  Flip  Do    Undo   -     +                      Menu
|
The attributes as defined for the physical printer appear on this screen. You can modify them by entering new values. For more information on these attributes, see the section Defining Special Attributes for a Physical Printer in the System Administration documentation.
| Key | Name | Function |
|---|---|---|
| PF2 | Add | Add another logical printer. |
![]() To modify a logical printer:
To modify a logical printer:
On the "Logical Printer Maintenance" screen, enter the line command
MO next to the logical printer you want to
modify.
The "Logical Printer Definition" screen appears for the logical printer you have selected.
You can modify the data displayed by entering new data in the input fields. For explanations of the input fields, see Adding a Logical Printer.
When you have finished modifying the logical printer definition, press ENTER to save your modifications.
A message confirms the modification.
If COMMIT is set to OFF, press PF5 (Do) to save your modifications before exiting. If you do not, a window opens in which you can commit the modifications by typing "Y".
A message confirms that all modifications have been committed.
![]() To authorize user access to a logical printer:
To authorize user access to a logical printer:
On the "Logical Printer Maintenance" screen, enter the line command
AU next to the logical printer for which you want to
grant authorization.
The "Authorization List" window for logical printers opens.
To grant authorization to a user, proceed as described in the section Authorizing User Access to Objects.
![]() To copy a logical printer:
To copy a logical printer:
On the "Logical Printer Maintenance" screen, enter the line command
CO next to the logical printer you want to copy.
The "Copy Printer Definition" window opens.
Enter the name of the target logical printer in the input field provided.
A message confirms that the Printer has been copied.
![]() To delete a logical printer:
To delete a logical printer:
On the "Logical Printer Maintenance" screen, enter the line command
DE next to the logical printer you want to
delete.
If CONFIRM is set to ON, a window opens asking you to confirm the deletion.
To do so, enter the logical printer name in the input field provided.
A message confirms the deletion.
![]() To display a logical printer:
To display a logical printer:
On the "Logical Printer Maintenance" screen, enter the line command
DI next to the logical printer you want to
display.
The "Logical Printer Definition" screen appears for the logical printer you selected.
![]() To display log information for a logical printer:
To display log information for a logical printer:
On the "Logical Printer Maintenance" screen, enter the line command
LO next the logical printer for which you want to
display log information.
The "Log Display" screen appears for the logical printer selected.
You can display more information about a log entry by entering the
IN line command in the command field preceding the
entry.
For further details, see the section Displaying Log Information for an Object and the Log Display screen.
![]() To rename a logical printer:
To rename a logical printer:
On the "Logical Printer Maintenance" screen, enter the line command
RN next to the logical printer you want to
rename.
The "Rename Logical Printer" window opens.
Enter the new logical printer name in the input field provided.