This section explains logical printers and the operations that can be performed on them. It covers the following topics:
Logical printers are used to print reports or bundles. A logical printer refers to printing on a physical printer such as a VTAM printer, a system printer or a DASD sequential dataset by applying a set of printing characteristics, such as FORM, CHARS, FCB, etc. Different logical printers can print on the same physical printer but with different characteristics.
To define logical printers, you must first have defined at least one physical printer for your system. For information on physical printers, see the section Defining a Physical Printer in the System Administration documentation.
![]() To list all available commands for logical printers:
To list all available commands for logical printers:
In the object workspace, expand the Printers folder.
Select a printer and invoke the context menu.
A list of available commands appears.
The following table briefly explains each command:
| Command | Shortcut | Explanation |
|---|---|---|
| Authorization | F9 | Authorize other users to process the logical printer. |
| Copy | Ctrl+C | Copy a logical printer. (*) |
| Delete | Del | Delete a logical printer. (*) |
| Display | Ctrl+D | Display a logical printer. |
| Display Log | F10 | Display log information about maintenance activity on this printer. |
| Filter | F3 | List selected logical printers. |
| List | F8 | List all logical printers. |
| New | Ctrl+N | Add a new logical printer. |
| Open | Ctrl+O | Modify a logical printer. |
| Rename | F2 | Rename a logical printer. (*) |
(*) These commands cannot be used for DEFAULT printers.
![]() To list all defined logical printers:
To list all defined logical printers:
In the object workspace, select the folder.
Invoke the context menu and choose .
All defined logical printers are listed in the content pane.
For each printer, the following information is displayed:
| Field | Explanation | |
|---|---|---|
| Printer | Name of the logical printer. | |
| Authorization | Authorization used to access the
logical printer. Possible values:
|
|
| Description | Short description of the logical printer. | |
| Physical | The name of the physical printer. | |
| Status | The status of the physical printer: S = printer stopped; blank = printer started and active for printing. | |
| Location | The location of the physical printer. | |
![]() To list defined logical printers according to selection
criteria:
To list defined logical printers according to selection
criteria:
In the object workspace or in the printer list, select the Printers folder.
Invoke the context menu and choose .
The Select Printers dialog appears in the content pane.
Enter selection criteria for the printers, for example:
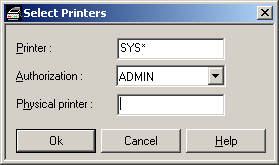
Choose .
Now only defined logical printers which satisfy the selection criteria appear in the expanded Printers folder in the object workspace.
![]() To define a new logical printer:
To define a new logical printer:
Select the folder in the object workspace and invoke the context menu.
Choose .
The New Logical Printer window opens in the content pane. The tab is displayed.
Enter your data as desired. The general attributes are described below.
To define special attributes for the printer, you select the tab. The special attributes are described below.
When you have finished , choose the button to save your data.
| Field | Explanation | |
|---|---|---|
| Name | If you are adding a logical printer, you must enter its ID before proceeding. If you are modifying an existing printer, this field is protected. The ID must be unique. | |
| Description | Enter a short description for the logical printer. | |
| Physical Printer | Name | Use the list box to select the ID for the physical printer where reports are to be printed. |
| Location | The location of the physical printer appears here, when a printer has been selected. (output field) | |
| Copies | Enter the number of copies to be printed. | |
| Priority | Enter the print priority. This is passed to the spooling system when using system printers, or used internally when referring to VTAM printers. | |
| Printer Exit | Member | Use the list box to select the name of the exit to be executed for each line before it is printed. |
| Library | The name of the library where the printer exit is located. (output field) | |
| Jobcards | Enter the job cards used when printing with a batch job. If you leave these lines blank, the specifications made for the Monitor Standard Definitions are used for printing with a batch job. | |
Depending on the type of the physical printer, as determined by the Physical Printer specifications under General Attributes (see above), you can set the following special attributes for a logical printer:
| Attribute | Explanation |
|---|---|
| Account | Enter the account number to be used. |
| Chars | Enter the character table to be used. |
| Class | Enter the output class to be used for system printers. |
| System ID | Enter system affinity. |
| Fcb | Enter the FCB image that describes the length (and width - optional) of a page. |
| Formdef | Enter the name of the FORMDEF to be used. |
| Form | Enter the name of the form to be used. |
| Hold | Should the printout be held by CMA-SPOOL? Enter YES/NO). |
| Linect | Enter the maximum number of lines to be printed on a page. |
| Limit | Enter the maximum number of lines allowed. |
| Filename | Enter the name of the output file. |
| Pagedef | Enter the name of the PAGEDEF to be used. |
| Programmer | Enter the programmer's name. |
| Prmode | Enter PAGE to use page mode as PRMODE. |
| Retention | How long should the print file be retained after printing? Enter the retention period (in hours). |
| Room number | Enter the room number. |
| Trc | TRC (table reference characters). Enter YES/NO. |
| Writer | Enter the name of the NJE writer. |
| Attribute | Explanation | ||
|---|---|---|---|
| DBID | Database ID of the Con-nect system file. | ||
| FNR | File number of the Con-nect system file. | ||
| Cabinet | Name of the Con-nect cabinet. You can leave this field blank. In this case, the document is created in the cabinet of the user who issued the printout. | ||
| Document name | Name of the Con-nect document. In this case, the document name is constructed from the report/bundle name, the run number of the object to be printed and the run number of the printout. | ||
| Document format | Enter the document format to be used: 0 = text document; 1 = Con-form document (default). | ||
| Description | Enter up to four lines of document description. | ||
| Keywords | Enter up to six keywords for the document. | ||
| Attribute | Explanation |
|---|---|
| Dataset | Enter the dataset name to be used. |
| Member | Enter the member name to be used. |
| Dataclas | Enter the DATACLAS parameter. This corresponds to the DATACLAS JCL parameter. |
| Dcb | Enter the DCB parameter. This corresponds to the DCB JCL parameter. |
| Disp | Enter the Disposition parameter. |
| Expdt | Enter the EXPDT parameter. This corresponds to the EXPDT JCL parameter. |
| Like | Enter the LIKE parameter. This corresponds to the LIKE JCL parameter. |
| Lrecl | Enter the record length to be used (for records of variable length, this is the maximum record length + record length field). |
| Mgmtclas | Enter the MGMTCLAS parameter. This corresponds to the MGMTCLAS JCL parameter. |
| Msvgp | Enter the MSVGP parameter. This corresponds to the MSVGP JCL parameter. |
| Recfm | Enter the record format to be used. In addition, this entry determines whether the data are printed with ASA/machine code or without carriage control characters. |
| Retpd | Enter the RETPD parameter. This corresponds to the RETPD JCL parameter. |
| Space | Enter the SPACE parameter. This corresponds to the SPACE JCL parameter. |
| Storclas | Enter the STORCLAS parameter. This corresponds to the STORCLAS JCL parameter. |
| Unit | Enter the Unit type. |
| Volser | Enter the Volser where the dataset is located. |
| Work file | This entry is made automatically according to the record format (RECFM) used. |
| Attribute | Explanation | |
|---|---|---|
| Service | Enter the name of the label in member SATSRV in library SYSSATU which identifies the set of attributes needed for client/server communication with the print server running under z/OS or Windows. To use different members specify <member.label>. | |
| Barcode | Enter the name of the BARCODE resource to be used. | |
| Cond. processing | Specifies the maximum nesting level for conditional processing. If it is AFP, this value is always 1. With PFM, the maximum value is 32767. | |
| Destination | Name of a logical destination as defined in ECL. | |
| Disposition | Hold | Hold before print. |
| Keep | Keep after print. | |
| Delete | Delete after print. | |
| Formdef | Enter the name of the FORMDEF resource if the output is to be formatted. | |
| Pagedef | Enter the name of the PAGEDEF resource if the output is to be formatted. | |
| Trc | Enter YES if your print file contains font indices. | |
| Trace | Enter YES to activate the trace facility. The trace output will be written to the ESY log. | |
| Attribute | Explanation |
|---|---|
| Recipient | Enter up to 10 e-mail addresses to which to send the report. Enter the "at" sign "@" as "(a)". |
| Recipient-CC | Enter up to 10 e-mail addresses to which to send the report as "CC" (carbon copy). Enter the "at" sign "@" as "(a)". |
| From | This is the name which will appear as the sender of the e-mail. |
| Node | This Entire System Server node will be used
for sending. It can be different from the node the Entire Output Management
monitor uses.
Notes:
|
| Encrypt | In an NPR version above 321 you will be able to encrypt the e-mail message, if you enter "Y" here. |
| Subject | The subject of the e-mail to be sent. |
| Attribute | Explanation |
|---|---|
| Printer Profile | Enter the name of a Natural Advanced Facilities Logical Printer Profile (LPF). The LPF determines which printer is used. For further information, see the Natural Advanced Facilities documentation. |
| CC Table | Enter the PROFILE parameter. For further information, see the Natural Advanced Facilities documentation. |
| Forms | Enter the FORMS parameter. For further information, see the description of the DEFINE PRINTER statement in the Natural documentation. |
| Listname | Enter the NAME parameter. For further information, see the description of the DEFINE PRINTER statement in the Natural documentation. |
| Disposition | Enter the DISP parameter (DEL/HOLD/KEEP). For further information, see the description of the DEFINE PRINTER statement in the Natural documentation. |
| Attribute | Explanation |
|---|---|
| Orig. attributes | Should original print attributes be used? Enter YES/NO. |
| Chars-modification | Should all character set characteristics be used or only certain ones? Enter YES/NO. |
| Chars | Enter one or several character sets to be used for printing. |
| Class | Enter job class to be used for the SPOOLOUT job. |
| Control | Determines whether control characters specific to laser printers should be used. |
| Destination | Determines logical printer to be used. |
| Dia | Enter the Formulardia to be used. |
| Document-format | Specifies the type of the document contents. |
| Fob | Enter the Forms Overlay Buffer (FOB) for overlaying printed pages with text and pictures. |
| Form | Enter the type of form to be used. |
| Header | Determines whether a header line should be printed on each page. |
| Image | Enter the name of a parameter file containing LOOP-, FOB- and CHARS-POOL sets. |
| Lines | Enter the number of lines to be printed on a page. |
| Loop | Enter the name of the LOOP set to be loaded in the carriage information buffer of the printer. |
| Pagecc | Determines whether control characters should be evaluated. |
| Pname | Job name for the SPOOLOUT job. |
| Rotation | Allows page rotation for output on laser printers. |
| Rotation-loop | Enter the name of loop for output in landscape format. |
| Shift | Enter the number of columns by which the output text should be indented. |
| Space | Determines the number of line feeds or the type of carriage control characters contained. |
| Text | This is stored in the SPOOL Control Block (SCB) for the processing of system exits. |
| Transl.Table | Enter the code translation table to be activated. |
| Tray | Enter the number of the tray from which to extract paper for printing. |
| Attribute | Explanation |
|---|---|
| Burst | Enter the BURST parameter. This corresponds to the BURST JCL parameter. |
| Chars | Enter one or more 4-byte character set names as in JCL. |
| Ckptline | Enter the maximum lines in a logical page. This corresponds to the CKPTLINE JCL parameter. |
| Ckptpage | Enter the number of logical pages to be printed before JES takes a checkpoint. This corresponds to the CKPTPAGE JCL parameter. |
| Ckptsec | Specify how many seconds of printing are to elapse between each checkpoint for the SYSOUT dataset. This corresponds to the CKPTSEC JCL parameter. |
| Class | Enter a one-character JES output class for the printout. |
| Compact | Enter the COMPACT parameter. This corresponds to the COMPACT JCL parameter. |
| Datack | Enter the DATACK parameter. This corresponds to the DATACK JCL parameter. |
| Dcb | Enter the DCB parameter. This corresponds to the DCB JCL parameter. |
| Destination | Enter the JES destination parameter. |
| Fcb | Enter the Forms Control Buffer. This corresponds to the FCB JCL parameter. |
| Flash | Enter the FLASH parameter. This corresponds to the FLASH JCL parameter. |
| Formdef | Enter the name of the library member that PSF uses in printing on a page-mode printer. |
| Forms | Enter the name of the form. This corresponds to the FORMS JCL parameter. |
| Index | Enter the INDEX parameter. This corresponds to the INDEX JCL parameter. |
| Lindex | Enter the LINDEX parameter. This corresponds to the LINDEX JCL parameter. |
| Lrecl | Enter the LRECL parameter. This corresponds to the LRECL JCL parameter. |
| Modify | Enter the MODIFY parameter. This corresponds to the MODIFY JCL parameter. |
| Pagedef | Enter the name of the library member that PSF uses in printing on a page-mode printer. |
| Prmode | Enter the PRMODE parameter. This corresponds to the PRMODE JCL parameter. |
| Recfm | Enter the RECFM parameter. This corresponds to the RECFM JCL parameter. |
| Trc | Enter the TRC parameter. This corresponds to the TRC JCL parameter. |
| Ucs | Enter the UCS parameter. This corresponds to the UCS JCL parameter. |
| Work file | This entry is made automatically according to the record format (RECFM) used. |
| Attribute | Explanation |
|---|---|
| Burst | Enter the BURST parameter. This corresponds to the BURST JCS parameter. |
| Chars | Enter one or more 4-byte character set names as in JCS. |
| Class | Enter a one-character POWER output class for the printout. |
| Cmpact | Enter the CMPACT parameter. This corresponds to the CMPACT JCS parameter. |
| Destination | Enter the POWER destination parameter. |
| Delt | Enter the DELT parameter. This corresponds to the DELT JCS parameter. |
| Disp | Enter the DISP parameter. This corresponds to the DISP JCS parameter. |
| Fcb | Enter the Forms Control Buffer. This corresponds to the FCB JCS parameter. |
| Flash | Enter the FLASH parameter. This corresponds to the FLASH JCS parameter. |
| Form | Enter the name of the form on which the Report or Bundle is to be printed. This corresponds to the FORM JCS parameter. |
| Jsep | Enter the JSEP parameter. This corresponds to the JSEP JCS parameter. |
| Modify | Enter the MODIFY parameter. This corresponds to the MODIFY JCS parameter. |
| Password | Enter the PWD parameter. This corresponds to the PWD JCS parameter. |
| Rbc | Enter the RBC parameter. This corresponds to the RBC JCS parameter. |
| Rbm | Enter the RBM parameter. This corresponds to the RBM JCS parameter. |
| Rbs | Enter the RBS parameter. This corresponds to the RBS JCS parameter. |
| Remote | Enter the REMOTE parameter. This corresponds to the REMOTE JCS parameter. |
| Sysid | Enter the SYSID parameter. This corresponds to the SYSID JCS parameter. |
| Ucs | Enter the UCS parameter. This corresponds to the UCS JCS parameter. |
| User | Enter the USER parameter. This corresponds to the USER JCS parameter. |
| Attribute | Explanation |
|---|---|
| Dataset | Enter the dataset name to be used. |
| Disp | Enter the Disposition parameter. |
| Blksize | Enter the block size to be used. |
| Recfm | Enter the RECFM parameter. This corresponds to the RECFM JCL parameter. |
| Lrecl | Enter the record length to be used. |
| Dcb | Enter the DCB parameter. This corresponds to the DCB JCL parameter. |
| Label | Enter the LABEL parameter. This corresponds to the LABEL JCL parameter. |
| Unit | Enter the Unit type. |
| Volser | Enter the Volser where the dataset is located. |
| Work file | This entry is made automatically according to the record format (RECFM) used. |
| Expiration | Enter the retention period for the dataset. |
| Attribute | Explanation |
|---|---|
| Dataset | Enter the dataset name to be used. |
| Volser | Enter the Volser where the dataset is located. |
| Unit | Enter the Unit type. |
| Disp | Enter the Disposition parameter. |
| Recfm | Enter the RECFM parameter. This corresponds to the RECFM JCL parameter. |
| Work file | This entry is made automatically according to the record format (RECFM) used. |
| Blksize | Enter the block size to be used. |
| Carriage control | Enter YES, if printing is to be done with carriage control. Enter NO, if not. |
| Expiration | Enter the retention period for the dataset. |
| Attribute | Explanation |
|---|---|
| Carriage control | Enter YES, if printing is to be done with carriage control. Enter NO, if not. |
| Form feed before | Enter the number of form feeds to be performed at the beginning of a printout. |
| Form feed after | Enter the number of form feeds to be performed at the end of a printout. |
| Trace | Enter YES, if you want a trace to be written by Entire System Server. |
| Logmode | Enter a special log mode, if desired. |
| Attribute | Explanation | |
|---|---|---|
| Service | Enter the name of the label in member SATSRV in library SYSSATU which identifies the set of attributes needed for client/server communication with the print server running under z/OS. To use different members, specify <member.label>. | |
| Barcode | Enter the name of the BARCODE resource to be used. | |
| Cond. processing | Specifies the maximum nesting level for conditional processing. If it is AFP, this value is always 1. With PFM, the maximum value is 32767. | |
| CR-Sequence | Enter the carriage return sequence. | |
| Destination | Enter the name of the destination spool queue. | |
| Device type | Enter the printer languages of your printer, for example, PCL4/PCL5. | |
| Disposition | Hold | Hold before print. |
| Keep | Keep after print. | |
| Delet | Delete after print. | |
| Form feed after | Enter the number of form feeds to be performed at the end of the output. | |
| Form feed before | Enter the number of form feeds to be performed at the beginning of the output. | |
| FF-Sequence | Enter the sequence for form feed. | |
| Frame | Enter the number of pages that make up a frame. Under Windows it is possible to divide a printout into several portions, so that the print manager can start printing while remaining portions are still being created. Control is also yielded to other tasks between each portion. | |
| LF-Sequence | Enter the sequence for line feed. | |
| Formdef | Enter the name of the FORMDEF resource, if the output is to be formatted. | |
| Pagedef | Enter the name of the PAGEDEF resource, if the output is to be formatted. | |
| Trc | Enter YES, if your print file contains font indices. | |
| Trace | Enter YES to activate the trace facility. The trace output will be written to the ESY log. | |
![]() To modify a defined logical printer:
To modify a defined logical printer:
Select the desired printer in the object workspace or in the bundle list.
Invoke the context menu and choose .
The logical printer definition is displayed, and you can make changes to it. The individual fields are described under Adding a New Logical Printer.
When you have finished making changes, choose the button to save your data.
![]() To display a defined logical printer:
To display a defined logical printer:
In the object workspace or in the printer list, select the desired printer.
Invoke the context menu and choose .
The definition of the logical printer is displayed. The individual fields are described under Adding a New Logical Printer.
![]() To rename a logical printer:
To rename a logical printer:
In the object workspace or in the report list, select the desired printer.
Invoke the context menu and choose .
Change the name of the selected printer, and press ENTER.
![]() To copy a logical printer:
To copy a logical printer:
In the object workspace or in the printers list, select the desired logical printer.
Invoke the context menu.
The Copy dialog appears.
Type the name of the target logical printer in the field provided and choose .
The new logical printer appears in the printers list.
![]() To delete a logical printer:
To delete a logical printer:
In the object workspace or in the printer list, select the desired printer.
Invoke the context menu and choose .
A dialog appears, asking you to confirm the deletion.
Choose to delete the printer, or to cancel the operation.
![]() To authorize user access to a logical printer:
To authorize user access to a logical printer:
In the object workspace or in the printer list, select the desired printer.
Invoke the context menu and choose .
The Authorization List appears:
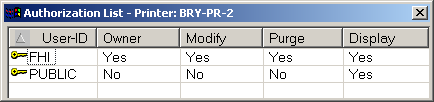
It lists all users and user groups on distribution lists who are authorized for the printer. It also displays their authorization level.
Invoke the context menu for the dialog and select .
The following dialog appears:
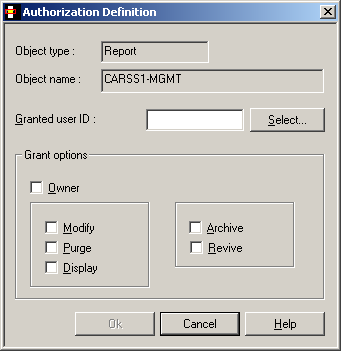
Enter data for the authorization. The fields are described under Authorizing User Access to a Report Definition.
When you are finished, choose to save your data.
![]() To display log information for a defined logical printer:
To display log information for a defined logical printer:
In the object workspace or in the printer list, select the desired printer.
Invoke the context menu and choose .
The following dialog appears:

![]() To display more detailed log information:
To display more detailed log information:
Select an entry from the log information dialog and invoke the context menu.
Choose .
A detailed log message for the selected entry will be displayed.
Physical (and logical) printers of type XML allow XML stylesheets to be merged with XML documents at print time. The output of an XML printer is always a dataset. On z/OS and compatible systems it is a disk file; on VSE it is a tape file; on OSD it is a print file. An XML printer has the same attributes as its equivalent dataset printer (DISKMVS, TAPEVSE or SYSPRBS2).
The stylesheet is resolved at print time as follows. If the document contains:
<?xml-stylesheet
href="[file://EOM/*]"...> |
the default stylesheet is taken from the definition of the report
being printed. For example, if the report is defined with a stylesheet of
HTTP://SERVER1/MYSTYLE.XLS, the document is adjusted at print time
to contain:
<?xml-stylesheet
href="[HTTP://SERVER1/MYSTYLE.XLS]"...> |
Stylesheets can also be stored as source members in SYSNOMU. In this case the document (or report definition) may specify something like:
<?xml-stylesheet
href="[file://EOM/SYSNOMU/MYSTYLE]"...> |
This print line is suppressed and the contents of MYSTYLE from library
SYSNOMU are inserted in its place. This implies that, for this method of
inserting a stylesheet, the <?xml-stylesheet...> must be on
a line of its own.
The two methods can be combined, so that the document itself refers to
file://EOM/*, which instructs the print task to take the
stylesheet URL from the report definition. The report definition then specifies
FILE://EOM/SYSNOMU/MYSTYLE, which instructs the print task to
suppress the <?xml-stylesheet...> and insert the contents of
MYSTYLE.
Additionally, a printer exit can specify the stylesheet by inserting a
record containing the URL of the stylesheet to be used. The printer exit may
not specify file://EOM/* but it can specify
FILE://EOM/SYSNOMU/MYSTYLE. The contents of any inserted
stylesheet are not passed to the printer exit. No stylesheet interpretation is
performed.