
This document covers the following topics:
A setup program is provided for installing Natural or Natural Runtime. This program decompresses the files contained on the installation medium, copies them to hard disk, and creates a Natural or Natural Runtime program folder. The setup program guides you step by step through the installation procedure with explanatory text available with all screens displayed.
The installation procedure is used for first-time installations of Natural or Natural Runtime as well as for update installations (in which case previous configuration information is used by the setup program).
With Natural Runtime, only a subset of the Natural features is installed. Natural Runtime and Natural are two entirely separate environments. The Natural Runtime installation procedure, however, is almost identical with the Natural installation procedure.
The actual installation process consists of two phases:
Configuration Phase
You are prompted to enter certain installation values; other values
are automatically included by the setup program. The installation parameters
are displayed for confirmation prior to the actual installation. During this
phase you may cancel the setup procedure at any time or step back to previous
dialogs. No changes to your system will occur during this phase.
Installation Phase
The setup program installs Natural according to the values you entered
during the configuration phase. The Natural shortcuts are created on your
Windows desktop.
Important:
You must have administrator rights to install Natural or Natural
Runtime.
Before you start the setup program, ensure that your system meets the requirements outlined in the section Installation Prerequisites.
![]() To run the setup program
To run the setup program
Close all active Windows applications.
Insert the Natural installation medium into the drive.
The setup program is automatically started and the initial installation screen appears.
Note:
If the autostart feature of your operating system is disabled,
execute Setup.exe which can be found in the root directory
of the installation medium.
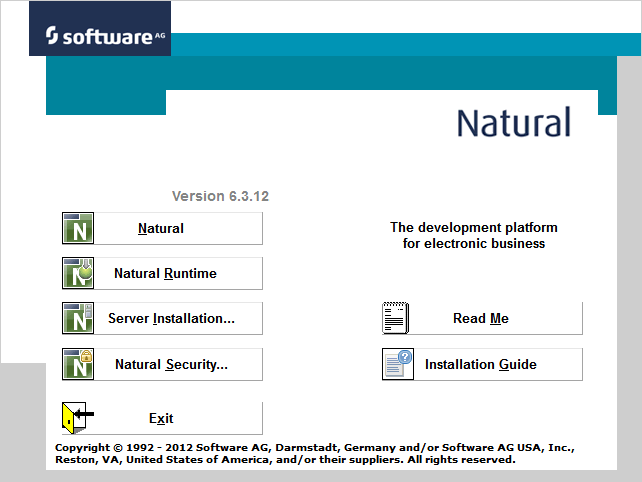
Choose either or in the initial installation screen.
The welcome screen for the selected product appears.
Choose the button to proceed.
Now, you will be guided through the installation for the select product. Proceed as described in the sections below.
Notes:
This section describes how to install Natural and Natural Runtime on a PC.
The following topics are covered below:
After the welcome screen, the license agreement screen is displayed. To proceed with the installation, you have to accept the terms in the license agreement.
Choose the button to proceed.
In this screen, you enter your customer information.
Enter your user name.
Enter the name of your organization.
Specify the path to the XML file which contains your license key.
You can overwrite the default with an alternative path to your license key file or change it by choosing the Browse button.
Choose the button to proceed.
This screen appears only if the installation routine detects an older version of Natural or Natural Runtime on your system.
In this screen, you can specify whether you want to migrate your parameter files to the newest version of Natural.
If you migrate your parameter files to the newest version of Natural,
the parameter files are transferred and the FNAT and steplib
settings are changed where necessary. The FUSER will remain
unchanged and cannot be modified during the installation procedure.
Select either No migration or the Natural version that you want to migrate.
Choose the button to proceed.
In this screen, you select the setup type that best suits your needs. Different screens appear for Natural and Natural Runtime:
Note:
The setup type Development Client for Single Point of
Development (SPoD) is not available in a Natural Runtime
installation.
This screen appears when you install Natural.
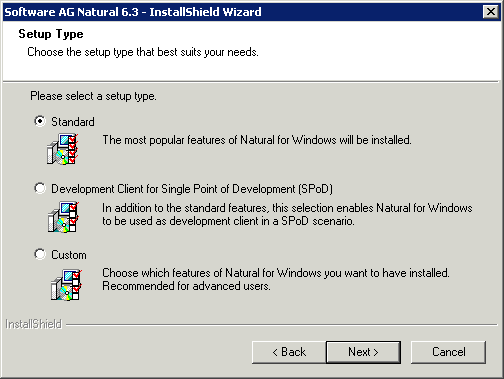
Select one of the following setup types:
Standard
If you select this setup type, Natural is installed including the
following features:
Reporter
Help Compiler
Example Libraries
Development Client for Single Point of Development
(SPoD)
If you select this setup type, Natural is installed including all
standard features plus the following:
Terminal Emulation
Natural Development Client (SPoD) which includes the following:
Application Wizard
Metrics and XRef Viewing
Object Description
Program Generation
Schema Generation
XRef Evaluation
Object Versioning
Web I/O Interface client
Custom
If you select this setup type, a screen appears where you can
choose the features you want to install. The standard features are
preselected.
Installable features are:
Example Libraries
Remote Debugger
Samples
Reporter
Help Compiler
Natural Development Client (SPoD)
Web Interface (SYSWEB3)
Natural for Tamino (requires a separate license key file; if you choose to install this feature, you will be prompted to provide the license key file)
Mainframe Navigation
Output Management GUI Client
Entire Operations GUI Client
Object Compare
Local Versioning
Trace and debug files
Web I/O Interface service
Natural Development Server (requires a separate license key file; if you choose to install this feature, you will be prompted to provide the license key file)
Natural for Ajax Tools
Choose the button to proceed.
This screen appears when you install Natural Runtime.
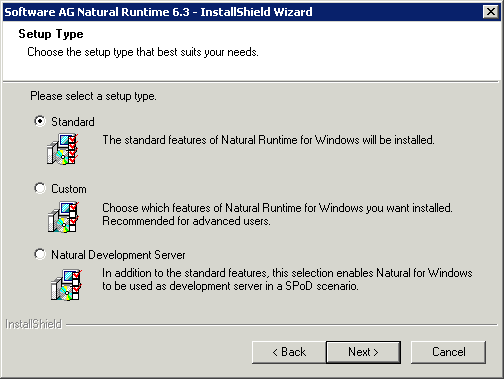
Select one of the following setup types:
Standard
If you select this setup type, Natural Runtime is installed
including the following features:
Natural Environment
Reporter
Custom
If you select this setup type, a screen appears where you can
choose the features you want to install. The standard features are
preselected.
Installable features are:
Reporter
Web Interface (SYSWEB3)
Natural for Tamino (requires a separate license key file; if you choose to install this feature, you will be prompted to provide the license key file)
Mainframe Navigation
Output Management GUI Client
Entire Operations GUI Client
Trace and debug files
Web I/O Interface service
Natural Development Server (requires a separate license key file; if you choose to install this feature, you will be prompted to provide the license key file)
Natural Development Server
If you select this setup type, Natural Runtime is installed
including all standard features plus the following:
Natural Development Server (requires a separate license key file; you will be prompted to provide it. You will also be prompted to provide a port number)
Choose the button to proceed.
In this screen, you specify the destination folder to which Natural or Natural Runtime will be installed. This folder must reside on a local disk drive.
The default path is displayed according to your
%ProgramFiles% system variable setting:
%ProgramFiles%\Software AG\product-name
where product-name is either "Natural" or "Natural Runtime".
You can change this path by choosing the Browse button.
Choose the button to proceed.
When you have selected the setup type Custom, a screen appears in which you have to select the features that are to be installed. Continue reading the section Additional Installation Steps for Custom Setup and then continue with the steps below.
When you have not selected the setup type Custom, continue reading with the steps below.
In this screen, your current settings and the features to be installed are displayed for reviewing.
Confirm the settings by choosing the button. The files are then copied to your system. The progress of the setup status is shown. The Natural or Natural Runtime shortcuts are created on your Windows desktop.
Or review your choices by choosing the button.
Or choose to exit the setup program.
After the files have been copied to your system, the last screen appears. You can display the Readme information now or later.
Complete the installation process by choosing the button.
The latest information will be displayed, unless you deselect this option.
You can restart your computer now or later. It is recommended to restart it now.
Continue reading the section Starting Natural or Natural Runtime.
The information in this section applies to the setup type Custom.
After you have defined the destination location, you have to select the features to be installed. Depending on your choice of features, further information may be required. This section describes all screens which may appear with the setup type Custom.
After the last screen described in this section has been displayed, continue reading with the above step Ready to Install.
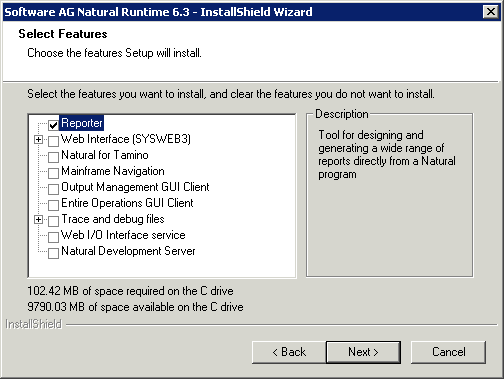
In this screen, the standard features to be installed are preselected. You can add or remove features according to your needs. Different screens appear for Natural and Natural Runtime:
This screen appears when you install Natural.
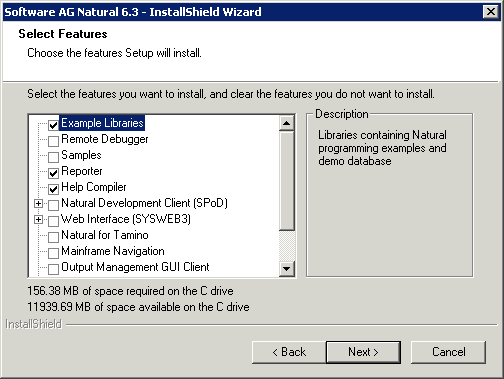
Select the features you want to install.
Choose the button to proceed.
This screen appears when you install Natural Runtime.
Select the features you want to install.
Choose the button to proceed.
In this screen, the values for the database IDs and file numbers for
FUSER
and FNAT and the default path for the
FUSER directory are displayed. Example for Natural:
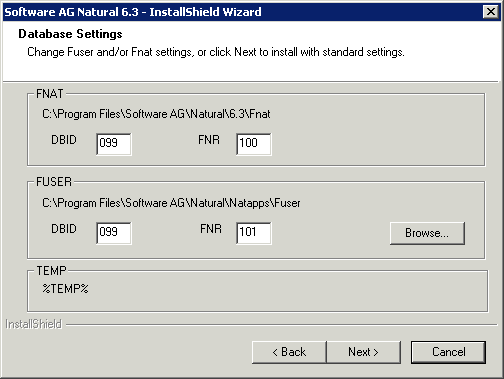
You can change the FUSER settings by choosing the
button.
Choose the button to proceed.
This screen appears only if you have selected the feature Remote Debugger (not available with Natural Runtime). The default port for the Remote Debugger is displayed.
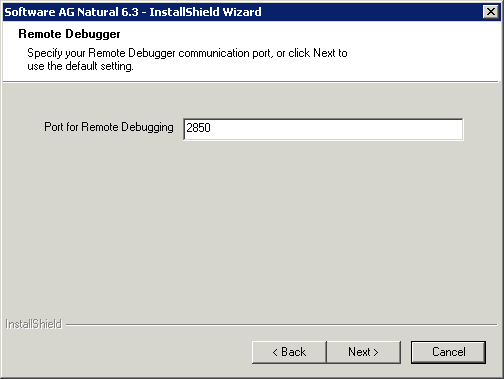
You can enter a value for the Remote Debugger communication port (TCP port).
Values between 0 and 65535 are valid. The default value is 2850.
Choose the button to proceed.
Note:
Unlike on Windows without Terminal Services activated, the Natural
Remote Debugger Service is not installed as a Windows Service. However, in
order to use it for debugging Natural programs remotely, it can be started via
the Windows menu (). After
starting the remote debugging service in this fashion, a dialog will appear
displaying the port ID that must be used with the RDPORT
parameter in the remote Natural session. For further information on how to use
the Remote Debugger, refer to the
Debugger documentation.
This screen appears only if you have selected the feature Web I/O Interface service. The default port for the Web I/O Interface service is displayed.
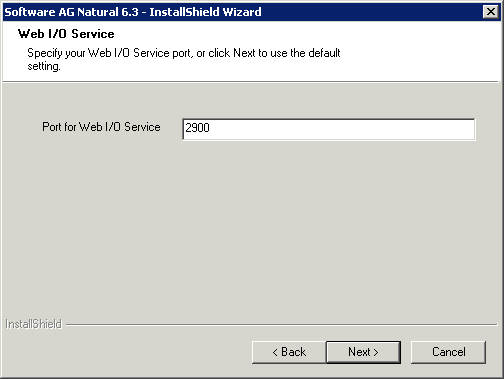
You can enter a value for the Web I/O Interface service port (TCP port).
Values between 0 and 65535 are valid. The default value is 2900.
Choose the button to proceed.
This screen appears only if you have selected the feature Web Interface. Example for Natural:
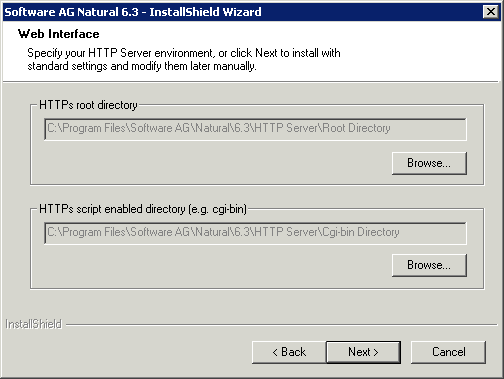
In this screen, you can verify the HTTP server root directory and the HTTP server script enabled directory for the Web Interface.
The paths shown in the screen are displayed according to your
%ProgramFiles% system variable setting.
If necessary, choose the buttons to change the paths.
Choose the button to proceed.
This screen appears only if you have selected the feature Web Interface and have selected the HTTP server extensions for Apache. Example for Natural:
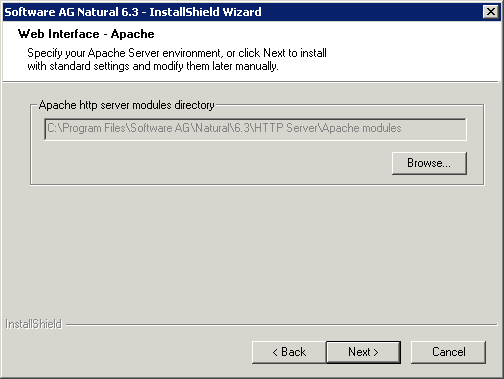
In this screen, you can verify the Apache HTTP server bin directory for the Web Interface.
The path shown in the screen is displayed according to your
%ProgramFiles% system variable setting.
If necessary, choose the button to change the path.
Choose the button to proceed.
This screen appears only if you have selected the feature Natural for Tamino. Example for Natural:
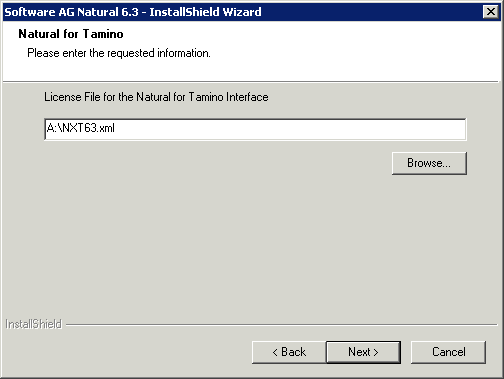
In this screen, the path and file name of your Natural for Tamino license key file is required.
If necessary, choose the button to change the path.
Choose the button to proceed.
This screen appears only if you have selected the feature Natural Development Server. Example for Natural:
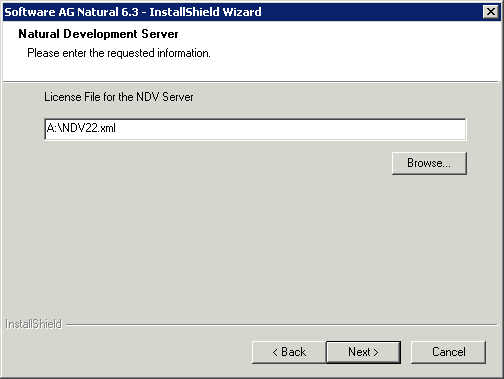
In this screen, the path and file name of your Natural Development Server license key file is required.
If necessary, choose the button to change the path.
Choose the button to proceed.
In the resulting screen, the default port for the Natural Development Server is displayed.
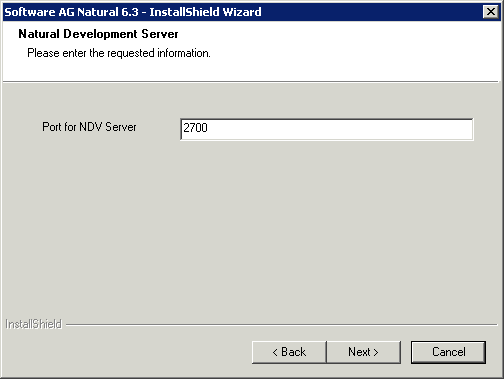
You can enter a value for the Natural Development Server port (TCP port).
Values between 0 and 65535 are valid. The default value is 2700.
Choose the button to proceed.
When the Natural Development Server is installed, it is automatically added as an allowed program to the Windows firewall.
Continue reading with the step Ready to Install earlier in this section.
Once the installation process is completed, you can start a Natural or Natural Runtime session.
For Natural, shortcuts for the following product components have been created on your Windows desktop:
If you would like to read more about using Natural, refer to First Steps with Natural.
For Natural Runtime, shortcuts for the following product components have been created on your Windows desktop:
Before using Natural or Natural Runtime, however, you may need to set up parameters and individual settings depending on your environment. If you wish to do so, see Profile Parameter Usage in the Operations documentation. For information on transferring Natural objects from another platform (for example, UNIX), see Object Handler in the Tools and Utilities documentation.
Note:
When Natural or Natural Runtime has been installed in an environment
protected by the Windows firewall and can therefore not be started, see
Configuring the
Microsoft Windows Personal Firewall to Run Natural in the
Operations documentation.
![]() To start Natural
To start Natural
From the Windows menu, choose .
Or:
Use the following shortcut on your Windows desktop.
![]()
Or:
Execute the file natural.exe which is stored in
Natural's bin directory. For example:
C:\Program Files\Software AG\Natural\n.n\bin\
where n.n is the current version number.
Natural Studio, the development environment for Natural, appears.
Note:
Dynamic parameters can be added when Natural is started from a
shortcut.
![]() To start Natural Runtime
To start Natural Runtime
From the Windows menu, choose .
Or:
Use the following shortcut on your Windows desktop.
![]()
Or:
Execute the file naturalr.exe which is stored in
Natural Runtime's bin directory. For example:
C:\Program Files\Software AG\Natural Runtime\n.n\bin
where n.n is the current version number.
Note:
Dynamic parameters can be added when Natural Runtime is started
from a shortcut.
You can modify, repair or remove a Natural or Natural Runtime installation at any time after it has been installed.
Choose the Add/Remove Programs feature of your operating system.
In the list of currently installed programs, select Software AG Natural n.n or Software AG Natural Runtime n.n (where n.n is the current version number).
Choose the button.
The following screen appears (example for Natural).
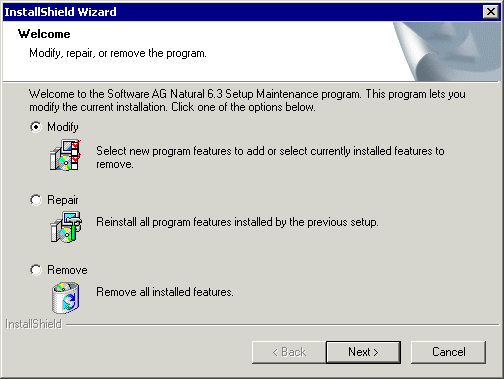
Select the required option button and choose the button. See the descriptions below for further information.
The Select Features screen of the custom installation will be displayed. There you can change your former choice of features. The features that are currently installed are selected. You can add or remove features by selecting or deselecting the corresponding check boxes. If you add new features, the installation will step-by-step prompt you for further input in accordance with your choice, as described above beginning in section Select Features.
If you deselect features, they will be uninstalled.
The repair feature allows you to repair your installed Natural or Natural Runtime environment, for example if application binaries were deleted by mistake or your system files are incomplete.
Note:
If there are damaged or incorrect entries in the Registry or
configuration files, the repair function may not be able to repair this. Then
it will be necessary to re-install the environment.
Using this feature you can uninstall your Natural or Natural Runtime environment.
If Natural or Natural Runtime is already installed on your PC and you want to install a newer update package or fix for the same version number, proceed as described below.
Notes:
Important:
If you are using the Natural Web I/O Interface,
make sure that the required version of Microsoft .NET Framework has already
been installed on your PC before you start the update installation.
The required version is listed under Software in the
section Installation Prerequisites.
![]() To update your environment
To update your environment
Start the update installation in the same way as a new installation by executing setup.exe from the installation medium.
Choose the product you want to install.
The welcome screen is displayed.
Choose the button to proceed.
A message appears asking if you wish to update Natural or Natural Runtime.
If you choose , your version will be replaced by the newer version. The former version will be uninstalled and subsequently the new update package or fix will be installed using the same settings as your former installation.
The new version will provide the same features as the former version. If you wish to change them, you can use the Modify function described in section Maintaining Your Natural or Natural Runtime Environment after the installation has been executed successfully.
It is possible to record an installation process in order to replay it on other PCs using the same user input as entered during the recorded installation. Since a replayed installation does not require any additional user interaction, no user interface is displayed.
![]() To record a silent installation
To record a silent installation
Use the following command:
x:\WINDOWS\NAT\Setup.exe /r -f1"%TEMP%/Natnnn.iss
where x stands for the letter of your disk drive containing the Natural installation medium and nnn stands for the current version number of Natural.
As a result of this installation, you will find the file Nat<nnn>.iss in your temp directory. This file can be used for silent installations of the same Natural environment on other PCs.
![]() To start a silent installation
To start a silent installation
Use the following command:
x:\WINDOWS\NAT\Setup.exe /s -f1"%TEMP%/Natnnn.iss
where x stands for the letter of your disk drive containing the Natural installation medium and nnn stands for the current version number of Natural.
After a silent installation of Natural is completed, a setup.log file is written to the same location as the Nat<nnn>.iss record file. Review this log and look for one of the following results:
| Setup Code | Explanation |
|---|---|
| 0 | Successful installation. |
| 1 | General error. |
| 2 | Invalid mode. |
| 3 | Required data not found in the Nat<nnn>.iss. |
| 4 | Insufficient memory. |
| 5 | File does not exist. |
| 6 | Cannot write to the response file. |
| 7 | Unable to write to the log file. |
| 8 | Invalid path to the InstallShield Silent response file. |
| 9 | Not a valid list type (string or number). |
| 10 | Data type is invalid. |
| 11 | Unknown error during setup. |
| 12 | Dialogs are out of order. |
| 51 | Cannot create the specified folder. |
| 52 | Cannot access the specified file or folder. |
| 53 | Invalid option selected. |
If any errors occur during a silent installation, an error log can be found and reviewed in the following directory:
%TEMP%/NATnnnInst.log
where nnn stands for the current version number of Natural.