
The System Maintenance function is used to define and maintain system defaults, and to manage the use of Con-nect within your environment.
This document covers the following topics:
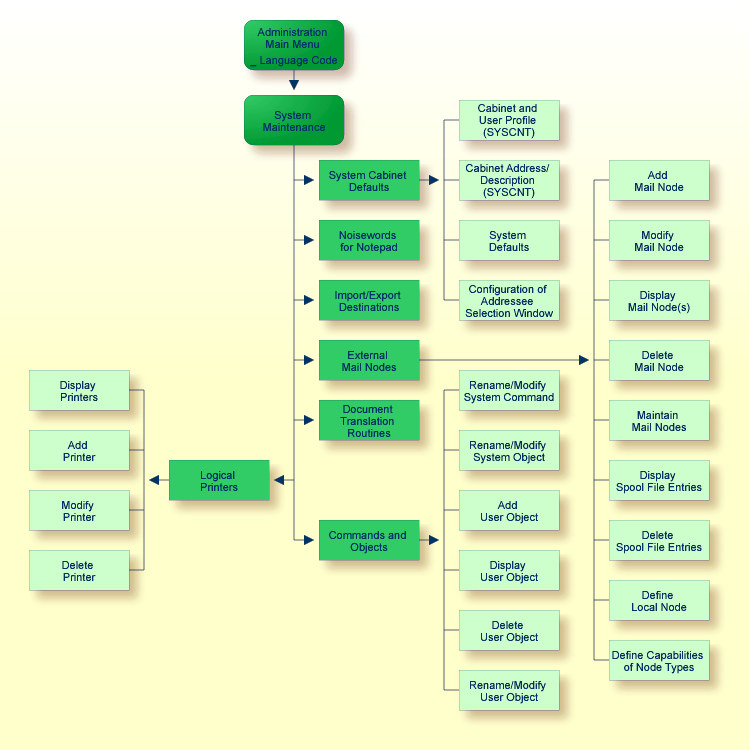
The following diagram shows the path you must take to invoke each aspect of System Maintenance.
All functions which can be performed within System Maintenance are shown on the "Administration - System Maintenance" screen.
  12:23                * * *  C O N - N E C T  3  * * *                14.Feb.94
  Cabinet LS           Administration - System Maintenance                A06700


  Select a Function:     _ System Cabinet Defaults

                         _ Noisewords for Notepad

                         _ Import/Export Destinations

                         _ External Mail Nodes

                         _ Document Translation Routines

                         _ Logical Printers

                         _ Commands and Objects

                         _ Return to Menu


 Enter-PF1---PF2---PF3---PF4---PF5---PF6---PF7---PF8---PF9---PF10--PF11--PF12---
       Help  Menu  Quit  Sys   Noise Dest  Nodes Trans Print Cmd
Mark one item from the list above |
To perform one of the System Maintenance functions, either mark it with any character and press ENTER, or press the PF-key which is assigned to that function. The screen for the function is then displayed.
The Noisewords for Notepad, Import/Export Destinations, Document Translation Routines, and Commands and Objects functions are language-specific, and are thus performed for the language specified in the "Language Code" field on the "Administration - Main Menu". You can only specify codes for languages that have been installed on your system. The language codes are as follows:
| 1 | English |
| 2 | German |
| 3 | French |
| 4 | Spanish |
| 5 | Italian |
| 6 | Dutch |
| 7 | Turkish |
| 7 | Icelandic |
| 7 | Finnish |
| 7 | Swedish |
| 8 | Danish |
| 8 | Hebrew |
| 9 | Norwegian |
| 9 | Portuguese (Brazilian) |
| 9 | Arabic |
| 9 | Russian |
The System Cabinet Defaults are taken as a basis for all cabinets within the system, and include the following:
cabinet profile and address
cabinet and user profile of cabinet SYSCNT
cabinet address/description of cabinet SYSCNT
system defaults
the name that appears on all screens (the default is: * * * C O N - N E C T 3 * * *)
the CPU timezone relative to Greenwich Mean Time
the number of days an item is kept in the Wastebasket
the number of days until the expiration date of an item is reached
whether an item is to be archived when the expiration date is reached
whether the cabinet ID or a specific string cannot be defined as a password
facility to trace cabinet usage
Con-nect TRS profile (if TRS is installed)
information which is to be displayed in the addressee selection window.
The "Administration - System Cabinet Defaults" screen is shown below. Mark the function you want to access with any character and press ENTER, or press the assigned PF-key.
  12:08 PM              * * *  C O N - N E C T  3  * * *               14.Feb.94
  Cabinet LS        Administration - System Cabinet Defaults              A06701


  Select a Function:


                         _ Cabinet and User Profile (SYSCNT)

                         _ Cabinet Address / Description (SYSCNT)

                         _ System Defaults

                         _ Configuration of Addressee Selection Window

                         _ Return to Menu


 Enter-PF1---PF2---PF3---PF4---PF5---PF6---PF7---PF8---PF9---PF10--PF11--PF12---
       Help  Menu  Quit  Prof  Addr  Def   AdrSe                         CmdOb
 Mark one item from the list above
|
The values you specify here are default values for all cabinets within your system. You can modify these values for all or individual cabinets.
Note:
Global changes to the command and object table can be accomplished
with PF12. See Global
Activation / Deactivation of Commands and Objects.
The information below contains the following topics:
Neither the cabinet administrator nor the user is allowed to change any of the specifications within the cabinet and user profile of SYSCNT. However, when a new cabinet is created, the cabinet administrator can modify the specifications within the constraints you allow here for that cabinet. Additionally, the cabinet administrator can authorize the user to modify some of the specifications by permitting use of the command MODIFY with the object Profile in the Command and Object Table function of Cabinet Maintenance.
The "Administration - Cabinet Profile SYSCNT" screen is shown below. The profile that you specify in this screen is taken as a basis for all cabinets within your system, except for those cabinets you create by copying pattern cabinets. Administrator status (cabinet and system maintenance functions) is not copied to the new cabinets.
  12:18 PM              * * *  C O N - N E C T  3  * * *               14.Feb.94
  Cabinet LS            Administration - Cabinet Profile                  A06052
                                         SYSCNT
  Password:
  Security:   Read 7   Modify 7   Copy 7   Print 7

  Send:       Max. Number of Addressees 9999
                          Address Level 9 may send _ levels higher

  Permitted:                X Cabinet Maintenance
  (mark to allow)           X System Maintenance
                            X Command Prompting
                            X Con-form
                            X Text Retrieval (TRS)
                            X Modify Own Address
                            X Display Home Addresses
                            X Send External Mail
                            X Modify Expiration Date
                            X Read Mail


 Enter-PF1---PF2---PF3---PF4---PF5---PF6---PF7---PF8---PF9---PF10--PF11--PF12---
       Help  Menu  Quit
 Modify the profile and press ENTER
|
The password and security protects the cabinet and objects within it from unauthorized access. The password is the only value within the SYSCNT cabinet profile that can be modified by a user. It is recommended that every user modifies his password with the "MODIFY Profile" command sequence in Con-nect to protect his cabinet.
See Cabinet and User Profile for a description of the above screen.
The "Administration - User Profile" screen is shown below. To access it, you must press ENTER on the "Administration - Cabinet Profile SYSCNT" screen.
Note:
You can only modify the user profile for cabinet SYSCNT from the
screen below, since the command MODIFY with the object Profile is not allowed
when cabinet SYSCNT is accessed.
With the exception of the sliding window value (defined in the "Date and Time Formats" window), the user profile SYSCNT is copied to all new cabinets, and can then be modified for the new cabinet by the cabinet administrator. If the cabinet administrator authorized him, the user can also modify these specifications.
The "Mark to use system value" field in the "Date and Time Formats" window is initially marked as the sliding window value for all new cabinets. The number to the right of this field is the system default value defined in the "Administration - System Defaults" screen in either the "Con-nect sliding window" or "Use Natural YSLW ( 0 )" field. For further information, see System Defaults and Date and Time Formats.
The sliding window value you define in the user profile SYSCNT is independent of the system default value (i.e. it is used only in the SYSCNT cabinet).
   9:56                 * * *  C o n - n e c t  3  * * *               16.Oct.03
  Cabinet LS             Administration - User Profile                    A06052
                                          SYSCNT

    Date and Time Formats      _

    Print Defaults             _

    Language/Command/Autosave  _

    Folders                    _

    Menu and Overlay Calendar  _

    Screen Colors              _

    Con-nect Version           _


 Enter-PF1---PF2---PF3---PF4---PF5---PF6---PF7---PF8---PF9---PF10--PF11--PF12---
       Help  Menu  Quit
Mark profile items to modify and press ENTER |
Choose the area(s) you want to modify by marking the input field(s) with any character and pressing ENTER. A window appears where you can modify the default specifications by typing over them. After you have completed your modifications press ENTER. (If you selected more than one area to modify, the next window will appear, and you can continue modifying the profile.)
See User Profile in section Cabinet Maintenance for a description of the various components of the profile shown in these screens.
The "Modify Address" screen for the work address is shown below.
For information on the fields in the following screens, see Cabinet Address/Description in section Cabinet Maintenance.
  11:29               * * *  C O N - N E C T  3  * * *               21.Dec.2000
  Cabinet LS                     Modify Address                           A06010

  Default System Address (copied for all new users)

        Company ________________________________  Title ________________________
     Department ________________________________ Number __________
       Location ________________________________
        Address ____________________________________________________________
                ____________________________________________________________
                ____________________________________________________________
           City ________________________________  ________
    Postal Code __________ Country ________
        Phone 1 ___ _______________ _____      Phone 2 ___ _______________ _____
         Mobile ___ _______________ _____          Fax ___ _______________ _____


         E-mail ________________________________________________________________
       Internet ________________________________________________________________
                                                Miscellaneous _   Home Address _

 Enter-PF1---PF2---PF3---PF4---PF5---PF6---PF7---PF8---PF9---PF10--PF11--PF12---
       Help  Menu  Quit
System record(s) have been updated |
Mark the "Miscellaneous" field to display the "Modify Miscellaneous " screen.
  12:05               * * *  C O N - N E C T  3  * * *                7.Feb.2001
  Cabinet LS                  Modify Miscellaneous                        A06010

  Default System Address (Miscellaneous is copied for all new users)


         Header Description
   ____________ ________________________________________________________________
   ____________ ________________________________________________________________
   ____________ ________________________________________________________________
   ____________ ________________________________________________________________
   ____________ ________________________________________________________________
   ____________ ________________________________________________________________
   ____________ ________________________________________________________________
   ____________ ________________________________________________________________
   ____________ ________________________________________________________________
   ____________ ________________________________________________________________
  Copy from Cabinet ________   Mark Headers _ or All _            Confirm Copy _

                                                 Work Address _   Home Address _

 Enter-PF1---PF2---PF3---PF4---PF5---PF6---PF7---PF8---PF9---PF10--PF11--PF12---
       Help  Menu  Quit
System record(s) have been updated |
Mark the "Home Address" field to display the "Modify Home Address" screen.
  10:48               * * *  C O N - N E C T  3  * * *               22.Jan.2001
  Cabinet LS                  Modify Home Address                         A06010

  Default System Address

   Home Address ____________________________________________________________
                ____________________________________________________________

           City ________________________________  ________
    Postal Code __________ Country ________

          Phone ___ _______________ _____
            Fax ___ _______________ _____

         E-mail ________________________________________________________________


                                                 Work Address _  Miscellaneous _

 Enter-PF1---PF2---PF3---PF4---PF5---PF6---PF7---PF8---PF9---PF10--PF11--PF12---
       Help  Menu  Quit
Modify the address as required and press ENTER to update |
As with the SYSCNT cabinet and user profile, the values specified on these three screens, including the Miscelleaneous information, are copied to all new cabinets. The home address itself is not copied to the new cabinets.
Make your entries and press ENTER to update the system address.
The "Administration - System Defaults" screen is shown below. Modify the defaults shown by typing over them.
   4:21 PM            * * *  C O N - N E C T  3  * * *                 12.Mar.98
  Cabinet LS             Administration - System Defaults                 A06701

               System Name   * * *  C O N - N E C T  3  * * *
                           ....+....1....+....2....+....3....+....4

              CPU Timezone 1   (relative to Greenwich Mean Time)
       Days in Wastebasket 60          Days until Expiration   365
   Con-nect sliding window __     or   Use Natural YSLW( 0  )  X

       Trace Cabinet Usage X           Archive on Expiration   x
   Force to check Password _           Days between registered Backup
                                       and Cabinet Deletion
  Con-nect TRS profile
                 Limit to  220   text blocks to invert online
                 Limit to  200   entries to be alphabetized
                 Limit to  2000  entries per FIND criteria
          Usage within API  _


 Enter-PF1---PF2---PF3---PF4---PF5---PF6---PF7---PF8---PF9---PF10--PF11--PF12---
       Help  Menu  Quit  Prof  Addr
 Make required changes and press ENTER to modify
|
- System Name
The name which appears at the top of all screens.
- CPU Timezone
The timezone CPU is located, relative to Greenwich Mean Time. For example, in New York you specify -6.
- Days in Wastebasket
The number of days an item is kept in the Wastebasket before it can be deleted from the system with a batch utility. This is used as the default value for utility B04130 "Delete Folder Contents". See Con-nect Utilities, section Delete Folder Contents for further information.
- Days until Expiration
The number of days until the expiration date of an item is reached, at which time it can be deleted from the system.
- Con-nect sliding window
The sliding window determines which two-digit year values belong to which century. The sliding window covers a period of 100 years. The start and end of the sliding window is determined by the value you enter in the "Con-nect sliding window" field or the value in the "Use Natural YSLW ( 0 )" field. As the range of the sliding window always begins in the past, the value you enter is automatically subtracted from the current year to determine the first year of the window range. To determine the last year of the sliding window, 99 is automatically added to the resulting year.
For example, if the current year is 2004 and you enter 40 as the sliding window, the sliding window will cover the years 1964 to 2063. In this case, a two-digit year value (nn) from 64 to 99 is interpreted as 19nn, while a two-digit year value (nn) from 0 to 63 is interpreted as 20nn.
You can enter a value from 0 to 99. The value you specify here is supplied as the system value that is copied to all new cabinets. For further information, see Date and Time Formats.
If you specify a value of 0, the sliding window mechanism is not used. This means that when a two-digit year is entered, Con-nect interprets it as in the current century.
To insure that the sliding window covers adequate time in the past and in the present, it is recommended that you do not set the sliding window to either the low or top end of the range. For example, if you set the sliding window to 2, the range of the sliding window will be (assuming the current year is 2004) 2002 to 2101. This means that when a user enters 95 as a two-digit year, Con-nect will interpret it as 2095 and not 1995.
If you enter a value here you cannot mark the "Use Natural YSLW ( 0 )" field.
- Use Natural YSLW ( 0 )
You can enter any character. The current value of the Natural YSLW parameter is the value displayed in parentheses. If you select this field, this value is supplied as the system value, which is copied to all new cabinets. For further information, see Date and Time Formats.
If you mark this field, you cannot enter a value in the "Con-nect sliding window" field.
- Trace Cabinet Usage
You can enter any character to specify that a record is to be kept of the last cabinet to logon to (use) another cabinet. Thus, Con-nect can generate three types of reports that display statistics on cabinet usage. See Con-nect Reports.
- Archive on Expiration
You can enter any character to specify that an item is to be archived onto a backup medium (tape, disc, etc.) when the expiration date is reached.
- Force to check Password
You can enter any character to specify that the cabinet ID or a specific string cannot be defined as a password. When this field is marked and you press ENTER, a window appears. In the window, you can specify one of the following:
- Cabinet
When this field is marked, it is not allowed to define the cabinet ID as the password.
- selected Constant
When a string (for example, SAG) is defined in this line, it is not allowed to define this string as the password.
Press ENTER to save your specifications and to close the window.
When this field is marked, the password is checked each time a user, or administrator defines a new password and when a user accesses a cabinet using the password.
When an invalid password is detected, an appropriate message is displayed and the user or administrator must define a new password.
- Days between registered Backup and Cabinet Deletion
You can specify the number of days between the last registered backup of a cabinet and its deletion.
This default can be used as a cabinet deletion control when you perform utility B04000 "Delete Objects". See Con-nect Utilities, section Delete Objects for further information.
The remaining fields appear only if Con-nect Text Retrieval is installed. See Con-nect Text Retrieval Administration.
The addressee selection window is available to each Con-nect user when sending objects to other users. It is used for example, if a user is unsure of the addressee's name or user ID, the user can invoke the addressee selection window to choose to whom the object is to be sent.
The addressee selection window contains information taken from each user cabinet address. Name, ID and Type are displayed by default in the addressee selection window. You can specify additional information that is to be displayed.
The "Administration - Configuration of Addressee Selection Window" screen is shown below.
  12:27 PM             * * *  C O N - N E C T  3  * * *                14.Feb.94
  Cabinet LS        Administration - Configuration of Addressee           A06704
                                     Selection Window

                      Position   Length   Information

                      __         __       Title
                      __         __       Company
                      __         __       Location
                      __         __       Department Name
                      __         __       Department Number
                      __         __       City
                      __         __       State
                      __         __       Postal Code
                      __         __       Country
                      __         __       Country Phone Code
                      __         __       Phone
                      __         __       Extension
                      __         __       Description


 Enter-PF1---PF2---PF3---PF4---PF5---PF6---PF7---PF8---PF9---PF10--PF11--PF12---
       Help  Menu  Quit  Init
|
- Position
Each item specified is shown in a column to the right of the standard information in the order selected here. The position numbers must be consecutive, e.g. 2 3 1 and not 4 6 1.
- Length
The number of characters to be displayed for each item selected. You must specify a length for the item which is to appear in position 1. If a length is not specified for the other items, a new column is not created, and the information is included in the column of the previous field specified. For example, if "Phone" and "Extension" are selected, but a length is not specified for "Extension", that number is included in the column for "Phone".
Con-nect automatically inserts a blank space between columns, and the total length of all items selected must not exceed 32.
- Information
The items which are to be shown in the Addressee selection window.
If you want to reset the "Administration - Configuration of Addressee Selection Window" screen to the original (default) values, i.e. Name, ID and Type, press PF4.
You use the Commands and Objects function to rename system commands and system objects. You can also add and maintain user objects that suit the specific needs of your environment.
The "Administration - System Command and Object Table" screen is displayed below. Only the system administrator can access this screen.
To access the "Administration - System Command and Object Table" screen, press PF12 on the "Administration - System Cabinet Defaults" screen and when prompted, enter the password. If you do not know the appropriate password, contact your Software AG support representative.
   7:01 PM             * * *  C O N - N E C T  3  * * *                14.Feb.94
  Cabinet LS        Administration - System Command and Object Table      A06701
                                Object Numbers              User Objects
     Cmd  ....+....1....+....2....+....3....+....4....+....58....+....9....+....
   1 Add  XXXX   X XX XXXXXX X  XX XXXX      X      XXX     XXXXXXXXXXXXXXXXXXXX
   2 Copy   X      XX  XXX X    X   X                       XXXXXXXXXXXXXXXXXXXX
   3 Disp XXXXXXXXXXX XXXXXXXX XXX XXXXX XX XXX X  XXX      XXXXXXXXXXXXXXXXXXXX
   4 Eras XXXX   X XX XXX XX X  XX XXXX             XX      XXXXXXXXXXXXXXXXXXXX
   5 File XX     X XX XXX  X    XX XX                X      XXXXXXXXXXXXXXXXXXXX
   6 Modi XXXX   X XX XXXXXX X XXXXXXXX   X  X  X  XXX      XXXXXXXXXXXXXXXXXXXX
   7 Prnt X X  X   XX  X X   X      XX              XX      XXXXXXXXXXXXXXXXXXXX
   8 Srch      X    X   X           X                       XXXXXXXXXXXXXXXXXXXX
   9 Send  X        X  XX  X     X XX             X         XXXXXXXXXXXXXXXXXXXX
  10 ----
  11 Info X X    X XX    X X    X    XX            XXX      XXXXXXXXXXXXXXXXXXXX
  12 Perf  X                                        XX      XXXXXXXXXXXXXXXXXXXX
  13 Use      X            X                       X        XXXXXXXXXXXXXXXXXXXX
  14 ----
  15 ----
 Mark To _ Activate or _ Deactivate -  Command __ and Object __

 Enter-PF1---PF2---PF3---PF4---PF5---PF6---PF7---PF8---PF9---PF10--PF11--PF12---
       Help  Menu  Quit  Prof  Addr
 Make required changes and press ENTER to MODIFY
|
- Activate
To activate an object, mark this field with any character.
- Deactivate
To deactivate an object, mark this field with any character.
- Command
Required - Enter the command number you want to modify (e.g. 1 for ADD).
- Object
Required - Enter the object number you want to modify (e.g. 3 for Appointment).
Complete your modifications and press ENTER. All modifications which are specified on this screen are applied to all cabinets.
The Noisewords for Notepad is the list of words that are not automatically indexed and registered as keywords when they appear in the "Subject" line of a notepad page (e.g.a, and, as, but).
The "Administration - Modify Noisewords" screen is shown below.
  12:28 PM             * * *  C O N - N E C T  3  * * *                14.Feb.94
  Cabinet LS           Administration - Modify Noisewords                 A06700


  A______________      ALL____________      ALSO___________      AM_____________
  AN_____________      AND____________      ARE____________      AS_____________
  AT_____________      BE_____________      BUT____________      HAD____________
  HE_____________      I______________      IF_____________      IN_____________
  IS_____________      IT_____________      ITS____________      MR_____________
  MRS____________      NO_____________      NOT____________      OF_____________
  ON_____________      SO_____________      TO_____________      THAN___________
  THAT___________      THE____________      _______________      _______________
  _______________      _______________      _______________      _______________
  _______________      _______________      _______________      _______________
  _______________      _______________      _______________      _______________
  _______________      _______________      _______________      _______________
  _______________      _______________      _______________      _______________
  _______________      _______________      _______________      _______________
  _______________      _______________      _______________      _______________


 Enter-PF1---PF2---PF3---PF4---PF5---PF6---PF7---PF8---PF9---PF10--PF11--PF12---
       Help  Menu  Quit
 Make the changes and press ENTER to update, or use a PF-key
|
The words shown on the screen are supplied as defaults. You can modify the list by typing over the defaults, deleting them, or adding new words.
The Import/Export Destinations contain the names of the programs that are executed when documents are exported from and imported to default destinations in Con-nect. You should not modify the programs that are associated with the default Con-nect Import/Export Destinations. However, you can delete these programs if you don't want to use them at your installation.
You can modify the display sequence of the default destinations on the related screens, the text that is displayed with a destination, and whether or not the display depends on the PC mode being switched on.
You can add your own programs to design your own export/import destinations. A maximum of 24 destinations is possible. When the lines on the screen are filled, press ENTER to obtain additional lines.
This function contains two screens, the first of which to appear is the "Import Destinations" screen.
  12:28 PM             * * *  C O N - N E C T  3  * * *                14.Feb.94
  Cabinet LS                  Import Destinations                         A06720

  Language : 1

  Position
   on Map     Program   PC  Text to be Displayed
  --------    -------   --  --------------------

  _1          C32001__  X   PC Binary File__________________
  _2          C32002__  X   PC Text File____________________
  _3          C32005__  X   PC Revisable Form Text DCA______
  _4          C32006__  X   PC Final Form Text DCA__________
  _5          C32008__  X   PC Voice Document_______________
  _6          C32004__  _   Natural Source/Document_________
  _7          C32003__  _   Natural Source/Native___________
  _8          C32007__  _   Natural Object__________________


 Enter-PF1---PF2---PF3---PF4---PF5---PF6---PF7---PF8---PF9---PF10--PF11--PF12---
       Help  Menu  Quit  Impo  Expo
 Make the changes and press ENTER to update, or use a PF-key
|
To proceed to the "Export Destinations" screen, you press PF5.
  12:28 PM             * * *  C O N - N E C T  3  * * *                14.Feb.94
  Cabinet LS                  Export Destinations                         A06720

  Language : 1

  Position
   on Map     Program   PC  Text to be Displayed              Allowed Objects
  --------    -------   --  --------------------              ---------------

  _1          C27002__  X   PC Binary File__________________  _
  _2          C27003__  X   PC Text File____________________  _
  _3          C27006__  X   PC Revisable Form Text DCA______  _
  _4          C27007__  X   PC Final Form Text DCA__________  _
  _5          C27004__  _   Natural Source__________________  _
  _6          C27008__  _   Natural Object__________________  _
  _7          C27001__  X   PC File_________________________  _
  __          ________  _   ________________________________  _


 Enter-PF1---PF2---PF3---PF4---PF5---PF6---PF7---PF8---PF9---PF10--PF11--PF12---
       Help  Menu  Quit  Impo  Expo
 Make the changes and press ENTER to update, or use a PF-key
|
The "Import Destinations" and "Export Destinations" screens contain the following:
- Language
The language code you specified on the "Administration - Main Menu" is shown in this field.
- Position on Map
The sequence according to which the entries are to be displayed on the "Import Document" and "Export Document-name" screens.
- Program
The name of the Natural program executed when a document is imported or exported. You should not modify the defaults shown here, however you can add additional programs you write yourself.
- PC
X results in the associated entry being displayed on the "Import Document" and "Export Document-name" screens only if the PC mode is switched on.
- Text to be Displayed
The text that is displayed on the "Import Document" and "Export Document-name" screens.
The "Export Destinations" screen contains the following additional column:
- Allowed Objects
Applies only to export programs you write yourself. You mark the fields in this column with any character to get a list of all Con-nect objects that can be exported with that program. You mark one of the objects to obtain another list showing all of the permitted document formats for this destination.
In addition to sending mail to internal users, you can also send mail items to external users - users who are not connected to your Con-nect node. Since the normal online delivery technique cannot be used to reach external users, a variety of other data communication facilities are used which utilize the Con-nect spool file (see Part 3. Maintaining the Con-nect Spool File Method) and the Con-nect transport service (see Part 5. The Transport Service). These include:
Con-nect multinode,
Con-nect Teleservices,
Con-nect SNADS,
printer as external recipient, and
external users that are defined as belonging to external mail nodes of various types (supported through user-written modules).
The creation and maintenance of external mail nodes is a System Maintenance function and is discussed in this section. Administrative features specific to the type of mail node are discussed later in this documentation. See Part 2. External Con-nect Nodes and Part 4. Printers as External Mail Nodes.
Specific administrative functions for the selectable units are discussed later in this documentation. See Part 6. Teleservices Nodes and Part 7. Con-nect SNADS.
Note:
Since several of the external mail nodes are associated with Con-nect
selectable units, not every mail node type may be available at your
installation.
The "Administration - External Mail Nodes" screen is shown below. Mark the function you want to access with any character and press ENTER, or press the assigned PF-key. The screen for that function is displayed.
If you are adding a mail node, you must enter a name in the "Mail Node/Type" field before you select the Add Mail Node function.
  11:08               * * *  C O N - N E C T  3  * * *                 26.Aug.02
  Cabinet LS          Administration - External Mail Nodes                A06740

  Select a Function:     _ Add Mail Node
                         _ Modify Mail Node

                         _ Display Mail Node(s)
                         _ Delete Mail Node

                         _ Maintain Mail Nodes
                         _ Display Spool File Entries
                         _ Delete Spool File Entries

                         _ Define Local Node
                         _ Define Capabilities of Node Types

                         _ Return to Menu

         Mail Node/Type  ________


 Enter-PF1---PF2---PF3---PF4---PF5---PF6---PF7---PF8---PF9---PF10--PF11--PF12---
       Help  Menu  Quit  Add   Modif Displ Delet Maint DisSp DelSp Local Cap
 Mark one item from the list above
|
Certain information that you must enter or which is displayed on the various "Mail Node" screens is the same, no matter which type of node you are dealing with. This information is discussed in the topics below:
When you add a mail node, the first screen to appear is the one shown below. Subsequent screens or windows are node-specific. See Adding an External Con-nect Node and Adding an External Print Node. For the Con-nect selectable units, see Adding a Telex, Teletex or Telefax Mail Node and Part 7. Con-nect SNADS.
  11:31 AM            * * *  C O N - N E C T  3  * * *                  5.Mar.01
  Cabinet LS             Administration - Add Mail Node                   A06740

          Node Name  FAIRFAX_

        Description  ________________________________________

      Address Level  _

          Node Type  _

  A Con-nect      B Telex         F Snads         G Printer       H Telefax
  T Teletex


 Enter-PF1---PF2---PF3---PF4---PF5---PF6---PF7---PF8---PF9---PF10--PF11--PF12---
       Help  Menu  Quit        Displ
 Enter data and press ENTER to add
|
- Node Name
A unique name is required for each mail node. The name you entered in the "Mail Node/Type" field on the "Administration - External Mail Nodes" screen is automatically displayed here.
- Description
Optional - any description to further identify the node.
- Address Level
Establishes limitations for sending mail to this node. In order to send mail to this node, users must have authorization to send mail to the level specified here. See Cabinet Profile.
- Node Type
You can only specify node types supported at your site. Only the node types installed at your site appear on the "Administration - Add Mail Node" screen. The options are:
A an external Con-nect B Telex F Con-nect SNADS G a printer H Telefax T Teletex 1 User Node
Enter a node name in the "Node Name/Type" field on the "Administration - External Mail Nodes" screen and select the Modify Mail Node function. Information you specified when you added that node is displayed.
Modify the information and press ENTER to display additional node information. Press ENTER again after all modifications have been made.
Enter a node name in the "Node Name/Type" field on the "Administration - External Mail Nodes" screen and select the Display Mail Node(s) function. Information you specified when you added or modified that node is displayed.
If you do not specify a node name, the "Administration - Display External Mail Nodes" is displayed which lists all nodes.
The PF-keys at the bottom of the "Display" screen list the functions that apply to the mail nodes.
Enter a node name in the "Node Name/Type" field on the "Administration - External Mail Nodes" screen and select the Delete Mail Node function. A screen containing the mail node definition (the information specified when the node was added) is displayed.
Mark the "Delete" field and press ENTER to confirm the deletion.
Addresses that are defined to the mail node are not deleted, however, once you delete the node mail items cannot be sent to the addresses.
The Maintain Mail Nodes function contains maintenance programs for the spool file and the transport service, which are used by mail nodes that do not have their own specific maintenance program, and if installed, Con-nect SNADS.
See Part 3. Maintaining the Con-nect Spool File Method for a description of the maintenance program for external Con-nect nodes and printers that use the spool file method.
See Maintaining the Transport Service for a description of the maintenance program used by external Con-nect nodes and printers that use the transport service.
See Part 6. Teleservices Nodes for a description of the maintenance program for Con-nect Teleservices and Maintenance of Con-nect SNADS.
The Display Spool File Entries function is used to display all spool file records, except the definition records for the nodes and queues, routing entries and some control information.
Select the Display Spool File Entries function and press ENTER. In the resulting older than _ days field, specify the number of days items are to be displayed and press ENTER.
The Display Spool File Entires screen is displayed:
 10:22               * * *  C O N - N E C T  3  * * *                 06.Aug.02
 Cabinet LS             Display Spool File Entries                       X-DISP

 Cmd  Record type             Start data created   End data created     Records
 --- ----------------------- -------------------- -------------------- --------
 __  X-AO                      Aug.06.02  11:21     Aug.06.02  11:21          3
 __  X-BO                      Aug.06.02  11:21     Aug.06.02  11:21          1
 __  Dummy,text records        Aug.06.02  11:21     Aug.06.02  11:21          3
 __  X---SYNC                  Aug.06.02  11:21     Aug.06.02  11:21          1
 __  Transport Log records     Jul.31.02  17:19     Jul.31.02  17:28         35


 Cmd:                                                          43 records found
 ER Erase                                                    older than  0 days
Enter-PF1---PF2---PF3---PF4---PF5---PF6---PF7---PF8---PF9---PF10--PF11--PF12---
      Help  Menu  Quit
Mark item(s) from the list above with a command or press a PF-key
|
The following records are returned:
Spool file records. These are notated as record type X-n, where n defines the type of external node (see Add a Mail Node). Con-nect SNADS and Con-nect Teleservices use the spool file records to transfer information from the Con-nect system file to the Con-nect spool file and vice versa.
Con-nect Teleservices log records.
Con-nect SNADS text and log records.
Transport Service text and log records.
Dummy and text records. Con-nect SNADS, Teleservices and the spool file use these records to store the message text.
Special records for the synchronization of internal processes (notated as X---SYNC). These records are used by all node types.
When you mark a record with ER (Erase), the
marked records are erased immediately. You are not asked to confirm the
deletion.
Note:
You can erase all records displayed. To ensure that the send process
is completed and all confirmation of delivery notices are relayed, do not erase
a record less than a day old. However, it is recommended that you erase those
records older than 30 to 60 days.
All external Con-nect nodes, whether they use the spool file or transport service method, must occasionally purge items in the spool file, as internally it is used to convey information between the Con-nect spool file and the Con-nect system file(s). The Delete Spool File Entries function is used to delete these spool file records.
Select the Delete Spool File Entries function and press ENTER. In the resulting "older than _ days" field, specify the number of days items are to be kept in the spool file before they are deleted and press ENTER.
This function should be performed on a regular basis.
If you are adding external mail nodes for the first time in your Con-nect environment, you must specify a unique network node name by which your Con-nect system can be identified.
Notes:
Select the Define Local Node function, enter the physical name of your spool file (e.g. DBID number) in the resulting "Define Local Node ___ (Spool File Method)" field and press ENTER. Enter the name of your transport service in the resulting "Define Local Node ___ (Transport Service)" field and press ENTER again.
Note:
You cannot quit from this screen (with PF3) without
specifying the name of your spool file or transport service.
The local node name you specify for your spool file is combined internally with the Con-nect database ID and file number. This node name is the connection between the spool file and the Con-nect system file, and thus identifies to which Con-nect incoming external mail is to be delivered.
Note:
If the Con-nect system file (251) is changed (i.e. either the DBID
or FNR is changed), the spool file must be initialized again to ensure that the
correct DBID and FNR are used.
To transfer the data sent, the program X-0INIT must be started periodically (e.g. once per hour) either as a batch job or online. See X-0INIT - Multi-node/Driver Start Program in section Maintenance of Con-nect SNADS for a description of this program. X-0INIT manages the start of individual driver programs. The frequency and time at which the drivers are started depends on user requirements.
When you select the Define Capabilities of Node Types function and specify a node type (e.g. G for Printer) in the "Mail Node/Type" field on the "Administration - External Mail Nodes" screen, the "Define Capabilities of Node Types" screen is displayed.
Mail nodes that send mail (transport items) using the transport service method can provide the user with various mailing notifications (e.g. when the transport item arrives at the external mail node).
The "Define Capabilities of Node Types" screen displays the various notifications possible for a particular node type. On this screen you can define the default notifications and whether the user is allowed to request other notifications.
  9:22 AM               * * *  C o n - n e c t  3  * * *            17.Aug.2004
 Cabinet LS            Define Capabilities of Node Types                 A06740


      Node Type:   _  Con-nect

      Can Reply Request:  X             Allow Reply Request:  X
                                                                        Default
      Can Delivery Report: Never  X     Allow Delivery Report: Never  X    _
                           Non    X                            Non    X    _
                           Always X                            Always X    X

      Can Receipt Report:  Never  X     Allow Receipt Report:  Never  X    _
                           Non    X                            Non    X    _
                           Always X                            Always X    X


Enter-PF1---PF2---PF3---PF4---PF5---PF6---PF7---PF8---PF9---PF10--PF11--PF12---
      Help  Menu  Quit
Make all required changes and press ENTER to modify
|
If you want to rename a node type, you can simply type over the name shown next to the "Node Type" field.
The left side of the screen displays the notification options available for that particular node type. These fields cannot be modified.
The right side of the screen displays the notifications the user can request. To disallow a notification type, remove the X in the field to the right of the notification.
The last column on the right displays the default notifications. If you want to change the defaults, move the X to the appropriate notification type. You cannot mark a notification type that is not allowed with that node type.
- Allow Reply Request
If marked, it allows the user to request a reply from the addressee. When the addressee displays the transport item, a message is displayed indicating that a reply is requested.
- Allow Delivery Report
Determines whether the user is notified when the transport item has arrived at the external node.
- Allow Receipt Report
Determines whether the user is notified when the addressee has touched (e.g. displayed, erased, filed) the transport item.
Possible notifications for "Allow Delivery Report" and "Allow Receipt Report" are:
Never No delivery or receipt notification is requested Non A notification is only requested if the transport item cannot be delivered Always A notification is always requested
The Document Translation Routines contain the names of the programs that are executed when documents are translated into other (default) formats in Con-nect.
You should not modify the programs that are associated with the default Con-nect Translation Routines.
You can modify the display sequence of the default routines on the related screens, the text that is displayed with a routine. You can add your own programs to design your own routines.
The "Document Translation Routines" screen is shown below.
  12:30 PM             * * *  C O N - N E C T  3  * * *                29.Apr.96
  Cabinet LS              Document Translation Routines                   A06750
  Language: 1

  Position
   on Map   Program     Translated Format (displayed Text) Executable Formats
  --------  --------    ---------------------------------  ------------------
    _1      C59001__    Cnf   Con-form Document_________   _
    _2      C59002__    Txt   Final Form Text___________   _
    _3      C59003__    Int   Con-form Intermediate_____   _
    _4      C59004__    RFT   Revisable Form Text DCA___   _
    _5      C59005__    Txt   Hexadecimal Dump__________   _
    _6      C59009__    Txt   Final Form Text___________   _
    _7      C59011__    FFT   Final Form Text DCA_______   _
    __      ________    ________________________________   _

        _ Modify/Display Con-form Control Characters

          Default Symbol Set     U.S.ENGL  (U.S. ENGLISH)
        _ Modify Symbol Set

 Enter-PF1---PF2---PF3---PF4---PF5---PF6---PF7---PF8---PF9---PF10--PF11--PF12---
       Help  Menu  Quit
 Make the changes and press ENTER to update
|
- Language
The language code you specified in the "Administration - Main Menu" is shown in this field.
- Position on Map
The sequence according to which the entries are to be displayed in the "Translate Document-name" screen. You can alter the position by typing over the numbers.
- Program
The name of the Natural program which is executed when a document is translated. You cannot modify the defaults shown here, however, you can add additional programs which you write yourself.
- Translated Format (displayed Text)
The text that is displayed on the "Translate Document-name" screen. You can alter the default text by typing over it.
- Executable Formats
Applies only to export programs which you write yourself. You can mark a field in this column with any character to get a list of all document formats that can be translated with that program.
- Modify/Display Con-form Control Characters
If you mark this field, a window appears and you can display the defaults for Con-form control characters. You press PF3 to close the window. These characters have a special meaning for Con-form when they are used in a particular context (see the Con-form User's Guide, section Special Characters for additional information).
- Page-number character
Represents a reserved variable containing the current page number.
- Instruction character
Begins each Con-form instruction.
- Escape character
Precedes escape sequences within the running text.
- End-of-line character
Denotes the end of a text line, causing a break in line filling.
- Variable character
Precedes a variable. (Variables are assigned using the .SV name=value instruction.)
- Instruction separator character
Separates multiple Con-form instructions in the same line.
- Tab character
Character used which denotes that the following text is to be moved to the defined tab position.
- Decimal character
Character used when the sum of a calculation is not rounded to the nearest integer.
- Hard space character
Character to be used as a hard space between two words. This means that these words cannot be separated by a line break.
- Default Symbol Set
Each supported language has a symbol set associated with it. The symbol set associated with the language code you specified on the "Administration - Main Menu" is shown as the default.
- Modify Symbol Set
If you mark this field, a window appears and you can select the symbol set associated with one of the other languages.
You use the Logical Printers function to:
assign a logical printer name to a printer destination;
associate a printer profile with a printer; and
maintain these assignments.
Thus you create a list of all permitted printers within the particular environment.
The "Administration - Logical Printers" screen is shown below. Mark the function you want to access with any character and press ENTER, or press the assigned PF-key. The appropriate screen is then shown.
If you are adding a logical printer, you must enter a name in the "Logical Printer" field before you select the Add Printer function. The name is associated with the printer destination and optionally, a printer profile. The user needs only to enter this name, and need not worry about destinations or profiles.
  12:32 PM             * * *  C O N - N E C T  3  * * *                14.Feb.94
  Cabinet LS           Administration - Logical Printers                  A06790


  Select a Function:
                         _ Display Printer(s)

                         _ Add Printer

                         _ Modify Printer

                         _ Delete Printer

                         _ Return to Menu


        Logical Printer  ________________________________


 Enter-PF1---PF2---PF3---PF4---PF5---PF6---PF7---PF8---PF9---PF10--PF11--PF12---
       Help  Menu  Quit  Displ Add   Modif Delet
 Mark one item from the list above
|
The following topics are covered below:
  12:32 PM             * * *  C O N - N E C T  3  * * *                14.Feb.94
  Cabinet LS          Administration - Add Logical Printer                A01790


    Logical Printer TEAM____________________________


        Destination ________


    Printer Profile ________________________________


        Description


 Enter-PF1---PF2---PF3---PF4---PF5---PF6---PF7---PF8---PF9---PF10--PF11--PF12---
       Help  Menu  Quit
 Enter data and press ENTER to ADD
|
- Logical Printer
The name you entered in the "Logical Printer" field of the "Administration - Logical Printers" screen is automatically displayed here.
- Destination
The terminal ID number, LU number or comparable terminal destination for the printer which is to be used when the user enters the logical printer name. If operating under Natural Advanced Facilities, enter the name of the logical printer profile in this field.
- Printer Profile
The optional printer profile assigned to this printer.
- Description
An optional description to further identify the printer.
If you do not specify a printer in the "Logical Printer" field on the "Administration - Logical Printers" screen, an alphabetical list of all printers is displayed. The list contains the information specified when the printer was added or modified.
If you enter a specific printer in the "Logical Printer" field on the "Administration - Logical Printers" screen, an alphabetical list of printers (beginning with the name you specified) are displayed. The list contains the information specified when the printer was added or modified.
- Position to
If the list exceeds one display page, you can choose a starting point for the next page by entering the required name.
You can modify or delete a logical printer directly from the "Display Printer" screen by marking it with any character and pressing PF4 (modify) or PF5 (delete).
You specify the printer you want to modify either by entering the name on the "Logical Printer" field on the "Administration - Logical Printers" screen, or by selecting a printer from a "Display" screen. Modify the printer specifications by typing over them.
You specify the printer you want to delete either by entering the name in the "Logical Printer" field on the "Administration - Logical Printers" screen, or by selecting a printer from a "Display" screen. Information for that printer is displayed, and you are asked to mark an input field at the bottom of the screen to confirm the deletion.
You use the Commands and Objects funtion to rename system commands and system objects. You can also add and maintain user objects which suit the specific needs of your environment.
The "Administration - Commands and Objects" screen is shown below. A list of commands and objects (including their numbers) and the Con-nect naming conventions are included at the end of this section.
   3:36 PM             * * *  C O N - N E C T  3  * * *                14.Feb.94
  Cabinet LS          Administration - Commands and Objects               A06080


  Select a Function:     _ Rename/Modify System Command

                         _ Rename/Modify System Object

                         _ Add User Object

                         _ Display User Object

                         _ Delete User Object

                         _ Rename/Modify User Object

                         _ Return to Menu

                    Name ________ Language 1


 Enter-PF1---PF2---PF3---PF4---PF5---PF6---PF7---PF8---PF9---PF10--PF11--PF12---
       Help  Menu  Quit  Cmd   Objs  Add   Displ Unl   Modif
 Mark one item from the list above
|
Mark the function you want to access with any character and press ENTER, or press the assigned PF-key. The appropriate screen is shown.
Note:
When you rename/modify commands or objects, the previous name is
removed from the system.
The information below contains the following topics:
Enter a command name in the "Name" line of the "Administration - Commands and Objects" screen, select the Rename/Modify System Command function and press ENTER.
Note:
If you do not enter a command name in the "Name" line of the
"Administration - Commands and Objects" screen and instead press PF9
(for Modify), a selection window appears. Select the command you want to rename
and press ENTER.
The following commands cannot be modified/renamed:
X
MX
DX
DY
DX-Y
EX
EY
EX-Y
Y
The input lines "New Name" and "New Description" are shown at the bottom of the screen. The command name you selected and its associated description are shown in these lines.
                         _ Delete User Object

                         _ Rename/Modify User Object

                         _ Return to Menu

                    Name ADD      Language 1
                New Name ADD      New Description

 Enter-PF1---PF2---PF3---PF4---PF5---PF6---PF7---PF8---PF9---PF10--PF11--PF12---
       Help  Menu  Quit
|
You rename the command by typing over the name in the "New Name" line. Keep the first two letters of the Con-nect command names strictly unique, since an object can be acted upon by entering the first two letters of a command in the Cmd-column in a screen which lists a number of objects.
Note:
Con-nect may be corrupted, if the command names are not
unique.
You can also modify the description, which can appear in the command prompting window.
Enter an object name in the "Name" input field of the "Administration - Commands and Objects" screen, select the Rename/Modify System Object function and press ENTER.
Note:
If you do not enter an object name in the "Name" input field of the
"Administration - Commands and Objects" screen and instead press PF9
(for Modify), a selection window appears. Select the object you want to rename
and press ENTER.
Input lines called "New Name" and "New Description" are shown at the bottom of the screen. The object name you selected and its associated description are displayed in these lines.
                         _ Delete User Object

                         _ Rename/Modify User Object

                         _ Return to Menu

                    Name APPOINTM Language 1
                New Name APPOINTM New Description

 Enter-PF1---PF2---PF3---PF4---PF5---PF6---PF7---PF8---PF9---PF10--PF11--PF12---
       Help  Menu  Quit
|
You rename the object by typing over the name in the "New Name" field. Keep Con-nect object names strictly unique to avoid confusion as to which object is to be acted upon.
Note:
Con-nect may be corrupted, if the object names are not
unique.
You can also modify the description which appears in the object prompting window.
   4:37 PM             * * *  C O N - N E C T  3  * * *                14.Feb.94
  Cabinet LS          Administration - Commands and Objects               A06080


  Select a Function:     _ Rename/Modify System Command

                         _ Rename/Modify System Object

                         X Add User Object

                         _ Display User Object

                         _ Delete User Object

                         _ Rename/Modify User Object

                         _ Return to Menu

                    Name REPORT   Language 1
                New Name REPORT
              New Number
 Enter-PF1---PF2---PF3---PF4---PF5---PF6---PF7---PF8---PF9---PF10--PF11--PF12---
       Help  Menu  Quit
|
To create a user object you must write certain programs and maps to use the new object. Additionally, the following information must be completed on the "Administration - Commands and Objects" screen:
- Name
The name you want to give the new object. Con-nect automatically adds the object to the command and object table.
- Language
The language code you specified on the "Administration - Main Menu" is shown in this field.
- New Name
Not applicable if you are adding an object for only one language.
- New Number
Assign a number between 80 and 99 to the new object (these numbers have been reserved for user objects). This number must be the same for all languages in which you add the object.
The numbers 8000 through 9990 in SYSERR must also be reserved for user objects.
A user object must not use a GDA of its own, since this destroys the Con-nect GDA.
Once the user object is added, you must specify the commands that can be used with this object. See Command and Object Table.
If you want to add the same object for another language, you must return to the "Administration - Main Menu" and specify the appropriate language code and then return to this screen by selecting "Add User Object" and entering the name you specified when the object was initially added.
                         _ Rename/Modify User Object

                         _ Return to Menu

                    Name REPORT   Language 2
                New Name REPORT
              New Number
 Enter-PF1---PF2---PF3---PF4---PF5---PF6---PF7---PF8---PF9---PF10--PF11--PF12---
       Help  Menu  Quit
|
- New Name
The name you specified when you added the object for the first language is shown in this field. You type over this name with the name of the object for the language selected.
- New Number
With each language you must assign the same number to the object. For example if you have the object "Report" with number 85 in English, and the same object named "Bericht" in German, the German object must also be assigned to number 85.
User objects are displayed in a selection window. Mark a user object in the list, and then select the function you want to activate by pressing the appropriate PF-key.
                         _ Delete User Object

                         _ Rename/Modify User Object

                         _ Return to Menu

                    Name REPORT   Language 1
      Delete User Object

 Enter-PF1---PF2---PF3---PF4---PF5---PF6---PF7---PF8---PF9---PF10--PF11--PF12---
       Help  Menu  Quit
|
Enter the name of the object you want to delete in the "Name" field, or select an object from the selection window. Confirm the deletion by marking the input field at the bottom of the screen.
The procedure to rename or modify a user object is identical to that as renaming or modifying a system object. See Rename/Modify a System Object.
Con-nect commands are listed in alphabetical order below:
| 1 | ADD |
| 16 | ADDRESS |
| 18 | ASCENDING |
| 20 | CANCEL |
| 22 | CONFIRM |
| 2 | COPY |
| 23 | DEFAULTS |
| 24 | DESCENDING |
| 25 | DESK |
| 17 | DETACH |
| 3 | DISPLAY |
| 26 | ENCLOSE |
| 4 | ERASE |
| 27 | EXPORT |
| 5 | FILE |
| 21 | FLIP |
| 29 | FORMAT |
| 30 | FORWARD |
| 31 | HELP |
| 32 | IMPORT |
| 11 | INFO |
| 33 | LOCK |
| 36 | LOGON |
| 37 | MENU |
| 6 | MODIFY |
| 38 | MX |
| 39 | NOTEPAD |
| 40 | ORIGINAL |
| 41 | OUTPUT |
| 42 | PAGE |
| 12 | PERFORM |
| 44 | PHONEPAD |
| 45 | POSITION |
| 46 | POSTPONE |
| 7 | |
| 47 | QUIT |
| 50 | REPLIES |
| 51 | REPLY |
| 8 | SEARCH |
| 9 | SEND |
| 53 | SHARE |
| 54 | SNAPSHOT |
| 55 | TOP |
| 59 | TRANSLATE |
| 56 | UNDO |
| 13 | USE |
| 57 | USER |
| 58 | X |
Text Retrieval:
| 28 | FIND |
| 49 | RULE |
Con-nect editor commands are listed in alphabetical order below:
| 35 | ABANDON |
| 19 | BOTTOM |
| 97 | CENTER |
| 72 | CHANGE |
| 43 | CHECK |
| 73 | CLEAR |
| 34 | COLUMN |
| 74 | COMPRESS |
| 75 | CONFORM |
| 2 | COPY |
| 76 | DELIMIT |
| 77 | DIRECTION |
| 78 | DX |
| 79 | DX-Y |
| 80 | DY |
| 81 | EX |
| 82 | EX-Y |
| 83 | EY |
| 21 | FLIP |
| 84 | INPUT |
| 85 | NEWPAGE |
| 40 | ORIGINAL |
| 42 | PAGE |
| 87 | RENAME |
| 88 | RESET |
| 89 | SAVE |
| 90 | SCAN |
| 91 | SET |
| 92 | SHIFT |
| 93 | SPLIT |
| 55 | TOP |
| 86 | TELEX |
| 56 | UNDO |
| 58 | X |
| 95 | Y |
Con-nect objects are listed in alphabetical order below:
| 1 | Address |
| 2 | Application |
| 3 | Appointment |
| 4 | Bulletin |
| 5 | Cabinet |
| 6 | Calendar |
| 8 | Command |
| 9 | Day |
| 10 | Distribution |
| 11 | Document |
| 38 | File |
| 13 | Folder |
| 14 | Form |
| 16 | Meeting |
| 17 | Member |
| 41 | Memo |
| 18 | Menu |
| 19 | Month |
| 39 | Name |
| 20 | Notepad |
| 21 | Object |
| 22 | PFkey |
| 23 | Printer |
| 24 | Procedure |
| 25 | Profile |
| 26 | Program |
| 27 | Reference |
| 28 | Reminder |
| 29 | Resource |
| 43 | Todo |
| 33 | User |
| 35 | Week |
| 37 | Year |
Text Retrieval:
| 7 | Category |
| 44 | Query |
| 42 | Results |
| 30 | Root |
| 32 | Synonym |
| 36 | Word |
User Objects:
| 80-99 | User-specified name |
The names of Con-nect commands and objects must be alphanumeric, and can be a maximum of 12 characters. If a command can be entered in the Cmd-column of a screen which displays a list of objects, the first two letters of the command must be unique throughout Con-nect.