
This document covers the following topics:
Cabinet Maintenance is used to add and maintain the Con-nect cabinets and users. It can be accessed by both the cabinet administrator(s) and the supervisor. A cabinet has a unique 8-byte (maximum) name. Generally, if a cabinet is a private cabinet, the cabinet ID is the same as the ID of the user to whom it is assigned.
The following cabinet types can be defined:
private cabinet;
standalone cabinet;
shared cabinet;
public cabinet.
In addition to the cabinet types above is the cabinet SYSCNT which can be accessed and maintained only by the system administrator(s).
The following diagram shows the path you must take to invoke each aspect of Cabinet Maintenance.
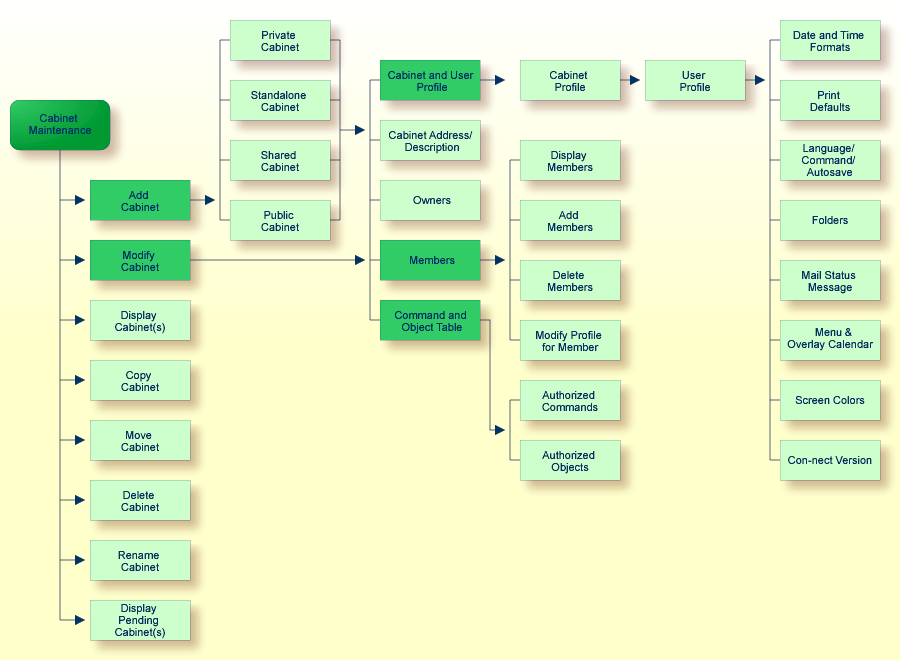
All functions which can be performed within Cabinet Maintenance are shown on the "Administration - Cabinet Maintenance" menu.
 11:13 AM            * * *  C O N - N E C T  3  * * *                 17.Jan.00
 Cabinet LS          Administration - Cabinet Maintenance                A00050

 Select a Function:      _ Add Cabinet
                         _ Modify Cabinet
                         _ Display Cabinet(s)
                         _ Copy Cabinet

                         _ Move Cabinet
                         _ Delete Cabinet
                         _ Rename Cabinet

                         _ Display Pending Cabinet(s)

                         _ Return to Menu


                 Cabinet ________ (* to select)


Enter-PF1---PF2---PF3---PF4---PF5---PF6---PF7---PF8---PF9---PF10--PF11--PF12---
      Help  Menu  Quit  Add   Modif Displ Copy  Move  Delet Renam Pend
Mark one item from the list above
|
To perform one of the functions, either mark it with any character and press ENTER; or press the PF-key which is assigned to that function. The screen for that function is then displayed.
Enter the name of the new cabinet in the "Cabinet" line of the "Administration - Cabinet Maintenance" screen. In the case of a shared cabinet, enter the group name; in the case of a private cabinet, you usually enter the user ID from the TP Monitor.
Note:
If the name (ID) of the new cabinet is a number and is specified in
the "Addressee(s)" line while sending mail, problems will arise, since Con-nect
objects are also identified internally by numbers. However, problems will not
occur if the last name or description are specified in the "Addressee(s)"
line.
Select the Add Cabinet function. As a result, the "Administration - Add Cabinet cabinet-name" screen appears. Specify one of the following cabinet types:
- Private Cabinet
Only one user is defined to a private cabinet. It is associated with the user ID from the TP Monitor or from Natural Security.
- Standalone Cabinet
This cabinet has no user directly associated with it, but can be accessed by anyone who has the password. Only the cabinet administrator can display a list in which this cabinet is shown (i.e. using the Display Cabinet(s) function). This means that when a user issues the "DISPLAY Cabinet" command, this cabinet is not displayed in the resulting list.
- Shared Cabinet
The shared cabinet can be accessed by defined members; non-members can access it with the password.
After you add the cabinet, you must define the members of the shared cabinet. See Members of a Shared Cabinet.
If a shared cabinet can receive or send mail, a distribution list is automatically created with the shared cabinet's name.
- Public
Any Con-nect user can access a public cabinet without a password.
Press ENTER, and depending on the cabinet type you specified, the following lines are displayed at the bottom of the screen. Enter the information as appropriate.
- Private Cabinet
Last Name Last name of the user. First Name First name of the user. Initial Optional - middle initial of the user. - Standalone, Shared or Public Cabinet
Description A description of the cabinet. Disallow Mail Mark this field if mail is not to be received and sent from the cabinet. This includes invitations to meetings, which means that if the cabinet is a resource, the resource cannot be reserved for the meeting via Con-nect. If in the case of a shared cabinet this field is marked, a distribution list for the cabinet is not automatically created.
Press ENTER to add the cabinet. As a result, the "Modify Cabinet cabinet-name" screen appears, you must then specify the profile components for the cabinet.
  12:45 PM             * * *  C O N - N E C T  3  * * *                14.Feb.94
  Cabinet LS             Administration - Modify Cabinet                  A06050
                                          ESH

  Select a Function:

                         _ Cabinet and User Profile

                         _ Cabinet Address / Description

                         _ Owners

                         _ Members

                         _ Command and Object Table

                         _ Return to Menu


 Enter-PF1---PF2---PF3---PF4---PF5---PF6---PF7---PF8---PF9---PF10--PF11--PF12---
       Help  Menu  Quit  Prof  Addr  Owner Membr Cmd
 Private cabinet added - profile and address may be modified
|
Not all profile components are applicable to each type of cabinet. The applicable components are indicated in the table below.
| Cabinet Type | Cabinet/User Profile | Address/Description | Owners | Members | Command and Object Table |
|---|---|---|---|---|---|
| Private | X | address | X | X | |
| Standalone | X | description | X | X | |
| Shared | X | description | X | X | X |
| Public | X | description | X | X |
You can add several cabinets at once by using theMass Cabinet Maintenance function. See Con-nect Mass Cabinet Maintenance and Remote Access.
The profile of a cabinet consists of two parts: the cabinet profile and the user profile. They contain the defaults specified by the system administrator with the System Cabinet Defaults function. See System Cabinet Defaults.
You can further restrict the activities which are allowed for the cabinet and modify other default values. However, you cannot allow an activity which the system administrator has disallowed.
You can also use the Command and Object Table function to authorize each cabinet user to modify his own cabinet profile - by permitting use of the command MODIFYwith the object Profile.
Sample screens and discriptions of the cabinet and user profiles are provided in the topics below:
   3:59 PM              * * *  C O N - N E C T  3  * * *               14.Feb.94
  Cabinet LS            Administration - Cabinet Profile                  A06052
                                         ESH
  Password:
  Security:   Read 9   Modify 9   Copy 9   Print 9

  Send:       Max. Number of Addressees 9999
                          Address Level 7 may send 2 levels higher

  Permitted:                _ Cabinet Maintenance
  (mark to allow)           X System Maintenance
                            X Command Prompting
                            X Con-form
                            X Text Retrieval (TRS)
                            X Modify Own Address
                            X Display Home Addresses
                            X Send External Mail
                            X Modify Expiration Date
                            X Read Mail

 Enter-PF1---PF2---PF3---PF4---PF5---PF6---PF7---PF8---PF9---PF10--PF11--PF12---
       Help  Menu  Quit
 Cabinet was modified
|
- Password
A user can access a cabinet in one of two ways: he must either know the password for the cabinet, or he must be defined as a shared user of the cabinet.
The cabinet ID is the default password, you can modify it by entering any other password.
This is the only value specified in the Cabinet Profile which can be modified by a user with the "MODIFY Profile" command, and every user should modify his password to protect his cabinet.
- Security
Certain objects created within Con-nect are assigned security levels.
To access (i.e. read, modify, copy or print) an object, the object must not be marked as private and the user must have a level equal to or greater than the security level of the object.
Read, Modify, Copy, Print Specify the levels (0 to 9) which are to be taken as the default for the cabinet. In the case of a shared cabinet in which the members do not use the profile of their private cabinets or special profiles, these levels are taken as the default for the members. See Members of a Shared Cabinet.
- Send
- Permitted
An X adjacent to a function means that it can be used within the cabinet. By default, all the functions except "Cabinet Maintenance" and "System Administration" are permitted. You disallow a function which is permitted by removing the X adjacent to it and pressing ENTER.
An X adjacent to the Cabinet and System Maintenance functions defines the user as a supervisor and can handle all functions of a cabinet and system administrator.
Only a supervisor can access this function. It is used to limit the administrative functions of a cabinet or system administrator. You cannot limit the functions for another user who is also a supervisor.
The "Administration - Cabinet Profile" screen contains an additional invisible field to the right of the "Cabinet Maintenance" field. Mark this field with any character to access the following window:
   3:58 PM              * * *  C O N - N E C T  3  * * *               14.Feb.94
  Cabinet LS            Administration - Cabinet Profile                  A06052

  Password:                            +---------------------------------------+
  Security:   Read 7   Modify 7   Co   !      Administrator Profile            !
                                       +---------------------------------------+
  Send:       Max. Number of Address   !  Mark to disallow                     !
                          Address Le   !                                       !
                                       ! X   Add    Cabinet                    !
  Permitted:                  Cabine   ! X   Modify Cabinet                    !
  (mark to allow)           X System   ! X   Delete Cabinet                    !
                            X Comman   ! X   Move   Cabinet                    !
                            X Con-fo   !     Unlock Cabinet                    !
                            X Text R   !     Broadcast                         !
                            X Modify   ! X   Member Maintenance                !
                            X Displa   !     Reports                           !
                            X Send E   !                                       !
                            X Modify   !                                       !
                            X Read M   +---------------------------------------+

 Enter-PF1---PF2---PF3---PF4---PF5---PF6---PF7---PF8---PF9---PF10--PF11--PF12---
       Help  Menu  Quit
 Change the profile and press ENTER
|
Mark the functions that you want to disallow with any character and press ENTER.
To access the "Administration - User Profile" screen, you must press ENTER on the "Administration - Cabinet Profile" screen.
  10:00                 * * *  C o n - n e c t  3  * * *               16.Oct.03
  Cabinet LS             Administration - User Profile                    A06052
                                          ESH

    Date and Time Formats      _

    Print Defaults             _

    Language/Command/Autosave  _

    Folders                    _

    Mail Status Message        _

    Menu and Overlay Calendar  _

    Screen Colors              _

    Con-nect Version           _


 Enter-PF1---PF2---PF3---PF4---PF5---PF6---PF7---PF8---PF9---PF10--PF11--PF12---
       Help  Menu  Quit
Mark profile items to modify and press ENTER |
Choose the area(s) you want to modify by marking the input field(s) with any character and pressing ENTER. A window appears where you can modify the default specifications by typing over them.
After you have completed your modifications, press ENTER. If you selected more than one area to modify, the next window will appear, and you can continue modifying the user profile.
The information below contains the following topics:
  10:06                 * * *  C o n - n e c t  3  * * *                4.Nov.03
  Cabinet LS             Administration - User Profile                    A06052

                                       +---------------------------------------+
    Date and Time Formats      X       !         Date and Time Formats         !
                                       +---------------------------------------+
    Print Defaults             _       !    Date format 1.4.5  1 DD            !
                                       !   (Any character as   2 MM  4 MON     !
    Language/Command/Autosave  _       !    a delimiter)       3 YY  5 YYYY    !
                                       !                                       !
    Folders                    _       !    Time format 0   0 24h  1 am/pm     !
                                       !      Delimiter :                      !
    Mail Status Message        _       !       Timezone 0   (from datacenter)  !
                                       !     Week start 1   1-7 Monday-Sunday  !
    Menu and Overlay Calendar  _       !      Day start 0   0-23 hr            !
                                       !                                       !
    Screen Colors              _       ! Set cabinet sliding window __ 0-99 or !
                                       ! Mark to use system value   X  50      !
    Con-nect Version           _       +---------------------------------------+


 Enter-PF1---PF2---PF3---PF4---PF5---PF6---PF7---PF8---PF9---PF10--PF11--PF12---
       Help  Menu  Quit
Modify the profile and press ENTER |
- Date format
Specifies how the date is displayed on all screens, and the order in which the day, month and year appear. The values mean:
1 The day is shown as a number. 2 The month is shown as a number. 3 The year is shown as a two-digit number. 4 The month is shown as a three-letter abbreviation. 5 The year is shown as a four-digit number. A delimiter separates the day, month, and year values. You can use any character, including a blank.
In the example above, the date format is 1.4.5 - which means that the date is displayed as "4.Nov.2003".
- Time format
Specifies how the time is displayed on all screens. The values mean:
0 24 hour display, e.g. 15:35. 1 AM/PM display, e.g. 3:35 PM. Note:
When using the 24 hour display, 23:59 is the last minute of the current day and 0:00 is considered the beginning of the next day.- Delimiter
The delimiter separates the hours and the minutes. You can use any character, including a blank.
- Timezone
The local time zone (taken from the data center) is the default, and is specified as 0. You can specify any other time zone by entering the number of hours ahead (e.g. 6) or behind (e.g. -8) your data center time zone. This is helpful, when a user adds calender entries.
However, the values specified here do not affect the time shown in the upper left corner of all Con-nect screens, as the local time is always displayed.
The local (CPU) time zone is specified on the "Administration - System Defaults" screen. See System Defaults.
- Week start
Indicates the first day of the week that is shown on the Con-nect menu and the calendar screens. The values mean:
1 The first day of the week is Monday. 2 The first day of the week is Tuesday. ... 7 The first day of the week is Sunday. - Day start
The start of a 10-hour period within which you expect the greatest number of calendar entries. A day on the "Display Month" screen begins with this time. For example, the values mean:
0 The day starts at midnight (12 PM or 0:00) and ends at 10 o'clock in the morning (10 AM or 10:00). 8 The day starts at 8 o'clock in the morning (8 AM or 8:00) and ends at 6:00 o'clock in the evening (6 PM or 18:00). An asterisk (*) to the left or to the right of the time scale of the "Display Month" screen indicates that a calendar entry occurs before or after the period covered by the scale.
- Set cabinet sliding window _ 0-99 or
Determines from which point the Con-nect calendar interprets a two-digit year value as belonging to another century. For further information, see System Defaults.
If you specify a value in this field, you cannot mark the "Mark to use system value" field.
- Mark to use system value
This field is initially marked. The number to the right of this field is the value defined as the system default. It is defined in the "Administration - System Defaults" screen in either the "Con-nect sliding window" or "Use Natural YSLW" field. For further information, see System Defaults.
If you mark this field, you cannot enter a value in the "Set cabinet sliding window" field.
  10:07                 * * *  C o n - n e c t  3  * * *                4.Nov.03
  Cabinet LS             Administration - User Profile                    A06052

                                       +---------------------------------------+
    Date and Time Formats      _       !             Print Defaults            !
                                       +---------------------------------------+
    Print Defaults             X       ! Printer name                          !
                                       !    DAEPRTB2________________________   !
    Language/Command/Autosave  _       !   Page length 65 Wrap printed line _  !
                                       !    Line width  72     Left margin 0_  !
    Folders                    _       ! Mark to print _ Info                  !
                                       !               _ Attached/Cover notes  !
    Mail Status Message        _       !               _ List of replies       !
                                       !               _ List of addressees    !
    Menu and Overlay Calendar  _       ! Printer profile                       !
                                       !     _______________________________   !
    Screen Colors              _       ! Formatting profile                    !
                                       !    FPROFILE________________________   !
    Con-nect Version           _       +---------------------------------------+


 Enter-PF1---PF2---PF3---PF4---PF5---PF6---PF7---PF8---PF9---PF10--PF11--PF12---
       Help  Menu  Quit
Modify the profile and press ENTER |
- Printer name
A printer name (combination of printer profile and printer destination) that you have defined using the Logical Printers function. Enter an asterisk (*) to obtain a list of defined printer names.
HARDCOPY can also be specified as the printer name. In this case, the printer which has been defined by the Natural variable *HARDCOPY is used.
- Page length
The number of lines (1 to 99) per page of printout.
- Wrap printed line
Optional - if marked, each line of text which is longer than the physical printer line is wrapped. When this field is not marked (default), lines that are longer than the physical printer line are truncated.
- Line width
The number of characters (1 to 249) per line. The line width is only evaluated by certain languages (e.g. Hebrew). In other languages this information is not considered.
- Left margin
Optional - the number of blank spaces at the beginning of each printed line.
- Mark to print
Any character to cause the following items to be printed with the document:
- Printer profile
If a printer profile different than the one associated to this printer is to be used, enter the name here. (The profile must be defined in SYSCNT.) As a result, that profile is substituted for the profile which belongs to the printer name.
If this field is left blank, the profile associated with the printer is used. If this field is left blank and the printer does not have a profile associated with it, a profile is not used.
Enter an asterisk (*) to obtain a list of defined printer profiles.
- Formatting profile
If a formatting profile different than the system default profile FPROFILE is to be used, enter the name here. A profile can be any Con-form text document in either SYSCNT or the user's own cabinet.
 10:08                 * * *  C o n - n e c t  3  * * *                4.Nov.03
 Cabinet LS             Administration - User Profile                    A06052

                                       +---------------------------------------+
    Date and Time Formats      _       !     Language / Command / Autosave     !
                                       +---------------------------------------+
    Print Defaults             _       !         Language code 1               !
                                       !                                       !
    Language/Command/Autosave  X       !      Command sequence X mark for      !
                                       !                OBJECT name COMMAND    !
    Folders                    _       !                                       !
                                       ! Rename system folders _               !
    Mail Status Message        _       !                                       !
                                       !      Blank substitute /               !
    Menu and Overlay Calendar  _       !                                       !
                                       !       Autosave every 10 modifications !
    Screen Colors              _       !                                       !
                                       !                                       !
    Con-nect Version           _       +---------------------------------------+


 Enter-PF1---PF2---PF3---PF4---PF5---PF6---PF7---PF8---PF9---PF10--PF11--PF12---
       Help  Menu  Quit
Modify the profile and press ENTER |
- Language code
The code number for the language to be used for all the commands, menus and screens. You can only specify codes for languages which have been installed in your system. The language codes are:
1 English 7 Finnish 2 German 7 Swedish 3 French 8 Danish 4 Spanish 8 Hebrew 5 Italian 9 Norwegian 6 Dutch 9 Portuguese (Brazilian) 7 Turkish 9 Arabic 7 Icelandic 9 Russian - Command sequence
If you leave this field blank, the default command sequence "command object name" ("name" can also be a date) is used.
Mark this field with any character if you want to use the alternative command sequence "object name command" (e.g. if you want to work with the German language).
- Rename system folders
Used in conjunction with the "Language code" field. If marked, the names of all system folders (e.g. Inbasket and Outbasket) are translated into the language that has been defined for this cabinet. If not marked, the names of the system folders are not changed.
- Blank substitute
The character which is to be entered in place of the blank when specifying names or dates with embedded blanks.
By default, the blank substitute character is a slash (/). You must not use a period (.), asterisk (*) or the letter X as the blank substitute character.
- Autosave every __ modifications
The number entered here refers to the "(Undo Document-name)" version of a user's document. You can specify that a version is updated, for example, every second time a user presses ENTER while modifying the document in the Con-nect editor.
You can specify a number from 1 to 99. The default is 10.
  10:09                 * * *  C o n - n e c t  3  * * *                4.Nov.03
  Cabinet LS             Administration - User Profile                    A06052

                                       +---------------------------------------+
    Date and Time Formats      _       !               Folders                 !
                                       +---------------------------------------+
    Print Defaults             _       !                                       !
                                       ! Customize folder _                    !
    Language/Command/Autosave  _       !                                       !
                                       !                                       !
    Folders                    X       ! Display reply column (Inb./Outb.) 1   !
                                       !     0 or blank  no display            !
    Mail Status Message        _       !              1  to sender             !
                                       !              2  to any user           !
    Menu and Overlay Calendar  _       !                                       !
                                       !                                       !
    Screen Colors              _       !                                       !
                                       !                                       !
    Con-nect Version           _       +---------------------------------------+


 Enter-PF1---PF2---PF3---PF4---PF5---PF6---PF7---PF8---PF9---PF10--PF11--PF12---
       Help  Menu  Quit
Modify the profile and press ENTER |
- Customize folder
Mark this field to display the screen below. This screen is used to determine how and which fields will be displayed in the "Contents of Folder" screen.
  11:32 AM            * * *  C O N - N E C T  3  * * *               16.Aug.1999
  Cabinet LS             Customize Folder Layout in Cabinet LS            C06131

       Field      Pos Len           Header                   Reset to Standard _
 Name,Description  _1 40 Item Name       (Description)___________ Name Length 15
 Sender/Addressee  __ 17 Sender/Address__________________________
 Object Type       _2 _6 Object__________
 Document Format   _3 _3 Typ_____________
 Items in Folder   _4 _3 Itm_____________
 Mail Type         __ _2 IO______________                Modify Mail Type Text _
 Author ID         __ _8 Author__________
 Modified ID       __ _8 Modified________  Date  Time Formats
 Created           __ 12 Created_________  1.4.5  _   Date: 1 DD  2 MM  3 YY
 Modified          __ 12 Modified________  1.4.5  _               4 MON 5 YYYY
 Mailed            __ 12 Mailed__________  1.4.5  _   Time: 0 24h 1 am/pm
 Filed             _5 _8 Filed___________  1.4.5  _         Blank No Display
 Enclosures        _6 _3 Enc_____________
 Private Use       _7 _1 P_______________
              Total   70                              Copy from Cabinet ________
    Mark to Preview _

 Enter-PF1---PF2---PF3---PF4---PF5---PF6---PF7---PF8---PF9---PF10--PF11--PF12---
       Help  Menu  Quit
 Make all required changes and press ENTER to modify
- Field
This column contains the type of information that can be displayed in the "Contents of Folder Name" screen. The adjacent "Pos" column is used to determine whether it will be displayed.
- Pos
The order in which the corresponding information is to be displayed in the "Contents of Folder Name" screen. Specify the order by entering consecutive numbers from 1 to 14 in this column. If you leave a field blank, the corresponding information is not displayed in the "Contents of Folder Name" screen.
- Len
The field length for the corresponding information in the "Contents of Folder Name" screen. Specify the length by entering the required number of characters in this column.
The maximum length for all fields is 74. The currently defined total length is displayed in the "Total" field. If you exceed the maximum length, an error message is displayed as soon as you press ENTER. The layout is not saved in this case.
- Header
In this column, you can define the header for the corresponding information that is displayed in the "Contents of Folder Name" screen. It must not exceed the length defined in the corresponding "Len" column.
- Reset to Standard
If marked, all fields are reverted to the standards delivered with Con-nect (not to the standards of cabinet SYSCNT) and the currently defined language for your cabinet.
- Name, Description
If the object has a name, the name is displayed in the "Contents of Folder" screen. The length of the name displayed is determined by the value in the corresponding "Name Length" field.
If the object does not have a name, the description is displayed in parentheses.
If the object has both a name and a description, the name is displayed first. The length of the description is the difference between the defined length for this field and the value specified in the "Name Length" field.
- Name Length
Determines the length of the name displayed in the "Contents of Folder Name" screen.
- Sender/Addressee
The sender's or recipient's full name, or remote node name.
- Object Type
The type of object. For example, a document or file.
- Document Format
This field applies to documents only. The format of the document (e.g. Txt, Cnf, Bin).
- Items in Folder
This field applies to folders and files only. When objects are stored in a folder or file, this is indicated by an X.
- Mail Type
Indicates the type of mail (e.g. "I<" for received item). You can modify the abbreviation using the "Modify Mail Type Text" field, as described below.
- Modify Mail Type Text
If marked, the "Modify Mail Type Text for Contents of Folder Screen" window appears. You can define the abbreviations that are used in the "Mail Type" field.
- Author ID
User ID of the author.
- Modified ID
User ID of user that last modified the item.
- Created
Date and time item was created. You define the time stamp layout in the "Date Time Format" fields.
- Modified
Date and time item was last modified. You define the time stamp layout in the "Date Time Format" fields.
- Mailed
Date and time item was mailed. You define the time stamp layout in the "Date Time Format" fields.
- Filed
Date and time item was filed. You define the time stamp layout in the "Date Time Format" fields.
- Date Time Formats
Specifies how the date and time are displayed for the above four fields (Created, Modified, Mailed and Filed). The date values mean:
1 The day is shown as a number. 2 The month is shown as a number. 3 The year is shown as a two-digit number. 4 The month is shown as a three-letter abbreviation. 5 The year is shown as a four-digit number. A delimiter separates the day, month, and year values. You can use any character, including a blank. In the example above, the date format is 1.4.5 which means that the date is displayed as "16.Aug.1999".
The time values mean:
0 a 24 hour display, e.g. 15:35 1 AM/PM display, e.g. 3:35 PM If left blank, the time is not displayed.
- Enclosures
Number of enclosures attached to a document.
- Private Use
If marked with an X, the item is private.
- Total
The current total length of the folder layout. Maximum length is 74. If you exceed the maximum length, an error message is displayed and the layout is not saved.
- Copy from Cabinet
If you want to copy a cabinet's folder layout, enter the cabinet ID in this field. You need not be defined as a shared user to copy from another cabinet. Folders and documents are not copied; only the folder layout.
- Mark to Preview
If you want to preview the layout before saving your changes, mark this field.
Press ENTER to confirm your modifications.
- Display reply column
You can specify whether the "Reply" column is to be shown in the Inbasket and Outbasket. Specify one of the following values:
0 or blank The "Reply" column is not shown. 1 The "Reply" column is shown. A character in this column indicates a reply to/from the sender. 2 The "Reply" column is shown. A character in this column indicates a reply to/from any user. For further information, see Checking Your Inbasket and Checking Your Outbasket in the Con-nect User's Guide.
  10:10                 * * *  C o n - n e c t  3  * * *                4.Nov.03
  Cabinet LS             Administration - User Profile                    A06052
                                       +---------------------------------------+
                                       ! Set mail status message: X            !
    Date and Time Formats      _       ! Date 24.Nov.03__ to 30.Nov.03__       !
                                       ! Time 23:00___    to 23:00___          !
    Print Defaults             _       ! Mark X to hide date and time          !
                                       !  Set X Cc Long,Sonia__________        !
    Language/Command/Autosave  _       !           LS (User)                   !
                                       ! I'm out of the office until Nov. 30th !
    Folders                    _       ! In urgent cases, contact Sonia Long._ !
                                       ! _____________________________________ !
    Mail Status Message        X       ! _____________________________________ !
                                       ! _____________________________________ !
    Menu and Overlay Calendar  _       ! _____________________________________ !
                                       ! _____________________________________ !
    Screen Colors              _       ! _____________________________________ !
                                       ! _____________________________________ !
    Con-nect Version           _       ! _____________________________________ !
                                       +---------------------------------------+

 Enter-PF1---PF2---PF3---PF4---PF5---PF6---PF7---PF8---PF9---PF10--PF11--PF12---
       Help  Menu  Quit
 Modify message and press ENTER. Use QUIT to close the window
4AÛ 04,067 |
- Set mail status message
If a user will not be available through Con-nect for an extended period of time, you can set a mail status message for the user (e.g. if that user is ill).
Enter any character in this field to activate the mail status message.
Note:
The mail status message is not displayed when a user sends a reply to a memo or an invitation to a meeting.To cancel the mail status message, remove the character from this field. The message is still shown in the window, but is not displayed when someone attempts to send mail to that user.
- Date
The (starting) date for the mail status message.
Note:
Day, month, and (optionally) year must be entered in the same sequence as shown in the upper right corner of the screen. When you abbreviate (truncate) the name of the month, you must make sure that the abbreviation is unique.- to
Optional - the ending date for the mail status message. It must not occur later than 3 years after the starting date.
- Time
The time range (start and ending time) in which the mail status message is to appear on the specified day(s). When the mail status message is to appear during the entire day, you specify 12:01 AM to 11:59 PM (0:00 to 23:59).
- Mark _ to hide date and time
When you mark this field, the date and time range for the mail status message is not displayed in the mail status message window of another user.
- Set
To activate the Cc feature, mark this field.
- Cc
You can specify who is to receive a copy of each mail item that is sent to the user. This can be a nickname, user ID, cabinet name or bulletin board. You can also enter an asterisk (*) to select the addressee from a list.
This feature does not apply to invitations to meetings.
A Cc can also be defined with a cabinet address. See Cabinet Address / Description. However, the Cc defined with the mail status message works independently from the Cc and Cc 2 defined in the cabinet address. Thus, 3 different Cc definitions may be in use.
- Message text
In the lines below the Cc, type the message you want to be displayed when other users send mail to the user.
Press ENTER to confirm your modifications.
Press PF3 to close the window.
Note:
Your modifications are not saved until you quit from the
"Administration - User Profile" screen.
  10:12                 * * *  C o n - n e c t  3  * * *                4.Nov.03
  Cabinet LS             Administration - User Profile                    A06052

                                       +---------------------------------------+
    Date and Time Formats      _       !      Menu and Overlay Calendar        !
                                       +---------------------------------------+
    Print Defaults             _       ! Main Menu Name                        !
                                       !   _______________________________     !
    Language/Command/Autosave  _       !         Display Month  1              !
                                       !                  Mail  2              !
    Folders                    _       !              Calendar  3              !
                                       !                                       !
    Mail Status Message        _       !      Display Day Name  x              !
                                       !                                       !
    Menu and Overlay Calendar  x       ! Overlay Calendar ID 1  ________       !
                                       !                  ID 2  ________       !
    Screen Colors              _       !         Window Border  !              !
                                       !                                       !
    Con-nect Version           _       +---------------------------------------+


 Enter-PF1---PF2---PF3---PF4---PF5---PF6---PF7---PF8---PF9---PF10--PF11--PF12---
       Help  Menu  Quit
Modify the profile and press ENTER |
- Main Menu Name
By default, this line is blank and the menu which has been defined in cabinet SYSCNT by the system administrator or supervisor is used as the main menu. If another menu has not been defined, the Con-nect menu is the main menu.
If you create a default menu for your environment in cabinet SYSCNT, the "Main Menu Name" line must be blank (i.e. it must not contain the name of any menu).
If the main menu defined for your environment does not fit the needs of the current cabinet, you can use another menu created and stored in cabinet SYSCNT. In this case, the name of the menu is specified in this line.
- Display Month/Mail/Calendar
The sequence the information (month, mail, calendar) is displayed on the Con-nect menu. The values mean:
0 The information is not displayed. 1 The information is displayed first. 2 The information is displayed next. 3 The information is displayed last. - Display Day Name
If this field is marked, the name of the current day is displayed below the date in the upper right corner of the screens. If this field is left blank, the system number for the screen is displayed.
- Overlay Calendar ID
Optional - the ID of one or two other private cabinets to which the cabinet has access. If given permission, with the SHARE command, the cabinet can display and modify the specified cabinets' calendar entries.
In a private cabinet, the IDs of public and shared cabinets can also be specified. In a shared cabinet, only the IDs of other shared or public cabinets can be specified. In a public cabinet, only the IDs of other public cabinets can be specified.
- Window Border
The character to be used for the vertical window borders.
If the terminal supports reverse video, the window border is always shown in reverse video.
Note:
If the terminal does not show the window border in reverse video, it might be necessary to enter the appropriate Natural terminal command. For example, for an IBM terminal, you enter %T=3278 (or %T=3279 for a color terminal). See the Natural reference documentation for further information.
  10:13                 * * *  C o n - n e c t  3  * * *                4.Nov.03
  Cabinet LS             Administration - User Profile                    A06052

                                       +---------------------------------------+
    Date and Time Formats      _       !           Screen Colors               !
                                       +---------------------------------------+
    Print Defaults             _       !  Enter Color Number                   !
                                       !                   Default   Intense   !
    Language/Command/Autosave  _       !    Text               6         7     !
                                       !    Modifiable Field   3         7     !
    Folders                    _       !    Output             2         2     !
                                       !    Window Border      3               !
    Mail Status Message        _       !                                       !
                                       !  Color Numbers                        !
    Menu and Overlay Calendar  _       !    1 Blue              5 Red          !
                                       !    2 Green             6 Turquoise    !
    Screen Colors              x       !    3 Neutral           7 Yellow       !
                                       !    4 Pink                             !
    Con-nect Version           _       +---------------------------------------+


 Enter-PF1---PF2---PF3---PF4---PF5---PF6---PF7---PF8---PF9---PF10--PF11--PF12---
       Help  Menu  Quit
Make changes and press ENTER to display the new colors |
You can specify the colors to be used for various types of text in a color terminal. The color numbers are shown at the bottom of the window.
Enter the number of the colors in the Default and Intense columns. When you have completed your entries, press ENTER. The new color assignments are then shown.
Press ENTER again to save these assignments and to close the window.
Note:
If the color terminal does not show the specified colors, it might
be necessary to enter the appropriate Natural terminal command. For example,
for an IBM terminal, you enter %T=3279. See Natural's Reference documentation
for further information.
 13:49               * * *  C o n - n e c t  3  * * *               15.Dec.2003
 Cabinet LS             Administration - User Profile                    A06052

                                      +---------------------------------------+
   Date and Time Formats      _       !           Con-nect Version            !
                                      +---------------------------------------+
   Print Defaults             _       !                                       !
                                      !            Version 3.4.1              !
   Language/Command/Autosave  _       !                                       !
                                      !  Installation date 8.Oct.2003         !
   Folders                    _       !  Installation time 16:05              !
                                      !                                       !
   Mail Status Message        _       !       Update level 2                  !
                                      !        Update date 12.Dec.2003        !
   Menu and Overlay Calendar  _       !        Update time 15:01              !
                                      !                                       !
   Screen Colors              _       !            User ID ESH                !
                                      !                                       !
   Con-nect Version           X       +---------------------------------------+


Enter-PF1---PF2---PF3---PF4---PF5---PF6---PF7---PF8---PF9---PF10--PF11--PF12---
      Help  Menu  Quit
Press ENTER to display installation history - or QUIT |
The following information is provided:
- Version
The version number of the currently installed Con-nect version.
- Installation Date/Time
The date and time at which the current version has been installed at your site.
- Update Level
The update level indicates the updates that have been installed.
- Update Date/Time
The date and time at which the current update has been installed at your site.
- User ID
The user ID of the person who has installed Con-nect at your site, or when updates have been installed, the user ID of the person who has installed the currenty displayed update.
To display the installation history, press ENTER repeatedly to page through all history windows. To close the window, issue the QUIT command.
 13:49               * * *  C o n - n e c t  3  * * *               15.Dec.2003
 Cabinet LS             Administration - User Profile                    A06052

                                      +---------------------------------------+
   Date and Time Formats      _       !     Con-nect Installation History     !
                                      +---------------------------------------+
   Print Defaults             _       !                                       !
                                      !            Version 3.4.1              !
   Language/Command/Autosave  _       !                                       !
                                      !  Installation date 8.Oct.2003         !
   Folders                    _       !  Installation time 16:05              !
                                      !                                       !
   Mail Status Message        _       !       Update level 1                  !
                                      !        Update date 27.Nov.2003        !
   Menu and Overlay Calendar  _       !        Update time 14:54              !
                                      !                                       !
   Screen Colors              _       !            User ID TPI                !
                                      !                                       !
   Con-nect Version           X       +---------------------------------------+


Enter-PF1---PF2---PF3---PF4---PF5---PF6---PF7---PF8---PF9---PF10--PF11--PF12---
      Help  Menu  Quit
Press ENTER to continue - or QUIT
|
If the cabinet is a private cabinet, the last name, first name and initial are filled in by Con-nect; if the cabinet is a shared, public or standalone cabinet, the discription is filled in. In addition, the system work address information specified in the system cabinet defaults for cabinet SYSCNT (see Cabinet Address / Description (SYSCNT)) is also filled in. You can enter additional address information for the cabinet.
The "Modify Address - Cabinet cabinet-name" screen for a private cabinet is shown below.
  2:47 PM            * * *  C O N - N E C T  3  * * *               25.Jul.2002
 Cabinet LS           Modify Address - Cabinet ESH                     Thursday

     Last name Eshberry________________________        Initial W
    First name John____________________________            Sex Male______
       Company Research Associates_____________  Title Manager_________________
    Department Public Relations________________ Number __________
      Location Building 4______________________
       Address 1537 Research Circle________________________________________
               ____________________________________________________________
               ____________________________________________________________
          City Maplewood_______________________  ________
   Postal code 55109_____ Country USA_____
       Phone 1 __1 777-1234_______ 103__      Phone 2 ___ _______________ _____
        Mobile ___ _______________ _____          Fax __1 777-1234_______ 891__
      Set X Cc Long,Sonia__________        Set _ Cc 2 ____________________
               LS (User)
        E-mail John.Eshberry(a)r-asso.com______________________________________
      Internet http://www.r-asso.com___________________________________________
                                Mail Status _  Miscellaneous _   Home Address _

Enter-PF1---PF2---PF3---PF4---PF5---PF6---PF7---PF8---PF9---PF10--PF11--PF12---
      Help  Menu  Quit
Modify the address as required and press ENTER to update |
Last name, first name, initial and sex can only be modified here.
Note:
If, at a later date, you modify a user's first or last name who is
authorized for remote access, you must also flag the user to be updated with
the next synchronization. See Remote Access -
User.
Most fields are self-explanatory. Special fields for the work address are described below.
- Sex
"Sex" is the default name for this field. You can enter any value. For example, "F" or "Female".
You can rename this field via error message 0130 (for example, to "Salutation"). For further information, see Changing the Cabinet Address/Description Fields.
- Phone/Mobile/Fax
Three fields are provided for each number:
1 Enter the country code (3 digits) in the first field. Leading zeros are automatically deleted. 2 Enter the phone number (15 digits) in the second field. 3 Enter the extension (5 digits) in the third field. Phone 2 and mobile can only be specified for the work address.
- Set Cc
This can only be defined on the screen showing the work address. You can specify who is to receive a copy of each mail item that is sent to this user (Cc and Cc 2). This can be a nickname, user ID, cabinet name or bulletin board. You can also enter an asterisk (*) to select the addressee from a list.
To activate this feature, mark the "Set" field.
This feature does not apply to invitations to meetings.
A Cc can also be defined with a mail status message. See Mail Status Message. However, the Cc defined with the mail status message works independently from Cc and Cc 2 defined in the user address. Thus, 3 different Cc definitions may be in use.
This can be defined on both screens, work address and home address. You can specify the user's e-mail address. This is only for informational purposes.
- Internet
This can only be defined on the screen displaying the work address. "Internet" is the default name for this field. You can specify, for example, your company's home page. This is only for informational purposes.
You can rename this field via error message 0130 (for example, to "Comments"). For further information, see Changing the Cabinet Address/Description Fields.
Mark the "Mail Status" field to display the "Set Mail Status Message" window, as shown below.
  2:47 PM            * * *  C O N - N E C T  3  * * *               25.Jul.2002
 Cabinet LS           Modify Address - Cabinet ESH                     Thursday
                                      +---------------------------------------+
     Last name Eshberry____________   ! Set mail status message: X            !
    First name John________________   ! Date 25.Jul.2002 to 30.Jul.2002       !
       Company Research Associates_   ! Time 12:01 AM    to 11:59 PM          !
    Department Public Relations____   ! Mark X to hide date and time          !
      Location Building 4__________   !  Set X Cc Long,Sonia__________        !
       Address 1537 Research Circle   !           LS (User)                   !
               ____________________   ! I'm out of the office until July 30._ !
               ____________________   ! In urgent cases, contact Sonia Long._ !
          City Maplewood___________   ! _____________________________________ !
   Postal code 55109_____ Country U   ! _____________________________________ !
       Phone 1 __1 777-1234_______    ! _____________________________________ !
        Mobile ___ _______________    ! _____________________________________ !
      Set X Cc Long,Sonia__________   ! _____________________________________ !
               LS (User)              ! _____________________________________ !
        E-mail John.Eshberry(a)r-as   ! _____________________________________ !
      Internet http://www.r-asso.co   ! _____________________________________ !
                                Mai   +---------------------------------------+

Enter-PF1---PF2---PF3---PF4---PF5---PF6---PF7---PF8---PF9---PF10--PF11--PF12---
      Help  Menu  Quit
Modify message and press ENTER. Use QUIT to close the window |
Press PF3 to quit from this window.
Mark the "Miscellaneous" field to display the "Modify Miscellaneous - Cabinet cabinet-name" screen.
  2:48 PM            * * *  C O N - N E C T  3  * * *               25.Jul.2002
 Cabinet LS          Modify Miscellaneous - Cabinet ESH                Thursday

     Last name Eshberry                                Initial W
    First name John                                        Sex Male

        Header Description
      Birthday 01.Jan.1966_____________________________________________________
         Hobby Traveling_______________________________________________________
       Married Yes_____________________________________________________________
      Children Jessica, Charles________________________________________________
  ____________ ________________________________________________________________
  ____________ ________________________________________________________________
  ____________ ________________________________________________________________
  ____________ ________________________________________________________________
  ____________ ________________________________________________________________
  ____________ ________________________________________________________________
 Copy from cabinet ________   Mark headers _ or all _            Confirm copy _

                                Mail Status _   Work Address _   Home Address _

Enter-PF1---PF2---PF3---PF4---PF5---PF6---PF7---PF8---PF9---PF10--PF11--PF12---
      Help  Menu  Quit
Modify the address as required and press ENTER to update |
- Header/Description
Ten lines are provided where each line consists of two fields - Header and Description. If Miscellaneous information has been specified for cabinet SYSCNT, it is automatically filled in.
- Copy from Cabinet
Optional - You can copy the Miscellaneous information from any cabinet.
- Mark Headers _ or All _
If you have specified a cabinet in the "Copy from Cabinet" field, you must mark one. If you mark "Headers", only the Miscellaneous headers defined for that cabinet is copied. If you mark "All", both the Miscellaneous headers and descriptions defined for that cabinet are copied. You press ENTER to display the information.
- Confirm Copy
You must mark this field to confirm the copy of Miscellaneous information from another cabinet.
Mark the "Home Address" field to display the "Modify Home Address - Cabinet cabinet-name " screen.
  2:49 PM            * * *  C O N - N E C T  3  * * *               25.Jul.2002
 Cabinet LS        Modify Home Address - Cabinet ESH                   Thursday

     Last name Eshberry                                Initial W
    First name John                                        Sex Male

  Home address 9999 Dodd Road______________________________________________
               ____________________________________________________________

          City St. Paul________________________  ________
   Postal code 55111_____ Country USA_____

         Phone __1 555-987-654____ _____
           Fax ___ _______________ _____

        E-mail ________________________________________________________________


                                Mail Status _   Work Address _  Miscellaneous _

Enter-PF1---PF2---PF3---PF4---PF5---PF6---PF7---PF8---PF9---PF10--PF11--PF12---
      Help  Menu  Quit
Modify the address as required and press ENTER to update |
The home address from cabinet SYSCNT is not copied to a new cabinet.
Most information here is self-explanatory. For a description of the Phone, Fax and E-mail, see the work address.
Complete your entries and press ENTER in each screen to update the cabinet address.
You can limit access to a cabinet, or group of cabinets, to specific administrator(s) by adding them as owners of the cabinets.
Cabinets which have owners can only be modified by the administrators who have been specified as owners (in the case of private cabinets, they can be modified by the user to which they are assigned as well). Cabinets which do not have owners can be modified by all cabinet administrators.
When you specify the owners of a cabinet, keep the following restrictions in mind:
A cabinet administrator cannot perform the following with cabinets which have owners unless he is one of the owners:
mark the cabinet for DELETE or MOVE
modify the Command and Object table
modify the Cabinet and User Profile
modify the Owners
modify the Members
modify the Address/Description
create Statistical or Membership reports
A supervisor can perform all functions for every cabinet.
   4:47 PM             * * *  C O N - N E C T  3  * * *                14.Feb.94
  Cabinet LS             Administration - Modify Cabinet                  A06051
                                          ESH


                         Owner ID   Owner Name
                         --------   --------------------
                         ________
                         ________
                         ________
                         ________
                         ________
                         ________
                         ________
                         ________


 Enter-PF1---PF2---PF3---PF4---PF5---PF6---PF7---PF8---PF9---PF10--PF11--PF12---
       Help  Menu  Quit
 Make all required changes and press ENTER to MODIFY
|
- Owner ID
The owner must be a cabinet administrator or supervisor. You can specify up to eight owners by entering their user IDs. (Owners are optional.)
- Owner Name
After you press ENTER, the corresponding names are displayed.
The members of a shared cabinet and their profiles are maintained with this function.
  12:28 PM             * * *  C O N - N E C T  3  * * *                14.Feb.94
  Cabinet LS             Administration - Shared Cabinet                  A06170
                                          TEAM1

  Select a Function:

                         _ Display Member(s)

                         _ Add Member(s)

                         _ Delete Member(s)

                         _ Modify Profile for Member

                         _ Return to Menu

               Member(s) ____________________
                 Profile _   1 Shared Cabinet Profile
                             2 Private Cabinet Profile
                             3 Special Profile

 Enter-PF1---PF2---PF3---PF4---PF5---PF6---PF7---PF8---PF9---PF10--PF11--PF12---
       Help  Menu  Quit  Displ Add   Delet ModPr
 Mark one item from the list above
|
The information below contains the following topics:
When the Display Member(s) function is marked, the "Administration - Display Member(s)" screen, as shown below, is displayed listing all members of the cabinet.
   5:01 PM              * * *  C O N - N E C T  3  * * *               14.Feb.94
  Cabinet LS            Administration - Display Members                  A03170
                        Cabinet TEAM1

  Mark Member   Type       Name / Description               Profile  Date Added
  ---- -------- ---------- -------------------------------- -------- -----------
    _  *9999987 User       Landrey, Carol                   Cabinet     11.08.94
    _  *9999982 User       Mayer, Julie                     Special     09.02.94
    _  EAS      User       Ashley, Elizabeth                Own         05.01.94
    _  NJ       User       Johnston, Norman                 Own         05.01.94
    _
    _
    _
    _
    _
    _
    _
    _
    _

  or Position to *

 Enter-PF1---PF2---PF3---PF4---PF5---PF6---PF7---PF8---PF9---PF10--PF11--PF12---
       Help  Menu  Quit        Prof                    Delet
 Mark one item from the list above
|
You can mark one user at a time in the list and either delete him from the cabinet, or modify the type of profile the member uses for the cabinet.
If any member of the cabinet is an external user, the external user's alias number is displayed in the column Member. External members can only be deleted with the Remote Access - Membership function. See Delete Authorization.
Enter the last name(s) or the user ID(s) of the new member(s) in the "Member(s)" line, and specify the type of profile the member(s) will use when accessing the shared cabinet:
| 1 | The profile of the shared cabinet (the printer specified in the user's profile will be used). |
| 2 | The member's own user profile. |
| 3 | A special profile which must be specified using the Modify Profile for Member function, discussed later in this section (this can only be used when a single member is being added). |
To add several members at one time, you can enter an asterisk (*) in the "Member(s)" line. A window listing all cabinet users is displayed. Mark those you want to define as members of the cabinet and press ENTER. All members added by this method will have the same profile.
The type of profile used by the member determines the cabinet ID used (as displayed in the upper left corner of the screen). For example:
| 1 | The name of the shared cabinet is used. |
| 2 | The name (cabinet ID) of the member is used. |
| 3 | The name of the shared cabinet is used. |
Specify the Add Member(s) function - Con-nect then displays the full name of the member just added to the right of the "Member(s)" line. To add additional members, repeat the process.
You can delete member(s) from the cabinet using the following steps:
enter the member name(s) or user ID(s) in the "Member(s)" line of the "Administration - Shared Cabinet" screen; or
mark the member(s) on the "Administration - Display Members" screen;
and select the Delete Member(s) function.
Note:
External members can only be deleted from the cabinet with the
Remote Access - Membership function. See Delete
Authorization.
The name of the last member deleted is displayed to the right of the "Member" line.
Use this function to change the type of profile the member uses when accessing the cabinet, or to specify a special profile.
See Profile Initialization for a description of how a profile is initialized when a shared cabinet is used.
Specify the cabinet member for which you want to modify the profile using the following steps:
enter the member name or user ID in the "Member(s)" line of the "Administration - Shared Cabinet" screen; or
mark the member on the "Administration - Display Members" screen;
and select the Modify Profile for Member function.
Note:
The name of the last member modified during the session is displayed
to the right of the "Member(s)" line.
As a result, the "Administration - Modify Profile" screen is displayed.
  12:32 PM             * * *  C O N - N E C T  3  * * *                14.Feb.94
  Cabinet LS             Administration - Modify Profile                  A06171


  In Shared Cabinet TEAM2    Member
  uses the Profile Type marked with =>


                    =>   _ Shared Cabinet Profile

                         _ Private Cabinet Profile

                         _ Special Profile

                         _ Return to Menu


  Select the desired Profile Type


 Enter-PF1---PF2---PF3---PF4---PF5---PF6---PF7---PF8---PF9---PF10--PF11--PF12---
       Help  Menu  Quit
 Mark one item from the list above
|
The type of profile currently being used is marked with "=>". Modify the type of profile by marking the new profile with any character.
If you select the special profile, you must define the profile just as you do when adding a new cabinet. See Cabinet Profile. Upon completion, the "Administration - Special Profile" screen is displayed. The special profile can then be used for existing members of other shared cabinets by marking the "Copy Special Profile to other Members" field.
  12:32 PM             * * *  C O N - N E C T  3  * * *                14.Feb.94
  Cabinet LS             Administration - Special Profile                 A06172
                         Member
                         Shared Cabinet TEAM2
  Select a Function:

                         _ Copy Special Profile to other Members

                         _ Cabinet and User Profile

                         _ Command and Object Table

                         _ Return to Menu


 Enter-PF1---PF2---PF3---PF4---PF5---PF6---PF7---PF8---PF9---PF10--PF11--PF12---
       Help  Menu  Quit  Init  Prof  CmdOb
 Profile has been modified
|
The Command and Object Table function allows you to specify the permitted commands and objects for each user individually. Con-nect then creates command and object tables for the user.
   4:47 PM             * * *  C O N - N E C T  3  * * *                14.Feb.94
  Cabinet LS        Administration - Command and Object Table             A06053
                                     Cabinet DEMO

  Select a Function:

                         _ Authorized Commands

                         _ Authorized Objects

                         _ Return to Menu


 Enter-PF1---PF2---PF3---PF4---PF5---PF6---PF7---PF8---PF9---PF10--PF11--PF12---
       Help  Menu  Quit  Cmd   Objs
 Mark one item from the list above
|
The information below contains the following topics:
The "Administration - Command/Object Authorization" screen appears when you select the Authorized Commands function. It lists all Con-nect commands in alphabetical order. The first column on the left contains the commands which are used in conjunction with specific objects. The five other columns contain the object-independent commands.
   4:53 PM             * * *  C O N - N E C T  3  * * *                14.Feb.94
  Cabinet LS        Administration - Command/Object Authorization         A06053
                                     Cabinet DEMO
  Cmds w/ Objs Object-independent Commands......................................
  O ADD        X ABANDON    X DESK       X HELP       X QUIT       X TRANSLATE
  X COPY       X ADDRESS    X DETACH     X IMPORT     X RENAME     X UNDO
  X DISPLAY    X ASCENDING  X DIRECTION  X INPUT      X REPLIES    X USER
  X ERASE      X BOTTOM     X DX         X LOCK       X REPLY      X X
  X FILE       X CANCEL     X DX-Y       X LOGON      X RESET      X Y
  X INFO       X CENTER     X DY         X MENU       X RULE       _
  O MODIFY     X CHANGE     X ENCLOSE    X MX         X SAVE       _
  X PERFORM    X CLEAR      X EX         X NEWPAGE    X SCAN       _
  X PRINT      X COLUMN     X EX-Y       X NOTEPAD    X SET        _
  X SEARCH     X COMPRESS   X EXPORT     X ORIGINAL   X SHARE      _
  X SEND       X CONFIRM    X EY         X OUTPUT     X SHIFT      _
  X USE        X CONFORM    X FIND       X PAGE       X SNAPSHOT   _
  _            X DEFAULTS   X FLIP         PHONEPAD   X SPLIT      _
  _            X DELIMIT    X FORMAT     X POSITION   X TELEX      _
  _            X DESCENDING X FORWARD    X POSTPONE   X TOP        _

 Mark with X to allow, O to specify allowed objects or leave blank to disallow
 Enter-PF1---PF2---PF3---PF4---PF5---PF6---PF7---PF8---PF9---PF10--PF11--PF12---
       Help  Menu  Quit  Cmd   Objs
 Make the changes and press ENTER to update
|
By default, all commands which are supported are marked with an X, which means that they can be used from the cabinet without restrictions. If you remove an X, the adjacent command cannot be used from the cabinet. For example, the command PHONEPAD has been disallowed on the screen above.
You can also limit the objects which can be used in conjunction with certain commands by marking the commands (in the left-most column) with the letter O. In the example above, objects are limited for the ADD and MODIFYcommands.
After you have made your selections, press ENTER. As a result, a screen is displayed for the first command selected, listing the available objects for the command. By default, all objects are allowed. To disallow an object with the command, delete the X adjacent to the object.
The example below displays the objects permitted with the ADD command; the user of this cabinet cannot add command aliases or printer profiles.
   4:57 PM             * * *  C O N - N E C T  3  * * *                14.Feb.94
  Cabinet LS        Administration - Command/Object Authorization         A06053
                                     Cabinet DEMO

  Mark the objects allowed with command ADD          with an X

   X ADDRESS        PRINTER      _              _              _
   X APPLICATION  X PROCEDURE    _              _              _
   X APPOINTMENT  X PROGRAM      _              _              _
   X BULLETIN     X QUERY        _              _              _
   X CATEGORY     X REFERENCE    _              _              _
     COMMAND      X REMINDER     _              _              _
   X DISTRIBUTION X RESOURCE     _              _              _
   X DOCUMENT     X ROOT         _              _              _
   X FOLDER       X SYNONYM      _              _              _
   X FORM         X TODO         _              _              _
   X MEETING      X WORD         _              _              _
   X MEMBER       _              _              _              _
   X MENU         _              _              _              _
   X NOTEPAD      _              _              _              _

 Enter-PF1---PF2---PF3---PF4---PF5---PF6---PF7---PF8---PF9---PF10--PF11--PF12---
       Help  Menu  Quit  Cmd   Objs
 Make the changes and press ENTER to update
|
After you have completed your specifications, press ENTER to proceed to the screen for the next command you want to modify.
The "Administration - Command/Object Authorization" screen appears when you select the Authorized Objects function. It lists all Con-nect objects in alphabetical order.
   4:59 PM             * * *  C O N - N E C T  3  * * *                14.Feb.94
  Cabinet LS        Administration - Command/Object Authorization         A06053
                                     Cabinet DEMO

    X ADDRESS      X MEMBER       X RESOURCE     _              _
    X APPLICATION  X MEMO         X RESULTS      _              _
    X APPOINTMENT  X MENU         X ROOT         _              _
    X BULLETIN     X MONTH        X SYNONYM      _              _
    X CABINET      X NAME         X TODO         _              _
    X CALENDAR     X NOTEPAD      X USER         _              _
    X CATEGORY     X PFKEY        X WEEK         _              _
      COMMAND      O PRINTER      X WORD         _              _
    X DAY          X PROCEDURE    X YEAR         _              _
    X DISTRIBUTION X PROFILE      _              _              _
    X DOCUMENT     X PROGRAM      _              _              _
    X FOLDER       X QUERY        _              _              _
    X FORM         X REFERENCE    _              _              _
    X MEETING      X REMINDER     _              _              _

  Mark with X to allow or leave blank to disallow
  O means that not all commands are allowed with this object
 Enter-PF1---PF2---PF3---PF4---PF5---PF6---PF7---PF8---PF9---PF10--PF11--PF12---
       Help  Menu  Quit  Cmd   Objs
 Make the changes and press ENTER to update
|
By default, all objects which are supported are marked with an X, which means that they can be used from this cabinet without restrictions. If you delete an X, the adjacent object cannot be used from the cabinet.
If you limited the use of an object so that it can only be used with certain commands (see previous section), that object is marked with the letter O on this screen.
Objects which are not permitted do not appear in the prompting windows in the user's cabinet.
To modify a cabinet, enter the name of the cabinet in the "Cabinet" field of the "Administration - Cabinet Maintenance" screen and select the Modify Cabinet function. The "Modify Cabinet cabinet-name" screen appears, where you can modify the following cabinet features - which are identical to the features specified when a cabinet is added:
cabinet and user profile;
address of private cabinet / description of standalone, shared, public cabinet;
owners of cabinet;
members of shared cabinet;
command and object table.
Note:
If owners have been defined to a cabinet, only the owners or
supervisor can modify the cabinet.
If you enter a specific cabinet on the "Cabinet" field of the "Administration - Cabinet Maintenance" screen and select the Display Cabinet(s) function, cabinet profile information for that cabinet is displayed.
To obtain a list of all existing cabinets, select the Display Cabinet(s) function, without specifying a cabinet name. A window appears, where you can mark the type of cabinet(s) you want to view, or press ENTER to obtain a list of all cabinets. The cabinets are listed in alphabetical order according to the cabinet names.
The PF-keys at the bottom of the "Administration - Display Cabinets" screen list the maintenance functions you can perform for a cabinet.
The following is the type of information displayed:
- Cabinet
The cabinet ID.
- Name / Description
The name of the corresponding user or the description in case of a standalone, shared or public cabinet.
- Type
Type of cabinet: private, standalone, shared, or public.
- NoM
An X indicates that the mail function has been disallowed for the current cabinet.
- Own
An X indicates that the current cabinet is an owner of the cabinet listed. If the current cabinet is not an owner, but other cabinets are, the total number of owners is displayed.
- Adm
The type of administrator who owns the cabinet:
A Cabinet administrator X System administrator S Supervisor (system and cabinet administrator) - Modified
The date when the cabinet was created or last modified.
To display a cabinet, you mark the cabinet and press ENTER.
Enter the name of the cabinet you want to copy (i.e. the source cabinet) in the "Cabinet" field of the "Administration - Cabinet Maintenance" screen and select the Copy Cabinet function. Enter the following information as appropriate on the "Administration - Copy Cabinet" screen.
- New cabinet
The target (new) cabinet. If the cabinet is to be a private cabinet, enter the user ID of the person who is to use the cabinet, otherwise enter a cabinet ID.
- Last Name
Last name of the private cabinet user.
- First Name
First name of the private cabinet user.
- Initial
Optional - middle initial of the private cabinet user.
- Description
A description of the standalone, shared or public cabinet.
- Disallow Mail
Mark this field with any character if mail is not to be received or sent from a standalone, shared or public cabinet.
If the mail function has been disabled for the source cabinet, it will also be disabled in the target cabinet. In this case, this field is not considered.
- Copy Folder
Mark this field with any character if all folders within the source cabinet are to be copied to the target cabinet. The documents stored within the folders are not copied.
If this field is not marked, only the profile and address of the source cabinet are copied.
To move the contents of a cabinet to another cabinet, enter the name of the cabinet you want to move in the "Cabinet" field of the "Administration - Cabinet Maintenance" screen and select the Move Cabinet function. Enter the following information in the lines shown at the bottom of the screen.
- Move Cabinet
The name of the cabinet you selected for the move function is filled in by Con-nect.
- to Cabinet
The ID of the cabinet to which you want to move the contents of the selected cabinet - this target cabinet must already exist.
You are notified that the cabinet is marked for the "Move Pending Cabinets" utility. For further information, see Con-nect Utilities, section Move Pending Cabinets.
Specify the cabinet you want to delete either by entering the name in the "Cabinet" field of the "Administration - Cabinet Maintenance" screen and selecting the Delete Cabinet function, or by selecting the cabinet from the "Administration - Display Cabinet" screen.
In either case, enter the following information at the bottom of the screen:
- Enter cabinet
Enter the name of the cabinet to be deleted for confirmation.
- Erase from
The current date is always given. If you want a different date, type over the given date and press ENTER to confirm.
If you decide not to modify the date, press ENTER. You are asked to press ENTER a second time to confirm the date.
You are notified that the cabinet is marked for the "Delete Pending Cabinets" utility. For further information, see Con-nect Utilities, section Delete Pending Cabinets.
A corresponding mail status message is also created for the cabinet.
Specify the cabinet you want to rename either by entering the name in the "Cabinet" field of the "Administration - Cabinet Maintenance" screen and selecting the Rename Cabinet function, or by selecting the cabinet from the "Administration - Display Cabinet" screen.
In either case, enter the following information at the bottom of the screen:
- Rename Cabinet
The name of the cabinet you selected for the rename function is filled in by Con-nect.
- to Cabinet
The ID of the cabinet to which you want to rename the selected cabinet.
- Rename from
The current date is always given. If you want a different date, type over the given date and press ENTER. You are asked to press ENTER a second time to confirm the date.
You are notified that the cabinet is marked for the "Rename Cabinets" utility. For further information, see Con-nect Utilities, section Rename Cabinets.
Once the rename date for a cabinet pending for rename is reached, no one is permitted to logon to that cabinet.
To display pending cabinets, select the Display Pending Cabinet(s) function on the "Administration - Cabinet Maintenance" screen. A window is displayed where you can select cabinets marked for deletion, cabinets marked to be moved or cabinets marked to be renamed.
The subsequent screen(s) list the cabinets marked for the pending action. You can either display specific cabinet(s), or undo the pending action for specific cabinet(s). See the Con-nect Utilities documentation regarding the "Delete Pending Cabinets", "Move Pending Cabinets" and "Rename Cabinets" utilities.