
Notes:
If you wish to retain hyphens during a Windows import, you must first set the KeepHyphens variable. The default is to have it unset (0).
If you desire to have Natural Logicals be treated as a Bit instead of a Byte (Default), you must set the ADA_NATURALBYTEASBIT variable to 1. The default is to treat Natural Logicals as a Byte field.
On Empty Fields (Fields in which the values are 0 or an empty string), CONNX treats these fields as a SQL Null by default. If you desire to have the fields be treated as a 0 or an empty string, you must set the variable ESQLNULL to 0.
The Adabas SQL Gateway server setup must be complete, and the CONNX Listener must be running on the mainframe.
Click the Import button in the CONNX Data Dictionary Manager window.
The Import
CDD dialog box appears.
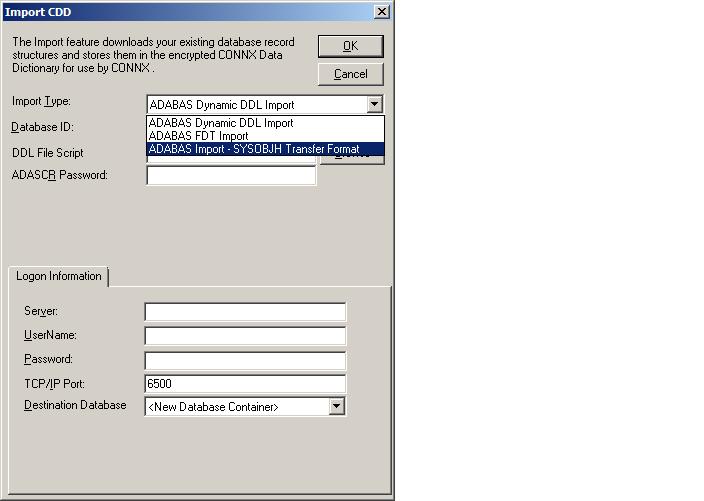
Select Adabas Import SYSOBJ Transfer Format in the Import Type list box.
Enter a Dictionary Database ID in the text box.
Enter the name of a SYSOBJ extract file. If necessary, use the Browse button to locate a file on the network. Instructions on how to do are at OpenSystems are and Mainframe.
Enter an ADASCR password, if you are using the ADASCR security method.
If the database you are importing from is located on the same Windows machine that you are importing to, enter "localhost" in the Server text box. For all other instances, enter the TCP/IP address or server name in the Server text box. The CONNX Listener Task attempts to access the given server. If the server is unavailable or cannot be located, the following message appears: "The CONNX Listener process (CNXRUN##_MAIN) is not running on the system."
Enter a CONNX user name and password.
Enter a TCP/IP port number. 6500 is the default TCP/IP port.
Select a Destination Database for the imported tables. See Adding a Database Connection for more information.
Click the OK button.
The CONNX Import Table Selection dialog box appears. Select each file to import, and then click the Add or Add All button.
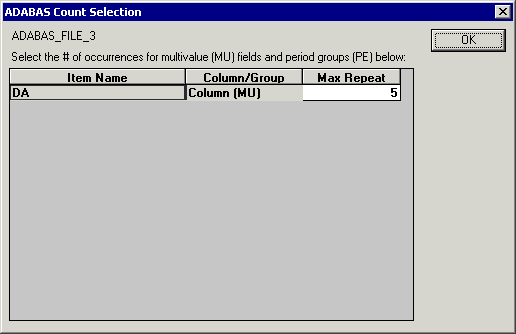
The Adabas
Count Selection dialog box appears. Enter the number of maximum
occurrences of each field under Max
Repeat, and then click the OK
button.
Save the CDD by selecting the File menu and then clicking Save. The CDD appears under Adabas in the upper pane of the CONNX Data Dictionary Manager.