
Java is required to run the Eclipse SDK
If you already have Java Runtime Environment (JRE, v1.6 or higher) installed, you may skip this step.
To find out what level of java you have installed, run the command
java -version from either a shell ( Unix/Linux) or
command box (Windows) depending on your system.
If Java is not installed already in your environment, follow these steps
Install the latest version from here.
The minimum version, JRE 1.6 is available here
Find the "Java Runtime Environment (JRE)" and download it.
Accept the license agreement, and choose the correct package for your platform.
Start the Java installer (for example double-click) and follow the instructions.
The Java download site provides detailed install instructions.
Once the installer has finished, Java is installed in your environment.
The Eclipse OpenSource framework forms the base for the SOA Gateway administration and monitoring tool, the 'Control Centre'.
Eclipse 3.6 (or higher) is required to run the SOA Gateway Control Centre. If you have a valid copy of Eclipse installed already, you may skip this step.
Steps required to install the Eclipse framework:
Download Eclipse version 3.6 for your environment :
for Windows x86
for Windows x86-64
for Linux x86 GTK2
kits for other environments are available here, select the one matching your environment.
Unzip the downloaded packages, this will create a directory structure under a top-level directory named 'eclipse', at the selected file system location. for example C:\eclipse on Windows when unzipping into C:\, or /user/eclipse on Unix/Linux if the selected location was /user
Start Eclipse - 'eclipse.exe' on Windows, './eclipse' on Unix/Linux, from the top-level eclipse directory.
If you are new to Eclipse, please take the 'Getting started with Eclipse' tour before continuing.
To run the SOA Gateway Control Centre, you must first install the following additional plugins.
Note:
As the Eclipse Update Manager may need to get to an external site, you
may have to specify a HTTP proxy in order to access it from an intranet.
Instructions on how to set the HTTP proxy can be found in the
Troubleshooting
section.
Steps required to install:
Start the Update Manager, which can be found on the Eclipse main menu under .
Open the Helios from the drop down box.
Select the following feature
Web, XML and Java EE Development
Click
A list of selected features will be presented, select to continue.
If you agree with the feature licences, select "I accept ..." radio button and click to download and install the features.
When prompted, restart eclipse.
The SOA Gateway Control Centre is installed into the Eclipse environment with the "Update Manager" as well. Start Eclipse and follow these steps to download the installation files, depending on the installation source:
Install from a product CD
Install from an update site
Start the Update Manager, which can be found on the Eclipse main menu under .
Select
Click Archive...
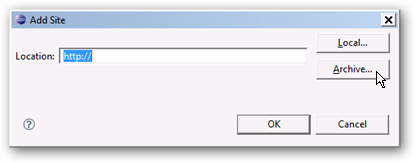
In the file chooser dialog, navigate to the location of the archived update site on the CD, in the eclipse/updates folder.
Important:
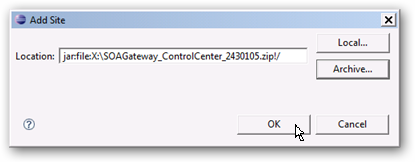
The name of the Archived Update Site zip file may be
different to this example as it may change from version to version, the current
zip file will always be located in eclipse/updates, so please
navigate to that location and pick the zip file present there.
Click
The Update Manager will now show the contents of the archive.
You should always select the SOA Gateway Control Centre catagory
Important:
To be able to deploy server(s) later on select all required
server install kit(s) here as well
Important:
Depending on the SOA Gateway version on your CD, the version
numbers above may not match exactly.
Click
A list of selected features will be presented for review, confirm by clicking the button
You will be prompted to restart Eclipse.
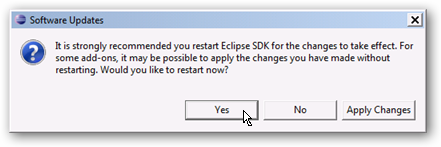
Click
After Eclipse has been restarted, the SOA Gateway Perspective will be activated automatically, and you are asked for the name of the initial project in the selected workspace.
Select to start the deployment wizard and begin deploying your SOA Gateway Server now.
Select to create the intial project, and deploy SOA Gateway Server files later on.
Proceed to the Server Installation section.
Start the Update Manager, which can be found on the Eclipse main menu under .
Note:
As the Eclipse Update Manager may need to get to an external site,
you may have to specify a HTTP proxy in order to access it from an intranet.
Instructions on how to set the HTTP proxy can be found in the
Troubleshooting
section.
In the text box, enter the URL
http://developer.softwareag.com/tech/eclipse/updates/site.xml. You will need an Empower account in order to be able to do this.
The Update Manager will now contact the update site and display the list of available downloads.
An empty box next to the features name indicates that the feature is not selected
Choose a feature by clicking the checkbox beside it. A tick appears in the box beside the features
You should always select the 'SOA Gateway Control Centre' catagory
You should also select the install kit(s) which correspond to the system that will run the SOA Gateway Server
In some cases, you may also drill down by expanding the feature menu.
Once finished, click and the required features will be downloaded.
Depending on the amount of features selected, and the speed of your connection, this may take some time.
Once the download has finished, you will be presented withe Legal Notices dialog. Read and Accept the license agreement before continuing.
Check and click
Review the features to be installed, and click
The selected features will now be installed.
If the features have been signed, you will be asked if you want to install a digitally signed feature.
Either way, click
Restart Eclipse when prompted.
After Eclipse has been restarted, the SOA Gateway Perspective will be activated automatically, and you are asked for the name of the initial project in the selected workspace.
Select to start the deployment wizard and begin deploying your SOA Gateway Server now.
Select to create the intial project, and deploy SOA Gateway Server files later on.
Now the SOA Gateway Control Centre has been installed. Proceed to the relevant server installation section choosing a link below.
Server Installation Procedure - Windows