The following will guide you through the process of installing and starting the SOA Gateway server.
Once the SOA Gateway Control Centre has been installed, you are ready to download the SOA Gateway Server install files to your local machine.
The next step then is to install and start the SOA Gateway server. To do this, you may have to deploy files to a remote machine. For example, you want to run your SOA Gateway Control Centre on Windows, but your SOA Gateway server on Linux. You can use the deployment wizard to send the deploy the required files to Linux and start your server.
If this is the first time you've started the Control Centre, the SOA Gateway Perspective will be activated automatically.
If, for some reason, the SOA Gateway Control Centre perspective has not started, click and choose SOA Gateway Control Center (Admin) from the list. Click
You will be asked to specify a project name or accept the default. Usually you will now simply click the 'Continue' button, which will then start the 'Deployment Wizard' to guide you through the process of defining your server within the SOA Gateway Control Center and transfer (FTP) the installation files to the SOA Gateway Server target machine.
If you, for whatever reason, opt to NOT run the Deployment Wizard at that time, you can start the wizard anytime later on by clicking the Deployment action button in the title bar of the 'SOA Gateway Servers' view
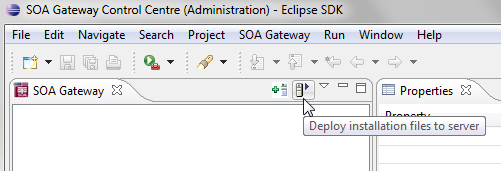
The Deployment Wizard will now start
From the drop-down menu, choose the installation files you want to deploy. These files were downloaded as part of the Find and Install step above.
Select your SOA Gateway license file.
In this example we are deploying to a x86 Suse Linux 10 machine, so select the relevant install kit from those listed as being covered by the selected license. The license information is also displayed.
Click
The following screen allows you to either select an existing SOA Gateway server to deploy to (a list of servers known within your Control Centre environment is presented), or to define a new SOA Gateway server to the Control Centre. This server definition will be used for both the deployment process as well for (remote) server administration later on.
To define a new server:
Enter a 'friendly name'. This name will be used to refer to a SOA Gateway Server without needing to enter the hostname (or IP) later on.
Enter the hostname or IP of the machine on which the SOA Gateway server will run. This host/IP will be used to send the install files ( via FTP ) and will become the host/IP that you use when issusing requests to SOA Gateway.
Enter the port which you would like SOA Gateway to listen for connections on.
A new Apache web server will be installed, you must ensure that the port choosen here is available for use on the server machine.
The port entered here will utimately be the port that SOA Gateway uses to service requests.
Important:
Once you have filled in all of the above, click
The server will now be added to your SOA Gateway Control Centre 'Servers View' for later use.
Alternatively, if an already defined server is to be used (i.e. installation files deployed to it), check 'Deploy to existing SOA Gateway Server' and select a server from the list in the 'Existing Server Information' section.
Select the transport mechanism, one of
FTP: only transfer, actual installation has to be carried out by logging on to the target system and starting the installation script manually
SSH: this method optionally allows for automatic ("silent") installation, no separate login to the remote system required. After the files have been transferred the install script will be executed by the deployment wizard, the SOA Gateway server (optionally) be started.
Click
The next screen is used to deploy the installation files to the target machine, i.e. the machine is where the SOA Gateway server will run. Which of the following paths will be taken depends on the choice made regarding the transport mechanism above.
FTP:
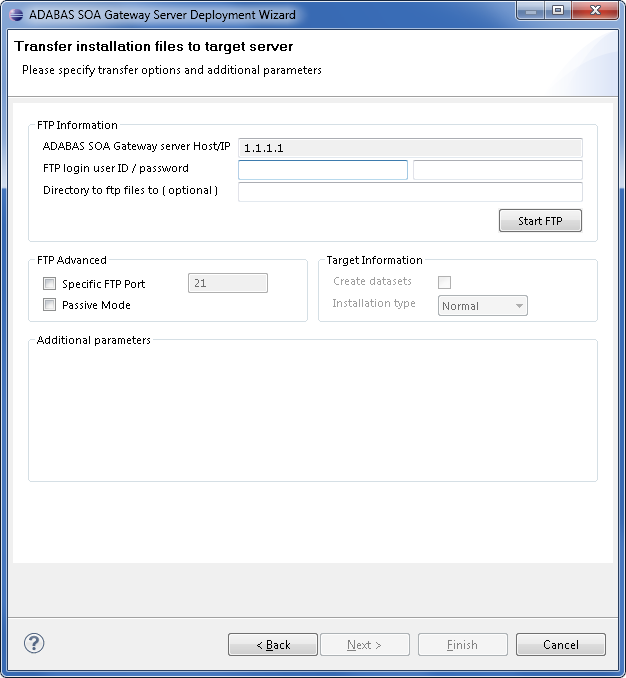
The Host / IP will have already been filled by what has been specified on the previous page.
Enter the username which is used to login (via FTP) to the server machine (if required)
Enter the password (if required)
Enter a directory to send the installation files to. This directory may be relative to the login directory, or can be a fully qualified path name. The directory will be created if it does not exist.
If your FTP server requires a port other than 21, you can specify that by selecting Specfic FTP Port and entering the FTP port number.
If your FTP server requires passive mode transfers, you can enable this by selecting the Passive Mode checkbox
Important:
Click the button to begin
the FTP.
The Additional parameters group will allow you to enter (if required) additional information required for the operation of the driver(s) to be installed. Parameters related to all licensed drivers are queried here, you may omit those for all drivers you do not intend to use.
Once the FTP has completed, you need to logon to the target machine, and run the server-specific installation steps.
SSH:
To just transfer the install files and not have the Deployment Wizard run the installation remotely, fill in your login credentials, sepcify a directory to transfer the files to and click .
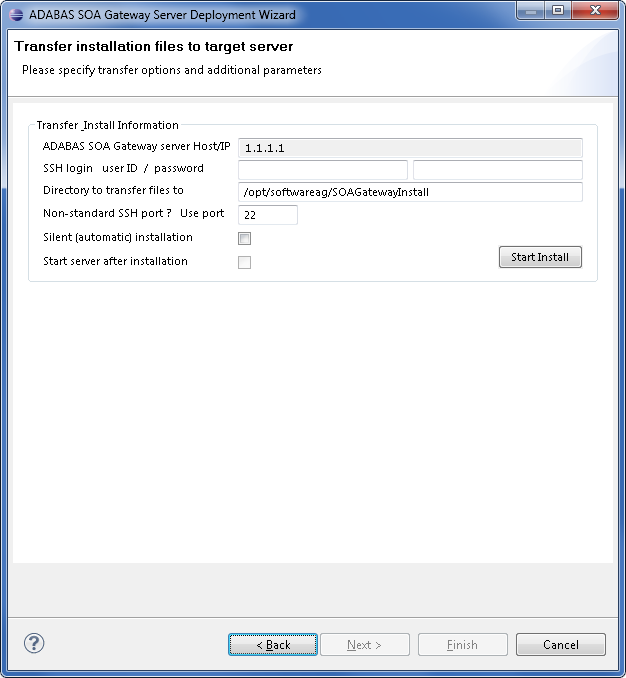
Once you have started the transfer you will prompted for your confirmation that it is really the host you want to send the files to.
If you want the Deployment Wizard to also schedule the actual installation remotely, check the option, set the various directories, then click .
Important:
If you do not want to do the installation silently, follow
the instructions here
Important:
If you are updating an existing installation, the
should not be
checked.
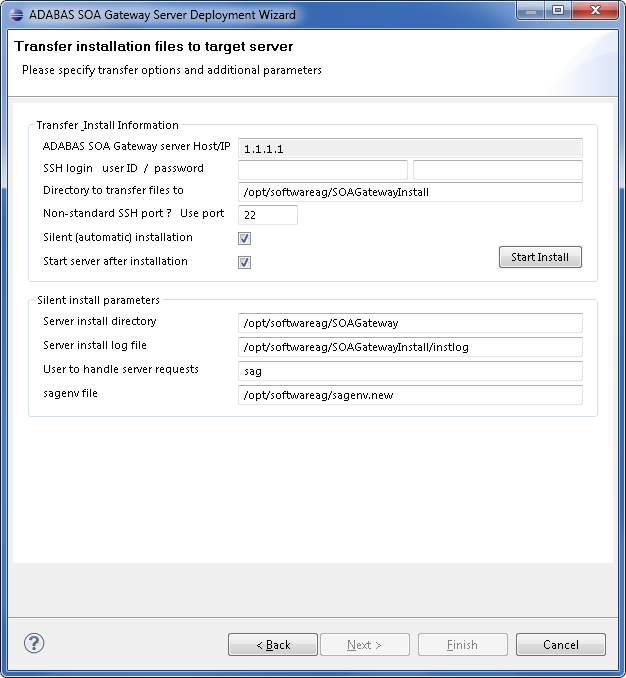
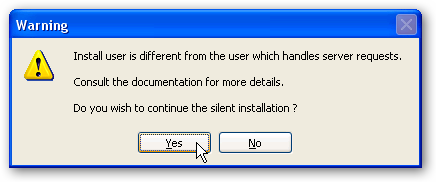
When different User IDs are specified for the "login" and "handle server requests", the following will prompt you for confirmation, please check if the authorization level for the user running the SOA Gateway server is sufficient to access and execute files created by the "login user".
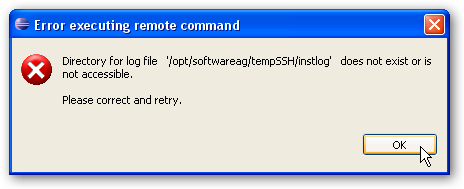
If the directory specified to contain the install log file does not exist you will be asked to create it before the installation can continue.
All other files will be created by the installation scripts.
The overall transfer status will be shown directly within the Deployment Wizard window, for larger files an external window will pop up to indicate the progress.

Note:
To enable "passwordless logins" execute the following
steps:
Run the command : ssh-keygen -t dsa
e.g.
Generating
public/private dsa key pair. Enter file in which to save the key
(/home/myUser/.ssh/id_dsa): Enter passphrase (empty for no passphrase): Enter
same passphrase again: Your identification has been saved in
/home/myUser/.ssh/id_dsa. Your public key has been saved in
/home/myUser/.ssh/id_dsa.pub. The key fingerprint is:
7d:a9:f9:44:31:c3:d8:6c:d8:c1:d0:5f:39:f8:75:79 myUser@192.168.135.51
Copy your public key to the remote server
e.g.
>> scp .ssh/id_dsa.pub
myUser@192.168.135.99:.ssh/ Password: id_dsa.pub 100% 600 0.6KB/s
00:00
Login to the remove server and add your public key to the authorized keys.
e.g.
myUser@192.168.135.51:~> ssh -l myUser
192.168.135.99 Password: Last login: Tue Sep 29 17:02:47 2009 from
v-br.vpn.risaris >> cd .ssh/ >> cat id_dsa.pub >>
authorized_keys2
You should now be able to login to the remote server without a password.
In the case of problems, SSH information will appear in /var/log/messsages or /var/log/lastlog
Now that the server has been installed, you can query the server status from the Deployment Wizard.
You can choose to view this status information in the Deployment Wizard, in a browser, or both.
Click the or the buttons to return the status of the server.
You should now click to create SOA Gateway drivers that are enabled in your license. If you choose to not add drivers now, they can also be created at a later stage, more information about defining drivers can be found in the Servers View section of this documentation.
The "Driver Wizard" will present a list of licensed drivers, and come up with all drivers selected and ready to be defined. You may now just click the button to define all of them, or deselect those you do not need or want to set up at that stage.
Click "Configure".
In case the driver does not require any additional parameters to be set, it will be defined now, otherwise the Driver Definition Dialog will ask for the additional parameter(s) to be set. e.g. for an Adabas driver set the "ListMaxRecords" parameter. Click the button.
Click to close the Deployment Wizard
Configure SOA Gateway using the SOA Gateway (Eclipse) Control Centre
This section outlines machine specific installation steps.
On the target machine, in the installation directory, execute the script ./installServer.sh.
Important:
This script should run using the
root or sag user.
Important:
If you wish to update an existing installation, run this
script with the -update option.
The script will check if the prerequisites are met.
Enter the full path of the SOA Gateway installation. Example: /opt/softwareag/soaGateway
If required, specify the Software AG sagenv file that is to be used (an absolute path must be used). Example: /opt/softwareag/sagenv.new
Note:
If you do not have a sagenv file available, enter
"skip".
The next prompt asks what user SOA Gateway should be started as. If you included a valid SAGENV file in the previous step, you should choose the user who runs Software AG products, normally the "sag" user. Otherwise, if you started the script as root, lesser privileged user will be chosen, normally www or nobody. If you did not start the script as root, the current user will be chosen.
The script now has all the information to commence the installation. Follow the on-screen instructions to start Apache.