This document describes the creation and maintenance of GFB schema using the Data Mapping Tool. It covers the following topics:
Note:
If you want to use UTF-8 character encoding, you must verify that your
GFB field lengths are increased as required to accommodate the character set
referenced by the code page you select and the data requested in the GFB. You
can increase these field lengths manually by editing the Predict file or data
definition module (DDM) used when the GFB is generated.
You can create a GFB schema that maps all the fields in the DDM to tables in your RDBMS. One table is created with the same name as the DDM and additional tables are created for each MU or PE field within the DDM.
Once a GFB schema is created, you can use it to generate a global format buffer (GFB) and associated field table (GFFT) for use by the Event Replicator for Adabas and the Event Replicator Target Adapter. For more information, read Generating a GFB and Field Table.
![]() To create the GFB schema from an entire DDM, complete the following
steps:
To create the GFB schema from an entire DDM, complete the following
steps:
Drag and drop a DDM from the SYSTRANS DDMs (leftmost) pane onto a target RDBMS in the Target RDBMS (middle) pane. For complete information on listing DDMs in the SYSTRANS DDMs column and target relational databases in the Target RDBMS pane, read Locating and Selecting a Source DDM and Maintaining the Target Relational Database List.
Note:
If you want to use UTF-8 character encoding, you must verify that
your GFB field lengths are increased as required to accommodate the character
set referenced by the code page you select and the data requested in the GFB.
You can increase these field lengths manually by editing the Predict file or
data definition module (DDM) used when the GFB is generated.
A Define GFB Schema Name dialog appears.

Specify the name you want to use for the RDMS table on the Define GFB Schema Name dialog. The name can be up to 32 characters long. The name you specify is used for the RDBMS table and its subtables.
Note:
This is not the same as the name of the global format buffer (GFB)
definition used by the Event Replicator for Adabas.
In addition, once you have selected a name here, you can always rename it in the GFB Schema area of the Data Mapping Tool. For more information on renaming tables, the GFB Schema, read Renaming Schema Tables.
Click .
The Set MU/PE Occurrences dialog appears, allowing you to specify the number of occurrences for MU and PE fields for which no flattening has been triggered. The following is an example of this dialog:
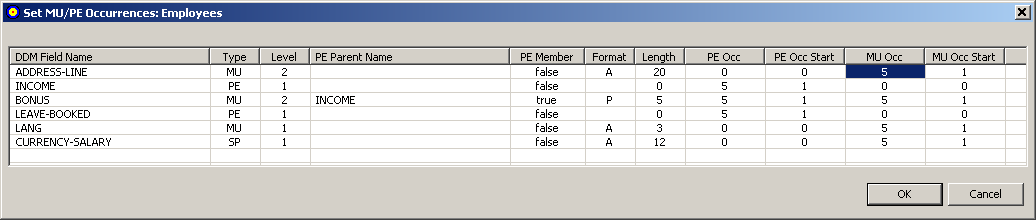
Optionally, adjust the MU or PE occurrence counts (MU Occ and PE Occ fields) and the MU or PE starting occurrence number (MU Occ Start and PE Occ Start fields) for the unflattened MU and PE fields listed in this dialog. Valid values must be positive integers.
Click when finished.
When all MU and PE fields have been accounted for, the GFB schema is created in the GFB Schema (rightmost) pane of the Data Mapping Tool main window.
The GFB schema consists of one or more tables. One table is created for the DDM; an additional table is created for each unflattened MU field, PE field, subfield, or superfield in the DDM.
You can create a GFB schema that maps individual fields in a DDM to existing tables in your RDBMS. You can also create a GFB schema that maps all the fields in a DDM to previously undefined tables in your RDBMS. For more information, read Creating the Schema from an Entire DDM. Once a GFB schema is created, you can use it to generate a global format buffer (GFB) and associated field table for use by the Event Replicator for Adabas and the Event Replicator Target Adapter. For more information, read Generating a GFB and Field Table.
Note:
By default, if the table you are mapping to was not originally
created by the Event Replicator Target Adapter, it may not contain the field ISN. If this is the case,
replication to this target will likely fail with an error indicating that the
RDBMS does not contain an ISN column. Even if the ISN field is not defined as a
primary key, its value in each Adabas record is always replicated to the target
base (parent) table. To resolve this problem, we recommend that you alter the
table in your target RDBMS, adding a column named
"ISN" and defined as type integer. Alternatively,
you could set the Event Replicator Target Adapter Adabas-RDBMS Synchronization Level
field to "apply" in the target database option
definition for replication to your RDBMS. For more information about target
database option definitions in Event Replicator Target Adapter, read Specifying Target Database Processing Option
Definitions, in the
Event Replicator Target Adapter Administrator's Guide.
![]() To create the GFB schema from individual fields in the DDM, complete
the following steps:
To create the GFB schema from individual fields in the DDM, complete
the following steps:
Be sure that you have expanded the tables and table columns in the Target RDBMS pane of the Data Mapping Tool main window.
Drag and drop a single field from the DDM in the SYSTRANS DDMs (leftmost) pane onto an existing field (table column) name in a table in the target RDBMS listed in the Target RDBMS (middle) pane.
The following general rules must be followed:
For MU (multiple occurrence), PE (periodic group), SB (subfield), or SP(superfield) fields, the target table name must conform to the primary/foreign key naming relationships used by the Event Replicator Target Adapter.
The length of the field being mapped must not exceed the length of the field (column) in the RDBMS table.
Consideration should be given to matching data types of the fields in the DDM and the fields in the target table. Do not attempt to map fields of different data types.
If you want to use UTF-8 character encoding, you must verify that your GFB field lengths are increased as required to accommodate the character set referenced by the code page you select and the data requested in the GFB. You can increase these field lengths manually by editing the GFB itself or by editing the Predict file or data definition module (DDM) used when the GFB is generated.
Duplicate mappings in the same target table are not allowed. You cannot map the same field to the same target RDBMS table and column combination.
If the ISN is not the primary key of your existing RDBMS table, you must change the primary key assignment. Likewise, if your RDBMS table uses multiple primary keys, you must set each composite key field and then specify the composite key order. For more information on maintaining primary and composite keys in your GFB schema, read Specifying Keys.
Note:
In addition, if ISN is not the primary key, you must also
manually add a dummy ISN column into the target table with integer as its data
type. This will ensure that replication occurs successfully.
For complete information on listing DDMs in the SYSTRANS DDMs pane and target relational databases in the Target Table pane, read Locating and Selecting a Source DDM and Linking to a Target Database.
The GFB schema is partially created in the rightmost (GFB Schema) pane of the Data Mapping Tool main window.
Repeat step 1 until all fields are mapped.
The GFB schema is updated in the GFB Schema (rightmost) pane of the Data Mapping Tool main window.
Optionally, rename the GFB schema in the GFB Schema pane. By default, schemas created from individual fields in the DDM have the same name as the name of the RDBMS table to which they are mapped. For complete information on renaming a GFB schema, read Renaming Schemas.
Click when finished.
The GFB schema has been created in the GFB Schema (rightmost) pane of the Data Mapping Tool main window. You can now use the Data Mapping Tool to generate a GFB and field table from the GFB schema.
Once a GFB schema is created, you can rename it if necessary.
![]() To rename a GFB schema once it is created:
To rename a GFB schema once it is created:
Right-click on the name of the schema you want to rename in the GFB Schema column of the main Data Mapping Tool window.
GFB schema names (which will result in the main table name of your
RDBMS table) are shown in the list prefixed by the icon
 .
.
A drop-down menu appears.
Select from the drop-down menu.
A Rename GFB Schema dialog appears.
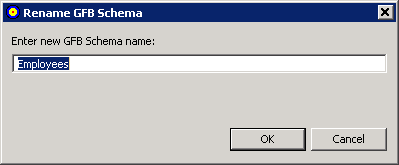
Specify a new name for the GFB schema in the dialog box and click
The GFB schema is renamed.
Once a GFB schema is created, you can rename any of the schema fields in the table if necessary.
![]() To rename a GFB schema field in an GFB schema:
To rename a GFB schema field in an GFB schema:
Right-click on the name of the schema field you want to rename in the GFB Schema column of the main Data Mapping Tool window.
GFB schema field names (which will result in the name of a column in
your RDBMS table) are shown in the list prefixed by the icon
 .
.
A drop-down menu appears.
Select from the drop-down menu.
A Rename RDBMS Column Mapping dialog appears.
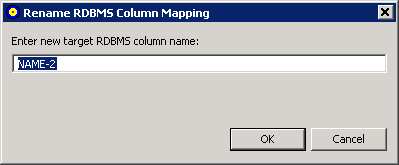
Specify a new name for the GFB schema field (RDBMS table column) in the dialog box and click
The field is renamed.
You can review the proprieties of a GFB schema field.
![]() To review a GFB schema field's properties:
To review a GFB schema field's properties:
Right-click on the name of the schema field whose properties you want to review in the GFB Schema column of the main Data Mapping Tool window.
GFB schema field names are shown in the list prefixed by the icon
.
A drop-down menu appears.
Select from the drop-down menu.
The Properties: GFB Schema Field: fieldname dialog appears, listing the GFB schema field properties.

Most of the fields in this dialog are read-only. If the field is an MU field, a PE field, a subfield, or a superfield you can modify the settings in the Occurrences section of this dialog. The following example shows the Occurrences section of a field properties dialog for an MU field:
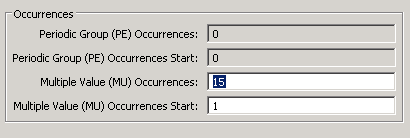
If the field is an MU field, a PE field, a subfield, or a superfield, optionally modify the occurrence count or starting occurrence number in the Occurrences section of the dialog.
Click when you are done reviewing the properties.
Once you have created a GFB schema, you can redefine a schema field. This is especially useful if you want to split a field into multiple smaller fields (column) in the resulting RDBMS table. In a Data Mapping Tool schema, you can redefine a field into multiple fields unless it is:
a key field (primary or composite key field)
a descriptor field (superdescriptor, subdescriptor, hyperdescriptor, phonetic, or collation descriptor)
Note:
Installations wishing to redefine schema fields must have Event Replicator for Adabas 3.2.1
or later installed.
Multiple value fields (MU fields) and periodic groups (PE fields) are supported.
In addition, you can redefine fields into combinations of the following data types: alphanumeric, binary, date, floating point, integer, logical, numeric, packed decimal, and time.
Finally, a field that is redefined cannot be expanded beyond its original field length unless it is first expanded in the original record and associated DDM. Once a GFB schema is created, you cannot increase the overall size of a field; so the sum of the sizes of the child fields that comprise a redefined field (the parent) must be less than or equal to the size of the original parent field. Note that you can also leave spaces between child fields of a redefined field; the Data Mapping Tool detects these spaces and fills them with read-only filler fields when you generate the GFB and associated field table (GFFT) entries. Filler fields appear in the GFFT with column names of FILLER.
Note:
Fields that have been redefined cannot become primary keys and cannot
be included in composite keys for the table.
![]() To redefine a schema field:
To redefine a schema field:
Right-click on the name of the schema field whose properties you want to redefine in the GFB Schema column of the main Data Mapping Tool window.
GFB schema field names are shown in the list prefixed by the icon
.
A drop-down menu appears.
Select from the drop-down menu.
The Redefine GFB Schema Field:fieldname dialog appears, listing the GFB schema field you can split and its child entries (if any have been defined yet). In the following sample, the parent field has not yet been split, so when this dialog appears, it shows only a single child field, which has the exact length and specifications of the parent field.
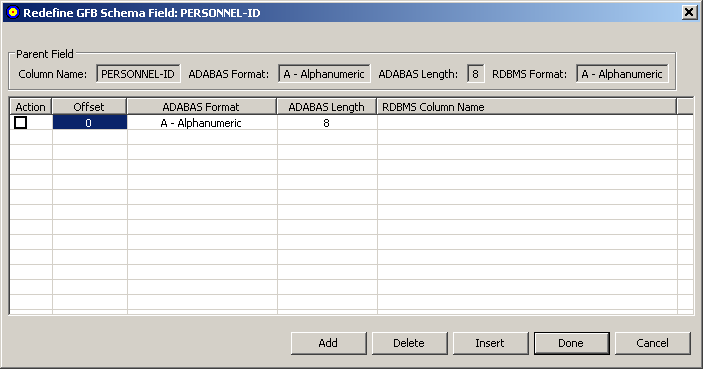
You can tab or click in the cells of this table of child fields, as needed, to alter the child field settings.
In the table, change the length of the first child field in the associated Adabas Length field, to accommodate additional child fields. If you do not do this, you can only specify a single child field (since the lengths of the child fields cannot exceed the length of the parent field). In addition, you must specify the column name for the child field in the RDBMS Column Name field.
Optionally, adjust the format (Adabas Format field) and offset (Offset field) of the child field in the table.
Maintain additional child fields, as necessary, in the table of child fields.
For every child field you define, you must specify a length and an RDBMS column name. If you do not specify an offset for a child field, the Data Mapping Tool automatically calculates it based on the lengths of the other child fields. If you do not specify a field format for a child field, the format of the parent field is assumed.
To add a child field, click the button. A new blank child line becomes editable in the table.
To insert a new child field between two fields already in the table, select the Action box (check it) of the lower child field and then click the button. A new blank child line is inserted between the two existing child fields and becomes editable in the table.
To delete a child field from the table, select the Action box (check it) of the child field and then click the button. The child field is removed from the table.
When all child fields have been specified in the table, click .
The field appears as redefined (split) in the GFB schema. When the GFB and associated field table are generated, the redefined field will appear as multiple columns in the resulting RDBMS table.
![]() To undo a schema field redefinition:
To undo a schema field redefinition:
Right-click on the name of the schema field whose redefined properties you want to undo in the GFB Schema column of the main Data Mapping Tool window.
GFB schema field names are shown in the list prefixed by the icon
.
A drop-down menu appears.
Select from the drop-down menu.
The Redefine GFB Schema Field:fieldname dialog appears, listing the GFB schema field you can redefine and its child entries. In the following sample, the parent field, PERSONNEL-ID, has been split into three child fields: Division Code, Branch Code, and Sequence Number.
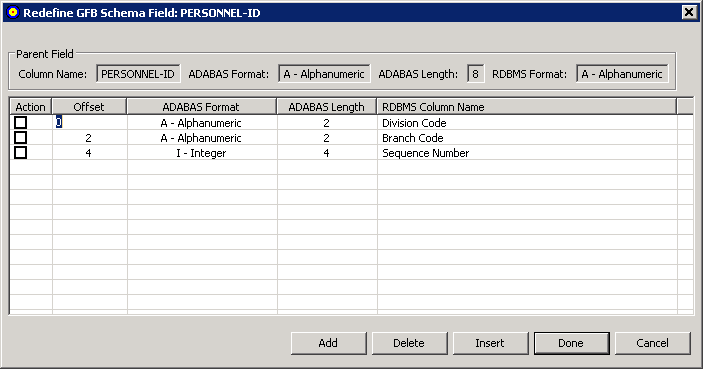
For each child field, select the Action box (check it) and then click the button. The child field is removed from the table.
Click .
The child fields are removed from the GFB schema and the parent field is no longer redefined (split). When the GFB and associated field table are generated, the parent field will appear as a single column in the resulting RDBMS table.
By default, the ISN (internal sequence number) is the primary key of every record in the GFB schema. However, the Data Mapping Tool allows you to change the primary key of the table in the schema and it allows you to select multiple keys to be used as a composite key for the table.
Key fields in the schema are prefixed by the icon
 .
.
Notes:
This section covers the following topics:
![]() To change the primary key:
To change the primary key:
Right-click on the name of the schema field that you want to make a primary key in the GFB Schema column of the main Data Mapping Tool window.
GFB schema field names are shown in the list prefixed by the icon
.
A drop-down menu appears.
Select from the drop-down menu.
The schema field you selected becomes the primary key for the table. If the ISN field was the primary key prior to this change, it is no longer listed in the schema.
A composite key is key that is comprised of multiple fields in the schema. Any field except the ISN field and redefined (split) fields can be used in a composite key.
Note:
Installations wishing to create composite keys must have Event Replicator for Adabas 3.2.1
or later installed.
![]() To create a composite key:
To create a composite key:
Right-click on the name of a schema field that you want to make part of a composite key in the GFB Schema column of the main Data Mapping Tool window.
Note:
At this time, the Event Replicator Target Adapter does not support the use of MU or PE
fields as primary keys or in composite keys.
GFB schema field names are shown in the list prefixed by the icon
.
A drop-down menu appears.
Select from the drop-down menu.
The schema field you selected becomes a key for the table. If the ISN field was the primary key prior to this change, it is no longer listed in the schema. The ISN field cannot be used in a composite key.
Repeat steps 1 and 2 for any additional fields you want to included in the composite key.
All fields you have identified as key fields are combined to create
a composite key and are prefixed by the icon
in the schema.
Read Changing the Composite Key Order for information on how to specify the order of the fields in the composite key.
By default, the order of the fields in a composite key is the same as the order of the original primary key selection.
![]() To change the order of the fields in a composite key:
To change the order of the fields in a composite key:
Right-click on the name of any of the schema fields that comprise the composite key in the GFB Schema column of the main Data Mapping Tool window.
Key field names are shown in the list prefixed by the icon
.
A drop-down menu appears.
Select from the drop-down menu.
The Set Composite Key Order dialog appears.
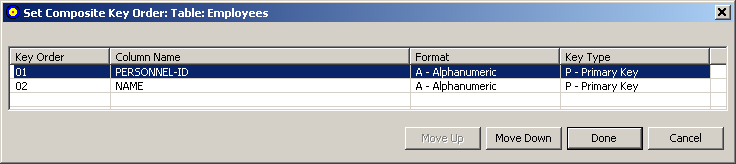
You can reorder the fields in the composite key using the Set Composite Key Order dialog. Simply select the field you want to move (click on it) and click the or buttons until it is placed where you want it.
When all composite key fields are in the order you want, click .
The dialog closes and the composite key order is logically updated. Any subtables containing foreign and primary key references are updated to show the new composite key order.
![]() To remove the primary key specification for a field in the
table:
To remove the primary key specification for a field in the
table:
Right-click on the name of the schema field that you want to remove as the primary key or remove from a composite key in the GFB Schema column of the main Data Mapping Tool window.
Key field names are shown in the list prefixed by the icon
.
A drop-down menu appears.
Select from the drop-down menu.
The schema field you selected is no longer a primary key for the table. If no other primary key is defined for a table, the ISN field appears as the primary key.
You can review the proprieties of a GFB schema.
![]() To review a GFB schema's properties:
To review a GFB schema's properties:
Right-click on the name of the schema whose properties you want to review in the GFB Schema column of the main Data Mapping Tool window.
GFB schema names are shown in the list prefixed by the icon
.
A drop-down menu appears.
Select from the drop-down menu.
The Properties: GFB Schema: schemaname dialog appears, listing the GFB schema properties.
You cannot edit any properties on this dialog.
Click when you are done reviewing the properties.
You can remove a GFB schema from the Data Mapping Tool (for example, if you want to start over).
![]() To rename a GFB schema once it is generated:
To rename a GFB schema once it is generated:
Right-click on the name of the schema you want to remove from the GFB Schema column of the main Data Mapping Tool window.
GFB schema names are shown in the list prefixed by the icon
.
A drop-down menu appears.
Select from the drop-down menu.
The GFB schema is removed.