Using the Natural Business Services Visual Studio add-in, you can perform the following tasks:
Before you can use the Natural Business Services Visual Studio add-in, you must define connections to a remote repository.
![]() To configure a connection:
To configure a connection:
Select on the menu.
Note:
You can also display the Configuration
Utility panel from the Business Service Explorer by opening the
context menu for a connection and selecting
on the submenu.
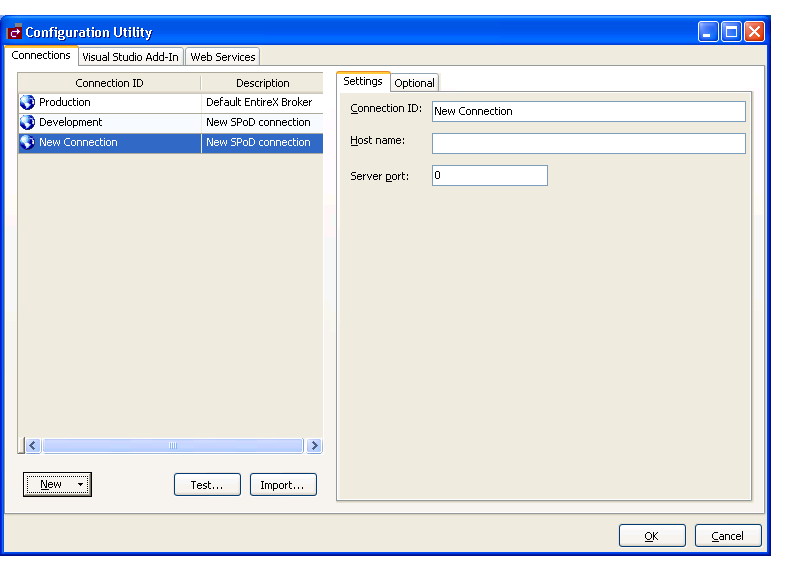
The Configuration Utility panel is displayed. For example:
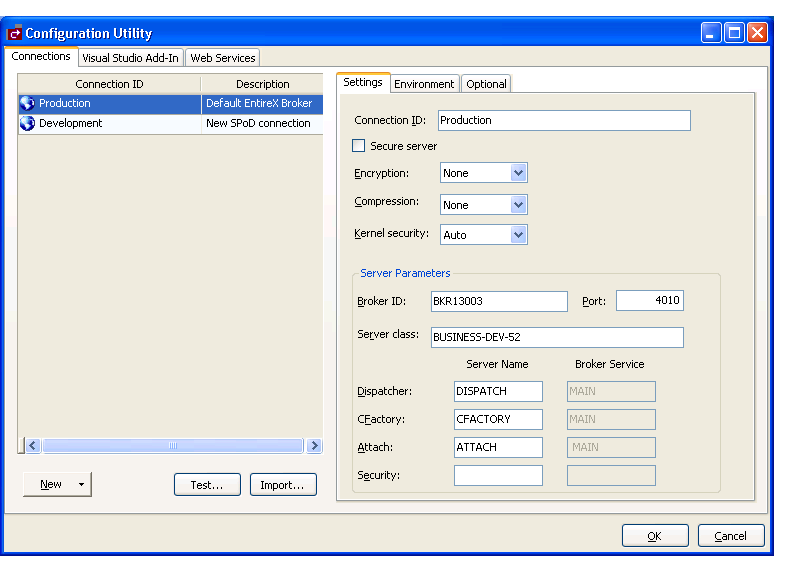
Use this panel to configure connections to the remote repository containing your business services. The following tabs are available:
| Panel Tab | Description |
|---|---|
| Connections | Defines connections to remote repositories (via the EntireX Communicator or Natural for Windows protocols). For information, see Connections Tab. |
| Visual Studio Add-in | Defines configuration settings used by the Natural Business Services Visual Studio add-in. For information, see Visual Studio Add-in Tab. |
| Web Services | Defines configuration settings that are specific to Web services. For information, see Web Services Tab. |
Use the Connections tab to view, edit, delete, or add connections. These connections define communication paths and options to remove business service repositories running on a Natural server. The Connections tab lists the available connections on the left side and details about the current selected connection on the right (under Settings).
This section covers the following topics:
A Broker connection uses the EntireX communication protocol to connect to Natural Business Services servers running in Natural. This type of connection is suitable for developing, testing, and running Natural Business Services applications.
Tip:
If you have an existing connection that is similar to the one you
want to add, you can copy the connection and then modify it to suit your
requirements. For information, see
Copy an Existing
Connection.
![]() To add a Broker connection:
To add a Broker connection:
Select on the Configuration Utility panel.
Note:
You can also open the context menu for an existing connection
and select on the submenu.
A menu is displayed.
Select .
A blank Broker connection is loaded on the right side. For example:
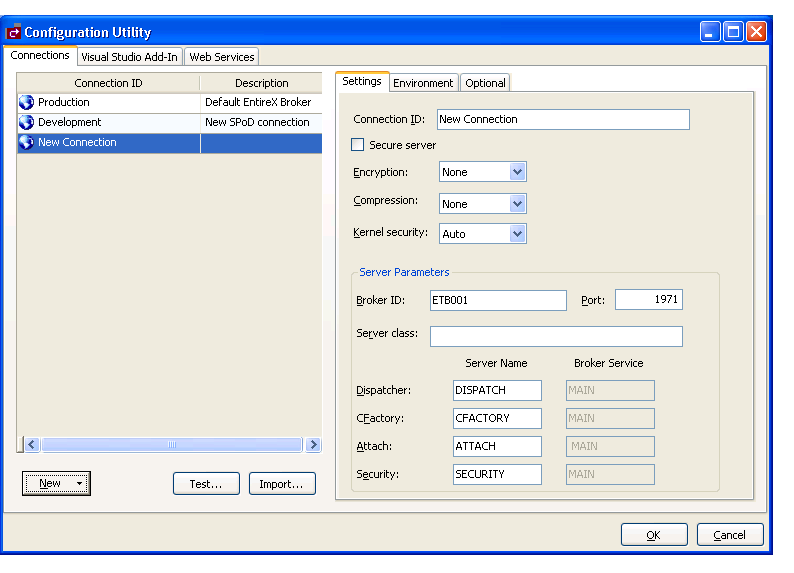
Type the Broker ID.
Tip:
If you have a Natural Business
Services server on the mainframe, you cannot use the IP address
in your configuration files for the Broker ID. Use the actual broker name and
define the IP address in your hosts file if necessary. If you use the IP
address, you may receive the EntireX communicator error message
'20/186 API Char "." or "," not allowed in ACI CB' when
downloading metadata.
Type the TCP/IP port number the EntireX broker is running on.
Note:
If you intend to define the port in your Windows services file,
leave this option blank.
Optionally, you can specify the following information:
| Setting | Description |
|---|---|
| Connection ID | Unique name of the server component that provides communications between the client and server. This name is listed in the Business Service Explorer and used in code when creating connections to business services. All communications are done by Connection ID. |
| Secure server | Select this option if the server is running
Natural Security or Natural Business
Services security and a password must be transported in the
communication buffer.
Note: |
| Encryption | Select this option to encrypt messages transported to and from the server. This value is based on the EntireX ACI settings for encryption. |
| Compression | Select this option to compress messages at a
specified level. This value is based on the EntireX
ACI settings for compression.
Note: |
| Kernel security | Select this option to use Broker security for the EntireX server. If you are not sure which security is used, you can leave this setting on Auto. To achieve the best network performance, however, you should select Yes or No. |
| Server class | EntireX server class defined for your business services. If you do not know this value, ask your Natural Business Services administrator. |
| Dispatcher, CFactory, Attach, and Security | Timestamp server names of the four Natural Business Services runtime servers. Leave these values as the defaults; only your Natural Business Services administrator should change these values. |
Select to save your new Broker connection.
Open the context menu for the Connections node in the Business Service Explorer.
Select on the submenu.
The connection is added to the list of available connections.
This tab contains the System Files and Step Libraries tables for your new Broker connection. For example:
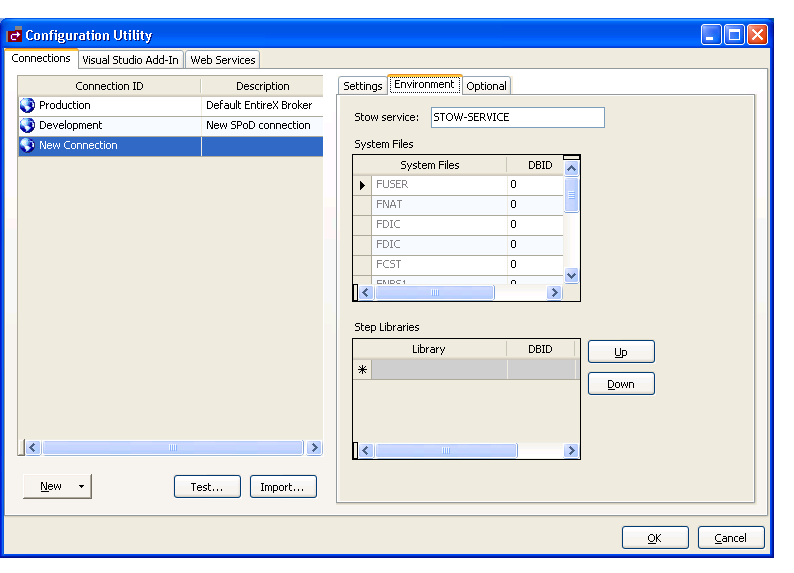
Use this tab to override the current defaults used in the Natural Business Services server environment.
Note:
Unless you have a compelling reason to override the defaults, we
recommend that you do not change the defaults.
This tab defines optional settings for your business service connections. For example:
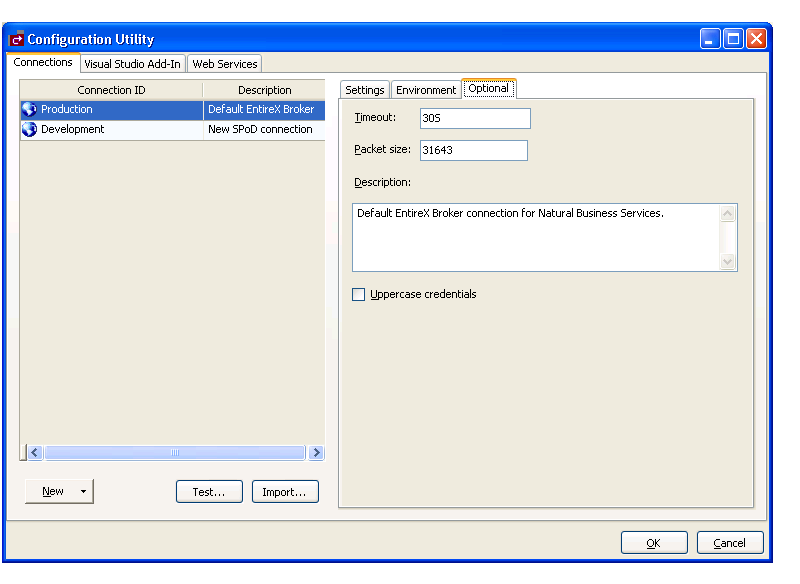
Use this tab to define the following optional settings for your new connection:
| Setting | Description |
|---|---|
| Timeout | Timeout value used by the Natural Business Services dispatcher when making remote service calls. The default is 30S (30 seconds). |
| Packet size | Default packet size for communication messages.
If you have many business services using interfaces larger than the default
(31643 bytes), increase this size.
Note: |
| Description | Description of the connection. For example, you can type “This is a development connection.” |
| Uppercase credentials | Select this option if the user ID and password
must be sent in upper case.
Note: |
A SPoD connection uses the Natural Single Point of Development (SPoD) protocol to communicate with the Natural Development Server (NDV) running in a Natural environment that contains Natural Business Services. This type of connection is only suitable for developing and testing Natural Business Services applications.
Note:
The Optional tab contains the same options as when adding a new
Broker connection. For information, see
Optional
Tab.
Tip:
If you have an existing connection that is similar to the one you
want to add, you can copy the connection and then modify it to suit your
requirements. For information, see
Copy an Existing
Connection.
![]() To add a SPoD connection:
To add a SPoD connection:
Select on the Configuration Utility panel.
Note:
You can also open the context menu for an existing connection
and select on the submenu. For information, see
Copy an Existing
Connection.
A menu is displayed.
Select .
A blank SPoD connection is loaded on the right side. For example:
Enter the following information on the Settings tab:
| Setting | Description |
|---|---|
| Connection ID | Unique name of the server component that provides communications between the client and server. This name is listed in the Business Service Explorer and used in code when creating connections to business services. All communications are done by Connection ID. |
| Host name | Name of the server running Natural Development Server (NDV). You may also enter a TCP/IP address. |
| Server port | TCP/IP port for the NDV server. This value
is required.
Note: |
Enter the following information on the Optional tab:
| Setting | Description |
|---|---|
| Session parameters | Any session parameters required to connect
to your environment. This can be a profile setting, such as
PROFILE=NBS52.
|
Select to save your new SPoD connection.
Open the context menu for the Connections node in the Business Service Explorer.
Select on the submenu.
The connection is added to the list of available connections.
To save time and effort, you can copy an existing connection and then modify it to suit your requirements.
![]() To copy an existing connection:
To copy an existing connection:
Open the context menu for an existing connection on the Configuration Utility panel.
Select on the submenu.
The settings for the Copy of ConnectionName connection are displayed. The new connection has the same settings as the existing connection.
Change the settings as required.
For example, change the connection name from Copy of ConnectionName to another name.
Select to save the new connection.
Open the context menu for the Connections node in the Business Service Explorer.
Select on the submenu.
The connection is added to the list of available connections.
This option allows you to change the settings for an existing connection.
![]() To modify an existing connection:
To modify an existing connection:
Open the context menu for an existing connection in the Business Service Explorer.
Select on the submenu.
The Configuration Utility panel is displayed.
Modify the configuration settings as desired.
For information on the configuration settings, see:
Select to save the new settings.
This option allows you to import connection IDs from different sources: SDC.ini or XML.
![]() To import a connection from SDC.ini or XML:
To import a connection from SDC.ini or XML:
Select on the Configuration Utility panel.
The Broker Connection Import wizard is displayed. For example:
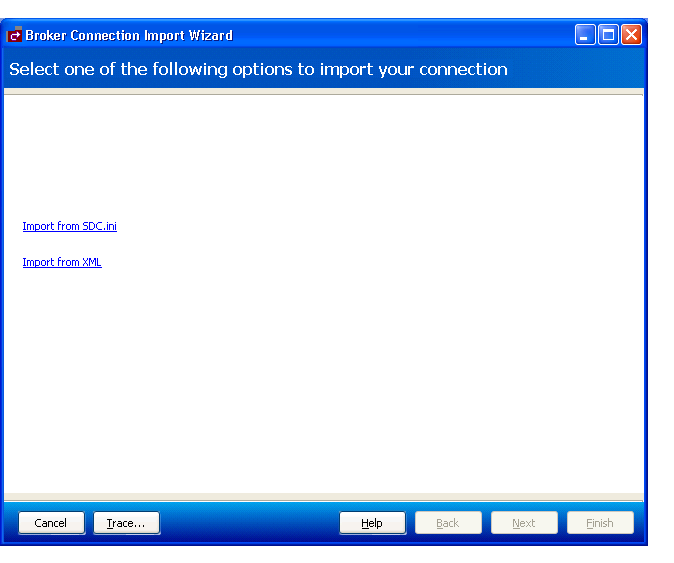
Select one of the following options:
| Option | Description |
|---|---|
| Import from SDC.ini | Select this option to import a Broker connection from SDC.ini. Enter the name of the connection file in File name. |
| Import from XML | Select this option to import either a Broker or SPoD connection from XML. Enter the name of the connection file in File name. |
Select to import the connection.
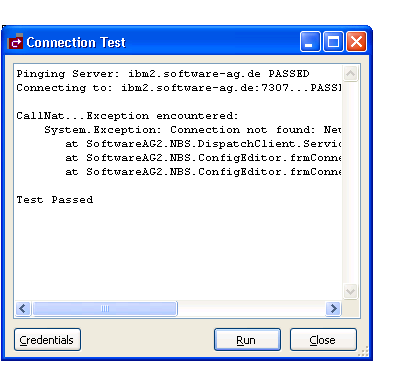
![]() To test a connection:
To test a connection:
Select the connection you want to test on the Configuration Utility panel.
Select .
The Connection Test window is displayed.
Note:
If the connection is secured, select
to enter the user ID and password for the
connection.
Select .
Natural Business Services performs the following test process:
Pings the specified Broker ID or Host name.
Connects to the Broker ID or Host name and port using TCP/IP.
Pings the Natural Business Services attach server.
If the attach server is running, attempts to ping a Natural Business Services dispatcher.
If no dispatchers are running, asks the attach server to initiate a new dispatcher.
Sends the system profile command to a running dispatcher.
Performs a test service call, which invokes the Calculator business service in the Demo domain.
The following example shows the results of testing a connection:
This option allows you to remove a connection from the list of available connections.
![]() To delete an existing connection:
To delete an existing connection:
Open the context menu for an existing connection on the Configuration Utility panel.
Select on the submenu.
A confirmation window is displayed.
Select .
Open the context menu for the Connections node in the Business Service Explorer.
Select on the submenu.
The connection is removed from the list of available connections.
The following example shows the Natural Business Services Visual Studio Add-in tab on the Configuration Utility panel:
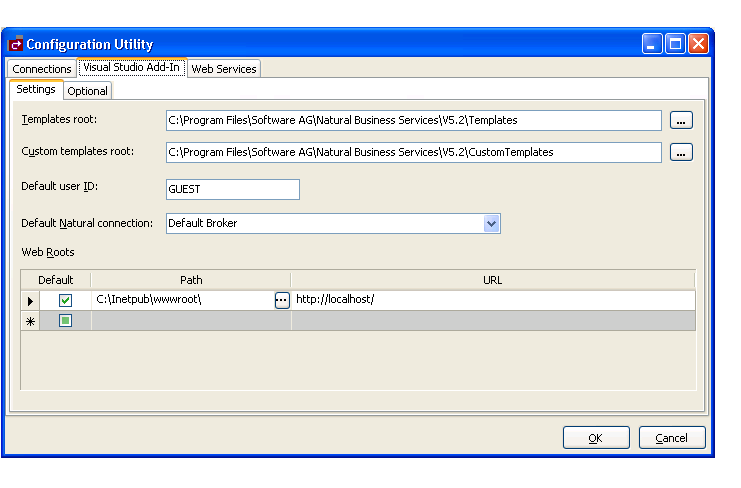
Use this tab to define the Visual Studio add-in settings used for all connections. These settings include:
| Setting | Description |
|---|---|
| Templates root | Path on your system to the code templates required by the Natural Business Services wizards for code generation. |
| Custom templates root | Path to the directory containing customizations or modifications to the supplied templates. Templates stored in this location must follow the same folder structure and naming standards as the Templates Root path. Any templates located in this folder are loaded first. |
| Default user ID | Default user ID used when connecting to Natural Business Services repositories. |
| Default Natural connection | Default connection ID used by the Visual Studio add-in. |
| Web Roots | Paths used by the add-in (for information, see Modify Web.config Files). |
The following example shows the Optional tab on the Visual Studio Add-in tab:

Use this tab to define optional settings used for all connections. These settings include:
| Setting | Description |
|---|---|
| Compare command | Path to a comparison utility used by the code generator wizards. When you select in the generate results, this comparison utility is invoked. Use %1 and %2 to pass in the names of the files you want to compare. |
| HTML editor | Name of the default HTML editor used by the Visual Studio add-in. |
| XSL editor | Name of the default XSL editor used by the Visual Studio add-in. |
| Default refresh metadata | If this field is marked, the Natural Business Services wizards download new copies of service metadata when regenerating classes or Web services. |
The following example shows the Web Services tab on the Configuration Utility panel:
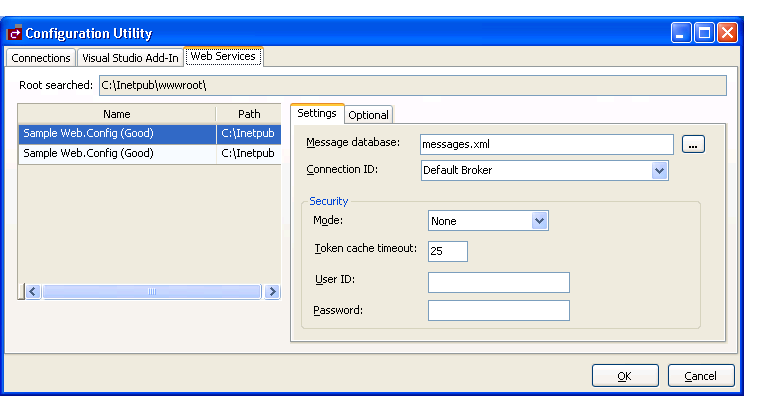
Use this tab to configure the Web.config file for Natural Business Services web roots defined in IIS (Internet Information Server). These settings are:
| Setting | Description |
|---|---|
| Message database | Indicates where messages are located. You can either supply the file location for your own messages (for example, mymessages.xml) or you can modify messages in the supplied messages.xml file (message numbers 5700–5799). For more information, see Messagedatabase. |
| Connection ID | Unique name of the server component that provides communications between the client and server. This name is listed in the Business Service Explorer and used in code when creating connections to business services. All communications are done by Connection ID. |
| Mode | Natural Business Services security mode for Web services. |
| Token cache timeout | Timeout limit for the security token cache. The default is 25 minutes. |
| User ID | Default user ID sent with SOAP messages. |
| Password | Default password sent with SOAP messages. |
These settings are used for all connections; they are not specific to one type of connection. For more information, see Modify Web.config Files.
The following example shows the Optional tab on the Web Services tab:
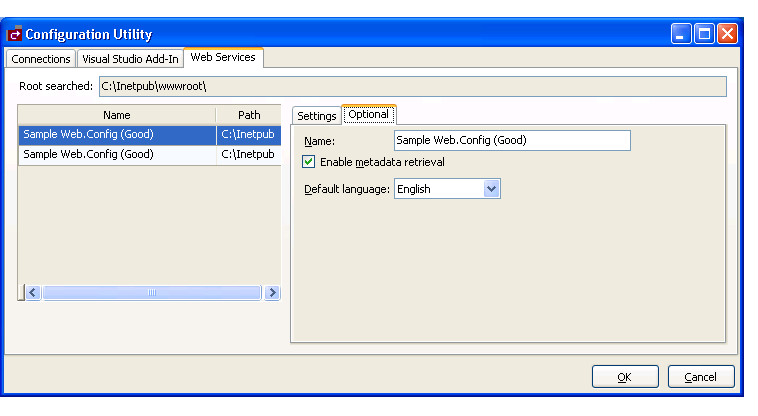
Use this tab to define optional settings for Web services. These settings are:
| Setting | Description |
|---|---|
| Name | Default name of the Web.config file for Web services. |
| Enable metadata retrieval | Select this option to allow Web services to retrieve metadata. |
| Default language | Default language for Web services. |
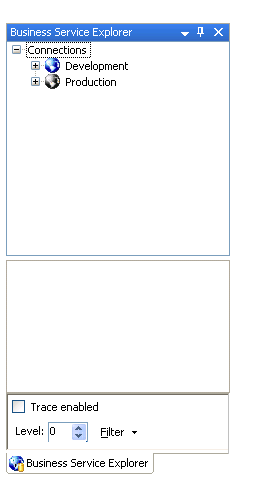
The Business Service Explorer lists all defined business service connections in a tree view.
Note:
To create new business services, see
Natural Business
Services Natural Plug-in and Natural Business Services
Administration.
![]() To access the Business Service Explorer:
To access the Business Service Explorer:
Select on the menu.
The Business Service Explorer is displayed. For example:
Move the explorer window to the location of your choosing.
Note:
By default, the window is dockable. You can use the context menu
for the Business Service Explorer title bar to redefine this window as Floating
or Tabbed Document.
Use the Business Service Explorer to:
![]() To access the business services:
To access the business services:
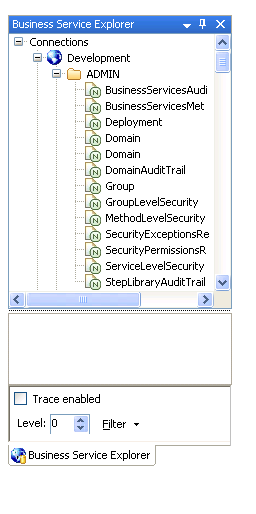
Select the connection node containing the business services.
The Logon window is displayed.
Enter your user ID and password.
Select in the Logon window.
The Natural Business Services server retrieves the list of domains for the specified connection.
Select a domain node.
The server retrieves the list of business services in the selected domain. For example:
![]() To find all business services in a specific domain:
To find all business services in a specific domain:
Open the context menu for a domain listed in the Business Service Explorer.
Select on the submenu.
The Find Services window is displayed. For example:
Select the name of the domain from Domain.
Select .
Natural Business Services returns a list of the business services in the specified domain. The following example shows the results of searching the Demo domain for all services:
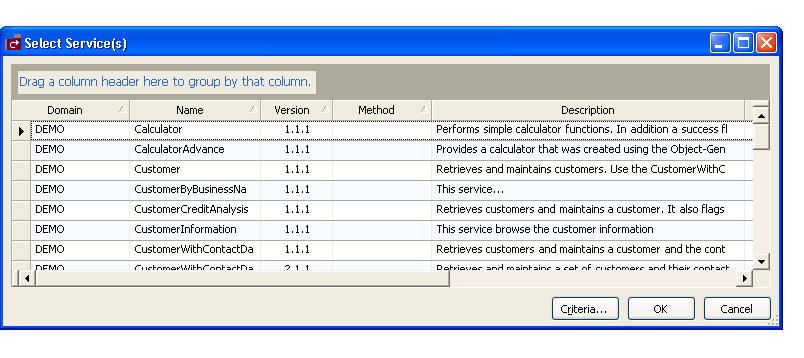
You can also use this window to:
Group the results by column
To group by column, drag the column heading to the shaded area
Rearrange the columns
To rearrange the columns, drag the column heading to the far left of this window (for example, to sort by version, drag the Version heading to the left of the Domain heading)
Select the service for which you want to create a Web service.
Select to display the Web Service wizard.
You can refine the results by limiting the search as follows:
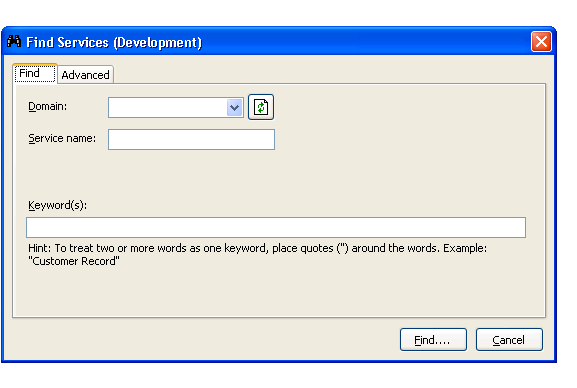
![]() To find specific business services in all domains:
To find specific business services in all domains:
Select All from Domain.
Do one of the following:
Type the name of a business service in Service name to return a list of all services in all domains with that name in their name
Note:
Ensure you use the correct case for Service name. For example,
use “Calculator”, not “calculator”, to return a list of all services with
Calculator in their name.
Type a keyword in Keyword(s) to return a list of all services in all domains with that name in their descriptions
Note:
You can also use options on the Advanced tab to limit the
search. For information, see Use the
Advanced Tab.
Select .
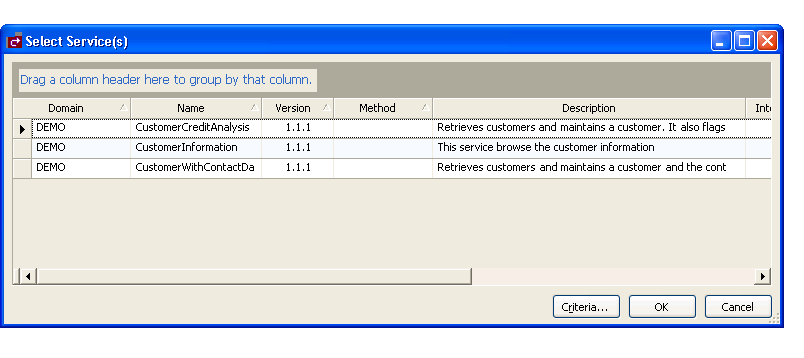
Natural Business Services returns a list of all specified business services in all domains. The following example shows the results of searching all domains for a service containing “customer” in its description:
![]() To find a specific business service in a domain:
To find a specific business service in a domain:
Select the name of the domain from Domain.
Type the name of a business service in Service name.
Note:
Ensure you use the correct case for Service name. For example,
use “Calculator”, not “calculator”, to find the Calculator service.
Select .
Natural Business Services returns a list of all business services in the domain with that name in their name.
![]() To limit the search of business services:
To limit the search of business services:
Type one or more keywords in Keyword(s).
Select the Advanced tab in the Find Services window.
The Find Services window is displayed. For example:
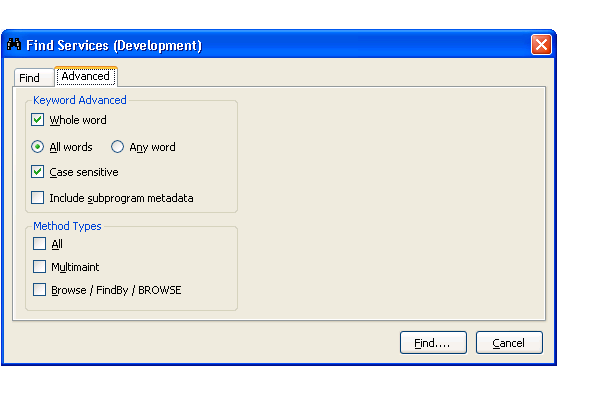
Select from the following search criteria:
Search for whole words only (for example, if you type “Customers” in Keyword(s), business services containing “Customer” will not be returned)
Search for either all words specified in Keyword(s) or any word (for example, if you type “Customer record” in Keyword(s) and select All words on the Advanced tab, only business services containing both “Customer” and “record” will be returned)
Search for words using a particular case (for example, if you type “Customer” in Keyword(s) and select Case sensitive, business services containing “customer” will not be returned)
Search business services and their subprogram metadata for services containing the keyword specified in Keyword(s)
Search for business services containing one of the method types listed (for example, you can search for business services containing all method types, the multimaint method type, or the Browse, FindBy, or BROWSE method types)
Select .
Natural Business Services returns a list of all business services with the specified criteria.
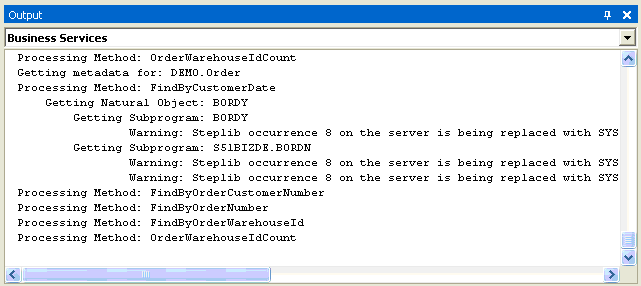
Select the Trace enabled option at the bottom of the Business Service Explorer to troubleshoot configuration and connection issues. This option records what is happening internally within the Visual Studio add-in and wizards. In addition, you can:
Set the desired trace level (select the desired trace level from Level)
Limit the items in the trace (select one or more items from Filter)
Note:
You can also enable the tracing options from the wizard
panels.
The Visual Studio add-in will display runtime information in the standard Visual Studio Output window. For example:
![]() To display environment information for a connection:
To display environment information for a connection:
Open the context menu for a connection listed in the Business Service Explorer.
Select on the submenu.
The Natural Business Services - Environment Check window is displayed. For example:
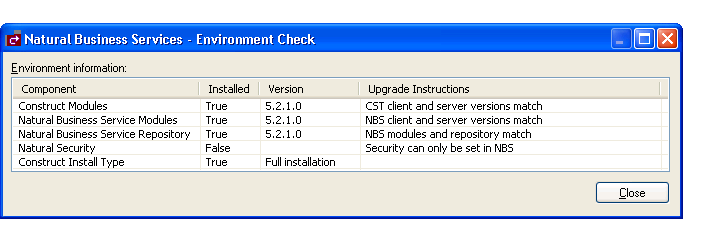
This window displays information about the environment for the current connection.
Select .
After using the Natural plug-in to create a business service, you can regenerate and compile an entire solution in Visual Studio from the command line using the following syntax:
Devenv.exe <solution name> /command "BusinessServicesAddIn.Connect.RegenSilent"
For example:
Devenv.exe s:\local\consoleapplication1\consoleapplication1.sln /command "BusinessServicesAddIn.Connect.RegenSilent"
The example above:
Loads the ConsoleApplication1 solution.
Retrieves all business services.
Regenerates the services.
Compiles the solution.
Closes Visual Studio.
Code snippets are small pieces of code you can use in Visual Basic .NET. Natural Business Services supplies this code in the following folder:
<Install Folder>\Samples\VB\Code Snippets
The code snippets supplied with Natural Business Services are:
| Short Cut Name | File Name | Description |
|---|---|---|
| Displogon | Displogon.snippet | Log onto a dispatcher. |
| NBSdisp | CreateDispatcher.snippet | Create an IRemoteCaller (dispatcher) object. |
| NBSTest | TestService.snippet | Test a business service. |
![]() To add the code snippets to Visual Studio:
To add the code snippets to Visual Studio:
Select on the menu.
The Code Snippets Manager window is displayed. For example:
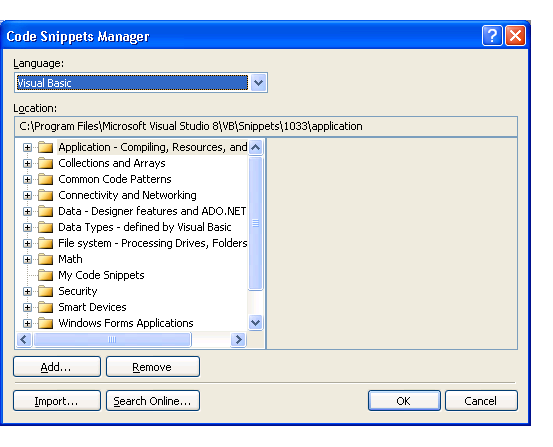
Select .
Select <Install Folder>\Samples\VB\Code Snippets.
Select .
![]() To invoke the code snippet:
To invoke the code snippet:
Type the short cut name in the Visual Studio code window.
Press Tab.
The code snippet is copied into the code window.
This section describes how to upgrade a Web service that was created using a previous version of Natural Business Services and import the service into Visual Studio.
![]() To upgrade and import existing Web services into Visual Studio:
To upgrade and import existing Web services into Visual Studio:
Select on the menu.
The Web Service Upgrade wizard is displayed. For example:
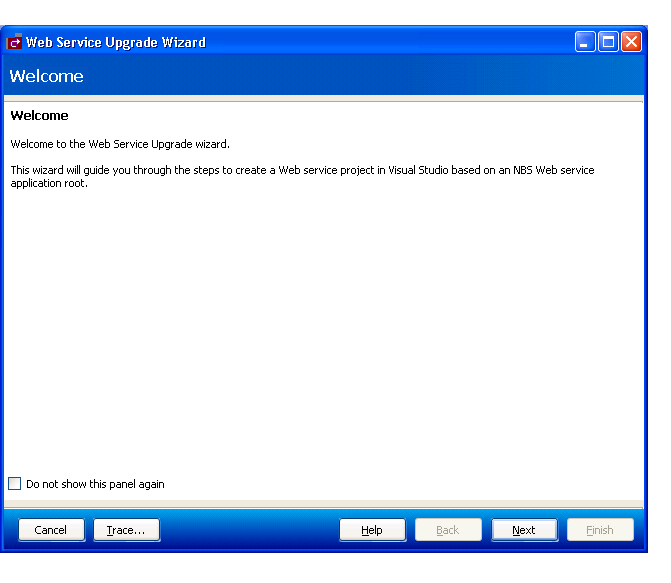
Select .
The following panel is displayed:
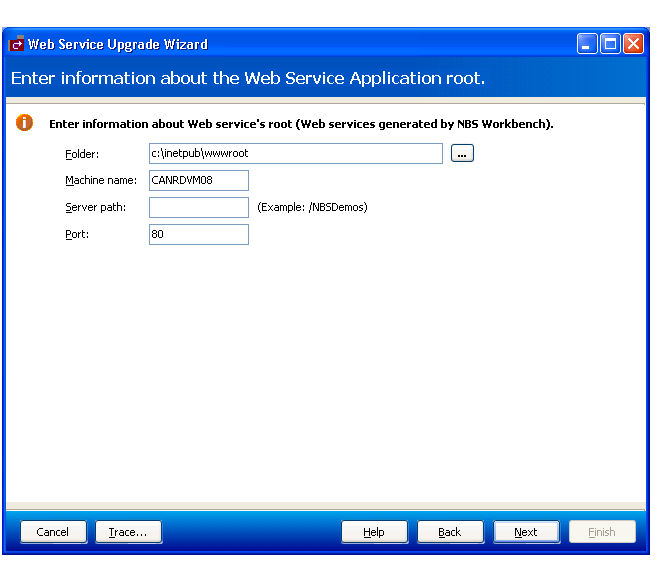
Enter the following Web service root settings for the existing service:
| Setting | Description |
|---|---|
| Folder | Root location of IIS. The default is c:\inetpub\wwwroot\. Note: If your services are in a different location, enter the location of the parent folder in this field. |
| Machine name | Name of the current machine or host. This
value is used when creating the new Web service project.
Note: |
| Server path | Subfolder within the folder specified above; this is the Web service root. |
| Port | TCP/IP port number the web server is currently running on. |
Select .
The following panel is displayed:
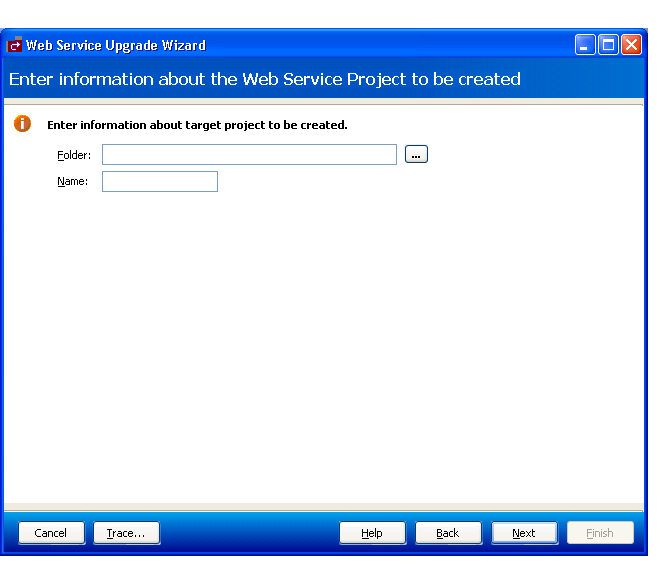
Enter the folder location and project name for the new project.
When naming projects, the following restrictions apply to the name:
Cannot contain spaces
First character must be alpha
All other characters must be alphanumeric
Select .
The following panel is displayed:
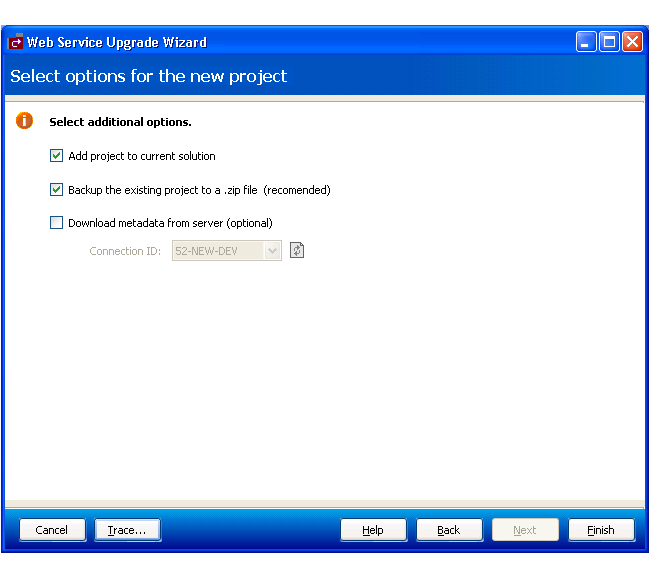
Select any additional options for the new project.
These options are:
| Option | Description |
|---|---|
| Add project to current solution | If this option is selected, the new project is added to other projects in the Solution Explorer. |
| Backup the existing project to a .zip file | If this option is selected, a backup zip file
is created for the existing Web service folder.
Note: |
| Download metadata from server | If this option is selected, metadata will be
downloaded from the server for each service.
Note: |
| Connection ID | This option is available when you select the Download metadata from server option. You can select a different connection and refresh the metadata. |
Select to upgrade the service.