This section describes how to create and maintain business services. A business service consists of a collection of methods related to a common business entity. Use the Business Service wizard to create and maintain a business service. The following topics are covered:
Note:
You must use a SPoD connection to create, test, or deploy business
services.
A business service consists of a collection of methods related to a common business entity. Use the Business Service wizard in the Eclipse plug-in to create and maintain a business service. This wizard generates a subprogram proxy to translate data (including Unicode formats) and then adds an entry in the NBS Repositories view. It also generates additional subprograms as required.
![]() To create a new business service:
To create a new business service:
Open the context menu for the SPoD connection in the NBS Repositories view.
For an example of this menu, see Access Connection Options.
Select .
The Define the Service panel is displayed. For example:
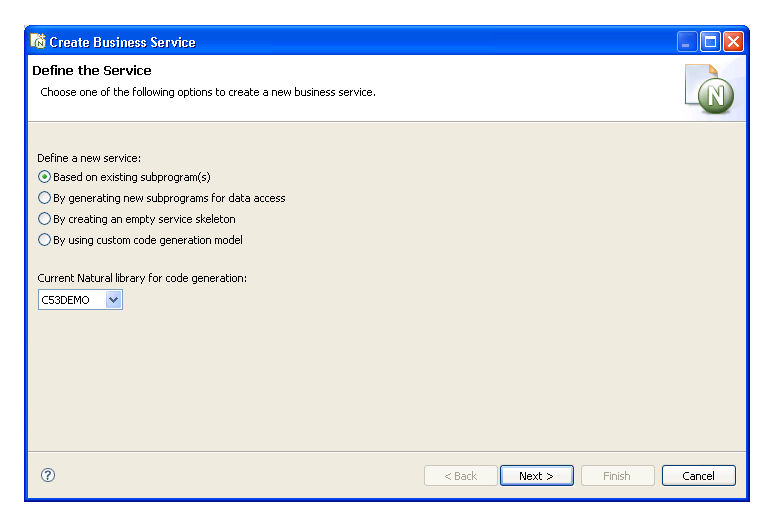
Select one of the following options:
Optionally, you can change the library in which to generate the service.
Depending on which option you select, one or more additional panels are displayed. After specifying the appropriate information, select on the last specification panel. The Enter Service Name and Select Domain panel is displayed. For example:
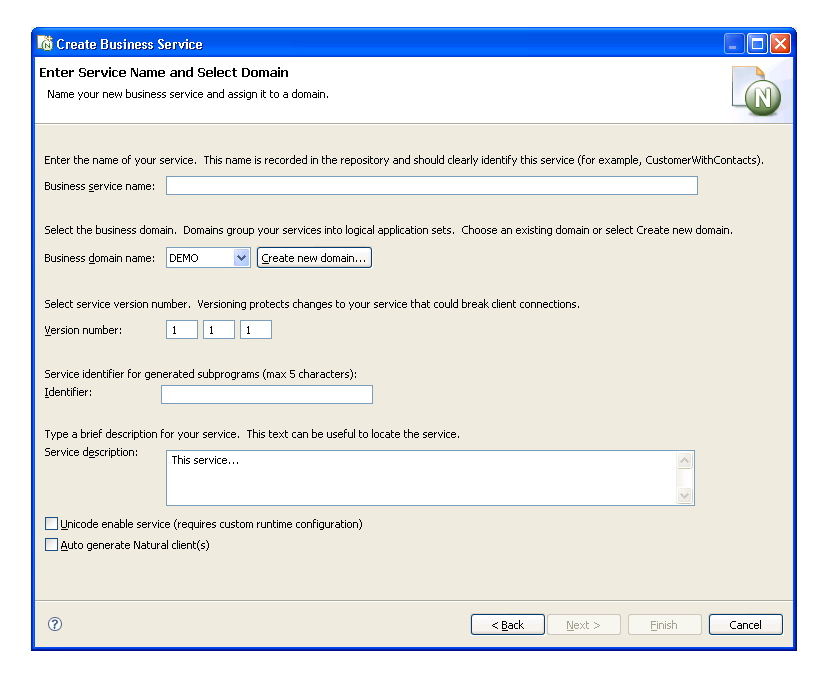
Use this panel to name your business service and assign it to a domain. Optionally, you can:
| Task | Procedure |
|---|---|
| Create a new domain | Select Create new domain. For information, see Create a New Domain. |
| Change the version number for the service | Type a new version number in Version number. Version numbers help protect changes to the service that can disrupt client communications. Use version 1.1.1 (default) for a new service. |
| Create the service interface using Unicode | Select Unicode enable service if your service has Unicode fields (U data type). Services that use a Unicode interface require a special EntireX runtime server definition. For information, see Use Unicode Parameters for Your Business Service. |
| Generate Natural clients | Select Auto generate Natural clients. This option automatically generates Natural clients, which can be used to invoke the business service from a Natural environment. The Business Service wizard generates a Natural client for each server proxy your business service creates. For information, see Natural Business Services Subprogram-Proxy-Client Model. |
Enter the name of your service in Business service name.
This name should clearly identify the service (for example, CustomerWithContacts).
Select the business domain from Business domain name.
Verify the service version number.
Type the service identifier for generated subprograms in Identifier.
The service identifier can be up to five characters in length and will be used with a wizard-generated prefix and suffix to identify the generated subprograms used for this service.
Type a brief description for your service in Service description.
This description can be useful when searching for a service.
Select to generate the business service.
The Generation Status window is displayed, showing the progress of the generation. When generation is completed, the window shows the names of the files generated for the business service.
The Results column indicates that the generated files have been generated for the first time (New).
Note:
To return to the wizard without saving the files, select
.
Select to save the files.
Note:
For information on testing your business service, see
Test a Business
Service.
If you want to create a business service based on existing subprograms, you have various options:
Directly enable a subprogram
This option associates the DEFAULT method with an existing subprogram by directly enabling the subprogram. For information, see Directly Enable Subprograms.
Note:
This option is only available when one subprogram is listed in
Selected Subprogram(s) and the option applies to that
subprogram alone.
Categorize parameters
If the subprogram(s) was generated by the Object-Browse or Object-Maint models, this option creates a business service that has associated methods. For information, see Categorize Parameters.
Use traditional defaults and FindBy methods
If the subprogram(s) was generated by Natural Construct, these options let you take advantage of the Business Service wizard’s knowledge of Natural Construct models and allow it to generate default methods for your business service. For information, see Select the Type of Methods Generated.
When you select the Based on existing subprogram(s) option on the Define the Service panel, the Select Subprograms panel is displayed. For example:
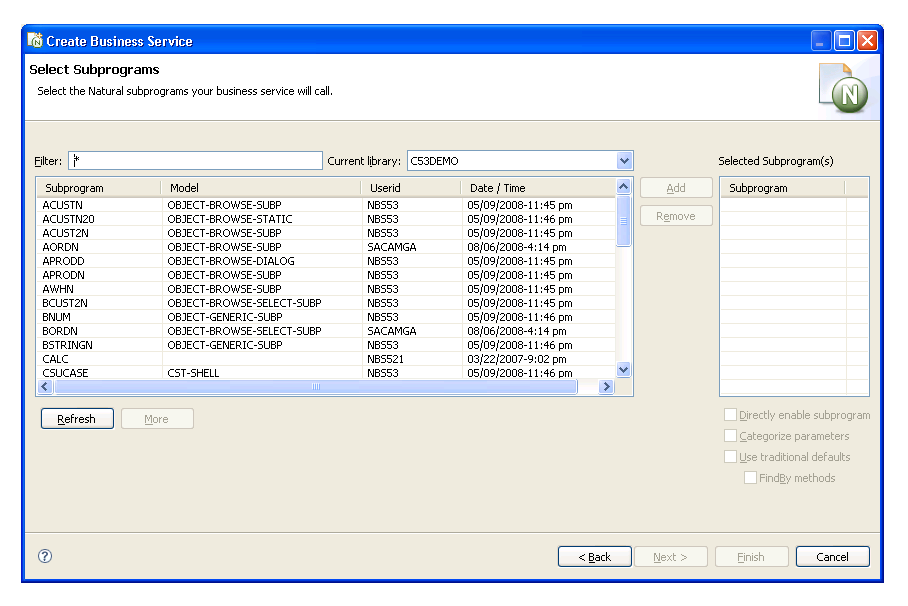
If a subprogram was not generated by Natural Construct, the Business Service wizard allows you to determine what the interface will look like (i.e., what data the service will expose to users) and which methods it will use. Use this panel to indicate which Natural subprograms the business service will call.
Note:
The list of available libraries is retrieved from either the FUSER
or FNAT file. The wizard determines which libraries to display based on the
library that is currently selected (i.e., the library in which the modules will
be created). If the current library is an FNAT library, all libraries in the
FNAT are available. If it is an FUSER library, all libraries in the FUSER are
available.
Select .
A list of available subprograms for the current library is displayed.
If all subprograms cannot be displayed in the space provided, use the scroll bar to display the additional subprograms.
To limit the list, enter a starting value and/or wildcard characters in Filter. In the example above, all subprograms in C52DEMO will be displayed.
If desired, select a different library from Current library.
Select the subprogram you want to use.
Select .
Each selected subprogram is listed in Selected Subprogram(s). To remove a subprogram from this list, select the subprogram and select .
By default, the Business Service wizard will:
Generate a subprogram proxy
Populate the service repository on the server
Generate a subprogram to call one or more existing subprograms
This occurs when the Use traditional defaults and FindBy methods options are NOT selected on the Select Subprograms panel. The wizard uses the Object-Generic-Subp model to generate the new subprogram. You can choose which methods the service will use and which combination of subprograms will be required to implement these methods. You can define customized methods for the business service, add user exit code, and choose and categorize attributes to be exposed to the business service user. Categorizing the attributes helps the business service user identify input, input/output, output, or state parameter structures.
Note:
State is similar to input/output, except that it identifies
parameters that are not exposed to the business service user and are only
required to maintain the state of the business object.
Select .
The Define Methods panel is displayed. For example:
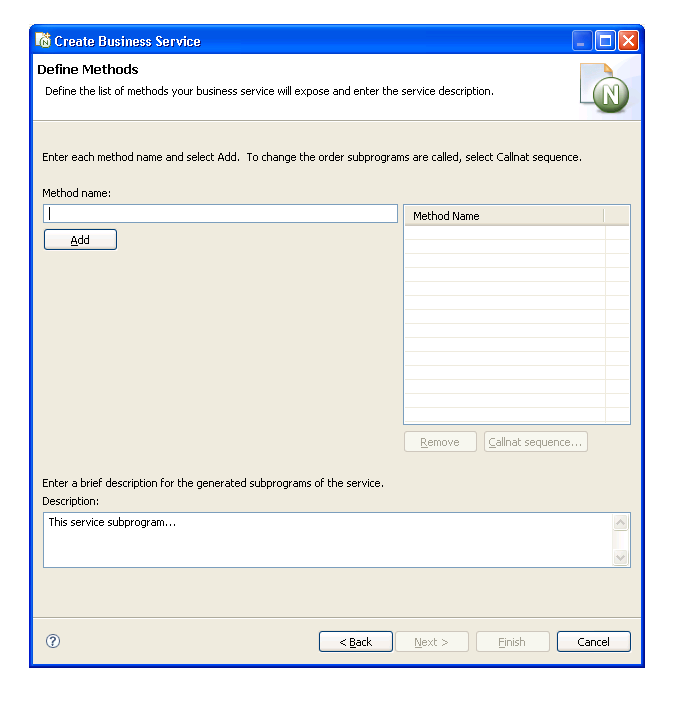
Use this panel to define the methods the business service will expose to the consumer and provide a brief description of the subprograms. Each time you enter a method name and select , the method is listed in Method Name.
You can change the functionality of each method by changing the Callnat sequence. For information, see Change the Method Callnat Sequence.
Select .
The last specification panel for the Business Service wizard is displayed.
Whether a subprogram is directly enabled or not, the Business Service wizard:
Generates a subprogram proxy
Populates the service repository on the server
When a subprogram is directly enabled, the wizard does not generate a
“wrapper” subprogram to call the specified subprograms. It does, however,
create one method called DEFAULT. This method searches
the subprogram from top to bottom and exposes each attribute in the
subprogram’s PDA when the subprogram is executed.
![]() To directly enable a subprogram:
To directly enable a subprogram:
Select a subprogram listed on the Select Subprograms panel.
Select .
The subprogram is listed in Selected Subprogram(s).
Select Directly enable subprogram.
Select .
The Enter Service Name and Select Domain panel is displayed.
Tip:
You can also directly enable a subprogram from the program editor
view by opening the context menu for the subprogram and selecting
. The Enter Service Name and
Select Domain panel is displayed.
Notes:
You can categorize parameters for your business service. Categorizing parameters allows users to easily identify input, input/output, state, and output requirements. To reduce network traffic, we recommend that only user-required fields be exposed in the interface.
Note:
By default, the categorization is turned off and the parameters for
existing subprograms are used at the same level for the service interface.
Categorizing parameters moves these parameters under new level 1 structures for
input, output, input/output, and state interface styles.
Note:
Whenever two subprograms interact, the exposed interface must be
defined carefully. For information, see
Interface
Considerations.
When categorizing parameters, you must ensure that parameters containing the same name (but different values) are not placed in the same category. If this happens, the subprogram will generate but not compile and you will have to decide how to handle the duplicate names.
When two subprograms contain level 1 structures with the same field or variable name, they must have different interface styles (for example, one can be input/output and the other can be input only). For example:
If the data for both parameters is the same, only one parameter must be exposed
If the data is different, the parameters must have unique names so users can easily differentiate between the two
Note:
Parameters are not categorized by default, but this option is
recommended for experienced users.
When you select this option on the Select Subprograms panel, the Define Interface panel is displayed when you select . For example:
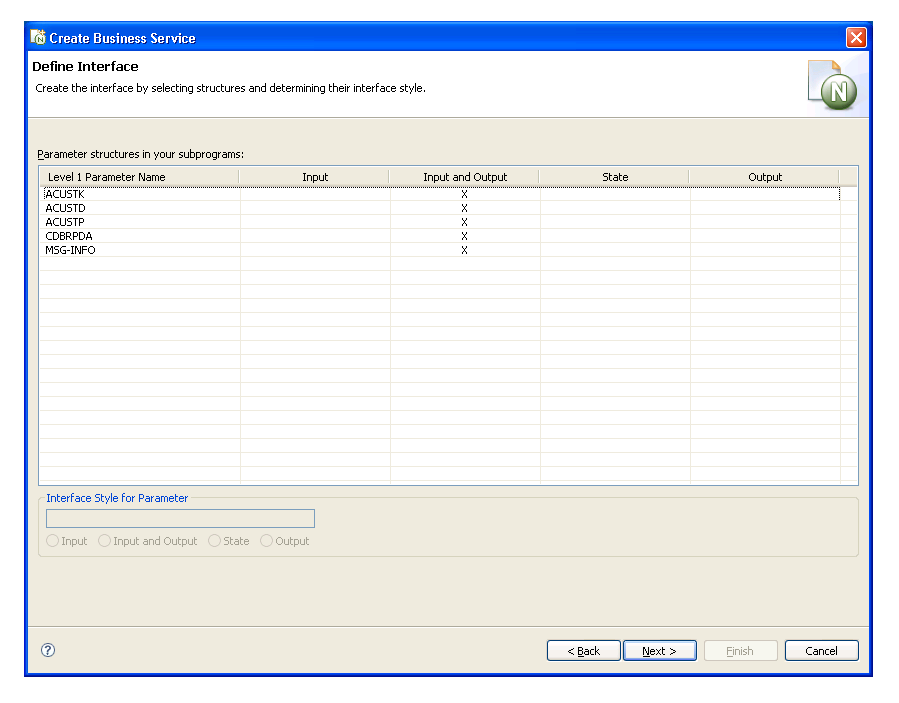
This panel lists each level 1 structure in the selected subprograms. By default, the parameters use the input/output interface style.
To change the interface style for a parameter, select the parameter and one of the following options:
Input
Data is moved from the exposed interface to the internal business service variables. These exposed fields will not be changed, even if the internal server fields change.
State
There is no coding difference between input/output and state interfaces styles. These structures just make it easier to identify which fields should be exposed to the user and which are only required to maintain a state with the server.
Output
Output parameters are reset. Even if the client copies data to the output structure, the data will be erased. Only data the server puts in these fields is sent back to the client.
Tip:
If parameters are not unique within each parameter structure, a
compile time error may occur. You can fix this error in the
Natural editor.
After categorizing the parameters, select to display the Define Methods panel. For information, see Define Methods.
The following table lists several cases you can consider when defining the interface for your business service:
| Case | Same Parameter Name | Example | Same Data | Example |
|---|---|---|---|---|
| 1 | No | Name, Make | No | Smith, Toyota |
| 2 | Yes | Personnel-ID, Personnel-ID | Yes | 1111, 1111 |
| 3 | No | #first, #num | Yes | 4, 4 |
| 4 | Yes | Name, Name | No | Smith, D&D Company |
This case is simple and can be handled by the wizard.
This case is relatively simple. Consider the following example:
01 #BIZ-INPUTS
    02 VEH
         03 PERSONNEL-ID (A8)
         03 MAKE   (A30)
         03 MODEL (A30)
    02 EMP
         03 PERSONNEL-ID (A8)
         03 NAME
![]() To solve this problem, do one of the following:
To solve this problem, do one of the following:
Put one of the parameters under #BIZ-INPUTS and the other under #BIZ-INPUTS-OUTPUTS (although this will expose the same attribute and data twice, creating some confusion for the business service user)
Or:
Define the parameters as follows:
01 #BIZ-INPUTS
    02 VEH
*        03 PERSONNEL-ID (A8)
         03 MAKE   (A30)
         03 MODEL (A30)
    02 EMP
*        03 PERSONNEL-ID (A8)
         03 NAME
    02 PERSONNEL-ID (A8)
Note:
This solution will work as long as PERSONNEL-ID is not part of a
redefined field and reserving a position in memory.
In this case, you must decide which parameter should be exposed. Once
this decision is made, you must ensure that the correct data is moved into the
other parameter using the MOVE-TO and MOVE-BACK user exits. For example, if
#NUM is exposed, add the following code to the MOVE-TO
exit:
#FIRST := #NUM
Add the following code to the MOVE-BACK exit:
#NUM := #FIRST
In this case, you must decide what “name” means and clarify the term for the business service user. Consider the following parameters:
01 #BIZ-INPUTS
  02 EMP
     03 NAME (A30)
     03 PHONE (N10)
  02 BUS
     03 NAME (A50)
     03 ADDRESS (A100/5)
For example, you can change the names to OWNER-NAME and BUSINESS-NAME:
01 #BIZ-INPUTS
  02 EMP
*     03 NAME (A30)
     03 OWNER-NAME (A30)
     03 PHONE (N10)
  02 BUS
*     03 NAME (A50)
     03 BUSINESS-NAME (A30)
     03 ADDRESS (A100/5)
If the parameter data area changes, you must define the names in the MOVE-TO and MOVE-BACK user exits as follows:
Add the following code to the MOVE-TO exit:
EMP.NAME := OWNER-NAME
BUS.NAME := BUSINESS-NAME
Add the following code to the MOVE-BACK exit:
OWNER-NAME := EMP.NAME
BUSINESS-NAME := BUS.NAME
Important:
If you change the business service interface (parameters), you
must regenerate the subprogram proxy (or proxies). For information, see
Regenerate a Service
Proxy.
If you do not select the Directly enable a subprogram option, the Business Service wizard generates another subprogram between the existing business service subprogram(s) and the proxy. This intermediate subprogram can contain multiple, named methods that call one or more subprograms.
Note:
For an example of the intermediate subprogram, refer to BNUM in the
demo application.
When the Categorize Parameters option is selected (for information, see Categorize Parameters), the parameter data areas (PDAs) are generated into the PARAMETER-DATA user exit. This allows the programmer to decide which parameters to expose in the client code.
Generating the PDAs into a user exit creates a problem, however, if the subprogram being called has been changed. These changes will not be picked up. To solve this problem, use the Regeneration wizard. This wizard adds comment indicators to the existing PDA code and creates a “fresh” PDA. Unfortunately, this solution does not re-incorporate any manual changes. The programmer must re-evaluate the PARAMETER-DATA user exit to determine which portion of the old and “fresh” code to keep.
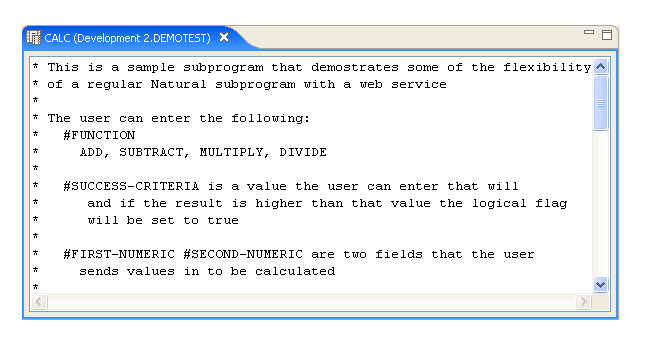
For example, if you regenerated the CalculatorAdvance service in the DEMO domain, BNUM appears as follows:
**SAG DEFINE EXIT PARAMETER-DATA
/*  01 #BIZ-INPUT-OUTPUTS
/*    02 E1-INPUT-DATA
/**     03 #FUNCTION (A30)
/*      03 #FIRST-NUM (N5.2)
/**     03 REDEFINE #FIRST-NUM
/**       04 #OPERAND-1 (I4)
/*      03 #SECOND-NUM (N5.2)
/**     03 REDEFINE #SECOND-NUM
/**       04 #OPERAND-2 (I4)
/*      03 #SUCCESS-CRITERIA (N5)
/**   02 E1-GCD-DATA
/**     03 #OPERAND-1 (I4)
/**     03 #OPERAND-2 (I4)
/**     03 #RESULT (I4) /* result goes into #GCD
/*  01 #BIZ-OUTPUTS
/*    02 E1-OUTPUT-DATA
/*      03 #RESULT (N11.2)
/*       /* Because result is used in both subprograms and because
/*       /* some methods will expose both the calculator result
/*       /* and the Greatest Common Denominator, a new exposed field
/*       /* has been created
/*      03 #GCD (I4)
/*      03 #TIME (T)
/*      03 #SUCCESS (L)
/*      03 #ERROR-MESSAGE (A79)
* Note: This EXIT creates MOVE-TO and MOVE-BACK exits.
*       To regenerate, delete all 3 exits
*
  01 #BIZ-INPUT-OUTPUTS
    02 E1-INPUT-DATA
      03 #FUNCTION (A30)
      03 #FIRST-NUM (N5.2)
      03 #SECOND-NUM (N5.2)
      03 #SUCCESS-CRITERIA (N5)
    02 E1-GCD-DATA
      03 #OPERAND-1 (I4)
      03 #OPERAND-2 (I4)
      03 #RESULT (I4)
  01 #BIZ-OUTPUTS
    02 E1-OUTPUT-DATA
      03 #RESULT (N11.2)
      03 #TIME (T)
      03 #SUCCESS (L)
In this example, the code added by the programmer before the regeneration has been commented out and may need to be re-incorporated.
For Natural Construct-generated subprograms, you can use the Select Subprograms panel to select the type of methods generated for your business service. After selecting and adding one or more subprograms, the following options are available for the subprogram(s) listed in Selected Subprogram(s):
If an object browse OR object maintenance subprogram is listed, the Use traditional defaults field is selected and the wizard will:
Generate a subprogram proxy
Populate the repository with the default methods associated with either the Object-Browse or Object-Maint models
If an object browse AND an object maintenance subprogram are listed, and they access the same file, the Use traditional defaults field is selected and the wizard will:
Generate a subprogram proxy for each subprogram
Populate the repository with the default methods associated with both the Object-Browse and Object-Maint models
If a single object browse subprogram is listed, OR if an object browse AND an object maintenance subprogram are listed that access the same file and the file has no intra-object relationships (i.e., relationships with other files that are maintained at the same time as the primary file), the Use traditional defaults and FindBy methods fields are selected and the wizard will:
Generate an object browse select subprogram and subprogram proxy
Populate the repository with the FindBy methods associated with the Object-Browse-Select-Subp model (and the default methods associated with the Object-Maint models, if an object maintenance subprogram is also selected)
For more information on the Object series of models, see Natural Construct Object Models.
As with the interface considerations, decisions must also be made as to which subprograms are executed for each method and what order they are executed. In addition, data may need to be massaged before the subprograms are executed for the method to work effectively and accurately. For a better understanding of this, refer to the BNUM and BSTRING subprograms in the SYSBIZDE library. For information, see Define Methods.
By default, the subprograms are executed in the order they were selected on the Select subprogram(s) panel.
![]() To change the method Callnat sequence:
To change the method Callnat sequence:
Select a method from Method Name on the Define Methods panel.
Select .
The Method Callnat Sequence window is displayed. For example:
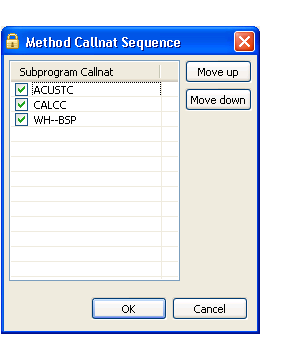
This window displays the name of each subprogram that is executed for the selected method and in what order it is executed. Use this window to change the order of subprograms (select a subprogram and select or ) or to de-select a subprogram that should not be executed with this method.
Select to save your changes.
In addition to these changes, you can further customize the functionality of methods within user exits generated into the Natural code by the Business Service wizard. The subprogram created by the wizard is called BserviceIdentifier and is located in the current library when the wizard is invoked.
Important:
If you make any changes to the exposed interface in this
subprogram (i.e., changes to the PDAs), you must regenerate the service proxy.
For information, see Regenerate a
Service Proxy.
This option will create the minimum components for a business service (a subprogram proxy and an entry in the NBS Repositories view), as well as at least one Natural Construct object subprogram. Depending on which data access type is selected on the Select Data Access Type panel, one of the following will be generated:
An object maintenance subprogram
An object browse subprogram
An object browse-select subprogram
A combination of these subprograms
When you select the By generating new subprograms for data access option on the Define the Service panel, the Define the Data Parameters panel is displayed. For example:
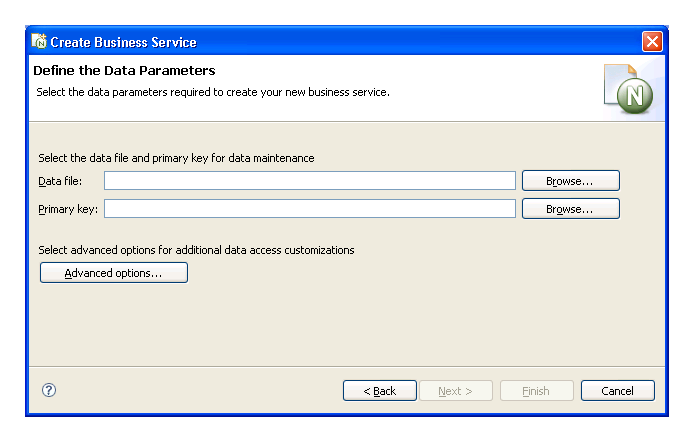
Use this panel to indicate the name of the file and the primary key used for data maintenance. To select advanced options for additional data access customizations, select . For information about this window, see Specify Advanced Options for Data Access.
Select the name of the file used for data maintenance from Data file.
This file must currently exist in Predict.
Select the primary key for the specified file from Primary key.
Select .
The Select Data Access Type panel is displayed. For example:
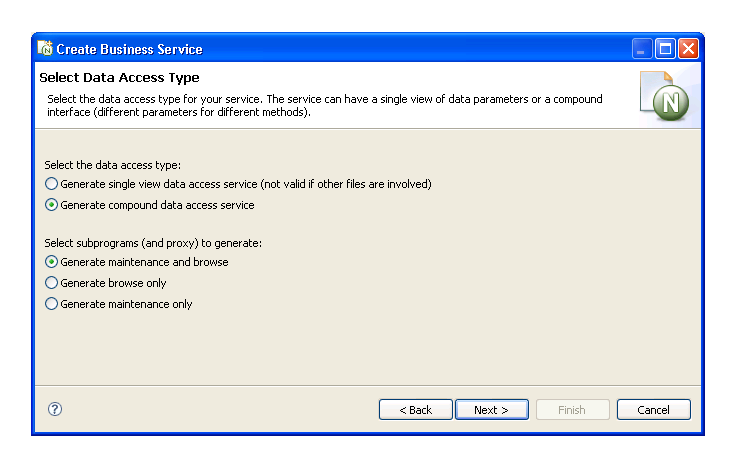
Select one of the following data access types:
| Data Access Type | Description |
|---|---|
| Generate single view data access service | Generates an object browse, object maintenance, and object browse-select subprogram and the business service will have the following methods: Delete, MultiMaint, Store, Update, FindBy (one or more, such as the FindByDomainName method), and, optionally, Count (one or more, such as the ServiceCountByDomain method). This access type does not work with files that have intra-object relationships (for example, the Order header has an intra-object relationship with Order lines). But if only one physical file is involved, this type only requires one user interface to browse and maintain data. It is also designed for network efficiency, which means n rows of data can be processed at a time for browse or data maintenance activities. |
| Generate compound data access service | Generates an object browse and object
maintenance subprogram and the business service will have the following
methods: BROWSE, DELETE, FORMER, EXISTS, GET , INITIALIZE, NEXT, STORE, UPDATE.
In addition, two subprogram proxies are created: one for the BROWSE method and
one for all other methods. This access type handles complex data structures
with intra-object relationships that must be maintained. It assumes that the
data browse subprogram has a different interface than the data maintenance
subprogram. A high-level browse interface can be exposed with multiple rows,
but when an object must be maintained, all details can be exposed. For example,
the maintenance subprogram can display all fields for Order and the browse
subprogram can display the Order header for n rows.
Note: |
For more information, see More About the Object Browse-Select Subprogram.
Select which subprograms (and proxies) to generate.
Generate maintenance and browse (the default)
Generate browse only
Generate maintenance only
Select .
The last specification panel for the Business Service wizard is displayed.
This option is available if an object maintenance subprogram will be generated.
![]() To specify advanced options for data access:
To specify advanced options for data access:
Select on the Define the Data Parameters panel.
The Advanced Options window is displayed. For example:
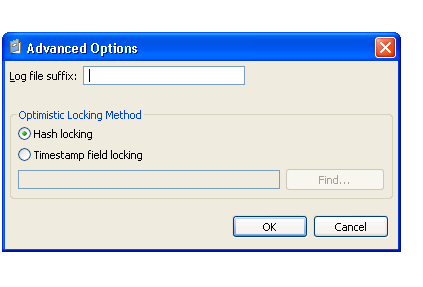
The first option in this window allows the wizard to generate code to maintain a log file whenever data is modified through this business service. The second option specifies the record-locking method. The object maintenance subprogram has two methods to lock records: hash locking and timestamp field locking. The traditional method is using a timestamp. This method works well if the file is always maintained by Natural Construct-generated objects. If not, data may have changed and the timestamp field may not have been updated. The hash locking method checks all data to ensure that nothing has been changed between when the user saw the data and when the database locks the data.
Note:
To locate subprograms to use with your business service, select
.
Type a suffix in Log file suffix.
The suffix identifies the log files for this business service.
Select one of the record-locking options.
Select .
An object browse-select subprogram can:
Determine the key fields for the object browse subprogram and separate them into different methods (for example, the various FindBy and Count methods)
Allow a row-state attribute on each row to process methods at the row level
Reduce network traffic by executing both the object browse and object maintenance subprograms from the same object browse-select subprogram
For example, if the row-state attribute determines that rows 3, 5, and 10 in the object browse subprogram must be modified, and the modified values are sent back to the server with all the rows, three calls to the object maintenance subprogram can be processed without going back to the client.
Be modified through user exit code.
You can write Natural code to massage the data and/or call other Natural subprograms.
Expose the data as a dataset
This allows the Natural Business Services .NET plug-in to take advantage of dataset processing and handle row processing beyond the n rows defined for the object browse-select subprogram. For example, the object browse-select subprogram can pass the 20 rows it receives from the object browse subprogram. But if the user adds four rows, special processing must be done internally because the object browse-select subprogram only handles a specified number of rows. In this case, two calls to the server must be made to process the 24 rows. Similar complexities arise when a user deletes rows.
The flexibility of allowing methods to be processed at the row level adds some complexity to security considerations. For example, assume that one user is allowed to add, update, and delete rows, and wants to do this to a group of rows at a time, but another user can only add and update rows. When an object browse-select subprogram is used, the FindBy* methods retrieve the data and the MultiMaint method processes row-level methods. As Delete, Store, and Update are row-level methods, both users can be granted access to the MultiMaint method, but only the first user will be granted access to the Delete method.
The Business Service wizard automatically generates the standard methods, but you can also add custom methods to the object browse-select subprogram. For information about this model, see Object-Browse-Select-Subp Model.
Use this option when you want full control of creating a new subprogram to be used as a business service. The wizard will generate the subprogram proxy and populate the service repository on the server. You can edit the new subprogram in the program editor view.
Note:
For information on determining the module names that belong to a
business service and loading the modules into the editor, see
Edit Service
Modules.
When you select By creating an empty service skeleton on the Define the Service panel, the Define Service Parameters panel is displayed. For example:
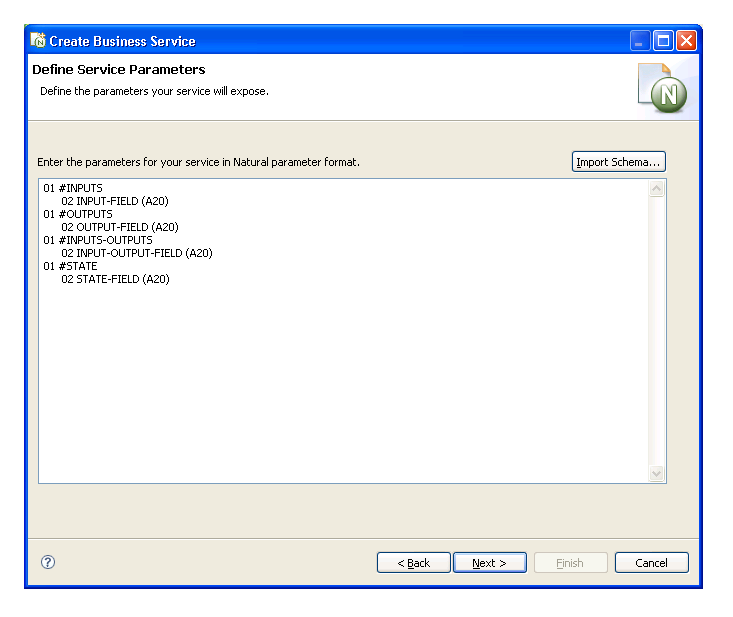
Use this panel to define parameters for the business service. Optionally, you can select to import an external schema to use as the data parameters for the service skeleton. For information, see Import Schema.
Enter the parameters for the new business service in the space provided.
The parameters must be in standard Natural parameter format (see example above).
Select .
The Define Skeleton Methods panel is displayed. For example:
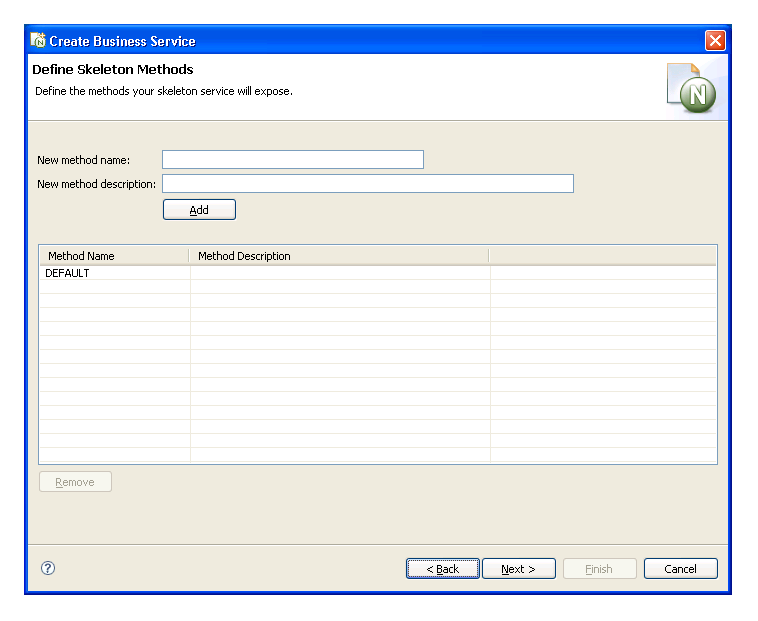
This panel lists the methods your skeleton service will expose to the user (DEFAULT in this example).
To add a new method, type the method name in New method name, a brief description of the method in New method description, and select .
To remove a method, select the method name and select .
Select .
The last specification panel for the Business Service wizard is displayed.
![]() To import an external schema to use as the data parameters for the
service skeleton:
To import an external schema to use as the data parameters for the
service skeleton:
Select on the Define Service Parameters.
The Import XSD/WSDL window is displayed. For example:
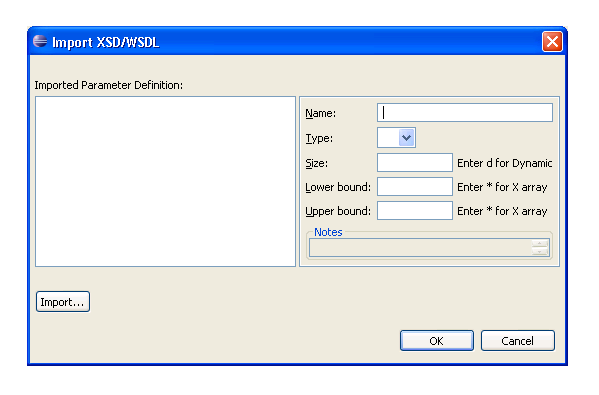
Use this panel to import a schema and, optionally, change the field names, data types, and array definitions (i.e., the use of dynamic or X-array variables). The schema can be either an XSD (XML Schema document) or WSDL (Web Service Description Language) file. The selected XML schema will be converted into Natural data area format.
Select .
A selection window is displayed to select the schema to import. Once the fields are displayed in Imported parameter definition, you can change the following options for a selected field:
| Option | Description |
|---|---|
| Name | Name of the field. |
| Type | Data type. |
| Size | Use of dynamic variables (either type or remove "D"). |
| Lower bound | Use of X-array variables for the lower bound (either type or remove "*"). |
| Upper bound | Use of X-array variables for the upper bound (either type or remove "*"). |
Select to save the changes to the parameter definition.
Use this option if the subprogram to be used as a business service was generated by a custom model.
Note:
To implement this option, the Custom models
file field in the Preferences window for
Natural Business Services must be set to a valid
models.xml file. For information, see
Set Natural Business Service
Preferences.
During installation, the default models.xml file is copied to the following folder:
C:\Documents and Settings\All Users\Application Data\Software AG\Natural Business Services\Configuration
Note:
If the models.xml file currently exists in this
folder, the new file will not be copied. This protects any changes you made to
your models.xml file from being overwritten. In this case
the new models.xml file is also copied to the NBS install
folder (C:\Program Files\Software AG\Natural Business
Services\Vn.n).
When you select the By using custom code generation model option on the Define the Service panel, the Select Custom Model panel is displayed. For example:
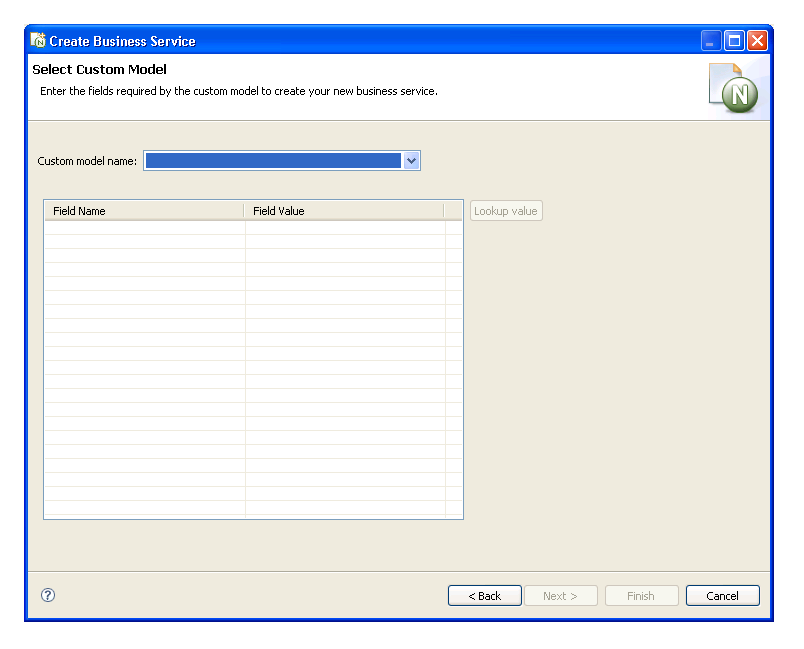
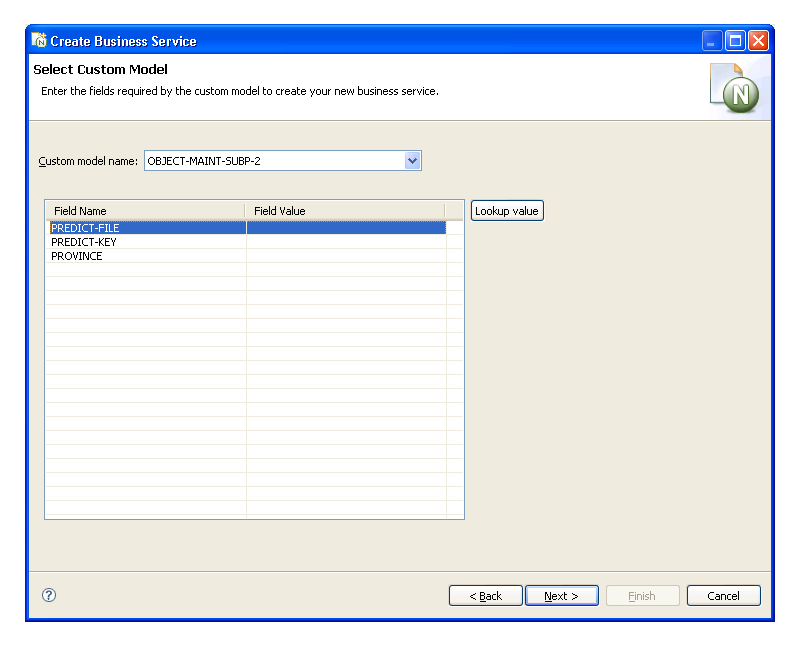
Select the custom model from Custom model name.
The fields available for the custom model are displayed.
Specify the field names and values.
If a field does not have lookup values available, the value must be manually entered. If lookup logic is available, the button becomes active when you select the field. For example:
Note:
Although lookup values for Predict files and keys are supplied,
they must be enabled. You can also define your own lookup logic for a custom
model. For information, see Define
Lookup Values.
Select .
The last specification panel for the Business Service wizard is displayed.
Note:
The custom model must be defined in the Natural Business Services
Administration. For information, see
Using Custom Models with Natural
Business Services.
This section describes how to enable the supplied lookup logic for Predict files and keys, as well as how to define your own lookup logic for a custom model.
Two CustomModelLookups extensions are supplied with the Business Service wizard:
PredictFileCustomLookup (displays a list of Predict files)
PredictKeyCustomLookup (displays a list of key fields for the selected Predict file)
To enable the supplied Predict extensions, the models.xml file for the custom model must include a binding between a parameter field name and a CustomModelLookups extension contribution.
![]() To enable the supplied lookup logic for Predict files and keys:
To enable the supplied lookup logic for Predict files and keys:
Modify the models.xml file (defined in the Natural Business Service Preferences window) and bind the parameter field names for your custom model to the Predict extensions listed above.
Note:
For more information, see the comments in the supplied default
models.xml file (located in C:\Documents and
Settings\All Users\Application Data\Software AG\Natural Business
Services\Configuration).
If desired, you can also define your own lookup options for a custom model.
![]() To define custom lookup logic:
To define custom lookup logic:
Create a plug-in project to store your custom lookup code.
Add the com.softwareag.nbs.ui plugin as a dependency in your plug-in project.
Create a java class that extends com.softwareag.nbs.generation.server.CustomLookupBase.
Implement logic in the lookup() method for your java class to return a String value (this value will be automatically set in the service wizard custom model field table).
Add an extension contribution to the com.softwareag.nbs.ui.CustomModelsLookups extension point.
Name the extension with a unique ID and set the class to the java class created in Step 3.
Modify the models.xml file (defined in the Natural Business Service Preferences window) and bind the parameter field names for your custom model to the new custom models lookup contribution.
Note:
For more information, see the comments in the supplied default
models.xml file.
Note:
This option is only available for SPoD connections.
![]() To regenerate a business service:
To regenerate a business service:
Open the context menu for the business service in the NBS Repositories view.
For an example of this menu, see Access Connection Options.
Select .
The Regenerate Business Service wizard panels are displayed, showing the specifications used to generate the service.
Revise the specifications as desired.
For information about the options on the wizard panels, see Create a Business Service.
Select on the last wizard panel to regenerate the service.
The service proxy is also referred to as the subprogram proxy. It provides the link between a subprogram and the Natural Business Services dispatch server.
When you change the parameters in a subprogram used for a business service, you must also change the subprogram proxy for the service to accommodate the new message size. This is done by regenerating the business service proxy.
Note:
If the parameters for a business service have changed and a business
service consumer has already incorporated the service, the consumer code (i.e.,
the Java class) must be regenerated as well.
![]() To regenerate a business service proxy:
To regenerate a business service proxy:
Open the context menu for the business service in the NBS Repositories view.
Select .
The Eclipse plug-in regenerates the service proxy (or proxies) without displaying the wizard panels. New metadata is downloaded from the server before regeneration.
![]() To test a method used by a business service:
To test a method used by a business service:
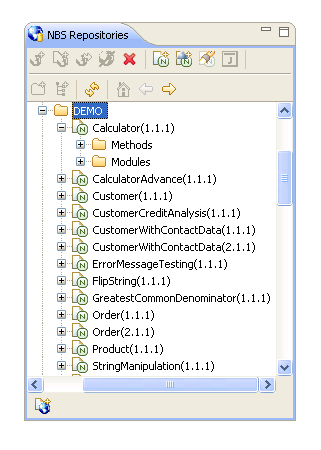
Expand the business service node in the NBS Repositories view.
Folders containing the methods and modules used for the business service are displayed. For example:
Expand the Methods node.
Open the context menu for the method you want to test.
Select .
The test window is displayed. For a description of this window, see Test a Business Service.
Certain methods are standard to business services. These methods can be divided into the following categories:
| Category | Standard Methods |
|---|---|
| Single-row access | DELETE, EXIST, FORMER, GET, INITIALIZE, NEXT, STORE, and UPDATE |
| Multiple-row access | BROWSE, MultiMaint, Update, Delete, Store, and the FindBy* series of methods |
Understanding the parameters for these methods will simplify the testing process. This section covers the following topics:
The DELETE, EXIST, FORMER, GET, INITIALIZE, NEXT, STORE, and UPDATE methods are used on a single row of data. All methods that access a single row of data contain the same PDAs. These PDAs are:
| PDA | Description |
|---|---|
| Data | Contains the -ID values (for example, MCUSTA-ID). |
| Restricted | Determines whether data has been modified
between the time it was retrieved for the test and the time a data maintenance
method was requested. This PDA should not be altered.
Tip: |
| Method (CDAOBJ2) | Contains method data that is handled by Natural Business Services. |
| MSG-INFO | Contains messages from the server; it is used for output only. |
This section covers the following topics:
![]() To test the DELETE method:
To test the DELETE method:
Issue the GET, NEXT, or FORMER method to retrieve a record.
Issue the DELETE method to delete the record.
A confirmation message should be displayed.
Note:
Ensure you are deleting the correct record.
![]() To test the EXIST method:
To test the EXIST method:
Issue the INITIALIZE method (to delete all data).
Enter a customer number (for example, "5555").
Issue the EXIST method.
This request will be successful whether the customer exists or not. The result of the request is contained within the method PDA (CDAOBJ2) under OUTPUTS (the EXIST flag will be either True or False).
The easiest single-row access method to test is NEXT because it does not require any input parameters. This method simply gets the next record in the dataset.
The sequence of records within the dataset is determined by the PDA values that end with -ID. For example, when testing the NEXT method for the Customer business service in the Demo domain, MCUSTA and MCUSTA-ID will be displayed (MCUSTA will contain additional data). When you expand MCUSTA-ID, CUSTOMER-NUMBER is displayed. This indicates that the next highest customer number is displayed when the NEXT method is issued (and the previous customer number is displayed when the FORMER method is issued).
To ensure that the restricted PDA is populated correctly, a record must be retrieved before an UPDATE or DELETE method can be issued. The record can be retrieved by issuing the NEXT or FORMER method, or issuing the GET method when you know what the key value is and whether the data for the key value is supplied in the data PDA.
![]() To test the GET method:
To test the GET method:
Enter a valid customer number in CUSTOMER-NUMBER in the data PDA.
Issue the GET method.
The record associated with specified customer number should be displayed.
![]() To test the INITIALIZE method:
To test the INITIALIZE method:
Issue the INITIALIZE method to delete all data except the key values.
Tip:
You can also delete the data from the -ID section of the data PDA
and from the restricted PDA (except for the first reference to the key value)
and then reissue the GET method. This should retrieve all the values for a
customer based on the customer number provided, assuming that number exists. If
the record does not exist, a message is displayed.
![]() To test the STORE method:
To test the STORE method:
Enter a unique value in the key field in the data PDA.
Issue the STORE method to store the record.
A confirmation message should be displayed.
![]() To test the UPDATE method:
To test the UPDATE method:
Issue the GET, NEXT, or FORMER method to retrieve a record.
Change the fields in the data PDA.
Issue the UPDATE method to update the record.
A confirmation message should be displayed.
The BROWSE, MultiMaint, Update, Delete, and Store methods, as well as the FindBy* series of methods, are used on multiple rows of data.
Note:
The Update, Delete, and Store methods are handled internally by the
MultiMaint method and should not be used as individual methods. They allow
administrators to revoke access to these methods when the MultiMaint method is
used.
All methods that access multiple rows of data contain the same PDAs. These PDAs are:
| PDA | Description |
|---|---|
| Row | Contains the rows of data retrieved from the
database (in an array of 1:20).
Tip: |
| Key | Contains the key fields and starting values for
components of the key being used. For example, if you enter
"M" in BUSINESS-NAME for the Customer business
service in the Demo domain, the BROWSE method displays records beginning at
"M".
Tip: |
| Restricted | Contains state information, such as where to
resume browsing, as well as fields like FIRST-TIME and KEY-DATA. This PDA
should not be altered.
Tip: |
| MSG-INFO | Contains messages from the server; it is used for output only. |
This section covers the following topics:
In addition to the standard PDAs, the BROWSE method contains additional PDAs that provide specialized functionality. For example, the BROWSE method can sort data up to six different ways depending on the availability of server-side keys. In addition, the server-side keys can be derived (so that they make up more than one field).
Unfortunately, which keys are available, and which fields make up the keys, is unknown during testing. The names of the fields that make up the keys are contained in the key PDA.
![]() To test the BROWSE method:
To test the BROWSE method:
Determine which keys are available and which fields make up the keys.
To do this, refer to the specification lines for the object browse subprogram. For example, the following keys are contained in the specifications for the ACUSTN subprogram used by the Customer business service in the Demo domain:
**SAG LOGICAL-KEY(2): NAME-BACKWARDS
**SAG PHYSICAL-KEY(2,1): BUSINESS-NAME
**SAG DESCENDING(2,1): X
where LOGICAL-KEY contains the field used to sort data
in a particular order and PHYSICAL-KEY contains the fields that
make up that key. For instance, back to our customer business service in the
demo domain.
Enter "NAME-BACKWARDS" in the SORT-KEY field in the CDBRPDA PDA.
The results should be sorted by name in descending order.
You can also use other fields in CDBRPDA to test the BROWSE method. For example, if the row PDA contains the COUNT field, you can use the HISTOGRAM field to return the number of key values, as opposed to the entire record (such as "SMITH 20" to indicate there are 20 Smiths in the database).
You can also request that fewer rows of data be returned (than the standard 20 rows) by entering a number in the ROWS-REQUESTED field.
Note:
For obvious reasons, you cannot specify a value higher than the
number of rows available.
To specify a range of values, enter a number in the RANGE-OPTION field based on the following information:
3 DEFAULT                          N    1 INIT<0> /* Input specifies a starting value, LE or GE will be determined based the sort order.
 *                                                                 /* Embedded wildcard can be specified using >, < and characters for Alpha an
 *                                                                 /* numeric characters.
   3 LESS-THAN                        N    1 INIT<1>
   3 LESS-THAN-OR-EQUAL               N    1 INIT<2>
   3 EQUAL                            N    1 INIT<3>
   3 GREATER-THAN-OR-EQUAL            N    1 INIT<4> /* Default
   3 GREATER-THAN                     N    1 INIT<5>
   3 BEGINS-WITH                      N    1 INIT<6> /* Prefix of key mat
 *                                                   /* the input key.
   3 NO-WILDCARD                      N    1 INIT<7>
If the RESTART field is False and the data has not changed, the BROWSE method will continue to get the next n rows of data until the end of data is reached.
Tip:
The end of data is reached when the END-OF-DATA field is True.
Note:
If the RESTART field is True, the browse action will
restart.
The ACTUAL-ROWS-RETURNED field contains the number of rows returned.
In addition to the standard PDAs used for multiple-row access, the MultiMaint and FindBy* series of methods contain the CDBUPDA PDA, which is a subset of the CDBRPDA PDA used by the BROWSE method. All fields in CDBUPDA behave the same way as described above. The key differences between CDBUPDA and CDBRPDA include:
The SORT-KEY field is not required because the FindBy* methods assign the SORT-KEY value on the server. You do not have to guess what the sort key should be.
The BUSINESS-INFO field is a subset of MSG-INFO; this field contains messages that pertain to all rows, as opposed to messages for a specific row.
Except for the Add action, the MultiMaint method can only be issued after a FindBy* method has retrieved the rows for maintenance. The MultiMaint method does not retrieve new rows (as do the FindBy* and BROWSE methods); it only alters the current rows based on the value in the ROW-STATE field for each row in the data PDA.
![]() To test the MultiMaint method:
To test the MultiMaint method:
Enter "A" in the ROW-STATE field in the CDBUPDA PDA.
The output response should be displayed in the state as "AS" add successful.
Enter "U" in ROW-STATE.
The output response should be displayed in the state as "US" update successful.
Enter "D" in ROW-STATE.
The output response should be displayed in the state as "DS" delete successful.
Note:
The existing states can be found in CDSTATE. For a list of valid
values, see
ROW-STATE
Values.
![]() To test your business service:
To test your business service:
Open the context menu for the business service in the NBS Repositories view.
Select .
The test window is displayed. For example:
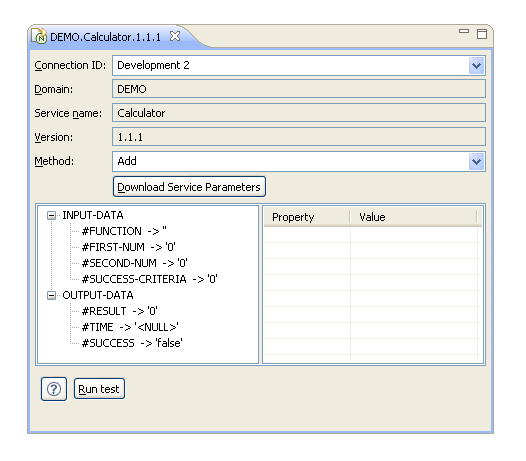
Select a method from Method.
For this example, select Add.
Select #FIRST-NUM.
The properties and values for #FIRST-NUM are displayed.
Type "1" in the Value property.
Select #SECOND-NUM.
Type "1" in the Value property.
Select #RESULT.
Type "2" in the Value property.
Select .
The results of the test are displayed in #SUCCESS. For example:
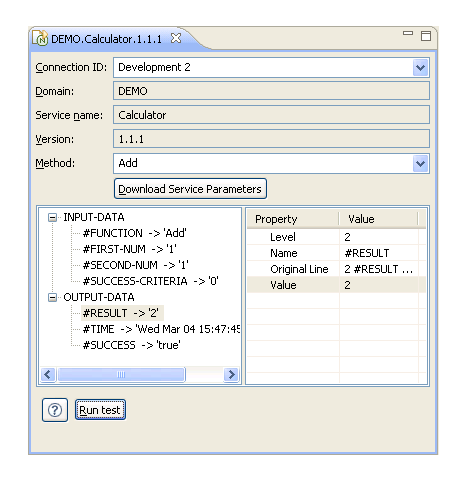
You can use this window to test all methods available for this business service.
If multiple rows occur because an object-browse or object-browse-select subprogram was used to create the service, two additional fields are available at the bottom of the test window. For example:
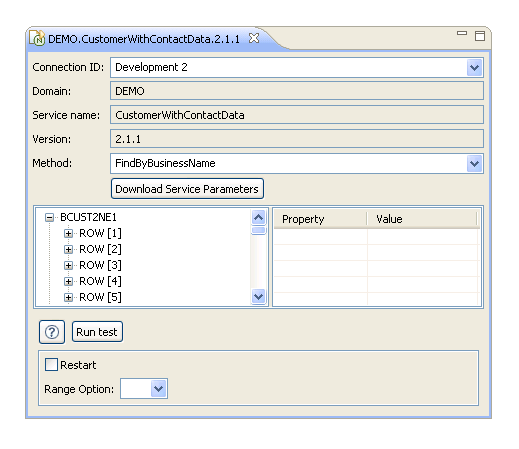
These fields provide an alternate, easier way to populate the CDBUPDA.RANGE-OPTION and CDBUPDA.RESTART parameters. The additional fields are:
| Field | Description |
|---|---|
| Restart | Select this option to restart the test for multiple rows. |
| Range Option | Select a range option to limit the test results.
The range options are:
|
Note:
Removing a business service will only delete the service from the
repository, it will not delete the Natural
modules.
![]() To delete (remove) a business service:
To delete (remove) a business service:
Open the context menu for the business service in the NBS Repositories view.
Select .
A confirmation window is displayed. For example:
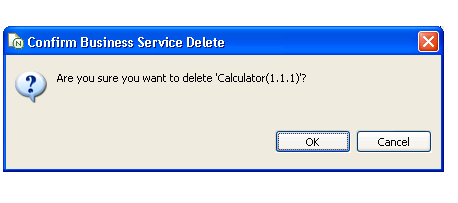
Select to delete the business service.
![]() To edit a business service definition:
To edit a business service definition:
Open the context menu for the business service in the NBS Repositories view.
Select .
The Properties window for the business service is displayed. For example:
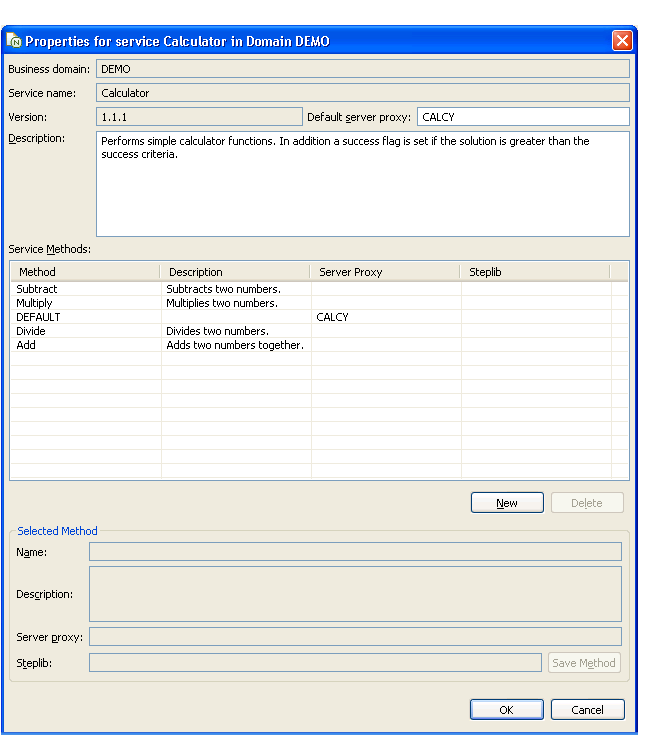
Use this window to:
| Task | Procedure |
|---|---|
| Change the business service description | Type a new description in Description. |
| Edit an existing method | Select the method from Service Methods and change the information in Selected Method. For example, you can the change the name, description, server proxy name, or step library chain. |
| Add a new method | Select and enter information about the new method in Selected Method. Select to save the new method. The new method is displayed in Service Methods. |
| Delete a method | Select the method from Service Methods and select . The method is removed from Service Methods. |
Select to close the Properties window.
Note:
You must use a SPoD connection to edit the service modules.
![]() To edit the modules used for a business service:
To edit the modules used for a business service:
Expand the business service node in the NBS Repositories view.
The methods and modules used for the business service are displayed as nodes in the repository view. For example:
Do one of the following:
To edit all modules, open the context menu for Modules and select .
To edit one module, open the context menu for the module and select .
The module(s) is displayed in the editor. For example:
You can edit the module in this editor and then save the changes. For information on using this editor, see the Eclipse documentation.
Important:
If you make any changes to the exposed interface in this
subprogram (i.e., changes to the PDAs), you must regenerate the service proxy.
For information, see Regenerate a
Service Proxy.