This document covers the following topics:
Task 1: Generate Integration Server Connections and Listeners
Task 2: Generate Client Interface Objects and Build Client Application
This scenario uses the EntireX Workbench tools IDL Extractor for Integration Server and COBOL Wrapper of the Software AG Designer.

| Use IDL Extractor for Integration Server to generate Integration Server connections and listeners from the Integration Server service to be called. | |
| Generate client interface objects and build COBOL client application. | |
| Execute the call from the COBOL client to the Integration Server service. |
This scenario makes the following important assumptions:
For Task 1:
You have an Integration Server with the EntireX Adapter installed.
For Task 3:
You have an Integration Server with the EntireX Adapter installed.
You can call the COBOL server program at runtime using different methods:
EntireX RPC
For the EntireX RPC connection method you need EntireX Broker on one of the supported platforms:
z/OS |
UNIX |
Windows |
BS2000/OSD |
z/VSE.

EntireX Direct RPC
For the EntireX Direct RPC connection method
there are no additional prerequisites.

This section describes your first steps to create a new Integration Server connection. This process creates the following:
a Software AG IDL file (metafile) in the EntireX Workbench; an IDL file contains definitions of the interfaces between client and server. See Software AG IDL File in the IDL Editor documentation and Mapping Software AG IDL to Integration Server Data Types in the Integration Server Wrapper documentation
a server connection
one of the following in Integration Server, depending on connection type specified in Step 4: Select the Connection Type below:
an RPC Listener
a Reliable RPC Listener
a Direct RPC Listener
The following steps are described in more detail under IDL Extractor for Integration Server.
 To start the IDL Extractor for Integration Server
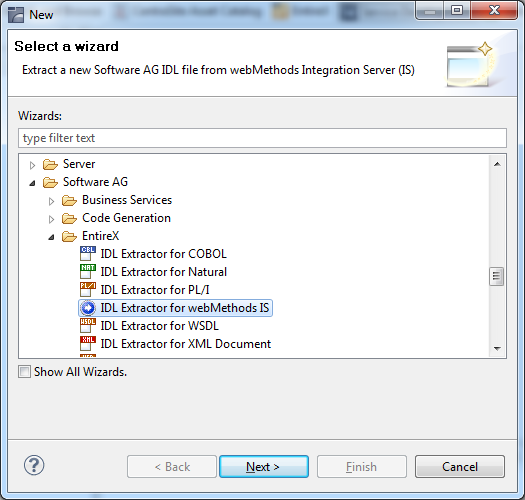
The IDL Extractor is a New Wizard in Eclipse. Choose New from the file menu, select IDL Extractor for webMethods IS in the following page and choose Next.
Note:
You can also chose New from the toolbar or
context menu of a view showing resources. Also Ctrl-N starts the
selection of the New Wizards.
If you are using the wizard for the first time without any predefined Integration Server connections, continue with Step 2: Connect EntireX Workbench with Integration Server below.
To create a new Integration Server connection
Define the new Integration Server connection on the
following wizard page. The only required field is Server.
 More info

Choose and continue with Step 3: Select the Integration Server Package to Extract.
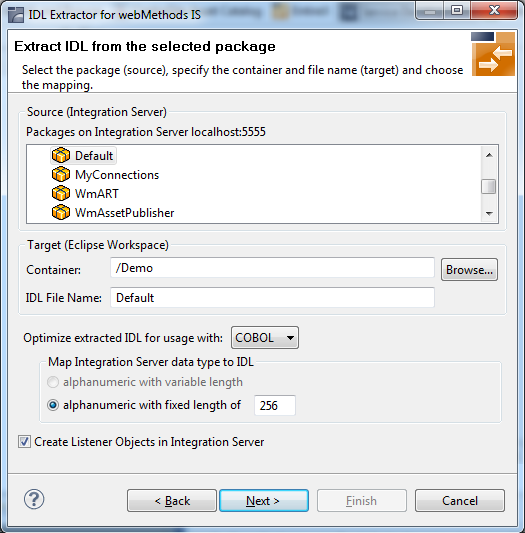
To extract the IDL from the selected package
Select the package to extract (from the list indicated by Source), for example the package "Default" in the screen above.
Specify the target. By default, the wizard tries to find a valid container based on your position in the Navigator or Package Explorer View.
Or:
Choose to select a container from
your workspace.
Notes:
Optimize the extracted IDL. Use the combo-box and select the target programming language:
COBOL
For usage with the COBOL Wrapper. Enter the default length for IDL type A(default-length) fields which map then to COBOL alphanumeric data items PIC X(default-length).
For this scenario, make sure Create Listener Objects in Integration Server is checked.
Choose to store the IDL file in the selected container in the Eclipse workspace. When you go to the next page, the button is disabled, because the IDL file has already been created and this step cannot be reverted.
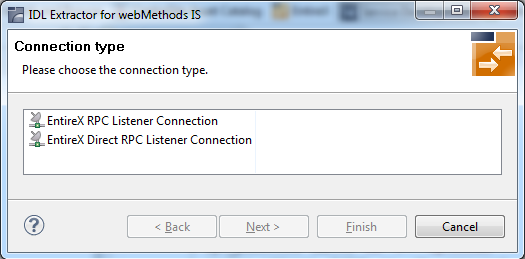
To select the connection type
As a prerequisite, the IDL file has been stored in the workspace and the button is now disabled.
Select a Connection type and click .
Notes:
IN parameters.
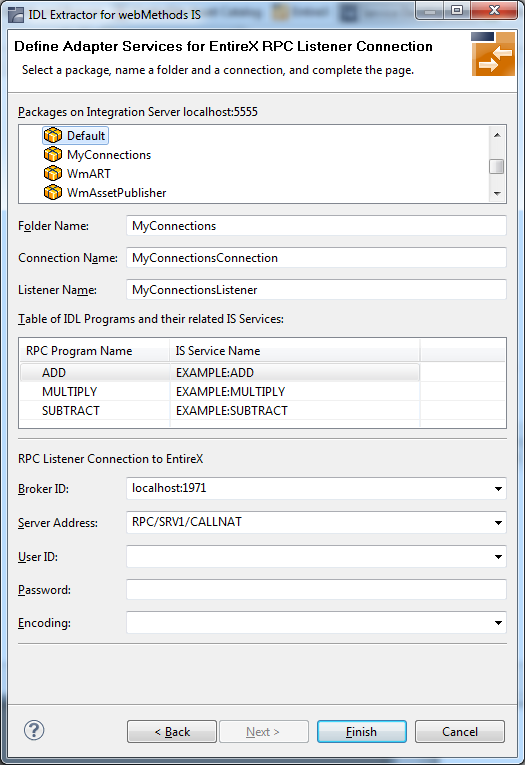
To define a listener
Select an Integration Server package where the listener will be stored.
Specify the names for Folder Name (default:
library name), Connection
Name (default: library
nameConnection) and Listener Name
(default: library nameListener).
Advanced users: You can alter the Integration Server services in the table headed by the RPC Program Name and IS Service Name. Note that a selected service must exist in some package of the Integration Server! This step is not recommended. Only perform it if required.
If necessary, edit the Broker settings for the Listener (Broker ID, Server Address, User ID, Password, and Encoding).
The check box Overwrite existing Objects in Integration Server can be used to re-generate the objects after you have changed the IDL file.
Notes:
WmEntireX) with the version currently used.
Choose .
As a result, the following objects will be created:
one connection of type EntireX RPC Listener, EntireX Reliable RPC Listener or EntireX Direct RPC Listener
one listener object
For a connection of type EntireX Reliable RPC Listener the following objects will be created in addition for each IDL program:
one notification object
one trigger object
one document type object
This section covers the following topics:
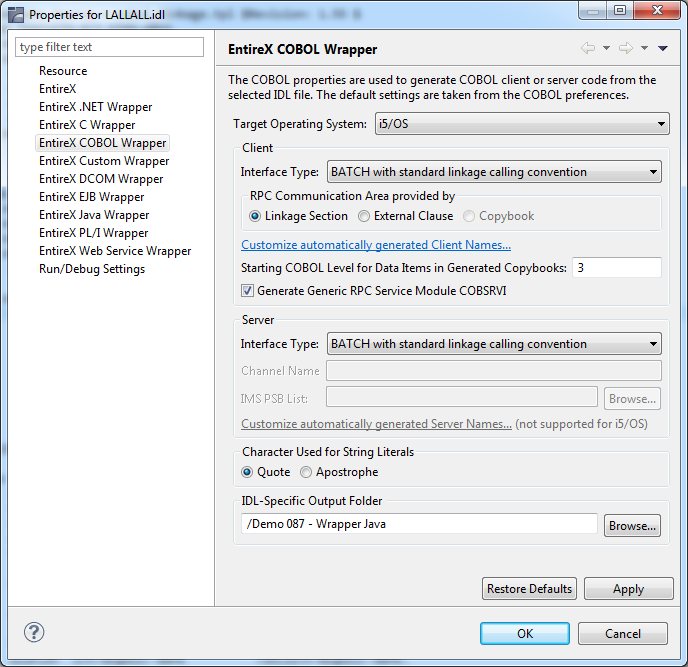
From the context menu on the IDL file extracted as described under Task 1: Generate Integration Server Connections and Listeners above, choose EntireX COBOL Wrapper and set the following properties:
Set the Target Operating System to "BS2000/OSD".
Set the Client Interface Type to "Batch with standard linkage calling convention".
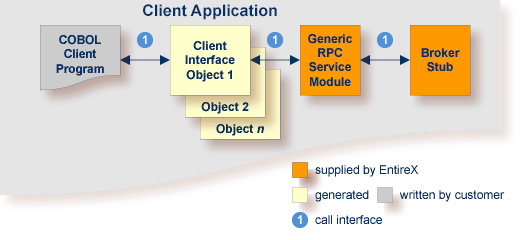
In this scenario, the COBOL client program, every generated client interface object, generic RPC services module and the broker stub are linked together to the client application.
Use the COBOL Wrapper for batch if you need to embed the client interface object into your application with a standard linkage calling convention.
The following steps are described in more detail under Using the COBOL Wrapper for Batch (z/OS, BS2000/OSD, z/VSE and IBM i):
To use the COBOL Wrapper for batch
Generate the client interface object(s) for the target operating
system and use interface
type "Batch with standard linkage calling convention". See Generating COBOL Source Files from Software AG IDL Files.
You do not need to generate the generic RPC service module COBSRVI because it is already installed on the mainframe,
so clear the check box.
More info
If necessary, use FTP to transfer the client interface object(s) to the target platform where you write your client application.
If you have generated the generic RPC service module and you plan to (re)install it within CICS, you may need to adapt the broker stub that supports the required transport (TCP, SSL, NET). See Adapting the Used Broker Stub.
Write your COBOL client program. See Writing Applications with the COBOL Wrapper, in particular the section Using the RPC Communication Area with a Standard Call Interface, and take into consideration the information given in Software AG IDL to COBOL Mapping.
Using a COBOL compiler supported by COBOL Wrapper, compile:
the generated client interface object(s)
if required, the generic RPC service module COBSRVI
your COBOL client program
Take care the generated copybooks (see Using the Generated Copybooks) are accessed correctly by the compiler and not confused with the client interface objects, because the copybooks and client interface objects have identical file names. See your compiler documentation.
Use the command CRTCBLMOD (create COBOL module) and compile all modules above to ILE modules.
Use the IBM i compiler command with the options shown below:
CRTCBLMOD
OPTION(*NOMONOPRC) EXTDSOPT(*NODFRWRT) LINKLIT(*PRC)
Using the standard linker (binder) of the target platform, link (bind) the following programs:
the generated client interface object(s)
if required, the generic RPC service module COBSRVI
if required, the broker stub
your COBOL client program
Use the IBM i command CRTPGM to bind
all compiled modules to an executable ILE program of type *PGM.
To link the main program, use the following create program command
with the options shown:
CRTPGM
   MODULE(*LIB/myapplication mystub1 mystub2 ..)
   BNDSRVPGM(EXX/EXA) ...
where EXX is the EntireX product library and
EXA the broker stub.
Make sure that the correct broker stub module is used and, if linked (bound) dynamically, that it can be called dynamically.
The broker stub EXA is located by default in the EntireX product library EXX.After building your client application in Task 2 above, you can test your scenario.