This section describes how to deploy virtualized services and consumer applications to webMethods Mediator.
Who Can Deploy Virtualized Services and Consumer Applications?
Conditions that Must be Satisfied for Effective Deployment of Virtualized Services
Deploying, Undeploying and Redeploying Consumer Applications
Securing Communications with CentraSite for Synchronous Deployment
Deployment refers to the process you use to send virtual services, virtual XML services, virtual REST services and consumer applications to the policy-enforcement points (PEPs) on which they are to be used for run-time governance. Instructions throughout the remainder of this guide use the term "virtualized service" when referring to all three virtual types in general.
Note:
This section provides information about deploying virtualized services
and consumer applications to webMethods Mediator. If you are using a different
kind of PEP, refer to its documentation for deployment procedures and
information.
As shown in the following diagram, the deployment process is initiated from CentraSite and is carried out by the "deployer" service on Mediator.
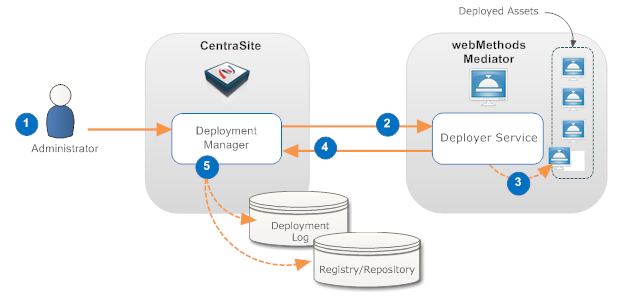
| Step | Description |
|---|---|
| 1 | An administrator initiates the deployment by selecting the assets that are to be deployed and specifies to which Mediator they are to be deployed. |
| 2 | The Deployment Manager on CentraSite prepares the asset for deployment (the specific preparation steps depend on the type of asset being deployed) and invokes the deployer service on the Mediator. The prepared asset is submitted as input to this service. |
| 3 | The deployer service deploys the asset in the Mediator. |
| 4 | If the deployment is successful, the deployer service returns a success message and data that is pertinent to the deployed asset. If the deployment is unsuccessful, the deployer service returns a failure message. |
| 5 | The Deployment Manager on CentraSite logs information about the deployment in the Deployment log. If the deployer service returned specific data about the asset, the asset's metadata is updated as needed in the registry/repository. |
For more information, see What Happens When You Deploy a Virtualized Service?.
To deploy virtualized services and consumer applications, you must belong to a role with the following permissions:
Create Assets —OR— Manage Assets
Manage Runtime Policies (required to configure virtualized services)
Manage Lifecycle Models (required to change state of virtualized services)
Manage Runtime Targets (required to deploy virtualized services)
For more information about roles and permissions, see the section About Roles and Permissions in Users, Groups, Roles and Permissions.
Note:
Mediator exposes several Web service operations to allow CentraSite to
manage deployed assets. This Web service is invoked by CentraSite any time a
user deploys or undeploys a virtual service or consumer application to
Mediator. A Mediator target's configuration details page includes the
User Name and Password fields
which identify an Integration Server user who is permitted to execute the
Integration Server services associated with Mediator's deployer service. After
installation, only members of the Integration Server
"Administrators" group are allowed to invoke these services.
However, administrators have the flexibility to allow their own users or groups
to invoke them. Access to these services is controlled by an ACL, called
MediatorDeployer. Initially, only the predefined
"Administrators" group is assigned to this ACL. An Integration
Server administrator can remove this group and add other groups or individual
users. For example, you can create your own deployer group, (for example,
"MyDeployers") and add Integration Server user IDs to this group.
Then, the user must update the MediatorDeployer ACL by
removing the "Administrators" group and adding the
"MyDeployers" group. Now, on the target's configuration detail
page, you can specify any user ID that belongs to "MyDeployers"
group.
To deploy a virtualized service to a webMethods Mediator target, the following conditions must be met:
Ensure that you have the "Manage Runtime Targets" permission. Only users with this permission can deploy a virtual service. CentraSite will not enable the deployment controls for any other users. For more information, see Who Can Deploy Virtualized Services and Consumer Applications?.
Ensure that the run-time policies for the virtualized service are active. This is indicated in the Policies profile on the virtualized service's detail page. If a policy is inactive, you must activate it as described in Activating a Run-Time Policy.
Ensure that the target to which the virtual service will be deployed has already been created, as described in the section Run-Time Targets.
Ensure that the target's specified deployment URL is active and the user credentials of Integration Server are valid. To check this, go to the target's detail page and click the button. If the connection is not active and valid, activate the deployment endpoint and modify the user credentials as required.
If the virtualized service is under the control of an active lifecycle model (LCM), ensure that:
The virtualized service is in a "deployable" lifecycle state. If you are not certain of what the "deployable" lifecycle state is, consult your CentraSite administrator.
The virtualized service has a design-time policy that includes the Change Deployment Status action and it is set to Yes. This action specifies whether the service is eligible for deployment. For more information, see the description of the action in the section Built-In Actions for Design/Change-Time Policies in the Built-In Design/Change-Time Actions Reference.
If these conditions are not satisfied, all or part of the deployment user interface controls will be disabled when you view the virtual service.
When you deploy a virtualized service to one or more webMethods Mediator targets, keep the following points in mind.
When you deploy a virtualized service, CentraSite automatically validates the service's run-time policy (or policies) to ensure that:
Any action that appears in a single policy multiple times is allowed to appear multiple times.
All action dependencies are properly met.
CentraSite will inform you of any violation, and you will need to correct the violations before deploying the service. For more information about dependencies and which actions can be included multiple times in a single policy, see the section Run-Time Governance Reference > Built-In Run-Time Actions Reference for Virtual Services .
If you need to modify a virtualized service or consumer application that is already deployed, you must modify it in CentraSite and then redeploy it to Mediator. Mediator does not monitor CentraSite for updates to deployed assets. If you make changes to a virtual service's processing steps, for example, you must manually redeploy the virtual service to put those changes into effect.
You cannot make changes to a run-time policy while it is active. To make changes to a policy after it has been switched to the active state you must do one of the following:
Switch the policy to the Suspended state (to deactivate it), update the policy and then switch it back to the Productive state (to reactivate it).
OR
Create a new version of the policy, make your changes to the new version of the policy and then switch the new version to the Productive state. Switching the new version of the policy to the Productive state will automatically Retire (and deactivate) the old version.
If you need to update a run-time policy that is already deployed with virtual services that are in production, always use the second method described above (i.e., create a new version of the policy). If you use the first method, which requires you to suspend the existing policy, your production services will be running without the policy while you are making your revisions to it.
When you deploy a virtualized service to a Mediator target, CentraSite generates an XML document called a virtual service definition (VSD). The VSD defines the virtualized service for Mediator, and contains all the run-time policies and resources required to deploy the virtualized service to Mediator. In addition, CentraSite automatically updates the service’s CentraSite endpoint to its Mediator endpoint. You can view the Mediator endpoint on the virtualized service's detail page in CentraSite. Because the endpoint information for virtualized services is generated and updated by CentraSite, you should not manually edit the endpoint information for virtualized services. In other words, unlike with native services, you should not manually add endpoints to a virtualized service. Instead, simply allow CentraSite to generate and manage the endpoints for the virtualized services that you deploy.
However, you can deploy multiple virtualized services for a single native service, in order to make the service available over multiple transports and/or security mechanisms. For details, see the section Managing Endpoints in Implementation Concepts.
If Mediator encounters a problem deploying or redeploying a virtualized service, it sets the service's Deployment Status to “Failed” and sends a message to CentraSite describing the problem. This failure is also logged to Mediator. In this case, it is up to the CentraSite or Mediator administrator to take corrective action and redeploy the service manually from CentraSite.
If the reason for the failure is that the Mediator instance is unavailable, and then you restart the Mediator instance, it loads all information about any previously deployed assets.
You can deploy, undeploy and redeploy virtualized services (of any type) to a webMethods Mediator target in any of the following ways:
You can deploy, undeploy and redeploy a virtualized service to one or more Mediator targets (see Deploying Virtualized Services from the Service's Detail Page).
You can deploy, undeploy and redeploy multiple virtualized services to a Mediator target in a single step (see Deploying Virtualized Services from the Operations > Deployment Page).
You can deploy, undeploy and redeploy multiple virtualized services to a Mediator target in a single step (see Deploying Virtualized Services from the Target's Details Page).
You can use the CentraSite Command facility to deploy, undeploy and redeploy virtualized services to a Mediator target individually or in bulk, and to synchronize consumers (see Deploying Virtualized Services Using Run-Time Commands.
You can ran a batch process to deploy, undeploy and redeploy multiple virtualized services to a Mediator target in a single step (see Deploying Virtualized Services Using a Batch Process).
If you have virtualized services that were created prior to version 8.2, those virtualized services will continue to hold the deployment metadata generated by CentraSite 8.0. Although this metadata is not applicable in CentraSite 8.2, and will not affect deployment in 8.2, we strongly recommend that you perform the following steps:
Undeploy all virtualized services from CentraSite 8.0.
Upgrade to CentraSite 8.2.
Ensure that all target deployment URLs are configured correctly.
Deploy all virtualized services from CentraSite 8.2.
Note:
Please be aware that the new synchronous deployment model does not
support subscriptions and subscription services.
The following procedure describes how to deploy, undeploy and redeploy a single virtualized service to one or more Mediator targets, using the service's Deployment profile.
![]() To deploy, undeploy or redeploy a virtualized service
To deploy, undeploy or redeploy a virtualized service
In CentraSite Control, display the virtualized service detail page. For procedures, see the section Viewing Details for an Asset in Using the Asset Catalog.
Select the virtualized service's Policies profile and ensure that all of the service's run-time policies are Active. If not, activate them as described in Activating a Run-Time Policy.
Ensure that the virtualized service has a design-time policy that includes the Change Deployment Status action and it is set to Yes. This action specifies whether the service is eligible for deployment. For more information, see the description of this action in the Built-In Design/Change-Time Reference.
Make sure you switch the service to an active, ready-to-deploy state, as follows. (If you do not know which state to select, you will need to examine your organization’s lifecycle model for Service objects or consult an administrator.)
In the menu, select the Change Lifecycle State option.
Select the lifecycle state to which you want to switch the asset and click . (The list will contain only the states that you are permitted to assign to the service.)
If the state change requires approval, CentraSite will initiate an approval workflow and your request for a state change will be submitted to the appropriate approvers. While the request is awaiting approval, the service will appear in a pending state.
After the lifecycle state has been successfully changed, select the virtualized service's Deployment profile.
The Deployment profile will display the following information.
| Column | Description |
|---|---|
| Target | The target on which the service is deployed. |
| Target Type | The type of target on which the service is deployed (e.g., webMethods ESB (Integration Server) or Insight). |
| Description | Description of the target. |
| Deployment Status | The deployment status of the service (e.g., Deployed or Failed). |
| Date Deployed | The date/time that the deployment occurred. |
Click the Deploy button, select the Mediator target(s) to which you want to deploy the virtualized service, and click .
The deployment process is carried out by a synchronous mechanism between the CentraSite and the Mediator:
CentraSite pushes the virtualized service that is ready for deployment to the webMethods Mediator target.
Instantly, the Mediator deploys the virtualized service that was received from CentraSite (along with its effective run-time policy), and notifies CentraSite when the deployment process is complete.
For more information, see What Happens When You Deploy a Virtualized Service?.
Important:
If the status shown in the Deployment
Status column does not automatically switch to
Deployed, click the Refresh button to
determine whether CentraSite was able to deploy the virtualized service
successfully. If the deployment process failed, identify and correct the error
and then try deploying the virtualized service again.
To undeploy the virtualized services, select the services' check boxes, and choose Undeploy from the Actions menu.
If the undeployment is successful, Mediator's deployer service returns a success message, and data that is pertinent to the undeployed virtual service. In addition, CentraSite's Deployment Manager logs information about the undeployment in the Deployment log. If the undeployment is unsuccessful, the deployer service returns a failure message.
Important:
If the status shown in the Deployment
Status column does not automatically switch to
Undeployed, click the Refresh button
to determine whether CentraSite was able to undeploy the virtualized services
successfully. If the undeployment process failed, identify and correct the
error and then try undeploying the virtualized services again.
To redeploy the virtualized service, select the services' check boxes, and choose Redeploy from the Actions menu.
Important:
If the status shown in the Deployment
Status column does not automatically switch to
Deployed, click the Refresh button to
determine whether CentraSite was able to redeploy the virtualized services
successfully. If the redeployment process failed, identify and correct the
error and then try redeploying the virtualized services again.
Examine the deployment log that is displayed by CentraSite Control and check for any errors that occurred during the deployment process.
The following procedure describes how to deploy, undeploy and redeploy multiple virtualized services to a Mediator target in a single step.
![]() To deploy, undeploy or redeploy a virtualized service
To deploy, undeploy or redeploy a virtualized service
In CentraSite Control, go to Operations > Deployment.
On the Deployed Assets tab, click .
In the Select a Target and Services to be Deployed on the Selected Target dialog box, perform a keyword or advanced search to display the virtualized services that are ready for deployment.
If you want to perform a keyword search and you need procedures for this step, see Keyword Search.
If you want to perform an advanced search and you need procedures for this step, see Advanced Search
Click .
The deployment process is carried out by a synchronous mechanism between the CentraSite and the Mediator:
CentraSite pushes the virtualized service that is ready for deployment to the webMethods Mediator target.
Instantly, the Mediator deploys the virtualized service that was received from CentraSite (along with its effective run-time policy), and notifies CentraSite when the deployment process is complete.
For more information, see What Happens When You Deploy a Virtualized Service?.
The Deployed Assets tab will display the following information.
| Column | Description | |
|---|---|---|
| Pending Changes | Icons indicating the deployment status of the virtualized services. | |
|
Icon
|
Description
|
|
| Service is deployed to the target. | ||
| Service is pending deployment to the target. | ||
| Deployment ID | The deployment ID of the virtualized service. | |
| Name | Name of the virtualized service. | |
| Status | The deployment status of the virtualized service (e.g., Deployed or Failed). | |
| Date/Time | The date/time that the deployment occurred. | |
| User ID | The user-ID of the Integration Server user to be used for the deployment operation. | |
| Type | Modification that is been performed on the deployed service. | |
|
Label
|
Description
|
|
| Processing Step Changes |
Reflects any change that is performed in the virtualized service's Processing Steps profile. For example, modifying the HTTP authentication mode. |
|
| Runtime Policy Changes |
Reflects any change that is performed in the runtime policy associated to the virtualized service. For example, deactivating an associated runtime policy. |
|
| WSDL Changes |
Reflects any change that is performed in the virtualized service's asset file. For example, modifying an existing asset file or uploading a new asset file. |
|
Important:
If the status shown in the Status column
does not automatically switch to Deployed, click the
Refresh button to determine whether CentraSite was able
to deploy the virtualized services successfully. If the deployment process
failed, identify and correct the error and then try deploying the virtualized
services again.
To undeploy the virtualized services, select the services' check boxes, and choose Undeploy from the Actions menu.
Important:
If the status shown in the Status column
does not automatically switch to Undeployed, click the
Refresh button to determine whether CentraSite was able
to undeploy the virtualized services successfully. If the undeployment process
failed, identify and correct the error and then try undeploying the virtualized
services again.
To redeploy the virtualized service, select the services' check boxes, and choose Redeploy from the Actions menu.
Important:
If the status shown in the Status column
does not automatically switch to Deployed, click the
Refresh button to determine whether CentraSite was able
to redeploy the virtualized services successfully. If the redeployment process
failed, identify and correct the error and then try redeploying the virtualized
services again.
Examine the deployment log that is displayed by CentraSite Control and check for any errors that occurred during the deployment process.
The following procedure describes how to use CentraSite's Search feature to select target and services to be deployed on the selected target using keyword searches and advanced searches.
The keyword search is an easy to use search facility in which you can specify arbitrary search patterns.
You can search for all virtualized services that contain one or more specified keywords (i.e., text strings) in the virtualized service's string attributes (virtualized service name, description, etc.).
The conventions for keyword searches are as follows:
A keyword search consists of 1-n search keywords. Multiple keywords are space separated. If multiple keywords are given, a logical disjunction (OR) is implied.
A keyword is treated as partial text which can occur at the beginning of the searched strings. The "starts with" semantics are implied.
Example: If the keyword is "AustralianPostCode", then the following matches are returned: "A sample VS for AustralianPostCode" as well as "AustralianPostCodeVService".
If quotes (" ") exist around a phrase, then a search is performed on the exact phrase within the quotes. A space within a quoted phrase is considered as a space character and not as a logical operation. To force the keyword search to treat the quote characters as a normal character, precede the quote character with a backslash (\). If you want to include the backslash character itself in the search, type two backslashes.
You can mix and match any number of words and quoted phrases within the keyword field.
The search is neither case nor accent sensitive, even within a quoted phrase. Example: A search for "AustralianPostCode" will return the same results as a search for "AUSTRALIANPOSTCODE" or "Australianpostcode".
If you enter a string that contains an odd number of double-quote characters, then the last double-quote character is ignored when the search is performed.
If the keyword search input field is empty when the search is executed, the search returns all available virtualized services.
The keyword search can include wildcard characters.
The available wildcard characters are:
| Character | Usage |
|---|---|
| * or % |
If you use the percent symbol ("%") or the asterisk ("*"), CentraSite replaces the wildcard symbol with as many characters as necessary to find a match. For example, an entry of "A%n" returns both "Amazon" and "American". If you enter "*al", then "CalcService", "Calendar" and "AustralianPostCode" all fit the search criteria. |
| ? or _ |
If you use the question mark ("?") or the underscore ("_"), CentraSite replaces the wildcard symbol with a single character in order to find a match. Example: "AustralianPostCode?VService" matches any character for "?". |
You can use a wildcard character at any point in the keyword text, and multiple times throughout the keyword text. If you enter a wildcard character in the middle of a string, for example "cat*dog", then at least one of the searched attributes must contain the string in order for the asset or supporting document to be included in the result set.
If a wildcard character between two words is surrounded by spaces, such as "word1 * word2", the wildcard will match one word.
Notes:
![]() To search by keyword
To search by keyword
In CentraSite Control, go to Operations > Deployment.
On the Deployed Assets tab, click . This opens up the Select a Target and Services to be Deployed on the Selected Target dialog.
In the text box, type the keyword(s) to search for. You can use one or more wildcards to specify the keywords.
If you leave the text box blank, or enter just a wildcard, the entire set of virtualized services is returned.
CentraSite returns the virtualized services that match the search criteria. The search looks for the keyword(s) in the virtualized service's name, type and description attributes.
CentraSite's advanced search capabilities allow you to search for virtualized services on the basis of service types and targets.
![]() To search using service type and target
To search using service type and target
In CentraSite Control, go to Operations > Deployment.
On the Deployed Assets tab, click Deploy.
In the Select a Target and Services to be Deployed on the Selected Target dialog box, do the following:
In the field Browse By, select a virtualized service type. As a result, only virtualized services that are classified with this service type will be displayed.
If you do not specify a virtualized service type in the field Browse by, CentraSite Control displays a list of all virtualized services belonging to the CentraSite.
If you specify a virtualized service type in the field Browse by, CentraSite Control displays a list of all virtualized services that belong to the specified service type.
There are several generic entries in the drop-down list for the Browse by field. These are:
[All]
This lists all virtualized services that are available in a
deployable state.
[Virtual Service]
This lists all virtual Web services that are available in a
deployable state.
[Virtual REST Service]
This lists all virtual REST services that are available in a
deployable state.
[Virtual XML Service]
This lists all virtual XML services that are available in a
deployable state.
In the field Target, select a target for deploying the selected services.
Select the virtualized services that you want to deploy on the selected target.
Click .
The following procedure describes how to deploy, undeploy and redeploy multiple virtualized services to a Mediator target, using that target's details page.
Important:
Ensure that the target's specified deployment URL is active and
the user credentials of Integration Server are valid. To check this, go to the
target's detail page and click the
button. If the connection is not active and valid, activate the deployment
endpoint and modify the user credentials as required.
![]() To deploy, undeploy and redeploy services to a target
To deploy, undeploy and redeploy services to a target
On the Target Details page, select the Services profile.
Expand the plus button next to the Name column.
The Services profile will display the following information.
| Column | Description | |
|---|---|---|
| Name | All services that are deployed
to the target (or are pending deployment or have failed deployment), as well as
all design/change-time policies associated with each service.
Clicking the hyperlinked name displays the service's detail page. |
|
| Description | Descriptions of the services. | |
| Deployment Status | The deployment status of the services (e.g., Deployed or Failed). | |
| Icons next to Name | Icons indicating the deployment status of the virtualized services. | |
|
Icon
|
Description
|
|
| Service is deployed to the target. | ||
| Service deployment failed in the target. | ||
Click the button. A pop-up displays all services that are eligible to be deployed to the target.
Select one or more services and click OK.
The deployment process is carried out by a synchronous mechanism between the CentraSite and the Mediator:
CentraSite pushes the virtualized service that is ready for deployment to the webMethods Mediator target.
Instantly, the Mediator deploys the virtualized service that was received from CentraSite (along with its effective run-time policy), and notifies CentraSite when the deployment process is complete.
For more information, see What Happens When You Deploy a Virtualized Service?.
To undeploy the virtualized services, select the services' check boxes, and choose Undeploy from the Actions menu.
Important:
If the status shown in the Status column
does not automatically switch to Undeployed, click the
Refresh button to determine whether CentraSite was able
to undeploy the virtualized services successfully. If the undeployment process
failed, identify and correct the error and then try undeploying the virtualized
services again.
To redeploy the virtualized service, select the services' check boxes, and choose Redeploy from the Actions menu.
Important:
If the status shown in the Status column
does not automatically switch to Deployed, click the
Refresh button to determine whether CentraSite was able
to redeploy the virtualized services successfully. If the redeployment process
failed, identify and correct the error and then try redeploying the virtualized
services again.
You can perform the following deployment tasks by executing commands in the command line interface CentraSiteCommand.cmd (Windows) or CentraSiteCommand.sh (UNIX) of Command Central. The tool is located in <CentraSiteInstallDir>/utilities.
Deploy or undeploy virtual services to a Mediator target.
Perform a "bulk deploy", a "bulk undeploy", a "bulk redeploy", and a "bulk clean redeploy".
Synchronize consumers.
If you start the command line tool with no parameters, you receive a help text summarizing the required input parameters.
The parameters of the command are case-sensitive, so for example the parameter "-url" must be specified as shown and not as "-URL".
![]() To deploy virtualized services to a Mediator target using a run-time
command
To deploy virtualized services to a Mediator target using a run-time
command
Use a command of the following format:
CentraSiteCommand deploy [-url <CENTRASITE-URL>] -user <USER-ID> -password
<PASSWORD> -virtualService <VIRTUAL-SERVICE> -target <TARGET>
The following table describes the complete set of input parameters
that you can use with the deploy utility:
| Input Parameter | Description |
|---|---|
-url |
The fully qualified URL (http://localhost:53307/CentraSite/CentraSite) for the CentraSite registry/repository. |
-user |
The user ID of a user who has the "CentraSite Administrator" role. |
-password |
The password of the user identified by the
parameter
-user.
|
-virtualService |
The name of the virtual service. |
-target |
The target to which the virtual service
identified by the parameter
-virtualService is to be deployed.
|
For example:
CentraSiteCommand deploy [-url "http://localhost:53307/CentraSite/CentraSite"] -user "Administrator" -password
"manage" -virtualService "VS1" -target "Target1"
![]() To undeploy virtualized services to a Mediator target using a run-time
command
To undeploy virtualized services to a Mediator target using a run-time
command
Use a command of the following format:
CentraSiteCommand undeploy [-url <CENTRASITE-URL>] -user <USER-ID> -password
<PASSWORD> -virtualService <VIRTUAL-SERVICE> -target <TARGET>
The following table describes the complete set of input parameters
that you can use with the undeploy utility:
| Input Parameter | Description |
|---|---|
-url |
The fully qualified URL (http://localhost:53307/CentraSite/CentraSitee) for the CentraSite registry/repository. |
-user |
The user ID of a user who has the "CentraSite Administrator" role. |
-password |
The password of the user identified by the
parameter
-user.
|
-virtualService |
The name of the virtual service. |
-target |
The target to which the virtual service
identified by the parameter
-virtualService is to be undeployed.
|
For example:
CentraSiteCommand  undeploy [-url "http://localhost:53307/CentraSite/CentraSite"] -user "Administrator" -password
"manage" -virtualService "VS1" -target "Target1"
![]() To synchronize consumers using a run-time command
To synchronize consumers using a run-time command
Use a command of the following format:
CentraSiteCommand sync consumers [-url <CENTRASITE-URL>] -user <USER-ID> -password
<PASSWORD>  -target <TARGET>
The following table describes the complete set of input parameters
that you can use with the sync consumers utility:
| Input Parameter | Description |
|---|---|
-url |
The fully qualified URL (http://localhost:53307/CentraSite/CentraSite) for the CentraSite registry/repository. |
-user |
The user ID of a user who has the "CentraSite Administrator" role. |
-password |
The password of the user identified by the
parameter
-user.
|
-target |
The target on which to synchronize the consumers. |
For example:
CentraSiteCommand  sync consumers [-url "http://localhost:53307/CentraSite/CentraSite"] -user "Administrator" -password
"manage" -target "Target1"
![]() To "bulk deploy", "bulk undeploy",
"bulk redeploy" and "bulk clean redeploy" virtual
services using a run-time command
To "bulk deploy", "bulk undeploy",
"bulk redeploy" and "bulk clean redeploy" virtual
services using a run-time command
Use a command of the following format:
CentraSiteCommand bulk deploy [-url <CENTRASITE-URL>] -user <USER-ID> -password
<PASSWORD>  -target <TARGET>
CentraSiteCommand bulk undeploy [-url <CENTRASITE-URL>] -user <USER-ID> -password
<PASSWORD>  -target <TARGET>
CentraSiteCommand bulk redeploy [-url <CENTRASITE-URL>] -user <USER-ID> -password
<PASSWORD>  -target <TARGET>
CentraSiteCommand bulk cleanredeploy [-url <CENTRASITE-URL>] -user <USER-ID> -password
<PASSWORD>  -target <TARGET>
The following table describes the complete set of input parameters that you can use with these utilities:
| Input Parameter | Description |
|---|---|
-url |
The fully qualified URL (http://localhost:53307/CentraSite/CentraSite) for the CentraSite registry/repository. |
-user |
The user ID of a user who has the "CentraSite Administrator" role. |
-password |
The password of the user identified by the
parameter
-user.
|
-target |
The target to which the virtual service is to be deployed/undeployed/redeployed. |
For example:
CentraSiteCommand bulk deploy [-url "http://localhost:53307/CentraSite/CentraSite"] -user "Administrator" -password
"manage" -target "Target1"
Use Runtime.deployment.Deployer when you do not have access to a browser or graphical user interface environment, and you want to perform deployment tasks. You can also use Runtime.deployment.Deployer when you want to automate deployment tasks through batch processes.
An automated deployment through a batch mode can be initiated by configuring the DeploymentConfiguration.properties file located in the URL http://<host>:53307/CentraSite/CentraSite/ino:dav/ino:dav/projects/CentraSite/configuration.
BatchSize is the maximum number of virtualized services to be pushed to a webMethods Mediator target before a syncpoint is taken. The default BatchSize is 50. To improve performance, you can set a BatchSize to define the maximum number of virtualized services to be pushed between two syncpoints using the property line:
com.softwareag.centrasite.runtime.deployment.DeployBatchSize=50
The BatchSize property can be set at any time. If a bulk deployment is already in progress, the current batch is sized according to the previous batch size. Subsequent batches use the new size. Suppose if the BatchSize is set to zero and changed while a deploy operation is already in progress, that operation loads the data as a single batch. Any subsequent deploy operations on the same CentraSite Control use the new BatchSize.
TransactionTimeout specifies the maximum time, in milliseconds, allowed for deployment operations (deployment, undeployment and consumer sync) that were pushed to a webMethods Mediator target to respond. Any such operations that do not respond before this timeout occurs are rolled back. The default TransactionTimeout is 6000 (ms). To improve performance, you can set a TransactionTimeout to define the maximum time for the deployment operations to respond using the property line:
com.softwareag.centrasite.runtime.deployment.TransactionTimeout=60000
For example, if a deployment operation attempts to set a transaction timeout of 360 seconds, and the TransactionTimeout setting is 300 seconds, the TransactionTimeout setting of 300 seconds is used. After the TransactionTimeout of 300 seconds the deployment operations roll back.
Note:
If set to 0, the transaction will not time out.
You can deploy consumer application asset(s) to a policy enforcement point (PEP) such as webMethods Mediator in any of the following ways:
You can deploy multiple consumer applications to a Mediator target in a single step (see Deploying Consumer Applications from the Operations > Deployment Page).
You can run a script file to deploy multiple consumer applications to a Mediator target in a single step (see Deploying Consumer Applications Using a Script File).
The following procedure describes how to deploy multiple consumer application assets to a Mediator target in a single step.
![]() To deploy consumer applications
To deploy consumer applications
In CentraSite Control, go to Operations > Deployment.
On the Deploy Consumers tab, click the Synchronize button.
In the Select a Target and Consumer Applications to be Deployed dialog box, perform a keyword or advanced search to display the consumer applications and the targets that are ready for deployment.
If you want to perform a keyword search and you need procedures for this step, see Using Keyword Search.
If you want to perform an advanced search and you need procedures for this step, see Using Advanced Search
Click .
The deployment process is carried out by a synchronous mechanism between the CentraSite and the Mediator:
CentraSite invokes the Mediator’s deployer service and pushes the consumer applications that are ready for deployment to the Mediator target.
Instantly, Mediator deploys the consumer applications that were received from CentraSite and notifies CentraSite when the deployment process is complete.
The Deploy Consumers tab will display the following information.
| Column | Description | |
|---|---|---|
| Pending Changes | Icons indicating the deployment status of the consumer applications. | |
|
Icon
|
Description
|
|
| The consumer application is deployed to the target. | ||
| The consumer application is pending deployment to the target. | ||
| Rule ID | The synchronization rule ID of the target (that is, webMethods Mediator or Insight). | |
| Target | The name of the target on which the consumer application is deployed. | |
| Last Sync Date | The date/time that the deployment occurred. | |
| Status | The deployment status of the consumer application (e.g., Deployed or Failed). | |
Important:
If the status shown in the Status column
does not automatically switch to Deployed or
Failed, click the Refresh button to
determine whether CentraSite was able to deploy the virtualized services
successfully. If the deployment process failed, identify and correct the error
and then try deploying the virtualized services again.
The deployment operation of a consumer application invoked between
CentraSite and the webMethods Mediator target using command line utility,
includes a main() method, which allows it to be called
from a Windows batch file or from a UNIX shell script.
Create a script file that looks as follows if CentraSite is running under Windows.
@echo offset JAVAEXE=fullPathToJava.exeset REDIST=CentraSiteHomeDirectory\redistset BASEDIR=%~dp0cd /d %REDIST%REM build CLASSPATH with all files from jar directoryset LOCAL_CLASSPATH=for %%I in (".\*.jar") do call "CentraSiteHomeDirectory\bin\cfg\lcp.cmd" %%I%JAVAEXE% -cp %LOCAL_CLASSPATH%deployerClassName%*cd /d %BASEDIR%
Where deployerClassName is the name of the deployer that you want to run.
Example
The following is an example of a script file that calls the Consumer Applications deployer:
@echo off
REM
REM Run Consumer Applications deployer
REM
set JAVAEXE=D:\software\java\jdk1.5.0_12\bin\java
set REDIST=C:\SoftwareAG\CentraSite\redist
set BASEDIR=%~dp0
cd /d %REDIST%

REM build CLASSPATH with all files from jar directory
set LOCAL_CLASSPATH=
for %%I in (".\*.jar") do call "C:\SoftwareAG\CentraSite\bin\cfg\lcp.cmd" %%I

%JAVAEXE% -cp %LOCAL_CLASSPATH% com.softwareag.centrasite.runtime.pep.util.VirtualServiceDeployer %*
cd /d %BASEDIR%
Create a script file that looks as follows if CentraSite is running under Unix.
set javaexe="fullPathToJava.exe"set redist="CentraSiteHomeDirectory/redist"set mainjar="CentraSiteRuntimePEP.jar" set delim='\:' cd "$redist" set cl="" foreach j ( 'ls *.jar' ) if ($cl != "") set cl=${cl}${delim} set cl=${cl}${j} end setenv CLASSPATH ${mainjar}${delim}${cl} $javaexe deployerClassName $*
Where deployerClassName is the name of the deployer that you want to run.
Example
The following is an example of a script file that calls the Consumer Applications deployer:
#!/bin/csh
#
# Run Consumer Applications deployer
#
set javaexe="/mydir/softwareag/cjp/v16/bin/java"
set redist="/mydir/softwareag/CentraSite/redist"
set mainjar="CentraSiteRuntimePEP.jar"
set delim='\:'
# build CLASSPATH with all files from jar directory
cd "$redist"
set cl=""
foreach j ( `ls *.jar` )
  if ($cl != "") set cl=${cl}${delim}
  set cl=${cl}${j}
end
setenv CLASSPATH ${mainjar}${delim}${cl}
$javaexe com.softwareag.centrasite.runtime.pep.util.VirtualServiceDeployer $*
The Deployment History Log contains information about the virtualized services that CentraSite has pushed to the webMethods Mediator target for deployment.
To view the Deployment History Log, you must belong to a role that includes the "Manage Runtime Targets" permission. To see the list of predefined roles that include this permission, see About Roles and Permissions in the section Users, Groups, Roles and Permissions.
The following procedure describes how to view the deployment history log. To view this log, you must belong to a role that includes the "Manage Runtime Targets" permission.
If you belong to one of the following roles, you can view all entries in the deployment history log.
CentraSite Administrator
Organization Administrator
Operations Administrator
If you belong to the Organization Administrator role for an organization, you can view the deployment history log entries for virtualized services that were created by users in your organization.
If you do not belong to either of these roles, but you have the "Manage Runtime Targets" permission, you can view the deployment history log entries for virtualized services that you created.
![]() To view the Deployment History Log
To view the Deployment History Log
In CentraSite Control, go to Operations > Deployment.
Click the Deployment History tab to view the list of all virtualized services that are sent to the webMethods Mediator target.
If you want to filter the list, type a partial string in the Search field. CentraSite applies the filter to the Name column. The Search field is a type-ahead field, so as soon as you enter any characters, the display will be updated to show only those virtualized services whose name contains the specified characters. The wildcard character "%" is supported.
The Deployment History tab provides the following information about each virtualized service.
| Column | Description |
|---|---|
| Rule ID | The synchronization rule-ID that CentraSite automatically generates up on creation of the webMethods Mediator Target in CentraSite Control. |
| Name | The name assigned to the virtualized service. |
| Type | The type of the virtualized service (say, Web Service, XML Service or REST Service). |
| Version | The user-assigned version identifier for the virtualized service. |
| Target Name | The name of the target on which the virtualized service is deployed. |
| Action | The deployment action of the virtualized service on the webMethods Mediator Target (e.g., Deployed, Undeployed). |
| Status | The deployment status of the virtualized service on the webMethods Mediator Target (e.g., Success, Failed). |
| Date | The date/time that the virtualized service has deployed, redeployed or undeployed. |
To view details of a particular deployment workflow, click the hyperlinked value in the Name column.
When you delete an activity log, keep the following points in mind:
To delete an activity log, you must belong to one of the following roles:
CentraSite Administrator
Organization Administrator
Operations Administrator
Remember deleting an activity log via the Deployment History tab does not affect the deployment status of a virtualized service. However, deleting an activity log via the Deployed Assets tab will undeploy a virtualized service from the Mediator target and the status automatically switches to Undeployed.
The Deployment History tab contains log entries for every deployment operation (such as Deployed, Undeployed etc.,) of a virtualized service. However, the Deployed Assets tab contains log entry only for a Deployed operation of the virtualized service. Once you undeploy a virtualized service, the log entry will automatically get removed from the Deployed Assets tab.
Be aware that you can never delete the last Deployed activity log of a virtualized service or consumer application via the Deployment History tab.
You can delete a deployment activity log in any of the following ways:
Using the tab on the Deployment page as described in Performing a Delete Operation Using the Deployed Assets Tab. This procedure enables you to delete the activity logs of virtualized services in the CentraSite Control.
Using the tab on the Deployment page as described in Performing a Delete Operation Using the Deployment History Tab. This procedure enables you to delete the activity logs of virtualized services and consumer applications in the CentraSite Control.
You delete the "deployed" and "redeployed" activity logs of virtualized services via the Deployed Assets tab.
You can delete multiple activity logs in a single step.
![]() To delete one or more activity logs
To delete one or more activity logs
In CentraSite Control, go to .
On the Deployed Assets tab, mark the checkbox next to the name of each activity log that you want to delete. (You can select multiple logs.)
In the Actions menu, click Delete.
When you are prompted to confirm the delete operation, click .
Each selected log is permanently removed from the CentraSite registry/repository. The activity logs in the virtualized service's Deployment profile and target's Service profile are not affected.
You delete the "deployed", "undeployed", "redeployed" and "failed" activity logs of virtualized services and consumer applications via the Deployment History tab.
You can delete multiple activity logs in a single step.
![]() To delete one or more activity logs
To delete one or more activity logs
In CentraSite Control, go to .
On the Deployment History tab, mark the checkbox next to the name of each activity log that you want to delete. (You can select multiple logs.)
Choose Delete.
When you are prompted to confirm the delete operation, click .
Each selected log is permanently removed from the CentraSite registry/repository. The activity logs in the asset's Deployment profile and target's Service profile are not affected.
An administrator can configure CentraSite to use either of the following kinds of authentication:
HTTP Basic authentication
HTTPS (Secure Sockets Layer (SSL)) authentication
Configuring CentraSite to use SSL authentication provides secure communications for the deployment.
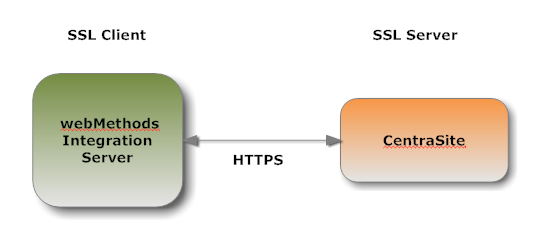
This section explains how SSL works with CentraSite (which acts as the client) and Mediator (which acts as the server). This section also provides the information you need to configure both the client and server sides for SSL authentication.
It is useful to conceptualize a CentraSite SSL connection in terms of a SSL client and a SSL server. The request for an SSL connection originates from a client.
During the SSL handshake process, the webMethods Mediator acting as the SSL server responds to the request for a connection by presenting its SSL credentials (an X.509 certificate) to the requesting CentraSite client. If those credentials are authenticated by the CentraSite client, either:
An SSL connection is established and information can be exchanged between the CentraSite and webMethods Mediator.
—OR—
The next phase of the authentication process occurs, and the webMethods Mediator requests the SSL credentials of the CentraSite. If the webMethods Mediator verifies those credentials (that is, the client’s identity), an SSL connection is established and information exchange can take place.
The types of SSL connection referred to above are termed one-way and two-way SSL authentication:
In a one-way SSL connection, client authenticates the credentials of server in preparation for setting up a secure transaction. In most cases, the server knows nothing about the client’s identity because verification of its credentials is not required. When desired, however the client can be authenticated by means such as basic username/password.
This type of connection is typically one where CentraSite needs to verify the authenticity of the webMethods Mediator without itself needing to be authenticated. As a result, configurations on the CentraSite side are not actually required for this one-way connection.
In a two-way SSL connection, both client and server must authenticate each other’s credentials before an SSL connection is established and information can be exchanged.
Unlike a one-way SSL connection, both CentraSite and the webMethods Mediator require access to each other’s SSL certificates in order to authenticate each other, establish an SSL connection, and transmit information. Compared to a one-way connection, a two-way SSL connection provides a much higher level of security.
When the CentraSite submits a HTTPS request to the webMethods Mediator, CentraSite is the SSL client and the webMethods Mediator with which it is communicating acts as the SSL server.

When the webMethods Mediator submits a request to CentraSite via HTTPS, and a two-way SSL connection is established, the webMethods Mediator acts as the SSL client and the CentraSite acts as the SSL server.
The following table provides a high-level roadmap for configuring SSL on CentraSite.
| Task | Activities | Notes |
|---|---|---|
| Create CentraSite keys and certificates |
|
Required for one-way and two-way SSL connections. Refer to the documentation for Java keytool or your certificate management tool. |
| Create keystore and truststore for CentraSite |
Important: |
Required for one-way and two-way SSL connections. Refer to the documentation for your certificate management tool. |
| Obtain certificates of webMethods Mediator |
Use the CentraSite truststore to save:
|
Required for one-way and two-way SSL connections. |
Use a standard certificate management tool, such as OpenSSL or Portecle, to generate a private/public key pair for CentraSite. Then, place the public key in a certificate signing request (CSR).
After creating the CSR, send to the CA to sign the CSR. Request the certificate in DER format. If you receive a certificate in PEM format (or any format other than DER), you need to convert it to DER format.
The signing CA’s certificate attests to the identity of the CA that signed the digital certificate for the CentraSite. The CA should send this certificate to you when it sends you the digital certificate for the CentraSite.
Once you receive your signed certificate from the CA, you need to import the certificate into a keystore. You will then have an SSL certificate and private key to use with CentraSite.
Note:
The above process is described in general terms. The procedures may
vary somewhat, depending upon the CA that you use.
Keystores and truststores are files that function as repositories for storage of keys and certificates necessary for SSL authentication, encryption/decryption, and digital signing/verification services. Keystores and truststores provide added layers of security and ease of administration, compared to maintaining the keys and certificates in separate files.
For information about creating keystores and truststores, importing keys and certificates into keystores and truststores, and other operations with these files, refer to the documentation for your certificate management tool.
For information about using CentraSite with keystores and truststores, see Keystores and Truststores.
If your CentraSite will submit HTTPS requests to the webMethods Mediator, the CentraSite will be acting as a client and will receive certificates from this webMethods Mediator. In order for these transactions to work, your CentraSite must have copies of their public keys and signing CA certificates. For information on importing webMethods Mediator certificates to CentraSite and setting up client authentication, refer to the document Administering webMethods Integration Server.
CentraSite stores its private keys and SSL certificates in keystore files and the trusted roots for the certificates in truststore files. Keystores and truststores are secure files with industry-standard file formats.
CentraSite uses a special file called a keystore to store SSL certificates and keys.
A keystore file contains one or more pairs of a private key and signed certificate for its corresponding public key. The keystore should be strongly protected with a password, and stored (either on the file system or elsewhere) so that it is accessible only to administrators.
The default, certificate file format for a CentraSite keystore is. JKS (Java keystore). Java keystore is a commonly used, standardized, certificate file format that provides a high degree of portability. PKCS#12 is another format you can use for a keystore. Other keystore types can be made available by:
Loading additional security providers
Setting the watt.security.keyStore.supportedTypes property.
Under certain conditions, webMethods Mediator supports the use of keystore files stored on a Hardware Security Module (HSM). Integration Server supports HSM-based keystores for ports, but not for other components. You cannot use HSM-based keystores with remote server aliases, outbound certificates, an internal server port, WS-Security, or Integration Server public services.
You can create and manage CentraSite keystores at the command line using keytool, a Java certificate editor.
You can also use other standard tools such as OpenSSL and Portecle.
Note:
Software AG does not provide its own set of keystore utilities for
creating or managing keystore files.
CentraSite uses a truststore to store its trusted root certificates, which are the public keys for the signing CAs. Although a truststore can contain the trusted roots for entire certificate chains, there is no requirement for the organization of certificates within a CentraSite truststore. It simply functions as a database containing all the public keys for CAs within a specified trusted directory.
CentraSite uses a truststore to store its trusted root certificates, which are the public keys for the signing CAs. Although a truststore can contain the trusted roots for entire certificate chains, there is no requirement for the organization of certificates within a CentraSite truststore. It simply functions as a database containing all the public keys for CAs within a specified trusted directory.
For a CentraSite service to be SSL authenticated, it must have a valid, authorized X.509 certificate installed in a keystore file and the private key and signing certificate for the certificate issuer (CA) installed in a truststore file. The following figure illustrates these requirements and the relationship between the two files.
Example Truststore File and Keystore File Showing Relationship
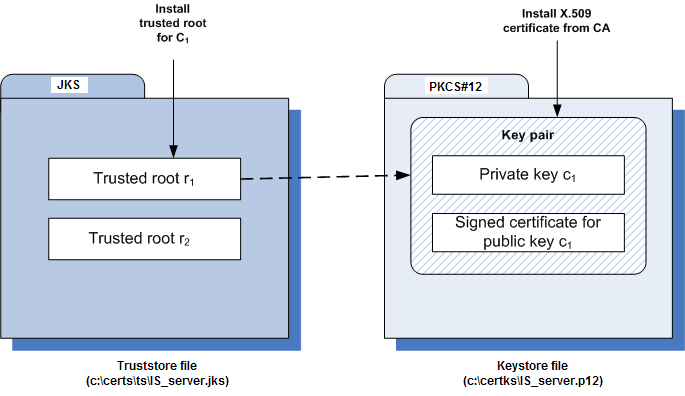
As shown in the above figure, the same truststore file can contain multiple trusted root certificates (public keys for the signing CAs). These trusted roots might be associated with numerous keystore files. A keystore file can contain the key pairs for multiple CentraSite services, and the entire certificate chain required for a service’s authentication.
With a certificate chain, it is necessary to validate each subsequent signature in the list until a trusted CA certificate is reached. For CentraSite, you must include the entire chain of certificates in a keystore and truststore. Also, any root CA certificates in use by clients must be in a CentraSite truststore.
Keystore and truststore files exist within the file system of your operating system, and since these are critically important files, you want to maintain them in a secure directory path. If either of the these files cannot be located, CentraSite authentication will be disabled and no connection with the CentraSite can be made. It is recommended that only users serving as CentraSite administrators have access to these certificate files.
The configuration settings covered in this section deal with the CentraSite client side.
You can configure CentraSite client to use SSL in any of the following ways:
You perform the following procedure to configure CentraSite for one-way SSL authentication:
![]() To configure one-way SSL
To configure one-way SSL
Create at least one truststore centrasitetruststore.jks, in JKS format, in a desired location on the machine where CentraSite is running.
Import the webMethods Mediator's self-signed certificate mediator.cer into the above created truststore or JAVA cacerts.
When prompted for password, the default for truststores is "password".
C:\deploykeystores\new>keytool -export -alias mediator -keystore mediatorkeystore.jks -rfc -file mediator.cer
Enter keystore password:
Certificate stored in file <mediator.cer>

C:\deploykeystores\new>keytool -import -alias mediator -keystore centrasitetruststore.jks -file mediator.cer
Enter keystore password:
Re-enter new password:
Owner:
Issuer:
Serial number:
Valid from:
Certificate fingerprints:
              Trust this certificate? [no]:  yes
Certificate was added to keystore

C:\deploykeystores\new>
If opting to import certificate in to Java cacerts, the Java runtime needs to trust the certificates of the webMethods Mediator in order to establish the SSL connections. To do that, add the certificate to the trusted certificates of Java via the keytool utility that comes with Java. The following command will add the certificate located at a location (for example, c:\temp\server.crt) to the trusted certificates in the Java used by CentraSite:
keytool.exe -import -v -trustcacerts -alias test -file "C:\temp\server.crt"
-keystore "<JDKInstallDir>\jre\lib\security\cacerts"
When prompted for password, the default for Java is "changeit".
Add the following Java system properties to the custom_wrapper.conf file in <SuiteInstallDir>/profiles/CTP/configuration folder. For information about setting Java system properties, see the webMethods cross-product document, Working with the webMethods Product Suite and the Java Service Wrapper.
wrapper.java.additional.<n>=-Djavax.net.ssl.trustStore=<location_of_truststore>
wrapper.java.additional.<n>=-Djavax.net.ssl.trustStorePassword=<password_for_truststore>
In the settings above:
<n> is a unique sequence number that you assign to each wrapper.java.additional property. For more information about assigning this sequence number, see the wrapper.java.additional property description in the cross-product document, Working with the webMethods Product Suite and the Java Service Wrapper.
<location_of_truststore> is the location to the trust store file (for example, C:/deploykeystores/new/centrasitetruststore.jks).
<password_for_truststore> is the password for the trust store.
Save and close the file.
Restart the Software AG Runtime. All communication via the webMethods Mediator to the database should now be using SSL.
You perform the following procedure to configure CentraSite for two-way SSL authentication:
![]() To configure two-way SSL
To configure two-way SSL
Using OpenSSL, create a self-signed certificate (centrasite.cer) with the following command:
openssl req -new -x509 -days 2000 -sha1 -newkey rsa:1024 -nodes
-keyout server.key -out server.crt -subj "/O=Company/OU=Unit/CN=localhost"
Whatever is specified in the CN section of the subject must match the hostname of the machine running the webMethods Mediator and is used to send requests to the Mediator.
Create at least one keystore centrasitekeystore.jks, in PKCS#12 or JKS format, containing a CentraSite key pair to use for SSL.
C:\deploykeystores\new>keytool -v -genkeypair -alias centrasite -keyalg RSA -validity 1000 -keystore centrasitekeystore.jks
Enter keystore password:
Re-enter new password:
What is your first and last name?
What is the name of your organizational unit?
What is the name of your organization?
What is the name of your City or Locality?
What is the name of your State or Province?
What is the two-letter country code for this unit?

Enter key password for <centrasite>
             <RETURN if same as keystore password>:
[Storing centrasitekeystore.jks]

C:\deploykeystores\new>
Create at least one truststore centrasitetruststore.jks, in JKS format, in a desired location on the machine where CentraSite is running.
Import the webMethods Mediator's self-signed certificate mediator.cer into the above created truststore or Java cacerts.
When prompted for password, the default for truststores is "password".
C:\deploykeystores\new>keytool -export -alias mediator -keystore mediatorkeystore.jks -rfc -file mediator.cer
Enter keystore password:
Certificate stored in file <mediator.cer>

C:\deploykeystores\new>keytool -import -alias mediator -keystore centrasitetruststore.jks -file mediator.cer
Enter keystore password:
Re-enter new password:
Owner:
Issuer:
Serial number:
Valid from:
Certificate fingerprints:
              Trust this certificate? [no]:  yes
Certificate was added to keystore

C:\deploykeystores\new>
If opting to import certificate in to Java cacerts, the Java runtime needs to trust the certificates of the webMethods Mediator in order to establish the SSL connections. To do that, add the certificate to the trusted certificates of Java via the keytool utility that comes with Java. The following command will add the certificate located at a location (for example, c:\temp\server.crt) to the trusted certificates in the Java used by CentraSite:
keytool.exe -import -v -trustcacerts -alias test -file "C:\temp\server.crt"
-keystore "<JDKInstallDir>\jre\lib\security\cacerts"
When prompted for password, the default for Java is "changeit".
Export the CentraSite's self-signed certificate centrasite.cer in to the webMethods Mediator's truststore.
Add the following Java system properties to the custom_wrapper.conf file in <SuiteInstallDir>/profiles/CTP/configuration folder. For information about setting Java system properties, see the webMethods cross-product document, Working with the webMethods Product Suite and the Java Service Wrapper.
wrapper.java.additional.5=-Djavax.net.ssl.keyStore=<location_of_keystore>
wrapper.java.additional.6=-Djavax.net.ssl.keyStorePassword=<password_for_keystore>
wrapper.java.additional.7=-Djavax.net.ssl.trustStore=<location_of_truststore>
wrapper.java.additional.8=-Djavax.net.ssl.trustStorePassword=<password_for_truststore>
In the settings above:
<n> is a unique sequence number that you assign to each wrapper.java.additional property. For more information about assigning this sequence number, see the wrapper.java.additional property description in the cross-product document, Working with the webMethods Product Suite and the Java Service Wrapper.
<location_of_keystore> is the location to the keystore file (for example, C:/deploykeystores/new/centrasitekeystore.jks).
<password_for_keystore> is the password for the keystore.
<location_of_truststore> is the location to the trust store file (for example, C:/deploykeystores/new/centrasitetruststore.jks).
<password_for_truststore> is the password for the trust store.
Save and close the file.
Restart the Software AG Runtime. All communication via the webMethods Mediator to the database should now be using SSL.
![]() To configure SSL using CTP server.xml file
To configure SSL using CTP server.xml file
Open the server.xml file located in the following directory:
<SuiteInstallDir>/profiles/CTP/configuration/tomcat/conf
Enter the keystore information as specified below:
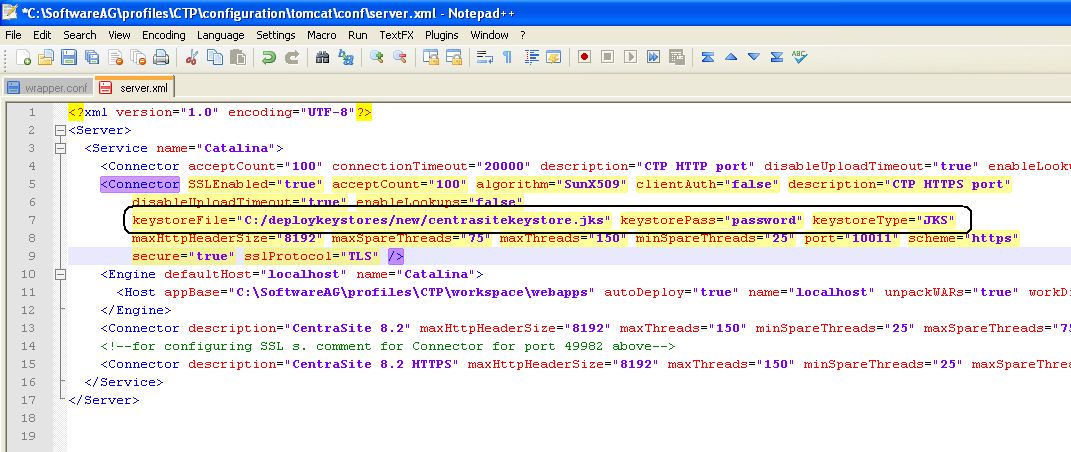
Add the mediator certificate (mediator.cer) into CentraSite JVM cacerts as below:

The configuration settings covered in this section deal with the webMethods Integration Server side.
You configure an Integration Server to use one of the following:
You perform the following procedure to configure Integration Server for one-way SSL authentication:
![]() To configure one-way SSL
To configure one-way SSL
Using OpenSSL, create a self-signed certificate (mediator.cer) with the following command:
openssl req -new -x509 -days 2000 -sha1 -newkey rsa:1024 -nodes
-keyout server.key -out server.crt -subj "/O=Company/OU=Unit/CN=localhost"
Whatever is specified in the CN section of the subject must match the hostname of the machine running the webMethods Mediator and is used to send requests to Mediator.
Create at least one keystore mediatorkeystore.jks, in PKCS#12 or JKS format, containing an Integration Server key pair to use for SSL and its corresponding key alias.
C:\deploykeystores\new>keytool -v -genkeypair -alias mediator -keyalg RSA -validity 1000 -keystore mediatorkeystore.jks
Enter keystore password:
Re-enter new password:
What is your first and last name?
What is the name of your organizational unit?
What is the name of your organization?
What is the name of your City or Locality?
What is the name of your State or Province?
What is the two-letter country code for this unit?

Enter key password for <mediator>
             <RETURN if same as keystore password>:
[Storing mediatorkeystore.jks]

C:\deploykeystores\new>
Export the webMethods Mediator's self-signed certificate mediator.cer into the CentraSite's truststore.
Configure an HTTPS port and specify the client authentication to Username/Password. The server prompts the client for a user ID and password.
On the Ports screen, click to change the Access Mode. You may Set Access Mode to Allow by Default or Reset to default access settings.
For more information on configuring ports and client authentication, refer to the document Administering webMethods Integration Server in the documentation set for webMethods Integration Server.
Now restart the Integration Server.
You perform the following procedure to configure Integration Server for one-way SSL authentication:
![]() To configure two-way SSL
To configure two-way SSL
Using OpenSSL, create a self-signed certificate (mediator.cer) with the following command:
openssl req -new -x509 -days 2000 -sha1 -newkey rsa:1024 -nodes
-keyout server.key -out server.crt -subj "/O=Company/OU=Unit/CN=localhost"
Whatever is specified in the CN section of the subject must match the hostname of the machine running the webMethods Mediator and is used to send requests to the Mediator.
Create at least one keystore mediatorkeystore.jks, in PKCS#12 or JKS format, containing an Integration Server key pair to use for SSL.
C:\deploykeystores\new>keytool -v -genkeypair -alias mediator -keyalg RSA -validity 1000 -keystore mediatorkeystore.jks
Enter keystore password:
Re-enter new password:
What is your first and last name?
What is the name of your organizational unit?
What is the name of your organization?
What is the name of your City or Locality?
What is the name of your State or Province?
What is the two-letter country code for this unit?

Enter key password for <mediator>
             <RETURN if same as keystore password>:
[Storing mediatorkeystore.jks]

C:\deploykeystores\new>
Create at least one truststore mediatortruststore.jks, in JKS format, in a desired location on the machine where CentraSite is running.
Export the webMethods Mediator's self-signed certificate mediator.cer into the CentraSite's truststore.
Import the CentraSite's self-signed certificate centrasite.cer in to the mediator's truststore mediatortruststore.jks.
C:\deploykeystores\new>keytool -export -alias

centrasite -keystore centrasitekeystore.jks -rfc -file

centrasite.cer
Enter keystore password:
Certificate stored in file <centrasite.cer>

C:\deploykeystores\new>keytool -import -alias

mediator -keystore mediatortruststore.jks -file

centrasite.cer
Enter keystore password:
Re-enter new password:
Owner:
Issuer:
Serial number:
Valid from:
Certificate fingerprints:
              Trust this certificate? [no]:  yes
Certificate was added to keystore

C:\deploykeystores\new>
Create a keystore and truststore alias using the above created keystore (mediatorkeystore.jks) and truststore (mediatortruststore.jks) respectively. For more information on creating keystore and truststore aliases, refer to the document Administering webMethods Integration Server in the documentation set for webMethods Integration Server.
Configure an HTTPS port and specify the client authentication to any of the following:
Username/Password. The server prompts the client for a user ID and password.
Request Client Certificates. The server requests client certificates for all requests. If the client does not provide a certificate, the server prompts the client for a userid and password. If the client provides a certificate:
The server checks whether the certificate exactly matches a client certificate on file and is signed by a trusted authority. If so, the client is logged in as the user to which the certificate is mapped in Integration Server. If not, the client request fails, unless central user management is configured.
If central user management is configured, the server checks whether the certificate is mapped to a user in the central user database. If so, the server logs the client on as that user. If not, the client request fails.
Require Client Certificates. The server requires client certificates for all requests. The server behaves as described for Request Client Certificates, except that the client must always provide a certificate.
On the Ports screen, click to change the Access Mode. You may Set Access Mode to Allow by Default or Reset to default access settings.
If chosen client authentication as Require Client Certificates above, map the client certificate to any valid user in the Integration Server.
For more information on configuring ports and client authentication, refer to the document Administering webMethods Integration Server in the documentation set for webMethods Integration Server.
Now restart the Integration Server.
Configure your instance of webMethods Mediator as described in the section Configuring Mediator in the document Administering webMethods Mediator in the documentation set for webMethods Mediator.