You create run-time policies and apply them to virtual services in order to govern the virtual services' run-time execution.
A run-time policy is a sequence of actions that are carried out by a policy-enforcement point (PEP) when a consumer requests a particular service through the PEP. The actions in a run-time policy perform activities such as identifying/authenticating consumers, validating digital signatures and capturing performance metrics. You create run-time policies using CentraSite Control and store them in the CentraSite registry/repository.
When you create a run-time policy in CentraSite Control, you:
Specify the PEP target type (for example, webMethods Mediator) to which you will deploy the virtual services and their policies.
Add run-time actions to the policy and configure their parameters. CentraSite provides a set of built-in run-time actions.
Apply the policy to the desired virtual services.
Activate the policy.
The content is organized under the following sections:
A run-time action is a single task that is included in a run-time policy and is evaluated by a policy-enforcement point (PEP). Actions in run-time policies perform tasks such as identifying/authenticating consumers and logging transaction activity. You specify actions when you define the policy. The PEP evaluates actions in the order in which they appear in the list of actions.
CentraSite provides run-time action templates. A run-time action template is a definition of an action that can be used in a run-time policy. Most action templates specify a set of parameters associated with a particular policy action. For example, when you configure the action that identifies consumers you specify an identifier (for example, an HTTP Authentication token) to identify the consumers who are trying to access the services. You can include multiple actions in a single policy.
Using the action templates, you can configure the following types of run-time actions:
Mediator provides two kinds of actions that support WS-SecurityPolicy 1.2: authentication actions and XML security actions.
You use the authentication actions to verify that the service consumer has the proper credentials to access a virtual service. You can authenticate consumers by their WSS X.509 certificates, WSS Username tokens or WSS SAML tokens.
You use the XML security actions to provide confidentiality (through encryption) and integrity (through signatures) for request and response messages.
Mediator provides the following run-time monitoring actions:
The "Monitor Service Performance" action, which monitors a user-specified set of run-time performance conditions for a virtual service, and sends alerts to a specified destination when these conditions are violated.
The "Monitor Service Level Agreement" action, which provides the same functionality as "Monitor Service Performance", but this action is different because it enables you to monitor a virtual service's run-time performance for particular consumers. You configure this action to define a Service Level Agreement (SLA), which is set of conditions that defines the level of performance that a specified consumer should expect from a service.
The "Throttling Traffic Optimization" action (not available in Mediator versions below 9.0), which limits the number of service invocations allowed during a specified time interval, and sends alerts to a specified destination when the performance conditions are violated. You can use this action to avoid overloading the back-end services and their infrastructure, to limit specific consumers in terms of resource usage, etc.
Mediator provides the following actions, which you can use in conjunction with the actions above.
"Identify Consumer", which you use in conjunction with an authentication action ("Require WSS Username Token", "Require WSS X.509 Token" or "Require HTTP Basic Authentication"). Alternatively, you can use this action alone to identify consumers only by host name or IP address.
"Require HTTP Basic Authentication", which uses HTTP basic authentication to verify the consumer's authentication credentials contained in the request's Authorization header against the Integration Server's user account.
"Authorize User", which authorizes consumers against a list of users and/or a list of groups registered in the Integration Server on which Mediator is running. You use this action in conjunction with an authentication action ("Require WSS Username Token", "Require WSS SAML Token" or Require HTTP Basic Authentication).
"Authorize Against Registered Consumers", which authorizes consumer applications against all Application assets that are registered in CentraSite as consumers for the service.
"Log Invocation", which logs request/response payloads to a destination you specify.
"Validate Schema", which validates all XML request and/or response messages against an XML schema referenced in the WSDL.
For detailed descriptions of these actions, see the section Run-Time Governance Reference > Built-In Run-Time Actions Reference for Virtual Services .
To create and manage run-time policies, you must belong to a role that includes the "Manage Runtime Policies" permission (or the "Manage System-wide Runtime Policies" permission).
By default, the following predefined roles include the "Manage Runtime Policies" permission:
Organization Administrator
Policy Administrator
By default, the following predefined roles include the "Manage System-wide Runtime Policies" permission:
CentraSite Administrator
Operations Administrator
Note:
For more information about roles and permissions, see
the section Users, Groups, Roles, and Permissions .
To create a run-time policy in CentraSite, you perform the following high-level steps:
Create a new run-time policy. During this step, you select the actions you want the policy to execute, and you assign values to the action parameters.
Allow other users to view, edit and/or delete this policy by assigning permissions to those users. For procedures, see Setting Permissions on a Run-Time Policy.
Activate the policy. During this step, you make the new policy ready to deploy to a PEP. For procedures, see Activating a Run-Time Policy.
Perform these steps to create a run-time policy and save it to CentraSite.
![]() To create a run-time policy
To create a run-time policy
In CentraSite Control, go to Policies > Run-Time.
Click Add Policy.
In the Policy Information panel, specify the following fields:
| In this field... | Specify... |
|---|---|
| Name | A name for the new policy. A policy name can contain any character (including spaces). |
| Description | Optional. A description for the new policy. This description appears when a user displays a list of policies in the user interface. |
| Version |
Optional. A version identifier for the new policy. Note: Examples:
  0.0a
  1.0.0 (beta)
  Pre-release 001
  V1-2007.04.30
Note: |
In the Scope panel, specify the following fields. Scope refers to the set of properties that determine the target type, organization and asset type to which the policy applies.
| In this field... | Specify... |
|---|---|
| Target Type | The target type to which the policy will be deployed. Select webMethods Integration Server (i.e., the webMethods Mediator target type). |
| Organization |
The organization to which the policy applies. Choose All if you want to apply the policy to the specified services in all organizations. Important: |
| Asset Types | The type of asset to which this policy applies. Choose one
of the following:
Note: |
In the Apply Policy to Services that Meet the Following Criteria panel, specify criteria that identify the virtual services to which the policy applies.
To target a policy for a particular set of virtual services, you refine the policy’s scope by specifying additional selection criteria based on the virtual service’s Name, Description or Classification properties.
Choose an attribute (Name, Description or Classification) that identifies the services to which the policy applies.
Choose an operator for the attribute (if applicable).
Specify a value for the attribute (if applicable). Values are case-sensitive.
If you need to specify multiple values or attributes, use the plus button to add multiple rows. For example, for the Classification attribute you might choose multiple Taxonomy names. If you specify multiple criteria, they are connected by the AND operator.
After you save the policy, you will see the generated list of services displayed on the Policy Detail page's Services profile.
Notes:
Caution:
CentraSite checks for policy conflicts when you deploy a
virtual service to Mediator. If the service has only one policy applied to it
(the policy you are applying here), that policy is deployed to Mediator,
and Mediator executes the policy's run-time actions in the order in which they
appear in the policy. However, if the service already has additional policies
applied to it, a policy conflict might occur, which might cause
unintended consequences. CentraSite will inform you of policy conflicts. For information about how Mediator evaluates
actions (and how to avoid policy conflicts), see the section
Run-Time Governance Reference > Built-In Run-Time Actions Reference for Virtual Services > Action Evaluation Order and Dependencies .
Click Next.
In the Available Actions dialog, select the built-in actions that you want to include in the policy. Keep the following points in mind when you select the actions for the policy:
If you are using webMethods Mediator as your PEP, you must include the "Identify Consumer" built-in action (and optionally other identification actions) in order to identify or authenticate consumers. For common usage cases of identification actions, see the section Run-Time Governance Reference > Built-In Run-Time Actions Reference for Virtual Services > Usage Cases for Identifying/Authenticating Consumers .
Ensure that the actions in the Selected Actions list appear in the order in which you want them to run when the policy is enforced. If necessary, use the control buttons on the right side of the list to place them in the correct order.
Click Finish to save the new (as yet incomplete) policy. The Runtime Policy Detail page is displayed, showing details of the policy you just created.
Specify parameter values for each of the policy’s actions as follows:
In the Actions profile, choose the action whose parameters you want to set.
In the Edit Action Parameters page, set the parameters as necessary and click Save. Required parameters are marked with an asterisk. For detailed information about the parameters, see the section Run-Time Governance Reference > Built-In Run-Time Actions Reference for Virtual Services .
When you have finished setting the parameters of all actions in the list, click Save and then Close. The icons next to the actions in the Parameters Set column will indicate whether the action parameters have been set.
| Icon | Description |
|---|---|
|
|
The action has required input parameters that have not yet been set. |
|
|
All of the action’s required input parameters have been
set.
Note: |
Complete the policy by doing the following:
If you want to allow other users to view, edit and/or delete this policy, go to the Policy Detail page, select the Permissions profile, and assign permissions to those users. You will not see this profile unless you belong to a role that has the "Manage Runtime Policies" permission. For procedures, see the section Users, Groups, Roles, and Permissions .
Activate the policy when you are ready to put it into effect. For procedures, see Activating a Run-Time Policy.
If you want to permit other users to manage (i.e., view, edit and delete) run-time policies, you do so by adding to the policy’s instance-level permission settings. A policy has the following types of instance-level permission settings.
| Permission | Description |
|---|---|
| View | Enables users to see the policy in their policy list and view details for the policy. |
| Modify | Enables users to view and modify the properties of a policy (including the policy’s scope and action list). |
| Full | Enables users to view, modify or delete the policy. |
To set permissions on a policy, you must belong to a role that has "Manage Runtime Policies" permission or the "Manage System-wide Runtime Policies" permission.
You can assign view, edit and delete permissions to any individual user or group defined in CentraSite.
Note:
If you give a user permission to view, edit or delete a policy, and
you want that user to be able to perform these operations using
CentraSite Control, make sure that the user belongs to a role that also has
the "Use the Policy UI" permission.
![]() To assign permissions to a policy
To assign permissions to a policy
If you are modifying the permissions of an active policy, you must first deactivate the policy.
Display the Policy Detail page for the policy that you want to activate. If you need procedures for this step, see Modifying a Run-Time Policy.
Select the Permissions profile.
To add a new a new user or group to the list, do the following:
Choose .
Select the users and/or groups to which you want to assign permissions.
If you want to filter the user list, specify a pattern-matching string in the Search field. The pattern-matching string can consist of one or more characters and/or the % wildcard symbol. The string is matched against group names and user IDs.
| If you type... | CentraSite will return... |
|---|---|
b% |
Groups and user names that start with the letter b. |
b |
Groups and user names that contain the letter b. |
%b |
Groups and user names that end with b. |
% |
All groups and user names. |
Choose .
Use the Full, Modify and View check boxes to assign specific permissions to the users and groups in the list.
To remove an entry from the list, select the check box beside the group or user name and click .
Click to save your settings.
When you activate a run-time policy, CentraSite applies it to the services you specified in the policy.
To activate a policy, you change the policy’s lifecycle state to the "Productive" state. This state change executes CentraSite's Automatic Policy Activation policy.
Note:
The Automatic Policy Activation policy is a
hidden system policy. You cannot edit or delete this policy.
When you activate a policy, be aware that:
You will not be allowed to activate the policy unless all of its parameters have been set. When you switch the policy to the Productive state, CentraSite executes the Validate Policy Activation policy. This policy will not allow you to switch a policy to the Productive state if the policy’s parameters have not yet been set.
Some organizations require an approval to activate a policy. If your organization has an approval action associated with the activation of a policy, CentraSite will not activate the policy until the required approvals are obtained. For more information about approval actions, see the section Working with Design/Change-Time Policies.
If an earlier version of the policy is already active, CentraSite will deactivate the old version before it activates the new one. For more information about working with versioned policies, see Versioning a Policy.
To activate a policy, you must have permission to change the policy to the Productive state.
To successfully change a policy to the "Productive" state, you must also have the Modify permission on all virtual type services to which the policy is applied.
To determine whether a policy is active or inactive, examine the policy’s Active indicator on the > page. The icon in the Active column indicates the policy’s activation state as follows:
| Icon | Description |
|---|---|
|
|
Policy is active. |
|
|
Policy is inactive. |
The activation state of a policy is also reported next to the State field in the Run-Time Policy Details page.
![]() To activate a policy
To activate a policy
Display the Run-Time Policy Details page for the policy you want to activate. If you need procedures for this step, see Modifying a Run-Time Policy.
Examine the Actions profile and verify that all of the actions on this profile display the green checkmark icon in the Parameters Set column. If any of the actions display the red circle icon in this column, set their parameters before you continue. For information about setting action parameters, see Modifying Action Parameters.
In the Policy Information panel, click the button. (If you do not see the button, it is probably because you do not have permission to change the lifecycle state of a policy.)
In the Change Lifecycle State dialog box, select the Productive lifecycle state and click OK.
Examine the State field in the Policy Information panel to verify that the policy's state has been changed.
If this state change requires approval, the State field will indicate that the policy is in the "pending" mode. CentraSite will automatically switch the policy to the requested state (and activate the policy) after all the necessary approvals have been obtained. For information about checking the status of objects that you have submitted for approval, see the section Working with Design/Change-Time Policies.
Note:
While the policy is in pending mode, it cannot be edited.
After you activate the policy, users with the proper permissions will deploy the services to your PEP. At that time, CentraSite will automatically validate the service's policies (e.g., check for policy conflicts or other violations). For information about how Mediator evaluates actions (and how to avoid policy conflicts), see the section Run-Time Governance Reference > Built-In Run-Time Actions Reference for Virtual Services > Action Evaluation Order and Dependencies .
You usually deactivate a policy if you want to edit the policy (for example, to modify the scope of a policy or change its action list).
To deactivate a policy, you change the policy to the Suspended state. Switching the policy to this state triggers the Automatic Policy Deactivation policy, which deactivates the policy. (Switching the policy to the Retired state also deactivates the policy, but you do not want to switch a policy to this state unless you intend to deactivate it permanently. After you place a policy in the Retired state, you cannot reactivate it.)
To deactivate a policy, you must have permission to change the policy to the Suspended state.
![]() To deactivate a policy
To deactivate a policy
Display the Run-Time Policy Details page for the policy you want to activate. If you need procedures for this step, see Modifying a Run-Time Policy.
In the Policy Information panel, click the button. (If you do not see the button, it is probably because you do not have permission to change the lifecycle state of a policy.)
In the Change Lifecycle State dialog box, select the Suspended state (to deactivate it temporarily) or the Retired state (to deactivate it permanently), then click OK
The Run-Time Policies page displays a list of all run-time policies residing on the CentraSite server.
![]() To view the policy list
To view the policy list
In CentraSite Control, go to .
By default, all of the available policies are displayed.
If you want to filter the list to see just a subset of the available policies, type a partial string in the Search field. CentraSite applies the filter to the Name column. The Search field is a type-ahead field, so as soon as you enter any characters, the display will be updated to show only those policies whose name contains the specified characters. The wildcard character "%" is supported.
You can sort the list by type of asset. To specify the sorting order, choose either Web Service, REST Service, XML Service, Virtual Service, Virtual REST Service or Virtual XML Service from the drop-down list labeled Browse by.
The Run-Time Policies page provides the following information about each policy.
Note:
Only the first six columns described below are displayed in this list
by default. To display the additional columns, click the button.
| Column | Description | |
|---|---|---|
| Name | The name assigned to the policy. | |
| Description | Additional comments or descriptive information about the policy. | |
| System Version | The automatically generated
system-assigned version identifier for the policy.
For more information about system-assigned version identifiers, see, System-Assigned vs. User-Assigned Version Identifiers. |
|
| Organization | The organization to which the policy applies. | |
|
This value...
|
Indicates that...
|
|
| All | The policy is system-wide and applies to all organizations. | |
| OrgName | The policy applies to the specified organization. | |
| State | The policy's current lifecycle state. | |
| Active | The policy’s current enforcement state. | |
|
Icon
|
Description
|
|
|
|
The policy is active. CentraSite enforces this policy when events within the scope of the policy occur. | |
|
|
The policy is inactive. Inactive policies exist in the registry, but they are not enforced. | |
| Version | The user-assigned version identifier
for the policy.
For more information about user-assigned version identifiers, see, System-Assigned vs. User-Assigned Version Identifiers. |
|
| Owner | The user to which the policy belongs. | |
The following sections discuss:
You use the Run-Time Policy Details page to examine and/or edit the properties for a policy. When editing a policy, keep the following points in mind:
To edit a policy, you must have Modify permission on the policy. If your user account belongs to a role that has the "Manage Runtime Policies" permission for an organization, you automatically have permission to modify all of the policies in that organization. If your user account belongs to a role that has the "Manage System-Wide Runtime Policies" permission, you have permission to edit any system-wide policy on the server.
You cannot modify an active policy. If the policy that you want to edit is in the active state, you must deactivate it or use the versioning feature to create a new version of the policy. Creating a new version of the policy allows you to make your changes without having to deactivate the existing policy. For details, see Versioning a Policy. For information about deactivating a policy, see Deactivating a Run-Time Policy.
If you modify a run-time policy for a virtual service that is already deployed to Mediator, CentraSite will automatically redeploy the modified virtual service.
![]() To edit a policy
To edit a policy
In CentraSite Control, go to Policies > Run-Time to display the policy list.
Locate the policy whose details you want to view or edit and choose from its context menu.
Examine or modify the properties on the Policy Detail page as necessary.
| Field or Profile | Description | |
|---|---|---|
| Name | The name of the policy. A policy name can contain any character (including spaces). | |
| Description | Optional. Additional comments about the policy. | |
| Version |
The user-defined version number to be assigned to the new version. We recommend that you update the version number anytime you make significant modifications to a policy. The usage of this field is the same as described in Creating a Run-Time Policy. |
|
| State | The policy's current lifecycle
state (e.g., New, Productive, Suspended, Retired). This field also displays an icon that indicates the activation state of the policy: |
|
|
Icon
|
Description
|
|
|
|
The policy is active (i.e., ready to be deployed to a PEP). | |
|
|
The policy is inactive. | |
| Organization | The organization to which the policy belongs. | |
| Owner | The user who created the policy. | |
| System Version | The automatically-generated system version identifier for the policy. For more information, see Creating a Run-Time Policy. | |
| Actions profile | The settings in this profile specify the actions that the PEP will execute when the policy is enforced. For more information about the properties on this profile, see Creating a Run-Time Policy. | |
| Scope profile | The settings in this profile determine the services to which the policy is applied. For more information about the properties on this profile, see Modifying the Scope of a Run-Time Policy. | |
| Services profile | Displays the list of Web services and/or virtual services to which the policy applies. For more information, see Viewing the List of Services to Which a Policy Applies. | |
| Permissions profile | The settings in this profile identify which users can view, edit and/or delete the policy. For more information about the properties on this profile, see Setting Permissions on a Run-Time Policy. | |
If you edited the settings on the Run-Time Policy Details page, click Save to save the updated policy.
If you deactivated the policy in order to edit it, activate the policy as described in Activating a Run-Time Policy.
You can view the details page of multiple policies as follows:
![]() To view the details page of multiple policies
To view the details page of multiple policies
In CentraSite Control, go to to display the policy list.
Locate the policies whose details you want to view, and mark their checkboxes.
In the menu, choose .
The details page of each of the selected policies will now be displayed.
This section discusses:
Use the procedure in this section to modify the actions list.
![]() To modify the actions list
To modify the actions list
Display the Policy Detail page for the policy whose actions you want to edit. If you need procedures for this step, see Modifying a Run-Time Policy.
If the policy is active, deactivate it. You cannot modify an active policy. If you need procedures for this step, see Deactivating a Run-Time Policy.
Select the Actions profile to display the list of actions associated with the policy.
To add actions to, delete actions from, or modify the order of actions in the list, do the following:
Click .
Use the controls in the Edit Assigned Actions List dialog box to add actions to the list and/or delete actions from the list.
When editing the list of actions, keep the following point in mind:
If you are using webMethods Mediator as your PEP, you must include the built-in run-time action "Identify Consumer" (and possibly other authorization/identification actions) in order to identify or authenticate consumers. For common usage cases of identification actions, see the section Run-Time Governance Reference > Built-In Run-Time Actions Reference for Virtual Services > Usage Cases for Identifying/Authenticating Consumers.
If necessary, you can click to return to the previous page and modify the information in the Policy Information panel.
Make sure that the actions in the Selected Actions list appear in the order that you want them to run when the policy is enforced. If necessary, use the control buttons on the right side of the list to place them in the correct order.
Click to save the modified list.
Use the procedure in Modifying Action Parameters to specify parameter values for any new actions that you might have added to the list, or to make any necessary updates to the parameter values for existing actions.
When the action list is complete and you have configured all of the input parameters for the actions correctly, click to save the updated policy.
If you deactivated the policy in order to edit it, activate the policy as described in Activating a Run-Time Policy.
Policy actions have parameters that you set to configure the behavior of the action at enforcement time. When you display the Actions profile on the Policy Detail page, the icon in the Parameters Set column indicates whether an action has input parameters that need to be set.
| This icon... | Indicates that... |
|---|---|
|
|
The action has required input parameters that have not yet been set. |
|
|
All of the action’s required input parameters have been set.
Note: |
Until the green check mark icon appears for all actions, you will not be able to activate the policy (if it is inactive) or save the policy (if it is already active).
![]() To modify action parameters
To modify action parameters
Display the Policy Detail page for the policy whose actions you want to edit. If you need procedures for this step, see Modifying a Run-Time Policy.
If the policy is active, deactivate it. You cannot modify an active policy. If you need procedures for this step, see Deactivating a Run-Time Policy
In the Actions profile do the following for each action in the list.
Choose the action whose parameters you want to examine or set.
In the Edit Action Parameters page, set the parameters as necessary.
Note:
Required parameters are marked with an asterisk. For more
information about built-in actions and their parameters, see the section Run-Time Governance Reference > Built-In Run-Time Actions Reference for Virtual Services .
Click to save the parameter settings.
After you configure the parameters for all of the actions in the list, click to save the updated policy.
If you deactivated the policy in order to edit it, activate the policy as described in Activating a Run-Time Policy.
You can use the Scope profile on the Run-Time Policy Detail page to modify a policy’s scope.
Note:
Once you create a policy, its organizational scope is fixed and
cannot be changed. That is, if you create a policy whose scope is specific to
organization ABC, you cannot change its scope to make it system-wide or switch
it to another organization. You must create a new policy and set its
organizational scope as needed.
![]() To modify the scope of a run-time policy
To modify the scope of a run-time policy
Display the Policy Detail page for the policy that you want to edit. If you need procedures for this step, see Modifying a Run-Time Policy.
If the policy is active, deactivate it. You cannot modify an active policy. If you need procedures for this step, see Deactivating a Run-Time Policy.
In the Scope profile, you can modify the following fields.
| Field or Profile | Description |
|---|---|
| Target Type | The target type to which the policy will be deployed (e.g., webMethods Integration Server). |
| Asset Type |
The type(s) of assets to which this policy applies. Note: |
| Organization | Read-only field. You cannot change the policy's organization after the policy has been created. |
| Apply Policy to Services that Meet the Following Criteria |
The services to which the policy applies.
|
Click Save to save the modified policy.
If you deactivated the policy in order to edit it, activate the policy as described in Activating a Run-Time Policy.
Use the following procedure to view the list of services to which a run-time policy applies.
Important:
The list only includes services that are in the "deployable
state" (that is, services whose deployment state has been enabled by the Change
Deployment State action in a design-time policy). Services that are within the
scope of the policy, but have not yet been made "deployable", do not appear in
this list.
![]() To view the list of services
To view the list of services
Display the Policy Detail page for the policy that you want to view. If you need procedures for this step, see Viewing or Changing a Run-Time Policy.
Select the Services profile to view the list of virtual services and/or Web services that was generated based on the criteria you specified in the Scope profile.
To view details of a service, click its hyperlinked name.
Note:
To add or remove services to or from the list, return to the
Scope profile and change the criteria in the
Apply Policy to Services that meet the following Criteria
panel. For more information, see the procedure in Modifying the Scope of a Run-Time
Policy.
You delete a policy to remove it from CentraSite permanently.
CentraSite is installed with a system-wide policy called Check State Validation Policy for Policy. This policy will not allow you to delete a policy unless the policy is in the New or Retired state.
![]() To delete a policy
To delete a policy
In the CentraSite Control, go to Policies > Run-Time to display the policy list.
Ensure that the policy is deactivated (see Deactivating a Run-Time Policy).
Enable the checkbox next to the name of the policy that you want to delete.
Click .
You can delete multiple policies in a single step. The rules described above for deleting a single policy apply also when deleting multiple policies.
![]() To delete multiple policies in a single operation
To delete multiple policies in a single operation
In CentraSite Control, go to Policies > Run-Time to display the policy list.
Mark the checkboxes of the policies that you want to delete.
From the Actions menu, choose Delete.
When you need to make changes to an existing policy, creating a new version of the policy is an efficient way to accomplish this task. Versioning a policy enables you to create a new version of a policy (which is an identical copy of the existing policy) and make your changes to the new version. When you are ready to put the updated policy into effect, you simply "activate" the new version of the policy. When you activate the new version, CentraSite automatically deactivates and retires the old version of the policy.
When you create a new version of a policy, be aware that:
You can only create a new version from the latest version of a policy. For example, if a policy already has versions 1.0, 2.0 and 3.0, CentraSite will only allow you to create a new version of the policy from version 3.0. (It makes no difference whether the policy that you are versioning is active or inactive. You can version a policy in either mode.)
To create a new version of a policy, you must have permission to manage run-time policies for the organization specified in the scope of the original policy. For example, if the original policy is scoped for organization ABC, you will not be permitted to create a new version of that policy unless you have permission to manage design/change-time policies for organization ABC.
When CentraSite creates a new version of a policy, it produces a version that is identical to the previous version, except that:
The new policy's system-assigned version identifier is incremented by one. (For additional information about system-assigned version numbers, see System-Assigned vs. User-Assigned Version Identifiers.)
Ownership of the new policy is assigned to the user who created the new version.
Like all new policies, the new version begins its lifecycle in the New state and is marked as inactive.
CentraSite automatically establishes a relationship between the new version of the policy and the previous version. This relationship enables several capabilities and features in CentraSite that relate to versioned policies.
![]() To version a policy
To version a policy
In CentraSite Control, go to to display the policy list.
Locate the most recent version of the policy for which you want to create a new version and choose Create New Version from its context menu.
Modify the new version of the policy as necessary and then save it.
When you are ready to put the new version into effect, activate the new policy. CentraSite will automatically deactivate and retire the previous version.
Note:
If you activate the new version of the policy while CentraSite is
in the middle of executing the old version, your activation request will fail.
If this occurs, wait for a period time and then try to activate the new version
of the policy again.
CentraSite maintains two version identifiers for a policy: a system-assigned identifier and a user-assigned identifier.
The system-assigned identifier is a version number that CentraSite maintains for its own internal use. CentraSite automatically assigns this identifier to a policy when the policy is created. You cannot delete it or modify it. A policy's system-assigned identifier is numeric and always has the format MajorVersion.Revision. A policy always begins with a system-assigned version identifier of 1.0. The MajorVersion number is incremented by one each time you create a new version of a policy (e.g., 1.0, 2.0, 3.0).
A policy's system-assigned version number is shown in the System Version column on the Run-Time Policies page and in the System Version field of the policy's detail page.
The user-assigned identifier is an optional identifier that you can assign to a distinguish a specific version of a policy. This identifier does not need to be numeric. For example, you might use a value such as "V2.a (beta)" to identify a version.
A policy's user-assigned version number is shown in the Version column on the Run-Time Policies page and in the Version field of the policy's detail page.
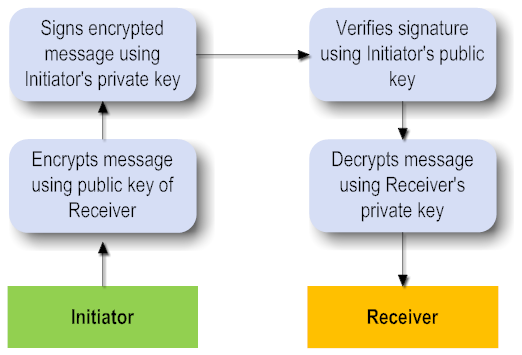
WS-SecurityPolicy specification deals with three types of Security Bindings. A security binding determines how the message transfer is to be done between the recipient and the initiator.
This section discusses:
Asymmetric Binding is used when both the Initiator and the Recipient possess public and private keys. The message transfer takes place using Public Key Infrastructure.
An Asymmetric Binding element in the WSDL looks like this:
<sp:AsymmetricBinding xmlns:sp="http://schemas.xmlsoap.org/ws/2005/07/securitypolicy">
    <wsp:Policy>
       <sp:InitiatorToken>
       </sp:InitiatorToken>
       <sp:RecipientToken>
       </sp:RecipientToken>
       <sp:AlgorithmSuite>
          <wsp:Policy>
             <sp:TripleDesRsa15/>
          </wsp:Policy>
       </sp:AlgorithmSuite>
       <sp:Layout>
          <wsp:Policy>
             <sp:Strict/>
          </wsp:Policy>
       </sp:Layout>
       <sp:IncludeTimestamp/>
       <sp:OnlySignEntireHeadersAndBody/>
     </wsp:Policy>
 </sp:AsymmetricBinding>
The following run-time actions that support WS-Security policies use a common Asymmetric Binding element:
The "Require Encryption" action.
The "Require Signing" action.
The "Require WSS SAML Token" action.
The "Require WSS X.509 Token" action.
The components of a security binding are as follows:
The value of Initiator Token Inclusion specifies how to include the initiator token during message exchange from Initiator to Recipient or Recipient to Initiator.
| Value | Description |
|---|---|
| Always | Always include the token. |
| AlwaysToRecipient | Include the token in all message exchanges from the Initiator to Recipient. |
| AlwaysToInitiator | Include the token in all message exchanges from the Recipient to Initiator. |
| Once | Only once. |
| Never | Do not include the token in any communications. |
The value of Recipient Token Inclusion specifies how to include the Recipient token during message exchange from Initiator to Recipient or Recipient to Initiator. It takes the same values as Initiator Token Inclusion above.
The value of Algorithm Suite specifies the algorithm suite to be used for this asymmetric binding. The possible algorithms supported are:
Basic 256
Basic192
Basic128
TripleDes
Basic256Rsa15
Basic192Rsa15
Basic128Rsa15
TripleDesRsa15
Basic256Sha256
Basic192Sha256
Basic128Sha256
TripleDesSha256
Basic256Sha256Rsa15
Basic192Sha256Rsa15
Basic128Sha256Rsa15
Layout describes the way information is added to the message header. The possible values are:
| Value | Description |
|---|---|
| Strict | Items are added to the security header in a principle of "declare before use". |
| Lax | Items are added to the security header in any order that conforms to WSS: SOAP Message Security. |
| LaxTsFirst | Same as Lax except that the first item
in the security header must be a wsse:Timestamp. Note that the wsse:Timestamp property must also be set to
true in this case.
|
| LaxTsLast | Same as Lax except that the last item
in the security header must be a wsse:Timestamp. Note that the wsse:Timestamp property must also be set to
true in this case.
|
You can change the Asymmetric Binding configuration by executing the following commands in the command line interface CentraSiteCommand.cmd (Windows) or CentraSiteCommand.sh (UNIX) of Command Central. The tool is located in <CentraSiteInstallDir>/utilities.
If you start this command line tool with no parameters, you receive a help text summarizing the required input parameters.
The parameters of the command are case-sensitive, so for example the parameter "-url" must be specified as shown and not as "-URL".
The configuration is maintained in the form of an XML file which is loaded with default values.
<?xml version="1.0" encoding="UTF-8" ?>
<AsymmetricBindingConfiguration>
<initiatorTokenInclusion>AlwaysToRecipient</initiatorTokenInclusion>
<recipientTokenInclusion>Never</recipientTokenInclusion>
<algorithmSuite>TripleDesRsa15</algorithmSuite>
<layout>Strict</layout>
</AsymmetricBindingConfiguration>
The commands include:
Use this command to obtain the current Asymetric binding configuration values. Use a command of the following format:
CentraSiteCommand get Asymmetric Binding [-url <CENTRASITE-URL>] -user <USER-ID>
-password <PASSWORD>
The following table describes the complete set of input parameters that you can use with the get Asymmetric Binding utility:
| Input Parameter | Description |
|---|---|
-url |
The fully qualified URL (http://localhost:53307/CentraSite/CentraSite) for the CentraSite registry/repository. |
-user |
The user ID of a user who has the "CentraSite Administrator" role. |
-password |
The password of the user identified by the
parameter -user. |
For example:
CentraSiteCommand get Asymmetric Binding [-url "http://localhost:53307/CentraSite/CentraSite"] -user "Administrator"
-password "manage"
Use this command to change the values in the CentraSite registry/repository.
CentraSiteCommand set Asymmetric Binding [-url <CENTRASITE-URL>] -user <USER-ID>
-password <PASSWORD> [-initiatorTokenInclusion <INITIATOR-TOKEN-INCLUSION>]
[-reciepientTokenInclusion <RECIPIENT-TOKEN-INCLUSION>] [-algorithmSuite
<ALGORITHM-SUITE>] [-layout <LAYOUT>]
The following table describes the complete set of input parameters that you can use with the set Asymmetric Binding utility:
| Input Parameter | Description |
|---|---|
-url |
The fully qualified URL (http://localhost:53307/CentraSite/CentraSite) for the CentraSite registry/repository. |
-user |
The user ID of a user who has the "CentraSite Administrator" role. |
-password |
The password of the user identified by the
parameter -user. |
-initiatorTokenInclusion |
Inclusion value for the Initiator Token. * |
-reciepientTokenInclusion |
Inclusion value for the Recipient Token. * |
-algorithmSuite |
The algorithm to be used. * |
-layout |
The layout to be used. * |
* At least one of the following parameters is required: "initiatorTokenInclusion", "reciepientTokenInclusion", "algorithmSuite" and "layout".
Use this command to remove the Asymmetric Binding configuration. It has the same parameters as the get Asymmetric Binding command:
CentraSiteCommand remove Asymmetric Binding [-url <CENTRASITE-URL>] -user <USER-ID>
-password <PASSWORD>
The following table describes the complete set of input parameters that you can use with the remove Asymmetric Binding utility:
| Input Parameter | Description |
|---|---|
-url |
The fully qualified URL (http://localhost:53307/CentraSite/CentraSite) for the CentraSite registry/repository. |
-user |
The user ID of a user who has the "CentraSite Administrator" role. |
-password |
The password of the user identified by the
parameter -user. |
For example:
CentraSiteCommand remove Asymmetric Binding [-url "http://localhost:53307/CentraSite/CentraSite"] -user "Administrator"
-password "manage"