The command Create Database From
Backup can be used to create an exact copy (at a given status) of
an existing database, for example on another machine or when performing a
database restore operation. The following types of backups are supported as
input for this command:
File system from 1 to n extents
Tape backups
Parallel backups on a file system or tapes
Mixed media backups on a file system and tapes
Named pipes
A database can only be created from a backup on the hardware architecture/operating system on which the backup was made.
When you create a database using the Create
Database From Backup command, Tamino creates the database in such
a way that any fragmentation that might have been present in the original
database is removed. The defragmentation can improve the efficiency of the
database's internal indexing mechanism and also reduce the overall physical
disk requirements of the database spaces.
Notes:
![]() To create a database from a backup
To create a database from a backup
Select and choose from the context menu. The Select Backup File(s) page of the Create Database from Backup dialog appears.
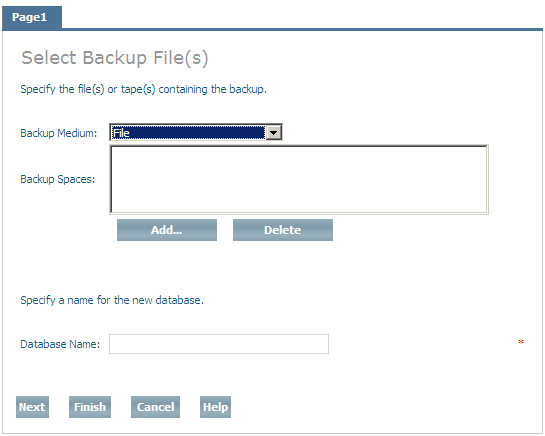
The list in the Backup Spaces list box is initially empty. Select the backup medium from the Backup Medium drop-down list box. Choose to add a file to the list. If you have chosen File as the backup media, the Create Database from Backup - Select Backup Files page appears (to delete a file from the list, select it and choose ).

By default, the contents of the default backup location are displayed. Files that match the search criterion specified by the filter (*.1B0 by default) are displayed in the Files list box. Select a file from the list box to display details about it (file name, backup extent, date and size, name of the database from which the backup was made) and choose (at any time) to add it to the list in the Select Backup Files dialog (choosing returns you to this dialog).
Select a drive from the Drives drop-down list box (and navigate to the corresponding directory in the Directories box) if you want to search for backups in a location other than the default backup location. You can specify an alternative filter (default value is *.1B0) to reduce the number of files found in a given directory - choose to activate the new filter. Check the Show only Tamino Backups check box to scan files in the directory to see whether they contain backup information (in conjunction with the filter function, this option is useful if the backup files have been renamed and do not comply with Tamino file naming conventions). Depending on the number of backup files in the directory and the combination of filter information and scan options used, it may take a while for the list of files to be generated.
Note:
If you need to select more than one input file, you must repeat
this step for each backup file to be selected.
If you chose Tape as the backup medium from the Select Backup Files page, the Specify Backup Device page appears (this applies only on Windows platforms).

Choose to read and display backup information from the tape. Select a file from the list box to display details about it (extent number, date and size, name of the database from which the backup was made and the database version) and choose (at any time) to add it to the list in the Select Backup Files dialog (choosing returns you to this dialog).
If you want to change to name of the database being created (which will be the case if a database with the same name already exists on the local machine), enter the new name in the field Database Name.
Note:
If it is available, you can choose
at any time after this point while defining a
database. If you do this, any settings you have already defined will be used,
and all other settings (location settings, default backup) will have their
respective default values. The values for the data, index and journal space are
taken from the former database, as well as the properties
Choose to proceed to the next page of the dialog.
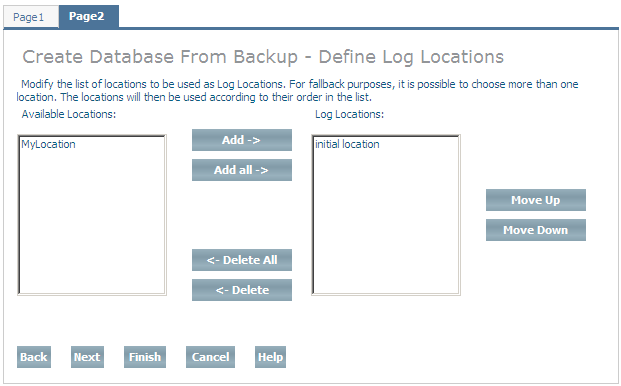
Define one or more log locations for the database. A log location is used to store the database log spaces. Multiple selections are possible. If you define more than one location, they will be used in the same order as in the list. Select an available database location and choose to add it to the list of log locations, or choose to add all available database locations to the list of log locations. If you add a database location to the list of log locations by mistake, you can remove it from the list by selecting it and choosing , or choose to remove all log locations from the list (locations that are deleted from the list are returned to the list of available locations). You can change the order of the locations in the list by selecting a location and using the and buttons.
When you have defined all of the log locations that you want, choose to continue to the next page of the dialog. Please refer to the section Location Management for further information about database locations.

Define one or more log archive locations for the database. The database log spaces are moved to the log archive location when they are closed. Multiple selections are possible. If you define more than one location, they will be used in the same order as in the list. Select an available database location and choose to add it to the list of log archive locations, or choose to add all available database locations to the list of log archive locations. If you add a database location to the list of log archive locations by mistake, you can remove it from the list by selecting it and choosing , or choose to remove all log archive locations from the list (locations that are deleted from the list are returned to the list of available locations). You can change the order of the locations in the list by selecting a location and using the and buttons.
When you have defined all of the log archive locations that you want, choose to continue to the page Define Temporary Working Locations. Please refer to the section Location Management for further information about database locations.
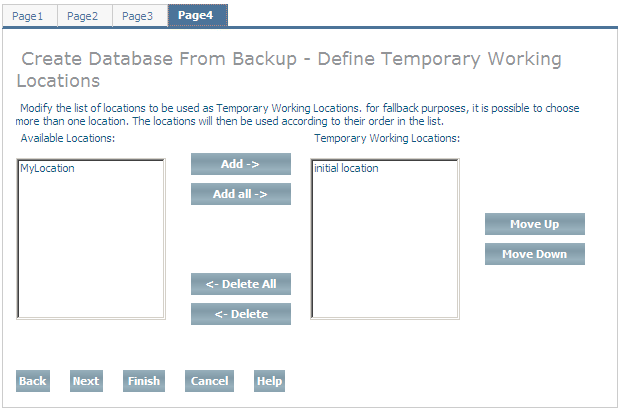
Define one or more temporary working locations for the database. Tamino uses the space in these locations to store temporary work spaces. If you define more than one location, they will be used in the same order as in the list. Select an available database location and choose to add it to the list of temporary working locations, or choose to add all available database locations to the list of temporary working locations. If you add a database location to the list of temporary working locations by mistake, you can remove it from the list by selecting it and choosing , or choose to remove all temporary working locations from the list (locations that are deleted from the list are returned to the list of available locations). You can change the order of the locations in the list by selecting a location and using the and buttons.
When you have defined all of the temporary working locations that you want, choose to continue to the page Define Reserve Locations. Please refer to the section Location Management for further information about database locations.
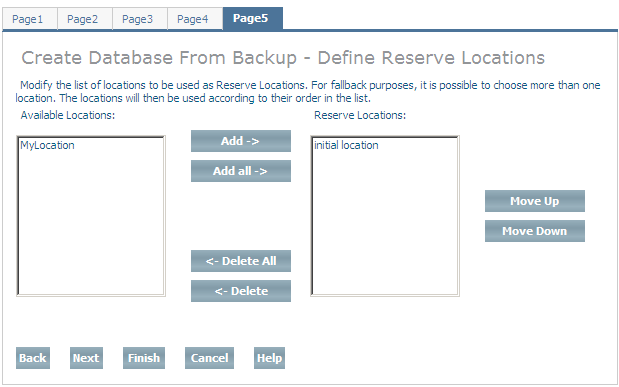
Define one or more reserved locations for the database. Reserved locations are used to store the database spaces if the assigned locations become full. If you define more than one location, they will be used in the same order as in the list. Select an available database location and choose to add it to the list of reserve locations, or choose to add all available database locations to the list of reserve locations. If you add a database location to the list of reserve locations by mistake, you can remove it from the list by selecting it and choosing , or choose to remove all reserve locations from the list (locations that are deleted from the list are returned to the list of available locations). You can change the order of the locations in the list by selecting a location and using the and buttons.
When you have defined all of the reserve locations that you want, choose to continue to the page Define Backup Locations. Please refer to the section Location Management for further information about database locations.
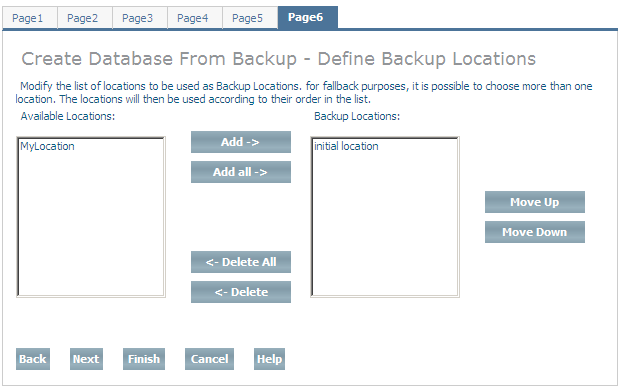
Define one or more backup locations for the database. Backup locations are used to store the backup spaces. If you define more than one location, they will be used in the same order as in the list. Select an available database location and choose to add it to the list of backup locations, or choose to add all available database locations to the list of backup locations. If you add a database location to the list of backup locations by mistake, you can remove it from the list by selecting it and choosing , or choose to remove all backup locations from the list (locations that are deleted from the list are returned to the list of available locations). You can change the order of the locations in the list by selecting a location and using the and buttons.
When you have defined all of the backup locations that you want, choose to continue to the page Change Properties.
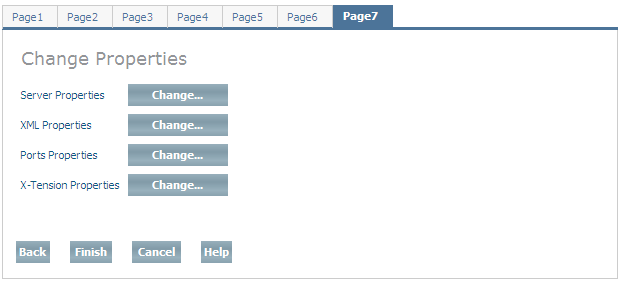
The operational properties of the database are divided into 4 groups:
Server property settings
XML property settings
Port property settings
X-Tension property settings
The property settings are taken from the backup of the original database. If you wish to change any of these settings, choose the appropriate button.
Please refer to the document Create a Database for further information about property settings.
When you have made all the changes (if any) that you want to make, choose to create the new database from the backup.