![]() To create a database
To create a database
Select Databases and choose from the context menu. If you have more than one version of Tamino installed, you must first select from the drop-down list box the version of Tamino to use for creating the new database. Choose . The page Define Database Name of the Create Database dialog appears.
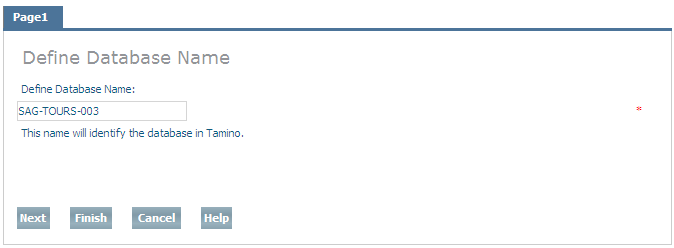
Enter the name for the database in the Define Database Name text field. This will be the name under which the database is known in the Tamino Manager. The database name can be up to a maximum of 32 characters in length.
Note:
The following characters may not be used: SPACE , ; ! \ = # . [ ]
" % ' / ^ ` ? *
Note:
You can choose at
any time while defining a database. If you do this, any settings you have
already defined will be used, and all other settings will have their respective
default values.
Choose to continue to the page Define Log Locations.

Define one or more log locations for the database. A log location is used to store the database log spaces. Multiple selections are possible. If you define more than one location, they will be used in the same order as in the list. In contrast to data and other locations, where the second location will only be used when the first location cannot be written to, Tamino will use the log locations alternately within a session when a log space switch occurs. When a new session is started, the first available location is used.
Select an available database location and choose to add it to the list of log locations, or choose to add all available database locations to the list of log locations. If you add a database location to the list of log locations by mistake, you can remove it from the list by selecting it and choosing ; or choose to remove all log locations from the list (locations that are deleted from the list are returned to the list of available locations). You can change the order of the locations in the list by selecting a location and using the and buttons.
Please refer to the section Location Management for further information about database locations.
When you have defined all of the log locations that you want, choose to continue to the page Define Log Archive Locations.
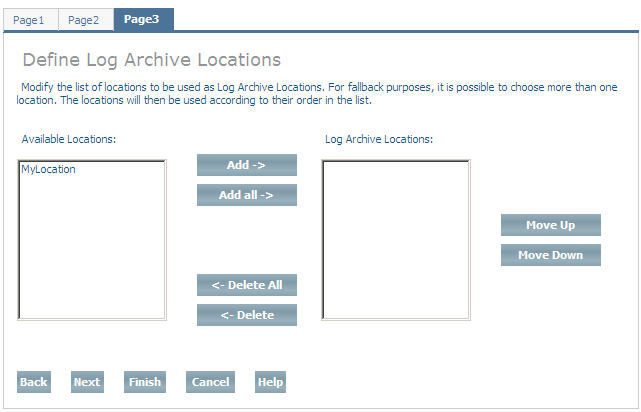
Define one or more log archive locations for the database. The database log spaces are moved to the log archive location when they are closed. Multiple selections are possible. If you define more than one location, they will be used in the same order as in the list. Select an available database location and choose to add it to the list of log archive locations, or choose to add all available database locations to the list of log archive locations. If you add a database location to the list of log archive locations by mistake, you can remove it from the list by selecting it and choosing ; or choose to remove all log archive locations from the list (locations that are deleted from the list are returned to the list of available locations). You can change the order of the locations in the list by selecting a location and using the and buttons.
Please refer to the section Location Management for further information about database locations. If no log archive location is defined, the log spaces will remain in their log location after closing.
When you have defined all of the log archive locations that you want, choose to continue to the page Define Temporary Working Locations.
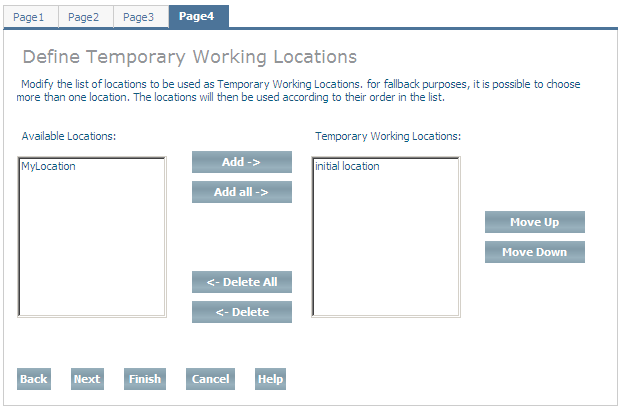
Define one or more temporary working locations for the database. Tamino uses the space in these locations to store temporary work spaces. If you define more than one location, they will be used in the same order as in the list. Select an available database location and choose to add it to the list of temporary working locations, or choose to add all available database locations to the list of temporary working locations. If you add a database location to the list of temporary working locations by mistake, you can remove it from the list by selecting it and choosing ; or choose to remove all temporary working locations from the list (locations that are deleted from the list are returned to the list of available locations). You can change the order of the locations in the list by selecting a location and using the and buttons.
When you have defined all of the temporary working locations that you want, choose to continue to the page Define Reserve Locations. Please refer to the section Location Management for further information about database locations.
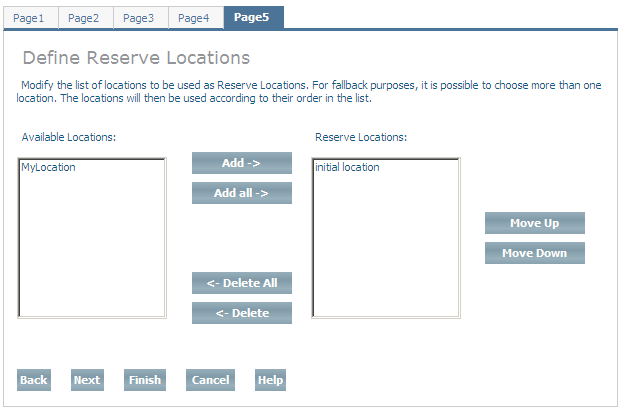
Define one or more reserved locations for the database. Reserved locations are used to store the database spaces if the assigned locations become full. In addition, information that can be used to analyze error situations is also written to the reserved location. If you define more than one location, they will be used in the same order as in the list. Select an available database location and choose to add it to the list of reserve locations, or choose to add all available database locations to the list of reserve locations. If you add a database location to the list of reserve locations by mistake, you can remove it from the list by selecting it and choosing ; or choose to remove all reserve locations from the list (locations that are deleted from the list are returned to the list of available locations). You can change the order of the locations in the list by selecting a location and using the and buttons.
When you have defined all of the reserve locations that you want, choose to continue to the page Define Backup Locations. Please refer to the section Location Management for further information about database locations.
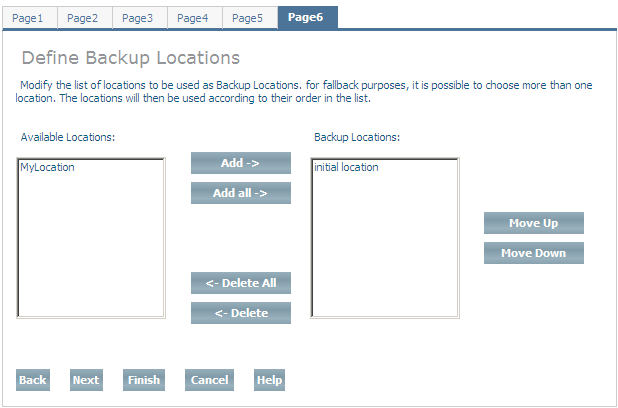
Define one or more backup locations for the database. Backup locations are used to store the backup spaces. If you define more than one location, they will be used in the same order as in the list (this does not apply to parallel backups). Select an available database location and choose to add it to the list of backup locations, or choose to add all available database locations to the list of backup locations. If you add a database location to the list of backup locations by mistake, you can remove it from the list by selecting it and choosing ; or choose to remove all backup locations from the list (locations that are deleted from the list are returned to the list of available locations). You can change the order of the locations in the list by selecting a location and using the and buttons.
When you have defined all of the backup locations that you want, choose to continue to the page Database Profile. Please refer to the section Location Management for further information about database locations.
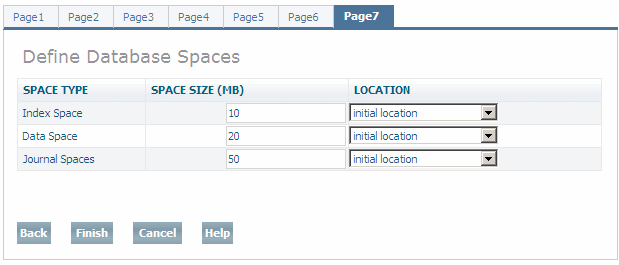
Define the initial space size for the data, index and journal space, and the location where each space is created. The proposed location is the location that has been selected as the default location in the location management. Further index, journal and data spaces can be added after the database has been created.
When you have made all the changes (if any) that you want to make, choose Finish to create the new database.
To set database properties after creating the database please refer to Modify Database Properties.