In order to specify physical storage on a node, the Tamino Manager uses the concept of database locations. Database locations define where the Tamino database spaces are stored. The Tamino Manager maps these database locations (which can also be thought of as logical names) to physical location paths.
Let us suppose that a database administrator has a directory called C:\Tamino Database Locations\Backups\mydbbackup, in which he plans to store backup copies of his database mydb. Using the Locations object, he can assign the database location name of mydbBackup to this directory. Once this has been done, he can administrate the files via the location name without having to remember where they are physically located.
The Tamino Manager also uses a default location: this is the location in which database spaces will automatically be created if you do not specify other locations when creating a new database. The initial setting uses a location as default location which is created during installation.
The Tamino Manager provides you with the following functions to administer and manage database locations:
![]() To display available database locations
To display available database locations
Select the Location Management object. A table with information about the available database locations is listed in the detail-view frame.
Location Name shows the name of the location, and Location Path where it resides in the file system. Location Size shows the size which is used by Tamino database spaces on this location. Other files may reside in this location (external to Tamino or files that are not database spaces). Location Free shows the total amount of space that is free on the physical volume (shared by locations). If, however, there is more than one location on the same disk, more free space might be shown than really exists.
Note:
The following functionality is only available on Windows
systems.
You can protect your database locations with the help of the Windows file system. The recommended procedure is to create a folder in the NTFS file system and switch encryption on, then base new database locations on the encrypted folder.
![]() To switch encryption of a folder on
To switch encryption of a folder on
Create a folder and choose (alternatively right-click on the folder and choose Properties from the context menu) in the Windows Explorer.
A dialog box showing the properties of the folder is displayed:

Choose the button.
The Advanced Properties dialog box is displayed:
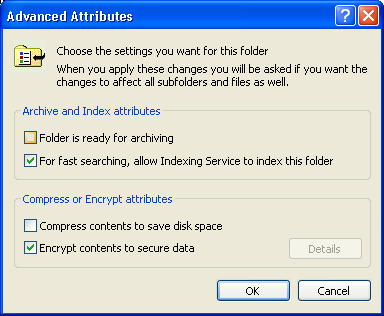
Select the Encrypt contents to secure data option and choose .
Next, create a Tamino location as described in the section Add a new Database Location, based on the folder you have created. When creating new databases, you can place the data, journal or index spaces to be protected in this location. You can also move database spaces from existing databases to this encrypted location, using the Tamino Manager ( see section Move a Database Location).
![]() To add a new database location
To add a new database location
Select Location Management and choose from the context menu. The Add Location page appears.
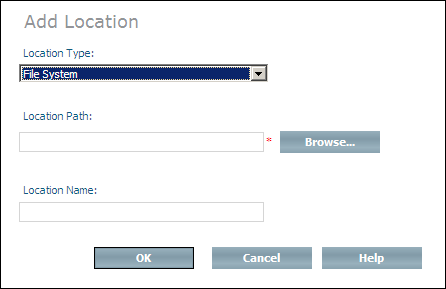
Select the type for the new database location from the Location Type drop-down list box. Available location types are the file system, tapes, or - depending on your system - named pipes and raw devices. Network drives are defined in the System Management Hub. For detailed information about network drives in the System Management Hub, see the description of Network Drives in the section Control Panel Package of the System Management Hub documentation.
Choose to display/select the available devices and directories on which the new location can be created, or enter the full path name of the new location in the Location Path dialog box. If the specified path does not exist, it will be created.
Enter the name of the new database location in the Location Name text box.
Choose to create the new database location.
Note:
Database locations cannot be allocated in folders
which have the Windows compressed attribute
set.
![]() To rename a database location
To rename a database location
Expand the node Location Management.
Select the database location that you want to rename and choose from the context menu. The Rename Database Location page appears.
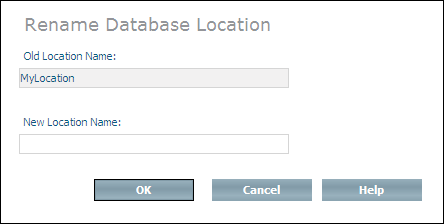
Enter the new name in the text field New Location Name and choose to rename the database location.
![]() To delete a database location
To delete a database location
Expand the node Location Management.
Select the database location that you want to delete and choose from the context menu. The Delete Location page appears.
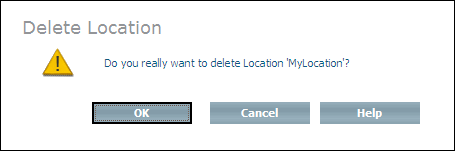
Choose to delete the database location.
Note:
A database location can only be deleted if it is empty. A database
location is empty if no database spaces are displayed in its detail view, and
if it is no longer used in any database-specific location settings (e.g. log
location). Deleting a database location does not delete its directory or any
files in that directory that are not associated with Tamino.
![]() To display information about a database location
To display information about a database location
Expand the node Location Management.
Select the database location for which you want information to be displayed.
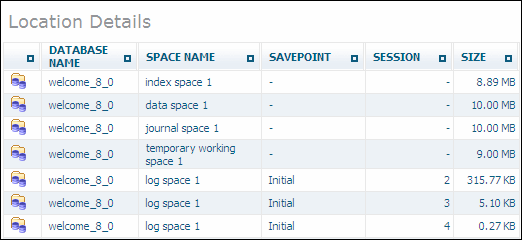
The information displayed includes for each space that resides on this location the database name, the space name, and - if applicable - the timestamp information, the session number, and the size of the space.
Moving a database location moves all of the spaces from the selected location to another defined database location. Data, index and journal spaces can only be moved if the associated database is offline. The location will continue to exist after moving.
![]() To move a database location
To move a database location
Expand the node Location Management.
Select the database location that you want to move and choose from the context menu. The Move Location page appears.

Select the location that you want to move the spaces to from the Target Location drop-down list box.
If you check the Modify Location Settings check box, the location settings of databases that point to the source location are modified to point to the new target location.
You are asked to confirm the move by choosing on the Confirm Move Location page. This saves you having to modify the location settings for each database individually with the Modify command.

Choose to move the location.
By default, Tamino creates database spaces in the default location specified during the installation. You can, however, define an existing location to be the default location in which new databases will automatically be created if you do not specify other locations when you create a new database.
![]() To define a default location
To define a default location
Select the database location that you want to use as the default location and choose from the context menu. The Set Default Location page appears.
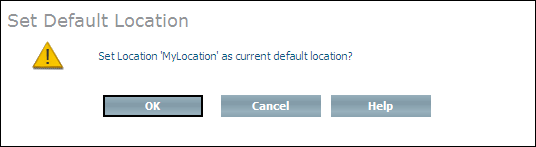
Choose to define the new default location.
You can use the Tamino Manager to define a location in which backup files will be stored. This definition is used as default for the backup location when you create a database.
![]() To define a default backup location
To define a default backup location
Select the database location that you want to use as the default backup location and choose from the context menu. The Set Default Backup Location page appears.
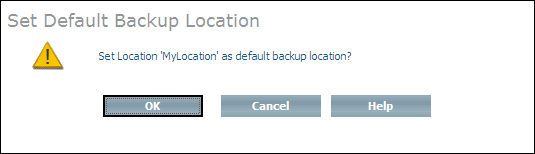
Choose to define the new default backup location.
The Modify command can be used to change the location settings of a database. The database can be either active or inactive.
This command may be useful if you create a database without specifying any given locations, or if you have not defined any database locations before creating the database - in this case, the default locations will be used.
![]() To modify location settings
To modify location settings
Expand the database whose location settings you want to modify.
Expand the object Locations and select the location you want modify. The current setting is shown in the display frame.
Choose from the context menu. The Modify Location Settings page appears.

Select a new database location from the list of available locations and choose to add it to the list of target locations, or choose to add all available database locations to the list of target locations. If you add more than one location, they will be used in the same order as in the list. If you add a database location to the list of target locations by mistake, you can remove it from the list by selecting it and choosing , or choose to remove all target locations from the list (locations that are deleted from the list are returned to the list of available locations). You can change the order of the locations in the list by selecting a location and using the and buttons.
Choose to modify the location settings.