
The menu contains general commands for managing different object types. These commands are described in this document.
See Working with Schemas and Working with Instances for further information.
We can add new collections to a database. A collection may contain groups of schemas and instances.
 To create a new collection
In the navigation tree, select the database to which we want to add the collection.
From the menu, choose .
Or:
Choose the following toolbar button:

Or:
Open the context menu and choose .
The Create New Collection dialog box appears.
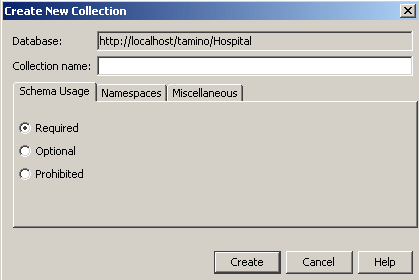
If the tab Schema Usage is not selected, select it now before proceeding.
Specify a name for the new collection.
The name must comply with the Tamino naming conventions (e.g. blanks are not allowed in a name).
Specify one of the following option buttons:
- Required
Default. Schema usage is required. Instances can only be stored in this collection when a schema has been defined.
Note:
Collections which have been created with an older version of Tamino are automatically defined as required.- Prohibited
Schema usage is prohibited. A schema is not required for storing instances.
- Optional
Schema usage is optional. A schema can be defined, but this is not required. Instances can also be stored when a schema has not been defined (for example,
ino:etcis a collection for which schema usage is optional).
Select the Namespaces tab.
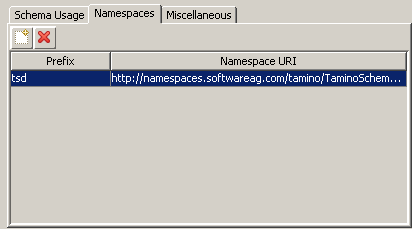
Set the custom namespaces, if required. Note that the tsd namespace definition is predefined and you cannot delete it.
To add a namespace, choose the button.
To remove a namespace, choose the button.
If we choose the Miscellaneous tab, the following options are displayed:
If we want auto version control to be enabled, check the Supports auto version control field.
We can also specify the end-of-line handling character:
Preserve
Transform
Choose the button.
The collection is now created and is visible in the navigation pane.
It is possible to modify the properties of an existing collection.
To modify the properties of an existing collection
Select a collection in the navigation tree and open the context menu. From the context menu, choose . This opens a dialog in which you can specify the collection's properties.
Choose the Schema Usage tab and specify one of the following option buttons:
| Option | Description |
|---|---|
| Required | Instances can only be stored in this collection if a schema has been defined |
| Optional | Schema usage is optional. A schema can be
defined, but this is not required. Instances can also be stored if a schema has
not been defined (for example, ino:etc is a collection for which
schema usage is optional) .
|
| Prohibited | Schema usage is prohibited. A schema is not
required for storing instances.
Note: |
Choose the Namespaces tab and modify the custom namespaces, if required. Note that the tsd namespace definition is displayed by default and that it is not possible to delete it.
To add a namespace, choose the button
( ).
).
To remove a namespace, choose the
button ( ).
).
Choose the tab.
If we want to modify the auto version control property of the collection, choose the Supports auto version control check box.
The End of line handling parameter can have
one of the following values:
Preserve (default)
Transform
If you select the value "Transform" for
the End of line handling parameter, the Tamino X-Plorer
adds this value to the corresponding instance in
ino:collection/tsd:collection:
<tsd:collection
     ino:docname="PretestTelefon01"
     name="PretestTelefon01"
     xmlns:tsd="http://namespaces.softwareag.com/tamino/TaminoSchemaDefinition">
        <tsd:property name="end-of-line-handling" value="transform" />
</tsd:collection>
Choose the button to store the modified the collection properties.
Using external tools, schemas and instances can be opened directly from the Tamino X-Plorer. We can then view or modify the schema or instance using the features of that external tool. The external tools have to be defined in the Customize dialog box. See Customizing the Tools for further information.
When we double-click a schema or instance in the navigation tree, it is opened using the default tool that has been defined in the Customize dialog box. This corresponds to selecting the object and choosing from the menu.
Each external tool that has not been defined as the default tool for a specific type of object is available for selection using the command from a context menu. We can thus use more than one tool for opening the same type of object (for example, two different schema editors where one of them has been defined as the default tool).
Each time a schema or instance is opened with an external tool, a file is written to the open location which has been defined in the Options dialog box. The file name is derived from the current instance descriptor. For example, when the name "Atkins" is shown for an instance in the navigation tree, the resulting file name is "Atkins.xml". When more than one item has been defined for the instance descriptor, all items are used in the file name (for example, "Fred, Bloggs.xml").
To open a schema or instance using the default tool
In the navigation tree, select the schema or instance to be opened.
From the menu, choose .
Or:
Press CTRL+O.
Or:
Choose the following toolbar button:

Or:
Double-click the schema or instance.
The schema or instance is opened using the external tool that has been defined as the default tool.
To open a schema or instance using another defined external tool (not
the default tool)
In the navigation tree, select the schema or instance to be opened.
Invoke the context menu and choose .
The schema or instance is opened using the chosen external tool.
Note:
When the command is not
available, an alternative tool has not been defined for the selected type of
object.
When we modify a schema or instance using an external tool, our modifications are not automatically stored in the database. To do so, we have to update the schema or instance.
We can update an existing schema or instance from a file in your file system (from the open location which has been defined in the Options dialog box), or by coping a schema from another database.
The update procedure checks whether the existing schema or instance will not only remain well-formed but also whether it is still a valid XML document (i.e. whether it matches the schema). If the modifications result in an invalid document, the existing schema or instance is not updated.
Note:
When we update an XML instance, the attribute ino:id is
no longer accepted by the parser. It is recommended that we delete the
attribute ino:id in the instance text.
To update a schema
In the navigation tree, select the schema to be updated.
From the menu, choose .
Or:
Choose the following toolbar button:

The Update Schema dialog box appears.
Select one of the following pages:
From File
This page is used to specify the name of a file containing a
schema.
Either specify the path and file name in the text box or choose the button to select the file from a dialog box.
From Database
This page is used to copy an existing schema from another
database.
When we have previously connected to a server and database, we can select their names from the corresponding drop-down list boxes. If we want to connect to a new server and database, enter the required names in the drop-down list boxes.
When the specified database is currently not connected, a dialog box appears asking whether we want to connect. Choose the button to invoke the Connect dialog box. See Connecting to a Tamino Database.
When a database has been specified and is connected, the names of all of its collections are available in the Collection drop-down list box. Select the collection containing the desired schema.
When a collection has been selected, the names of all of its schemas are available in the Schema drop-down list box. Select the schema to be copied.
Choose the button.
The existing schema is now replaced with the schema that we have just specified.
Caution:
Do not specify information on different pages. When we choose
the button, only the information on the currently
shown page is used.
To update an instance
In the navigation tree, select the instance to be updated.
From the menu, choose .
Or:
Choose the following toolbar button:
The Update Instance dialog box appears. The title bar shows the doctype and the name of the selected instance as displayed in the navigation tree.
This dialog box is used to specify the name of a file containing an instance.
Either specify the path and the file name in the text box or choose the button to select the file from a dialog box.
Choose the button.
The existing instance is now replaced with the instance that we have just specified.
You can delete a collection or instance permanently from the database.
| Warning: When you delete a collection, all instances of all doctypes in this collection will also be deleted. |
Note:
If you want to undefine a schema
or delete a collection, you need exclusive access to the collection. Otherwise,
these commands result in an error. The error message indicates that the
documents could not be locked. No user is allowed to access this collection
while an "undefine schema" or "delete
collection" is about to be executed. This error will also occur
if you are the user who is accessing a group of instances of that collection,
for example, in an XQuery result. If this error occurs, the problem will
persist until the database is disconnected and connected once again.
Workaround: Disconnect the database, connect it once again and then execute the
command without previously accessing instances of this collection.
To delete a collection or instance
In the navigation tree, select the collection or instance to be deleted.
From the menu, choose .
Or:
Choose from the
toolbar.
Or:
From the context menu of the collection or instance, choose
.
You are now asked whether you really want to delete the collection or instance.
Choose the button to confirm the deletion.
You can save a schema or instance that is stored in a database in your local file system.
A schema is saved with the extension "tsd". An XML instance is saved with the extension "xml". A non-XML instance is saved with its original file name and extension.
To save a schema or instance in your file system
In the navigation tree, select the schema or instance to be saved.
From the menu, choose .
The Save As dialog box appears.
Specify a file name and select the path in which you want to save the file.
Choose the button.