In the Customize dialog box, which is available under , you can define external tools for editing the following types of objects that are displayed in the navigation tree:
You can define an external tool as the default tool for a specific type of object. The default tool is invoked when you double-click the corresponding type of object in the navigation tree, or by choosing from the menu.
The defined external tools are also available as menu commands in the menu (provided that the corresponding check box has been selected in the Customize dialog box, see below).
When you invoke an external tool from the menu, any schema or instance which is currently selected in the navigation tree is ignored. It is therefore recommended that you proceed as described in section Opening a Schema or Instance.
Important:
Predefined external tools for which a path has not been
specified are not shown as commands in the menu and
cannot be invoked using the or
command.
See Predefined External Tools for further information.
 To customize the tools
From the menu, choose .
The Customize dialog box appears.
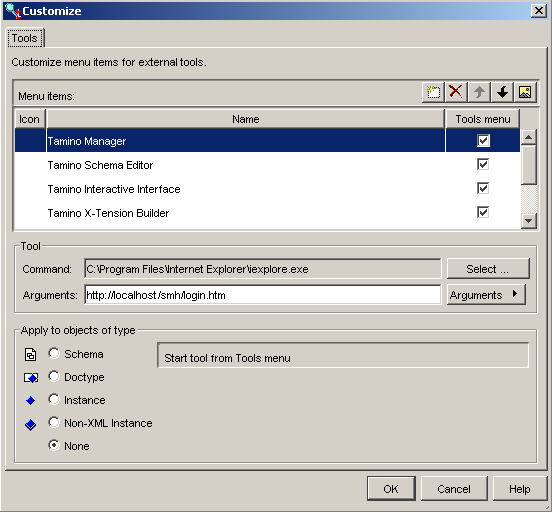
When external tools have already been defined, they are shown in the upper half of the dialog box. When the corresponding check box in the Tools menu column has been selected and a valid path has been entered in the Command text box, the external tool is provided as a menu command in the menu.
The information shown in the lower half of the dialog box always applies to the external tool that is currently selected in the upper half.
If the same external tool is to apply to objects of different types, you have to add an entry for each of these types.
The following buttons are provided:
|
|
Add a new external tool. |
|
|
Delete the selected external tool. |
|
|
Move the selected external tool one position up in the menu. |
|
|
Move the selected external tool one position down in the menu. |
|
|
Define an icon for the selected external tool. When the corresponding check box in the Tools menu column is selected, the icon will be shown in the menu. For your convenience, several image files are available in the folder "X_Plorer\icons" which is created during installation. |
To add a new external tool, choose the following button:

A new line is now shown.
Enter a name for the new external tool in the new line and press ENTER.
The description below applies to both new external tools that you have just added and existing external tools that you want to modify.
Select the external tool in the upper half of the dialog box.
When the external tool is to be provided as a menu command in the menu, make sure that the corresponding check box in the Tools menu column is selected.
In the Command text box, specify the path to the external tool.
Use the appropriate notation for the platform on which you are running the Tamino X-Plorer. Under Solaris, slashes are used (instead of backslashes as used under Windows).
Or:
Choose the button to select the
executable file for the external tool from a dialog box.
Once the path to the external tool has been selected, the corresponding icon is automatically displayed in the icons column of the Customize dialog box.
Tip:
Under Windows, you can copy the information from the
Properties dialog box. From the Start menu,
select . Do not execute the
program. Instead, invoke the context menu and choose
. You can now copy the string in the
Target text box and paste it in the
Command text box. Make sure not to copy any quotes at the
start and end of the string.
If you leave this text box empty, the external tool is not shown as a command in the menu and cannot be invoked using the or command.
In the Arguments text box, define the arguments with which the external tool is to be invoked.
This can be a mixture of the following:
- Context-specific arguments
The following arguments can be used to send information about the object that is currently selected in the navigation tree to the external tool:
Argument Description $FILE_PATH$Creates a (temporary) file for the selected object in your open location. This argument is usually required for tools used to edit instances and schemas. $URL$Creates an URL pointing to the selected object. Notes:
- If the selected object is a schema,
$URL$is equal to$SERVER_URL$/$DATABASE$/$COLLECTION$/$SCHEMA$.- If the selected object is an instance and if
ino:docnameexists,$URL$is equal to$SERVER_URL$/$DATABASE$/$COLLECTION$/$DOCTYPE$/$INSTANCE$.- If the selected object is an instance and if
ino:docnamedoes not exist,$URL$is equal to$SERVER_URL$/$DATABASE$/$COLLECTION$/$DOCTYPE$/@ino:id.$SERVER_URL$Creates an URL pointing to the server containing the selected object. $DATABASE$Creates a string with the name of the database containing the selected object. $COLLECTION$Creates a string with the name of the collection containing the selected object. $SCHEMA$Creates a string with the name of the selected schema. $DOCTYPE$Creates a string with the name of the selected doctype. $INSTANCE$Creates a string with the name of the selected instance ( ino:docname).$USER$Your user ID for the database containing the selected object. $PASSWORD$Your password for the database containing the selected object. Instead of entering the above arguments in the text box, you can also select them from a list. To do so, choose the button.
- Tool-specific arguments
You have to specify all arguments that are expected by the external tool. See your external tool documentation for information on the supported arguments.
In the Apply to objects of type group box, select one of the following option buttons (the adjacent information changes depending on the option button that has been selected):
- Schema
The tool applies to schemas.
If you want to use this tool as your default tool for schemas, make sure that the Open (double-click) schema with tool check box is selected. When the check box is not selected, this tool is available from a context menu via the command.
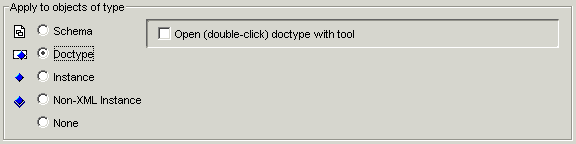
- Doctype
The tool applies to doctypes.
If you want to use this tool as your default tool for doctypes, make sure that the Open (double-click) doctype with tool check box is selected. When the check box is not selected, this tool is available from a context menu via the command.
- Instance
The tool applies to XML instances.
If you want to use this tool as your default tool for XML instances, make sure that the Open (double-click) instance with tool check box is selected. When the check box is not selected, this tool is available from a context menu via the command.
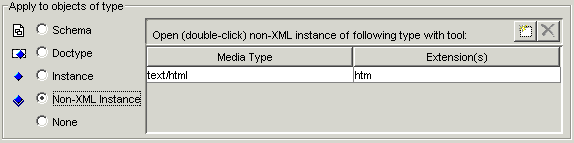
- Non-XML Instance
The tool applies to non-XML instances.
When you open a non-XML instance, the application which is associated with the media type and extension that has been defined in this table is used.
You have to specify the required media type and the corresponding extension(s). It is also possible to define an extension without a media type. See Media Types for Non-XML Instances.
Tip:
Under Windows, you can copy the media type from the Folder Options dialog box. Invoke the Windows Explorer (not the Internet Explorer) and from the menu, choose . In the resulting Folder Options dialog box, choose the File Types tab. Select a registered file type and copy media type and extension to the Customize dialog box.When you define several tools for one type of object (for example, GIF), the first tool that has been defined in the upper half of the Customize dialog box is used as the default tool (i.e. when you use the command or double-click the non-XML instance). All other defined tools are available from a context menu via the command which offers the tools in the following sequence: tools for which media type and extension have been defined are shown first, tools with a media type only are shown next, and tools with an extension only are shown last.
The following buttons are provided:
Add a new media type and its extension(s).
Delete the selected media type and its extension(s). - None
The tool does not apply to a specific type of object. It can only be invoked from the menu (provided that the Tools menu check box has been selected). You can define, for example, an editor such as the Windows Notepad.
Choose the button.
In the menu, commands are now available for each tool for which you have defined a path and for which the Tools menu check box has been selected.