
This document covers the following topics:
When you create a new schema, your new schema is by default created according to the Tamino schema language of the current Tamino version.
When you start the Tamino Schema Editor, the name "NEW_schema_1" is shown in the schema tree and you can immediately create a new schema.
Note:
See First Steps with the Tamino
Schema Editor for a brief tutorial which explains the
creation of a simple Tamino schema from scratch.
 To create a new schema
From the menu, choose .
Or:
Press CTRL+N.
Or:
Choose the following toolbar button:

If the currently displayed schema has been changed, a dialog box appears asking whether you want to save the changes. You can choose either the or button.
An empty schema with the name "NEW_schema_1" is shown in the schema tree.
Specify a name for the schema.
You can do this either in the schema tree or in the pane displaying the logical properties. This is the name under which the schema will later be defined in Tamino.
In the pane displaying the logical properties, specify the collection name.
This is the collection in which the schema will later be defined in Tamino.
From the menu, choose .
A node with the name "NEW_doctype" is shown in the schema tree.
Specify a name for the doctype.
You can do this either in the schema tree or in the pane displaying the logical properties.
Important:
Schema name, collection name and doctype name are mandatory.
See Missing
Information for further information.
In the pane displaying the physical properties for the doctype, select the required storage type and define all required properties. See Properties Explained for descriptions of all logical and physical properties.
Use the commands from the menu to add further schema constructs (for example, complex elements and element references). See Inserting an Element in the Schema Tree for further information.
Define the new schema in Tamino and/or save it in your file system. See Defining and Saving Schemas for further information.
Certain information items must be specified in a schema before it can be defined to Tamino or validated against a database. These items are:
schema name
collection name
doctype name
If any of these information items are missing, the Schema Editor prompts you to supply the missing information.
See also: Defining and Updating a Schema in Tamino and Validating a Schema.
Any interaction with the Tamino Server requires that you are connected to it. If you are not, you have to establish the connection.
Important:
The web server as well as the target Tamino database must be up
and running.
The connection can be established from the following dialog boxes:
All servers and databases that you have previously accessed are automatically remembered. They are shown in the above dialog boxes. When you do not need access to a specific server or database any longer, you can remove its entry from the dialog box. The following buttons are provided in the above dialog boxes:
|
|
Go up one level. |
|
|
Connect to a Tamino database. See below. |
|
|
Remove the selected server or database from the dialog box. The selection is removed immediately. You are not asked to confirm the deletion. |
|
|
Explore the selected database. See below. |
To connect to a Tamino database
Access one of the dialog boxes listed above and choose the following button:

Note:
The Connect dialog box appears
automatically when you initiate an action which requires database access. Thus,
it is not always necessary to use this button.
The Connect dialog box appears.
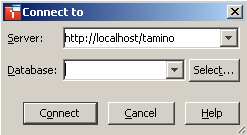
If this is the first time you are connecting to a server, the drop-down list boxes are empty and you have to type in the required information. The next time you access this dialog box, this information is available and can be selected from the drop-down list boxes.
Enter the path to the required server in the following format:
http://host/tamino
where host is the name of the computer on which the Tamino Server resides. You can specify "localhost" for your local computer, or a path such as "yourpc.ourcompany.com" for a remote computer.
Or:
Select the required server from the corresponding drop-down list
box.
Enter the name of the database to which you want to connect.
Or:
Select the required database from the corresponding drop-down list
box.
Or:
Choose the button to display all
databases on the specified server in an additional dialog box. You can then
choose the desired database. This feature works only with databases that have
been created starting with version 4.2.1. In all other cases, a message appears
saying that a list of databases is not available.
Choose the button.
When a password is required for the database, a database login dialog box appears.
Specify the user ID and password with which you are defined to Tamino security and/or the authentication file of your web server (if authentication is active), and then choose the button.
If you have to specify a domain name with your user ID, specify it in the following way:
domain-name/user-ID
If the authentication of your web server is not active (which is the default setting) and you have no explicit user ID/password entry in the Tamino security file, you can enter any combination here. You are then assigned default access rights in Tamino.
The last user ID you entered in this text box is automatically remembered.
To explore the selected database
Select a database in one of the dialog boxes from which a connection can be established (see the list at the beginning of this topic).
Choose the button, which is located next to the Look in drop-down list box:

Note:
The Connect dialog box appears
automatically when the connection to this database has not yet been
established. In this case, you have to proceed as described above.
The Explore dialog box appears, showing the structure of the database. Here is an example for the Hospital database:
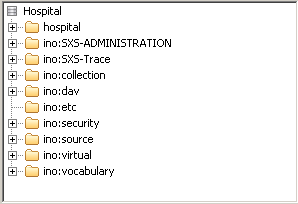
You can now explore the contents of the database.
Choose the button to close this dialog box.
Only valid schemas can be defined in Tamino. Even if the XML schema code is valid, the schema can only be defined in Tamino if the Tamino-specific properties are valid.
It is recommended that you validate the schema before defining the schema to Tamino.
To validate a schema
From the menu, choose .
Or:
Choose the following toolbar button:

All errors are reported in the output panel.
To validate the XML schema code for the current schema
From the menu, choose .
Or:
Choose the following toolbar button:

All errors are reported in the output panel.
There are different ways for storing and updating a schema, depending on the location in which it is (to be) stored. Different commands are used for this purpose (see below).
The command is used for two purposes:
To define one or more newly created schemas to Tamino.
To update one or more existing Tamino schemas which you have modified.
Important:
An existing Tamino schema is only overwritten with the new
schema, if its doctype declaration has the physical property
Update access set to
"true".
If you attempt to update a schema in such a way that existing instances would become invalid, Tamino rejects the update operation.
To define or update one or more schemas in Tamino
From the menu, choose .
Or:
Choose the following toolbar button:

The Define Group of Schemas dialog opens. This dialog allows you to select which of the currently open schemas you wish to define or update.
Mark the checkbox of each schema that you wish to define or update.
If you are updating a schema that is already defined in Tamino, you can check that the previously stored document instances that conform to this schema are valid against the updated schema. Do this by checking the box .
Choose the button.
The Define Schema dialog box appears.
If this is the first time you are connecting to a server, the list box is empty. In this case, you have to proceed as described under Connecting to Tamino. This section also provides information on the buttons that are located next to the Look in drop-down list box.
Choose the required server.
The databases on this server are now shown.
Select the database in which you want to define or update the schema or schemas.
Choose the button.
If the database is not yet connected, the Connect dialog box appears and you must proceed as described under Connecting to Tamino.
If you are updating a schema or schemas, a dialog box appears, asking whether you want to update the existing schema or schemas. To update, choose the button.
Successful definition or update of the schema or schemas is reported with a message in the output panel.
If a schema is invalid, any errors in the schema are listed in the output panel. In this case, the schema is not defined/updated in Tamino.
While the schema is defined to Tamino, it is possible to cancel the define process and stop processing of the schema. Choose the button to stop schema definition. A message is displayed, confirming the action.
You can save a schema from the Tamino Schema Editor to your file system.
To save the current schema in the file system (under a new name)
From the menu, choose .
The Save As dialog box appears.
Browse to the drive and folder in which the schema is to be saved and specify a file name.
Select the file type with which the schema is to be saved.
For a Tamino schema, the file type is "tsd".
Select the encoding with which the schema is to be saved.
The encoding is written to the XML declaration of the schema file. The default encoding is UTF-8.
Note:
The Encoding drop-down list box is
editable.
Choose the button.
The schema is written to the file system.
To save the modifications to the current schema
This command is only available if the schema has previously been saved in the file system.
From the menu, choose .
Or:
Press CTRL+S.
Or:
Choose the following toolbar button:

The modifications are written to the existing file in the file system.
There are different ways for loading a schema into the Tamino Schema Editor, depending on the location in which it is stored. Different commands are used for this purpose (see below).
The following topics are covered below:
You can load an existing Tamino schema into the Tamino Schema Editor.
To get an existing schema from Tamino
From the menu, choose .
Or:
Choose the following toolbar button:

The Get Schema dialog box appears.
If this is the first time you are connecting to a server, the list box is empty. In this case, you have to proceed as described under Connecting to Tamino. This section also provides information on the buttons that are located next to the Look in drop-down list box.
Choose the required server.
The databases on this server are now shown.
Choose the database from which you want to get the schema.
If the database is not yet connected, the Connect dialog box appears and you must proceed as described under Connecting to Tamino.
When the connection to the database has been established, all collections of this database are shown in the Get Schema dialog box. If the list of collections is not visible, expand the database structure by, for example, double-clicking on the name of the database.
Choose the collection containing the required schema.
The schemas in this collection are now shown.
Select the required schema.
Choose the button.
Successful loading of the schema is reported with a message in the output panel.
You can open and modify a schema file that is stored in your file system. When you open a schema, it is always shown in a view which is able to display the whole schema. See also: Switching to Another View. In the dialog for opening a schema, you can choose to open several schemas at the same time.
The most recently opened files are always listed at the bottom of the menu. Instead of using the command, you can open one of these recent files directly by choosing the corresponding item from the list.
To open one or more existing schemas from the file system
From the menu, choose .
Or:
Press CTRL+O.
Or:
Choose the following toolbar button:

When the modifications to the current schema have not yet been modified, a dialog box appears, asking whether you want to save the currently displayed schema. To save the schema, choose the button.
The Open dialog box appears.
Browse to the drive and folder containing the required schema or schemas.
Select the schema you wish to open. You can also select multiple schemas.
Choose the button.
To open one of the most recently opened files
From the bottom of the menu, choose the item which reflects the path to the desired file.
When the modifications to the current schema have not yet been modified, a dialog box appears, asking whether you want to save the currently displayed schema. To save the schema, choose the button.
When you undefine a schema, it is deleted from the Tamino database in which is has been defined. All instances related to the schema are also removed. A new schema with the same name can then be defined in Tamino.
The command does not automatically undefine the schema that is currently shown in the schema editor. You first have to select the schema to be undefined from a dialog box. This may be the schema that is currently displayed. But it can also be any other schema.
To undefine a schema in Tamino
From the menu, choose . The submenu items of allow you to choose between undefining a single schema and undefining multiple schemas.
The remainder of this description covers the case of undefining a single schema; the dialog for undefining multiple schemas follows the same principle.
If this is the first time you are connecting to a server, the list box for the Undefine Schema dialog is empty. In this case, you have to proceed as described under Connecting to Tamino. This section also provides information on the buttons that are located next to the Look in drop-down list box.
Choose the required server.
The databases on this server are now shown.
Choose the required database.
If the database is not yet connected, the Connect dialog box appears and you must proceed as described under Connecting to Tamino.
When the connection to the database has been established, all collections of this database are shown in the Undefine Schema dialog box.
Choose the required collection.
All schemas in this collection are now shown.
Select the schema that is to be undefined.
Choose the button.
You are now asked whether you really want to undefine the schema and thus remove all related instances.
Choose the button to undefine the schema.
Successful undefine of the schema is reported with a message in the output panel.


