
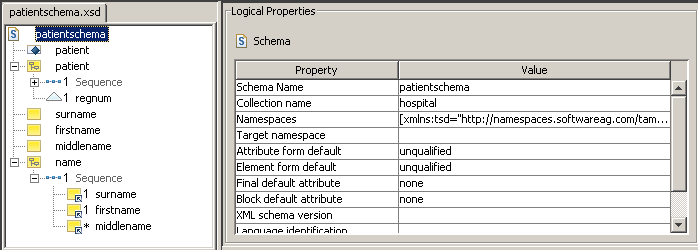
When you start the Tamino Schema Editor, its application window appears. When a schema has been loaded into the application window, it may look as follows:
The application window contains several panes. To modify the size of a pane, move the mouse pointer over the border separating the panes until the pointer changes, showing two arrows pointing in opposite directions. Then drag the border using the mouse until the panes have the desired size.
For details on keyboard access not mentioned in this documentation, consult the documentation of the individual operating system or software product.
The following topics are covered below:
The following menus are available:
For reference information on each menu command, see Menu Commands.
You can execute the most important functions using a toolbar button. The following toolbars are available:
The following toolbar buttons are available from the standard toolbar:
 To switch the standard toolbar display on and off
From the menu, choose .
When the standard toolbar is displayed in the application window, a check mark is shown next to this menu command.
This toolbar provides buttons for the commands of the menu. The available buttons vary, depending on the current selection in the schema tree.
The items in the insert menu allow you to add new nodes to the schema, for example doctypes, elements, attributes, simple and complex types, sequences and choices.
To add a new node to the schema
In the graphical view, select the node under which you wish to insert the new node.
From the menu, choose the required new node.
To switch the insert toolbar display on and off
From the menu, choose .
When the insert toolbar is displayed in the application window, a check mark is shown next to this menu command.
The Tamino Schema Editor provides different views. See Switching to Another View for further information.
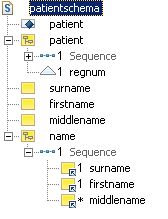
When one of the tree views is active, the left side of the application window shows a tree of the current Tamino schema, for example:
Note:
When you start the Tamino Schema Editor, the tree shows
a new, empty schema named "New_Schema_1". You can
now either create a new schema or load an existing schema into the editor. See
Creating a Schema from
Scratch or Getting and Opening
Schemas.
You can expand or collapse the tree structure by clicking the plus or minus sign in front of an item. When using the keyboard, select the node and press RIGHT-ARROW or LEFT-ARROW.
When you select an item, the logical and/or physical properties of this item are displayed on the right side of the application window, but the item is not expanded.
The following icons may appear in the tree (see Schema Tree Items Explained for further information):
Characters may appear to the right of an icon in the schema tree. See Specifying the Occurrence Constraints and Declaring an Element as Optional, Required or Prohibited for detailed information.
To expand all nodes in the tree
From the menu, choose .
When you modify a schema, the tab containing the name of the schema is shown with an asterisk "*". This is a reminder that your changes have not yet been saved. When you save the schema, for example using , the asterisk is removed.
In the schema tree, tooltips indicating the type of schema construct can be shown. By default, this feature is disabled. To enable this feature, you have to add the following line to the file parameter.properties which is located in the root directory of your Tamino Schema Editor installation:
com.softwareag.xtools.schematools.schemaeditor.components.SchemaTree.SchemaTree.showTreeNodeToolTip=true
Structure info text is the gray information in the schema tree (for example, "Sequence", "Choice" or "Annotation"). For better readability, you can disable the display of this information.
To display/hide the structure info text in the schema tree
From the menu, choose .
When the structure info text is displayed in the schema tree, a check mark is shown next to this menu command.
Context menus are available for the elements in the schema tree. For example, the following context menu is available when you select a simple element:
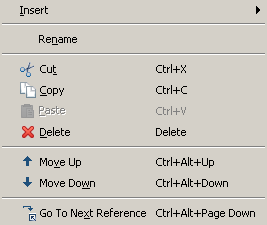
To invoke a context menu for an element or attribute
Select the element or attribute for which you want to invoke a context menu.
Click the right mouse button.
Or:
Press SHIFT+F10.
The context menu appears and you can now choose the required command.
A context menu with features that apply globally to a schema (such as several of the entries in the menu) is also available from the schema tab.
To invoke the context menu for a schema
Move the cursor to the tab where the name of the schema is displayed.
Click the right mouse button.
The context menu appears and you can now choose the required command.
When one of the tree views is active, the logical properties of the element that is currently selected in the schema tree are shown at the top right of the application window. Example:
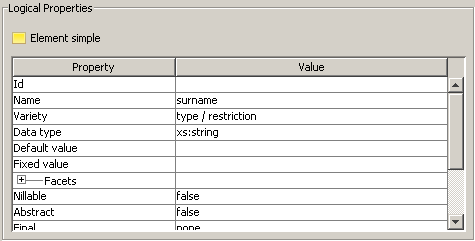
The Property column displays the property name. The Value column displays the current property value, which you can modify.
You can expand or collapse the tree structure by clicking the plus or minus sign in front of an item. When using the keyboard, select the node, press F2 to activate edit mode and then and press CTRL+RIGHT-ARROW or CTRL+LEFT-ARROW.
See Properties Explained for detailed information.
When one of the tree views is active, the physical properties of the element that is currently selected in the schema tree are shown at the bottom right of the application window. The physical properties are shown according to the selected storage type. Example:
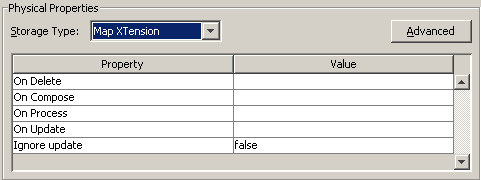
The Property column displays the property name. The Value column displays the current property value, which you can modify. See Properties Explained for detailed information.
For some element types, an button is provided. When you choose this button, additional information is shown. You can then define the physical properties of a node that can be accessed via multiple paths. See Advanced Physical Properties.
Note:
If physical properties cannot be defined for an element
(such as Sequence or Choice), the Physical Properties
frame is not displayed.
When you open a schema, it is always shown in a view which is able to display the whole schema.
A schema which does not match XSD is opened in code view. You can modify the code manually in code view. However, it is only possible to switch back to one of the tree views if this tree view is able to display the whole schema.
Caution:
The undo/redo history is cleared when you switch to another
view.
To switch to tree view
This description assumes that you want to switch to tree view or that code view is currently active.
From the menu, choose .
If the current schema contains information which is not supported in another view, switching is not possible. The output panel will then inform you why the switch is not possible.
In the menu, a check mark is always shown next to the menu command which corresponds to the current view. The toolbar button for the current view is always shown in down status.
To switch to code view
This description assumes that one of the tree views is currently active.
From the menu, choose .
Or:
Select the toolbar button for code view.

In the menu, a check mark is always shown next to the menu command which corresponds to the current view. The toolbar button for the current view is always shown in down status.
When you switch to code view, a code editor is shown instead of the schema tree, logical properties and physical properties which are shown in tree view.
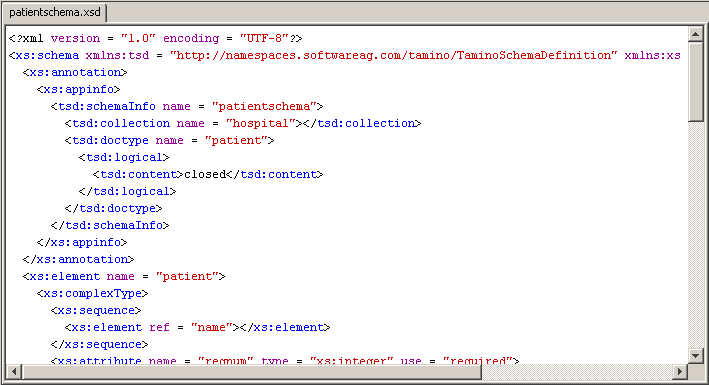
Using the commands from the menu, you can, for example, cut and paste or find and replace information.
Note:
Not all commands are available in code view. Database
access is not possible. Thus, commands such as or are not
available. The menu is only available when one of the
tree views is active.
The output panel at the bottom of the application window displays status messages about the last action that has been performed. For example, it tells you that a replace operation has been completed, or it provides information about errors that appear when you try to switch from code view to one of the tree views.

If a hyperlink is provided for an error, you can choose it. You are then positioned at the entry that caused the error. If you are working in code view, the corresponding line and column numbers are provided at the beginning of the hyperlink text.
To switch the output panel display on and off
From the menu, choose .
When the output panel is displayed in the application window, a check mark is shown next to this menu command.
The status bar is the horizontal information line at the bottom of the main application window.
In code view, the following information is shown: the numbers of the current line and column, and the total amount of lines in the current schema.

To switch the status bar display on and off
From the menu, choose .
When the status bar is displayed in the application window, a check mark is shown next to this menu command.
Most Tamino Schema Editor dialog boxes can be resized. This is indicated by the following symbol in the lower right corner of a dialog box:

To resize a dialog box
Move the cursor to the bottom-right corner of the dialog box. The cursor shape changes to a two-headed arrow.
Using the left mouse button, drag the box to the required size.
Resizing a dialog box is helpful if a string is so long that it is not fully shown.
You can navigate in the Tamino Schema Editor using the standard mouse and/or keyboard techniques for navigating through the menus and selecting items. You can edit names of elements and attributes both in tree view, as well as in the corresponding property pane.
Keyboard users should additionally note the use of the following keys:
| Key | Function |
|---|---|
| F2 | Activate the selected input field for editing (edit mode). |
| ALT+DOWN-ARROW and ALT+UP-ARROW | Open and close a drop-down list box in a dialog
box.
In edit mode: open and close a drop-down list box in the Value column of the logical or physical properties. |
| CTRL+RIGHT-ARROW and CTRL+LEFT-ARROW | In edit mode: open and close a group tree in the Property column of the logical properties. |
| TAB | Select the next control, or select the next item in a table. |
| CTRL+TAB | If a control uses TAB for its own purposes (for example, a table), you have to use CTRL+TAB to leave the context of current control. |
| CTRL+ENTER | If a control uses ENTER for its own purposes (for example, the property editor in which you enter documentation text), you have to use CTRL+ENTER to choose the default button. |


