
This tutorial provides a very simple and brief introduction to the Tamino Schema Editor. It is intended to get you, the schema developer, started with the basic steps that are required to create a simple schema from scratch.
The steps are presented in the following order:
Estimated duration for this tutorial: 1 hour.
First-time users are recommended to work through this tutorial to obtain an overview of how to work with the Tamino Schema Editor. This tutorial is not intended to be a comprehensive description of the full range of possibilities provided by the Tamino Schema Editor. Therefore, explanations are kept to a minimum. For a full description of each feature, refer to the remainder of this documentation.
This tutorial illustrates the creation of a schema which contains elements that are to appear in various content models. You will declare global elements and insert references to them in the content models in which they are to be included.
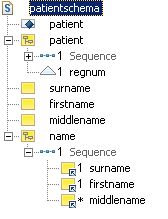
When you have completed all steps of this tutorial, your schema tree will look as follows:
Instances of the schemas that you will create in the course of this tutorial are to be stored in Tamino's native XML data store.
Important background information can be found in the XML Schema Part 0: Primer on the W3C site http://www.w3.org/TR/xmlschema-0/.
The Tamino Schema Editor can be invoked from all supported Windows and UNIX platforms.
 To start the Tamino Schema Editor on Windows
From the Windows menu choose in the Tamino program group.
To start the Tamino Schema Editor on UNIX platforms
Start the following script from the command line:
inoschema.sh
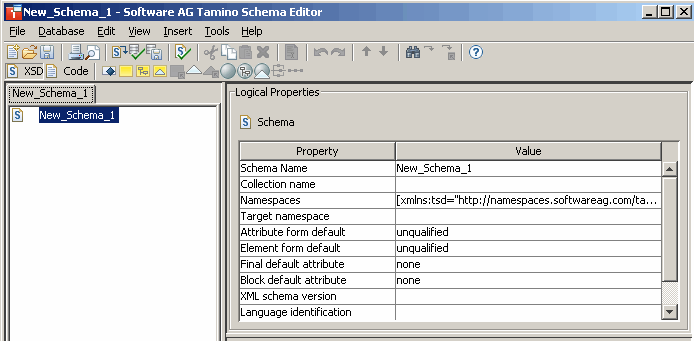
When you have started the Tamino Schema Editor, its application window appears. An empty schema with the name "New_Schema_1" is shown in the schema tree. Its logical properties are shown on the right side of the application window. You can immediately start with the creation of a new schema.
You will now specify the name under which the schema is to be defined in Tamino, and the name of the collection in which the schema is to be defined in Tamino.
To specify schema name and collection
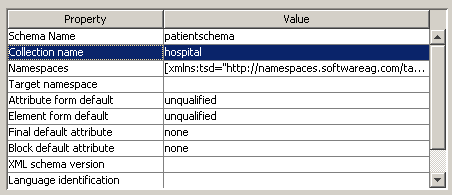
Specify the name "patientschema" for the schema.
You can do this either directly in the schema tree, or in the Value column of the logical properties.
Tip:
Keyboard users can switch between schema tree and
logical properties as follows: Use CTRL+TAB to switch to the schema
tree group tab, then select the schema, then use TAB to get the
schema node selected. The input field in the schema tree or in the
Value column can be activated using F2.
In the logical properties, specify "hospital" as the collection name.
For a description of all available properties, see Properties Explained later in this documentation.
You will now check the code that has so far been generated for the schema.
To invoke the code editor
From the menu, choose .
Or:
Choose the following toolbar button:

The code editor is now shown in the application window. The following XML Schema code has been generated:
<?xml version = "1.0" encoding = "UTF-8"?>
<xs:schema xmlns:tsd = "http://namespaces.softwareag.com/tamino/TaminoSchemaDefinition"
           xmlns:xs = "http://www.w3.org/2001/XMLSchema">
  <xs:annotation>
    <xs:appinfo>
      <tsd:schemaInfo name = "patientschema">
        <tsd:collection name = "hospital"></tsd:collection>
      </tsd:schemaInfo>
    </xs:appinfo>
  </xs:annotation>
</xs:schema>
Note that the XML Schema constructs refer to the namespace prefix "xs", and the Tamino-specific constructs refer to the Tamino schema namespace "tsd".
Before continuing with the next exercise, you will return to tree view.
Caution:
If you modify the schema in code view and define elements that
are not supported in tree view, it is not possible to switch back to tree view.
The output panel at the bottom of the application window will then inform you
why the switch is not possible.
From the menu, choose .
Or:
Choose the corresponding toolbar button:

The schema tree is shown again.
You will now insert the complex element "patient" in your schema. This is the root element for all instances of this schema. When the root element has been inserted, you will also insert the doctype. The names of the root element and doctype must be identical.
Note:
It is possible to create several root elements and doctypes.
To insert the root element
In the schema tree, select the schema node with the name "patientschema".
From the menu, choose .
Or:
Choose the following toolbar button:

A declaration for a complex element with the name "NEW_element_complex" is added to the schema tree. The logical and physical properties for the complex element are shown on the right of the application window.
Specify "patient" as the
value of the Name logical property for the complex
element.
Leave the logical property Mixed content
with its default value (false). This means that the element must not contain
arbitrary characters and elements (no mixed content).
In the physical properties, leave the storage type and the index with the default values (native storage type and no index).
When the storage type is "Native", instances will be stored in Tamino's native XML store.
When an index has not been defined, instances of this node will not be indexed.
With the physical properties Collection
reference, dereference,
Node reference and Node reference
operator, which are visible when you choose the
Reference tab of the physical properties, a join with
another document instance can be defined. These properties are set to their
defaults, that means, no join is defined.
The Tamino Schema Editor generates the following schema code for the "patient" node:
  <xs:element name = "patient">
    <xs:complexType></xs:complexType>
  </xs:element>
This is the root node for all element declarations that you will add later.
In the schema tree, select the schema node with the name "patientschema".
From the menu, choose .
Or:
Choose the following toolbar button:

A doctype node with the name "NEW_doctype" is added to the schema tree.
In the logical properties, select the "NEW_doctype" entry in the "Value" column.
A drop-down arrow is shown. The drop-down list box provides for selection all elements that have been inserted directly below the schema name.
Tip:
Keyboard users can open the drop-down list box using
ALT+DOWN-ARROW.
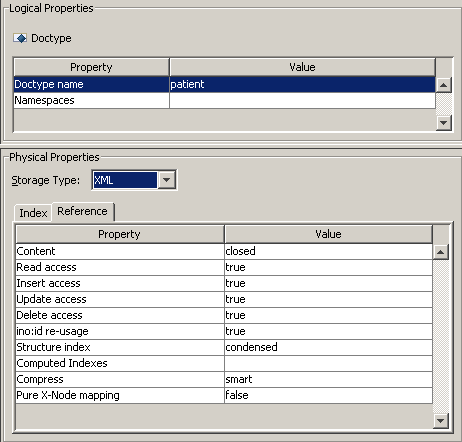
From the drop-down list box, select patient as the name for the doctype.
In the physical properties, leave the
Content property and the different access
properties with their default values. This means that all instances of doctype
"patient" in the Tamino XML store can be read,
inserted, updated and deleted.
You will now insert simple elements that you will later reuse by referencing them.
To insert simple elements
In the schema tree, select the schema node with the name "patientschema".
From the menu, choose .
Or:
Choose the following toolbar button:

A declaration for a simple element with the name "NEW_element_simple" is added to the schema tree.
Specify the name "surname" for the simple element.
Leave the logical and physical properties with their default values.
Insert two more simple elements by repeating the above steps. Specify the names "firstname" and "middlename", in that order. Make sure to select the schema node with the name "patientschema" before inserting/pasting a simple element.
Tip:
You can also use the and
commands from the
menu.
The Tamino Schema Editor generates the following schema code for the
simple elements. They are inserted in the schema as children of the root
element xs:schema.
<xs:element name = "surname" type = "xs:string"></xs:element>
<xs:element name = "firstname" type = "xs:string"></xs:element>
<xs:element name = "middlename" type = "xs:string"></xs:element>
You will now insert the complex element "name" to which you will later add the references for the simple elements that you have defined in the previous exercise.
To insert a complex element
In the schema tree, select the schema node with the name "patientschema".
From the menu, choose .
Or:
Choose the following toolbar button:
A complex element with the name "NEW_element_complex" is added to the schema tree.
Specify the name "name" for the complex element.
Leave the logical properties with their default values.
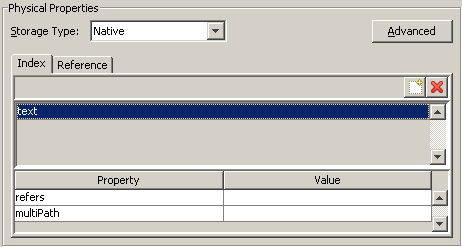
In the physical properties, leave the storage type with its default value "Native" so that instances will be stored in Tamino's native XML store.
Create a "text" index. This means that instances of the element will be indexed for full-text searches. To do so, choose the following button on the Index tab:

A new entry with the name "standard" is shown on the Index tab.
Select the new entry.
A drop-down arrow is shown at the right. The drop-down list box provides for selection different types of indices.
From the drop-down list box, select text.
You will now insert a sequence as a child node of "name". You will later add element references to the sequence. In an instance, all elements within a sequence must appear in the same order that has been defined in the schema.
To insert a sequence
In the schema tree, select the complex element "name".
From the menu, choose .
Or:
Choose the following toolbar button:

A structural element named "Sequence" is added to the complex element. Leave the logical properties with the default values.
You will now add three element references ("surname", "firstname" and "middlename") to the sequence you have just created.
To add element references to the sequence
In the schema tree, select the "Sequence" element.
From the menu, choose .
Or:
Choose the following toolbar button:

An element reference is added to the sequence.
For the logical property
Reference, select
surname from the drop-down list box that is
available in the Value column.
Leave all other properties with the default values.
Insert two more element references by repeating the previous steps. Select the names "firstname" and "middlename", in that order.
Tip:
You can also use the and
commands from the
menu.
Make sure to select the "Sequence" element before inserting/pasting an element reference.
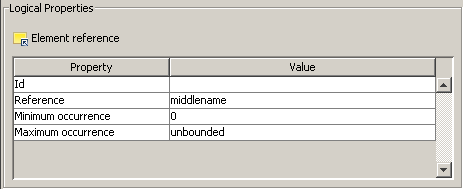
Select the element reference "middlename".
Change the following logical properties: set Minimum
occurrence to "0" and
Maximum occurrence to
"unbounded".
Or:
From the menu, choose .
This means that "middlename" is optional and can occur as often as desired. This is indicated by an asterisk (*) next to the icon in the schema tree.
For "surname" and "firstname", use the default values (1). They are required to occur once. More occurrences are not allowed. This is indicated by the number 1 next to the icon in the schema tree.
The following example shows the properties for "middlename" for which different occurrence constraints have been specified.
The Tamino Schema Editor generates the following schema code for the "name" element:
<xs:element name = "name">
  <xs:annotation>
    <xs:appinfo>
      <tsd:elementInfo>
        <tsd:physical>
          <tsd:native>
            <tsd:index>
              <tsd:text></tsd:text>
            </tsd:index>
          </tsd:native>
        </tsd:physical>
      </tsd:elementInfo>
    </xs:appinfo>
  </xs:annotation>
  <xs:complexType>
    <xs:sequence>
      <xs:element ref = "surname"></xs:element>
      <xs:element ref = "firstname"></xs:element>
      <xs:element ref = "middlename" minOccurs = "0" maxOccurs = "unbounded"></xs:element>
    </xs:sequence>
  </xs:complexType>
</xs:element>
The default values (1) for the properties Minimum
occurrence and Maximum occurrence
have not been changed in the elements "surname" and
"firstname". Therefore, no code for these attributes
has been generated.
You will now add an element reference to your root element. This element references the complex element "name" which in turn references the simple elements "surname", "firstname" and "middlename".
To add a sequence with an element reference to the root element
In the schema tree, select the complex element "patient".
From the menu, choose .
Or:
Choose the following toolbar button:
A structural element named "Sequence" is added to the schema tree.
Select this new "Sequence" element in the schema tree.
From the menu, choose .
Or:
Choose the following toolbar button:
An element reference is added to the sequence.
For the logical property Reference,
select name from the drop-down list box.
Leave all other properties with the default values.
The Tamino Schema Editor generates the following schema code for the "patient" element:
<xs:element name = "patient">
  <xs:complexType>
    <xs:sequence>
      <xs:element ref = "name"></xs:element>
    </xs:sequence>
  </xs:complexType>
</xs:element>
You will now add an attribute to complex element "patient".
To insert an attribute
In the schema tree, select the complex element "patient".
From the menu, choose .
Or:
Choose the following toolbar button:

An attribute with the name "NEW_attribute" is added to the complex element.
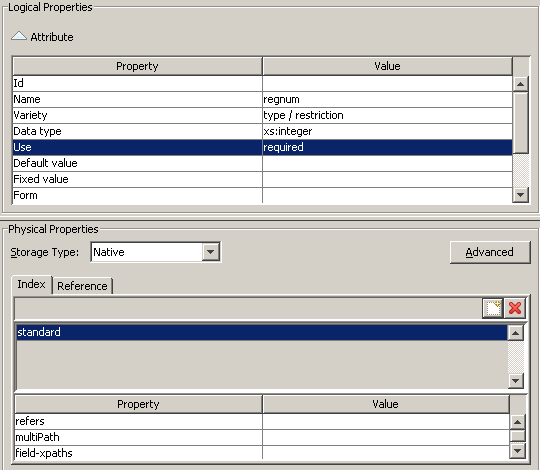
Specify the name "regnum" (for registration number) for the attribute.
For the logical property Data
type, select the value xs:integer
from the drop-down list box in the Value column.
This is a data type from a namespace that is by default defined for your schema.
For the logical property Use, select the
value required from the drop-down list box.
When an attribute is required, this is indicated by the number 1 next to the attribute icon in the schema tree.
In the physical properties, leave the storage type with the default value "Native" so that instances will be stored in Tamino's native XML store.
Create a "standard" index. This means that instances of the attribute will be indexed to optimize queries that use numerical comparisons in retrieval expressions. To do so, choose the following button on the Index tab:
A new entry ("standard") is shown on the Index tab.
The Tamino Schema Editor generates the following schema code for the attribute:
<xs:attribute name = "regnum" type = "xs:integer" use = "required">
  <xs:annotation>
    <xs:appinfo>
      <tsd:attributeInfo>
        <tsd:physical>
          <tsd:native>
            <tsd:index>
              <tsd:standard></tsd:standard>
            </tsd:index>
          </tsd:native>
        </tsd:physical>
      </tsd:attributeInfo>
    </xs:appinfo>
  </xs:annotation>
</xs:attribute>
Note the constructs for the physical schema within the
attributeInfo element.
You will now save your new schema to the file system.
You can also define your new schema in Tamino. However, this is not part of this tutorial. See Defining and Updating a Schema in Tamino later in this documentation.
To save the schema to the file system
From the menu, choose .
The Save As dialog box appears.
Select the folder in which the schema is to be saved and specify a file name, for example, patientschema.
Select the file type with which the schema is to be saved. For a Tamino schema, the file type is "tsd".
Select the encoding with which the schema is to be saved.
The encoding is written to the XML declaration of the schema file. The default encoding is UTF-8.
Note:
The Encoding drop-down list box is
editable.
Choose the button.
You have successfully completed this tutorial.