Editing a Process

To edit a process
1. In My My webMethods: Navigate > Applications > Administration > Business > Business Processes
2. If necessary, enter search criteria on the Keyword tab, then click Search.
In the Business Process window, Optimize displays a list of processes that were defined and updated for monitoring using Software AG Designer.
3. To edit a process, click its process name or click the Edit icon in the Edit column. The Edit Process page appears.
4. In the Process Details tab on the Edit Process page, you can do the following tasks:
a. Enable or disable the execution of a webMethods-executed (BPM) process by selecting or clearing the Execution Enabled check box.
Note:
If you disable a webMethods-executed (BPM) process, its current instances will continue to run but new trigger documents cannot start new instances of the process.
b. Enable or disable the Optimize analysis of a webMethods-executed (BPM) process by selecting or clearing the Analysis Enabled check box.
The Analysis Enabled check box is available only if the Execution Enabled check box is checked.
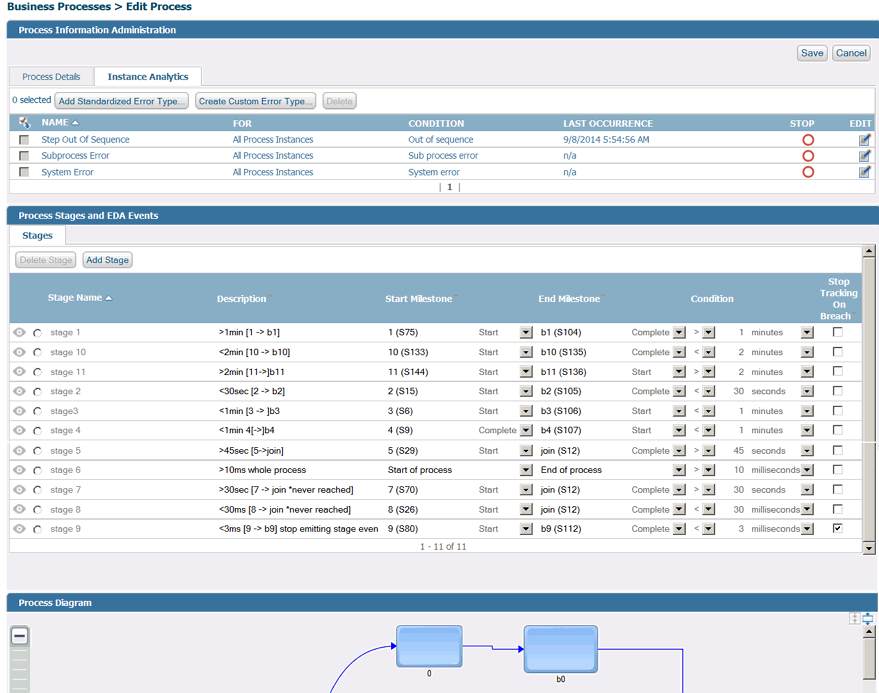
5. In the Instance Analytics tab on the Edit Process page, you can do the following:
a. View a list of error types associated with the current process.
b. Modify an existing error type to specify a time in which the process instance, or a step within the process instance, must complete.
c. Create a new standard error type that can be applied to a process instance or to a step in a process instance. Click Add Standardized Error Type and specify the error-type conditions in the Add Standardized Error Type page. See
Standardized Error Types for details. d. Create a new custom error type. Click Create Custom Error Type and specify a name for the error type in the Create Custom Error Type page. See
Custom Error Types for details. 6. In the Process Stages and EDA Events window:

The
Stages tab displays all process stages defined for this process model. For more information, see
Working with Stages and Milestones. If the process model contains no stages, this window is collapsed to show only the title bar. It cannot be expanded.
To sort the stages table by the contents of a column, click on a column name to activate the sort controls for that column.
7. The Process Diagram window shows the steps and, for externally executed processes, the events associated with the process. Note that this window interacts with the Stages tab. For more information, see
Working with Stages and Milestones. The following right-click options are available in the Process Diagram window.
Fit to screen - Resizes and re-centers the diagram based on the screen size.
Hide transition labels - Hides description and expression text on all transition lines in the diagram.
Show transition descriptions - Shows all applicable description text created in
Designer for all transitions on the diagram.
Show transition expressions - Shows applicable transition expressions created in
Designer for all transitions on the diagram.
8. Click Save to save your changes, or Cancel to return to the Business Processes page without saving. (Save and Cancel are replaced with Close for externally executed processes.)