Custom Error Types
To add a custom error type to the list of error types displayed in the Instance Analytics panel on the Edit Process page, you must define the custom error-type name. Custom errors are activated externally and then tracked by Optimize.

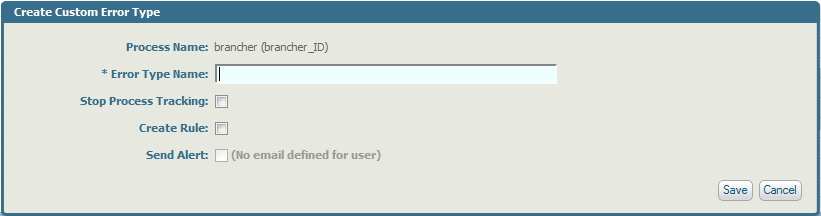
To add a custom error type
1. On the Edit Process page, click the Create Custom Error Type button in the Instance Analytics panel.
The Create Custom Error Type dialog is displayed.
2. Enter a unique name for the error type in the Error Type Name field. The name must match the name originally given to this error type. Custom errors are sent into Optimize by a custom data collector. The custom data collector gives each custom error a name, and the name entered on the Create Custom Error Type page must match that name from the custom data collector.
Although this field will accept up to 150 alphanumeric characters, the name is truncated at 50 characters on the Instance Analytics panel of the Edit Process page.
3. Select Stop Process Tracking if you want Optimize to stop tracking this process instance, or to stop tracking a step in this process instance, if the error type occurs.
4. Select Create Rule if you want to automatically create a rule associated to this error type. The rule name will be the same as the error-type name, and the rule type will be Event.
This check box is available only if the current user has Access Privileges for the Rule List page (see Administering My webMethods Server).
Note:
Errors appear only on the Process Instance Detail page. If you create an automatic rule for the error type, that rule is displayed on both the Problems page and the KPI Instance Detail page. If the error type is subsequently deleted, the associated rule remains unless it is manually deleted, as well.
5. If you selected Create Rule, you can select the Send Alert check box if you want an e-mail alert sent to you when the rule you created is violated.
This check box is available only if a valid e-mail address has been configured for the current user.