This document covers the following topics:
A typical scenario starts from an existing (legacy) server application "wrapped" with EntireX technology and accessible to RPC clients via the EntireX RPC protocol. The interface of the (legacy) server is described by an IDL file (see Software AG IDL File). If there is a related server mapping file (Natural | COBOL), this is also used (internally). Using the EntireX Web Services Wrapper, the (legacy) server is exposed as a web service. For example, the following files are generated from example.idl:
a SOAP mapping (example.xmm)
a WSDL description (example.wsdl)
a service archive for the Web Services Stack (example.aar)
This section covers the following topics:
This section describes the general approach for generating a web service archive with the Web Services Wrapper.
 To generate a web service
Before the wizard is started for the first time, initialize the preference pages > > > and > > > > with values appropriate for your environment.
Select the IDL file to be processed. From the context menu of this IDL file, choose Properties.
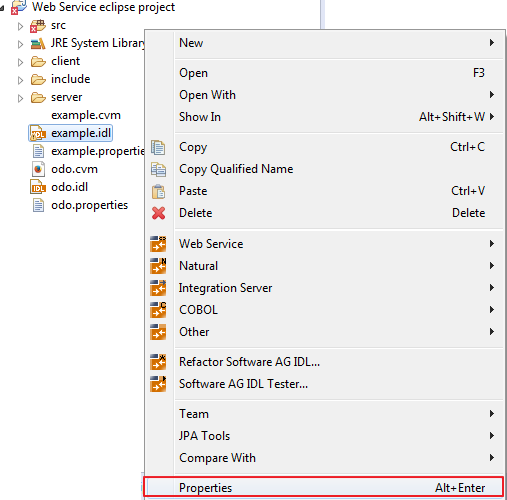
Change the EntireX settings if necessary.
If necessary, change the web service generation settings using the WSDL tab (Service Name and Service URL).
Choose to leave the Properties dialog.
Select the IDL file to be processed. If there is a related server mapping file (Natural | COBOL), this is also used (internally). From the context menu of the IDL file, choose > .
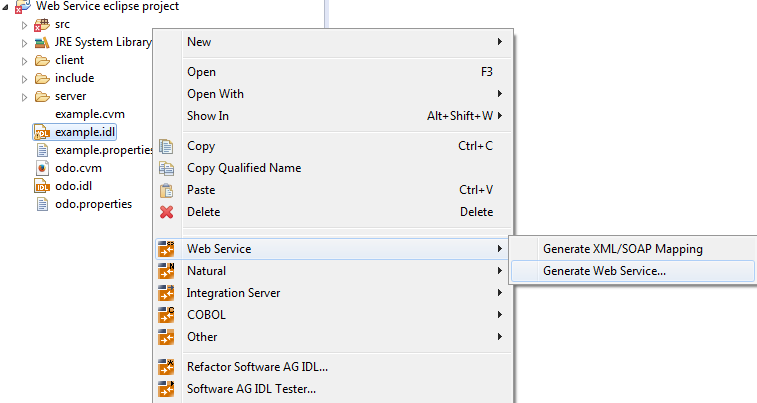
You can select more than one Software AG IDL File to merge all IDL files into one web service. As a result you will get multiple XML mapping files, one WSDL file and one web service archive. Merging does not support the use of the same IDL program name in different IDL libraries.
The EntireX Web Services Wrapper is launched:
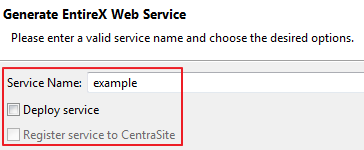
You can enter a service name. The default name is the name of the selected IDL file.
If you check , an additional confirmation page is displayed. See Deploying Web Services for this dialog.
If you check , a confirmation page is displayed. See EntireX CentraSite Integration for this dialog.
If you uncheck for the section, you can select the following configuration items:
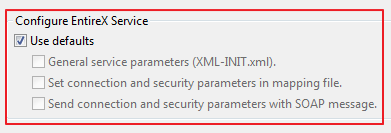
General service parameters (XML-INIT.xml)
An additional configuration page is appended.
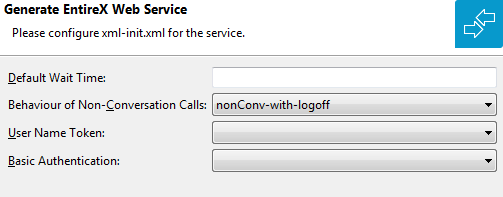
The parameters on this page are described in the Web Services Stack Configuration Editor. See also Initialization Parameters for the Listener for XML/SOAP.
Set connection and security parameters in mapping file
An additional configuration page is appended.
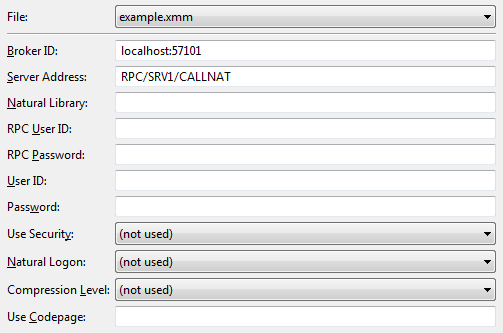
The parameters on this page are described in the Web Services Stack Configuration Editor. See also Service Parameters.
Send connection and security parameters with SOAP message
An additional configuration page is appended.
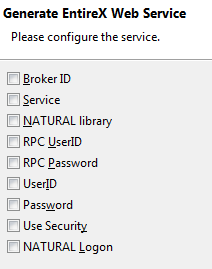
The selected parameters are generated in alphabetical order and are enclosed by xsd:all in the SOAP header section of the generated WSDL file. Example:
<xsd:schema targetNamespace="urn:com.softwareag.entirex.xml.rt">
 <xsd:element   name="EntireX">
  <xsd:complexType >
   <xsd:all >
    <xsd:element name="exx-brokerID" type="xsd:string"/>
    <xsd:element name="exx-natural-library" type="xsd:string"/>
        ...
    <xsd:element name="exx-userID" type="xsd:string"/>
   </xsd:all>
  </xsd:complexType>
 </xsd:element>
</xsd:schema>
A web service client will then be able to set these parameters in the SOAP header of the SOAP message. See also The HTTP Interface in the XML/SOAP Wrapper documentation.
Choose , enter your configuration parameters and select the methods for which the web service is to be generated.
Choose to generate the web service (XML/SOAP mapping file (Designer file with extension .xmm), WSDL file and web service archive (Designer file with extension .aar)).
This section describes specific settings required when you generate a web service archive (Designer file with extension .aar) with the Web Services Wrapper for HTTP Basic Authentication and UsernameToken Authentication.
 To generate a web service with HTTP Basic Authentication and UsernameToken Authentication
In general, follow the steps under Generating a Web Service.
In step 4, check General service parameters (XML-INIT.xml) and in the additional configuration page enable User Name Token and Basic Authentication.
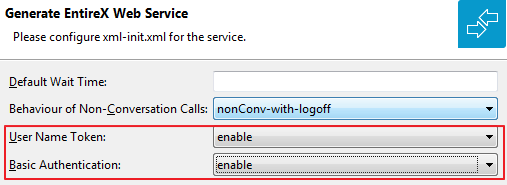
The priority of credentials settings is as follows:
exx-userID, exx-password, exx-rpc-userID, exx-rpc-password (highest priority)
UsernameToken
Basic Authentication (lowest priority)
This section describes specific settings required when you generate a web service archive (Designer file with extension .aar) with the Web Services Wrapper for EntireX Security or Natural Security.
 To generate a web service for EntireX Security or Natural Security
In general, follow the steps under Generating a Web Service. In step 4, check Set connection and security parameters in mapping file and in the additional configuration page enable Use Security and/or Natural Logon. If required, also set the Natural library.

The following resources are required to deploy and run a web service:
An application server where the Web Services Stack is installed (wsstack.war). The Web Services Stack is accessible by default at the URL http://<host-name>:<port-number>/wsstack/sagdeployer with port number 10010. The default port can be changed during installation. In the case of deployment in custom application servers, the port is configured by the corresponding server administration tools. For more details see the Web Services Stack documentation in the Software AG Infrastructure Administrator's Guide under Software AG Suite & Cross-Product Guides.
The EntireX Runtime (entirex.jar) containing the Listener for XML/SOAP. This must be located in the WEB-INF\lib folder of the Web Services Stack Web application. See Listener for XML/SOAP.
The Eclipse plug-ins of the Web Services Stack must be installed.
EntireX Broker and the RPC server hosting the server implementation are up and running. See Setting up Broker Instances under z/OS | Linux | Windows | BS2000 and EntireX RPC Servers and Listeners.
Note:
Default password handling was enhanced in EntireX version 10.8 and all Software AG products that are installed with the Software
AG Installer.
During installation, on the Administrator Password panel, enter a default product administrator password for the products you are installing, and choose whether to require
the password to be changed on first product login.
We strongly recommend adopting the new password in the Web Services Stack preferences of the Designer.
The password must be at least 8 characters long. The maximum number of consecutive identical characters (for example
"aaa") or sequential characters (for example "123") is 3.
Deploying a web service means sending a web service archive (Designer file with extension .aar) to a running Web Services Stack Web application. The Web Services Stack Web application stores the web service archive in the WEB-INF/services folder of the Web Services Stack Web application.
 To deploy a web service
From the context menu of the generated web service archive, choose > . In a wizard you can select hostname, port number, and a servlet address of the Web Services Stack Deployment Servlet. You also need to supply your credentials (user ID and password).
Choose to send the web service archive to the selected deployment connection point.
Notes:
If you want to deploy the Web Services Stack Web Application to WebSphere Liberty Server, perform the following steps:
 To deploy to WebSphere Liberty Server 22.0 or 21.0
Create a liberty server instance, e.g. myServer.
In the server.xml of myServer add a feature "jsp-2.3". The part in the xml file should look like this:
<featureManager>
  <feature>jsp-2.3</feature>
</featureManager>
The default http port is 9080, the default https port is 9443.
Copy SoftwareAG_directory/WS-Stack/webapp/wsstack.war to the dropins folder of the myServer server instance.
Unpack wstack.war to ../dropins/wsstack.
Remove wsstack.war.
Rename the wsstack folder to wsstack.war.
Copy entirex.jar to folder ../wsstack.war/WEB-INF/lib.
Set the JAVA_HOME environment variable to the Java 11 distribution of the EntireX installation. Example: JAVA_HOME=SOFTWAREAG_INSTALL/jvm/jvm
Start the Liberty Server instance.
Start a browser with URL http://localhost:9080/wsstack. You should see the Web Services Stack welcome page.
 To test a Web Service with the EntireX XML Tester
From the context menu of the generated web service archive (Designer files with extension .aar), choose . This starts the EntireX XML Tester. If the web service archive contains multiple XMM/SOAP mapping files (Designer file with extension .xmm), select the one you want. Refer to the documentation of the EntireX XML Tester to create a sample document.
You can retrieve the WSDL of a web service deployed in the Web Services Stack running in a servlet engine.
 To query the WSDL of a Web Service
Use a browser and append "?wsdl" to the web service URI. Example:
http://host:port/wsstack/service/myService?wsdl
The returned WSDL will return to the requestor all relevant configuration information of the web service, for example all endpoints through which the web service is accessible and policies that are in effect for the web service.
Once the web service is up and running and its WSDL is accessible (using HTTP), web service client applications can be developed. See also Writing Web Service Client Applications in the IDL Extractor for WSDL documentation.
Undeploying a web service means informing a running Web Services Stack Web to remove a deployed web service. The Web Services Stack Web removes the corresponding web service archive from the WEB-INF/services folder of the Web Services Stack Web.
 To undeploy a web service
Choose > > > > ...
Notes:
When a web service is removed from an Eclipse project, using , the following artifacts are additionally deleted depending on the source of the generated web service.
| Generated from | Additionally Deleted Artifacts |
|---|---|
| Natural/COBOL | |
| IDL File |
|
| XMM File |
|