
The following topics are covered below:
Application Designer's Eclipse plug-in allows you to edit Application Designer layouts directly inside Eclipse. When the plug-in has been installed and configured, you can use the Layout Painter and some other Application Designer tools in Eclipse.
The plug-in is delivered with the Application Designer software. After the installation of Application Designer, a directory with the name EclipsePlugin is available in your <installdir>/tomcat/webapps/cis directory.
The Eclipse plug-in consists of two parts which have to be installed separately: the common part and the GUI part. You must first install the common part.
![]() To install the common part of the Eclipse plug-in
To install the common part of the Eclipse plug-in
It is required that your servlet container has been started.
From the menu of Eclipse, choose .
A dialog appears.
Select the option button Search for new features to install.
Choose the button.
On the resulting page, choose the button.
The following dialog box appears.
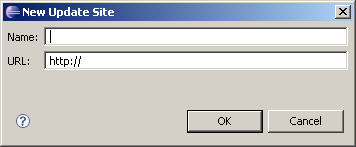
In the Name text box, specify a name of your choice.
In the URL text box, specify the path to the Eclipse plug-in. For example:
http://localhost:51000/cis/EclipsePlugin/com.softwareag.common
Choose the button.
![]() To install the GUI part of the Eclipse plug-in
To install the GUI part of the Eclipse plug-in
Proceed as described above for the common part. In the URL text box, however, specify the following path:
http://localhost:51000/cis/EclipsePlugin/com.softwareag.cis.gui.swt
You create an Eclipse project in the same way as described in Creating a Java Project in Eclipse.
Each Application Designer project has an project/xml directory in which the layouts are kept. This directory needs to be defined in Eclipse. To do so, you have to modify the properties of each Eclipse project that you create for the Eclipse plug-in.
![]() To configure the Eclipse project
To configure the Eclipse project
Select the Eclipse project.
Invoke the context menu and choose .
Enable the check box Enable Application Designer Access.
In the Layout Folder text box, specify the path to your project's xml folder.
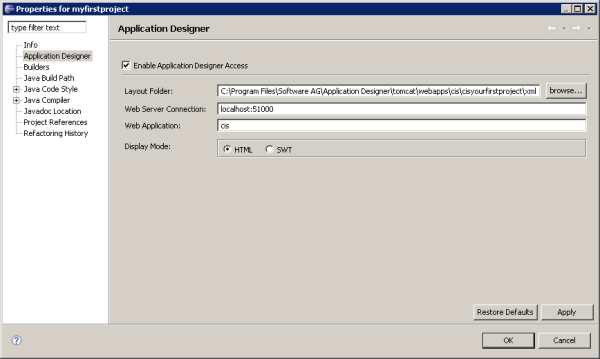
If required, change the properties of the Web Server Connection and the Web Application in this dialog box. See the Tomcat documentation for more details.
Select the display mode for the Layout Painter and Layout Tester:
HTML
This mode makes use of the ActiveX plug-in of Eclipse in which
Internet Explorer is running.
SWT
This mode makes use of SWT controls which are shown in an SWT
client.
Choose the button.
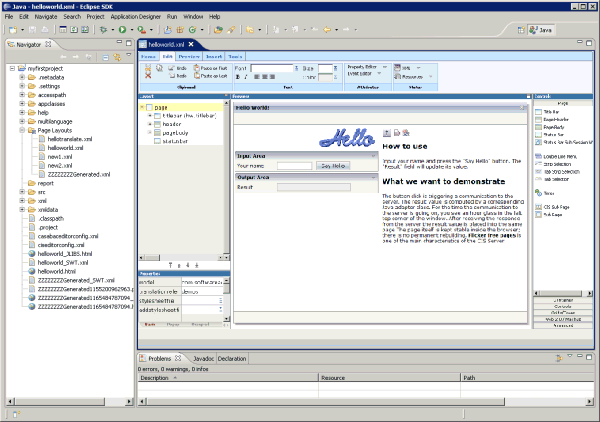
The Page Layouts node is automatically created in the Navigator view. See below.
In order to work with the Eclipse plug-in, your servlet container must have been started. See Starting the Servlet Container in the Development Workplace documentation.
The Eclipse plug-in provides the following tools:
You use these tools in a similar way as those in the development workplace. See the Development Workplace documentation for further information. The descriptions in the Development Workplace documentation also apply to the Eclipse plug-in; the only difference in the Eclipse plug-in is that the tools are invoked in a different way (see below). The screenshots in the Development Workplace documentation also apply - with slight differences - to the Eclipse plug-in.
![]() To invoke the Project Manager
To invoke the Project Manager
From the menu, choose .
In the resulting Show View dialog box, expand the Software AG Application Designer node.
Select the entry Tool - Project Manager and choose the button.
A list of existing application projects is now shown.
![]() To create a new layout
To create a new layout
In the Navigator view, select the Page Layouts node. This node contains all XML layout definitions.
From the menu, choose .
In the resulting dialog box, expand the Software AG node.
Select the entry Application Designer Layout and choose the button.
In the resulting dialog box, enter the name of the file that is to contain your layout definition. The name must end with ".xml".
Select the layout template that you want to use.
Choose the button.
The Layout Painter appears.
![]() To open an existing layout
To open an existing layout
In the Navigator view, select the layout in the Page Layouts node.
Invoke the context menu and choose .
The Layout Painter appears.
![]() To invoke the Style Sheet Editor
To invoke the Style Sheet Editor
From the menu, choose .
In the resulting Show View dialog box, expand the Software AG Application Designer node.
Select the entry Tool - Style Sheet Editor and choose the button.
![]() To invoke the Control Editor
To invoke the Control Editor
From the menu, choose .
In the resulting Show View dialog box, expand the Software AG Application Designer node.
Select the entry Tool - Control Editor and choose the button.
A dialog appears, listing all available editor extensions.
Choose the editor extension that you want to open.
The contents of the editor extension are loaded into the Control Editor. You can now edit your editor extension.
![]() To invoke the monitoring tool
To invoke the monitoring tool
From the menu, choose .
In the resulting Show View dialog box, expand the Software AG Application Designer node.
Select the entry System Monitoring and choose the button.
The Layout Tester can be used to test the currently defined layout according to the display mode which is defined in the properties of the Eclipse project: it is either shown as in the browser or as in the SWT client.
![]() To invoke the Layout Tester
To invoke the Layout Tester
Select the layout in the Navigator view.
Invoke the context menu and choose .