Defining Multpile OAuth 2.0 Scopes in API Gateway
Scope is a mechanism in OAuth 2.0 to limit an application's access to a user's account. Scope is required to get an access token. A scope is the definition of the resources the client application can access on behalf of a resource owner. In API Gateway, scope is defined for methods or resources of an API. You can apply Scope to an API from the Identity and Access Policy page.
Types of Scopes
 OAuth Scope:
 Defined in Authorization Server
API Scope: Scope defined in API
If you do not define scope for an API, a global scope is provided by default. This global scope is applicable for all the methods or resources of the API .
Actors
Developers with basic knowledge on webMethods API Gateway, Integration Server, OAuth2 architecture
Customers with basic knowledge on webMethods API Gateway, Integration Server, OAuth2 architecture
Before you begin
Ensure that you have:
Installed Integration Server with API Gateway
Knowledge on any REST Client
API Gateway up and running
Basic Flow
This section explains the following three flows :
Creating OAuth Scopes in the Local Authorization Server and mapping this scope to the Global Scope for an API
Creating OAuth Scopes in External Authorization Server and mapping this scope to the Global Scope for an API
Creating multiple OAuth Scopes in Local Authorization Server and mapping this scope to the Scope defined in the API
Creating OAuth scopes in local authorization server and mapping this scope to the global Scope for an API
1. Create OAuth scope in local authorization server .
You can create the OAuth scope using the Authorization Server page.
a. Expand the menu options in the title bar and select Administration
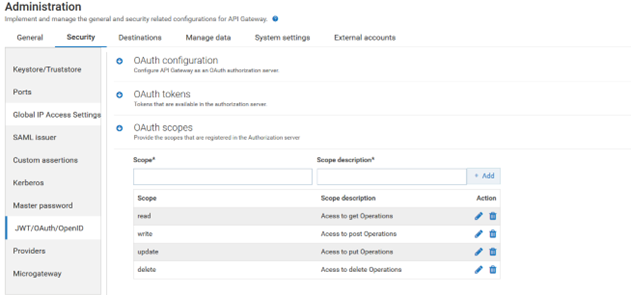
b. Select Security > JWT/OAuth/OpenID. Click local. All configurable settings for the local authorization server appears
c. Click local
d. Click OAuth Scope to add Scope
e. Provide the values in the following fields
Scope: OAuth2Scopes
Scope description: OAuth2Scopes
f. Click Add.
2. Map the OAuth scope to the global scope.
You must map the OAuth scope to the global scope or to a scope defined for the methods or resources of the API. Here, as the scope for the methods or resources of the API is not created, the methods or resources of the API is not restricted.The global scope is applicable to all the methods or resources of the API.
In this example, consider the global scope API scopes. Map the OAuth scope to the API scopes for an API RestOps.
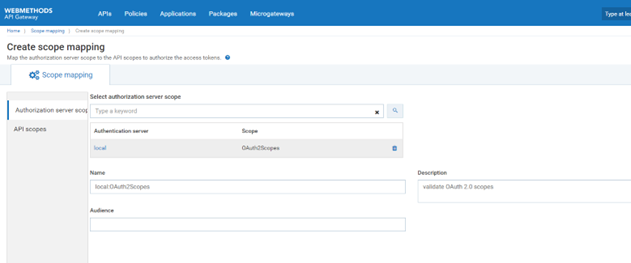
a. Expand the menu options in the title bar and select OAuth/OpenID scopes.
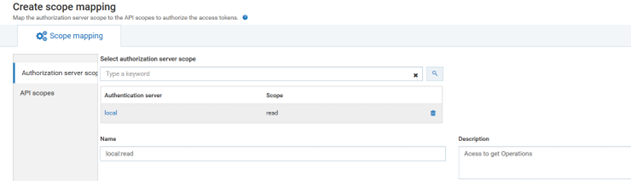
b. ClickMaps scope. Type OAuth2Scopes in Select authorization server scope and select the listed authorization server scope from list.
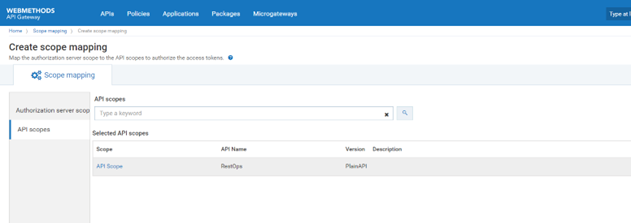
c. Click API scopes
d. Type either the the API RestOps or API Scope in API scopes. This is the Global scope, which is to be linked to the authorization server.
e. Save the changes. This maps the authorization server scope to the selected API scopes and lists the authorization scope in the scopes list.
Creating OAuth scopes in External Authorization Server and mapping this scope to the Global Scope for an API
1. Create OAuth scope in external authorization server.
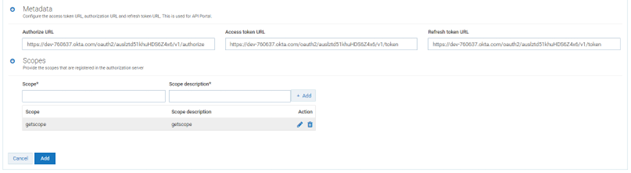
In the authorization page the external authorization server is defined. Initially scope has to be created in the external authorization server. The same scope needs to be created or gets automatically listed with the discovery URL. Here the external authorization server is OKTA.
a. Create scope getscope in OKTA.
b. Expand the menu options in the title bar and selectAdministration
c. SelectSecurity > JWT/OAuth/OpenID.. Click local. This displays all the configurable settings for the Authorization Server
d. Click on okta-oauth-server
e. Click Scopes
f. Click on Scopes. Verify getscope is present in the list.
2. Map the external OAuth scope to the global scope.
You must map the scope specified in the OKTA Authorization server with the APIs in API Gateway to authorise the access tokens to access the protected resources.
a. Expand the menu options in the title bar and select OAuth/OpenID scopes.
b. Click Map scope.
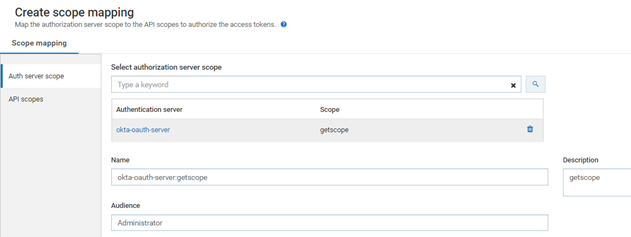
c. Type getscope in select authorization server scope and select the listed authorization server scope from the search list populated.
d. Provide Audience : Administrator
e. Click API scopes.
f. Type RestOps or API scope, which is to be linked to the authorization server, in API scopes search text box.
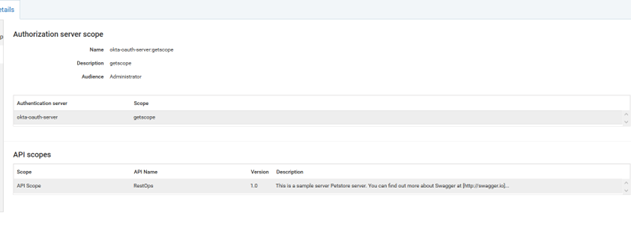
g. Save the changes. This maps the authorization server scope to the selected API scopes and lists the authorization scope in the scope list
Creating multiple OAuth Scopes in Local Authorization Server and mapping this scope to the scope defined in the API
1. Create multiple OAuth scopes in local authorization server.
a. Expand the menu options in the title bar and select Administration
b. Select Security > JWT/OAuth/OpenID. ClickLocal. This displays all the configurable settings for the authorization server
c. Click on Local.
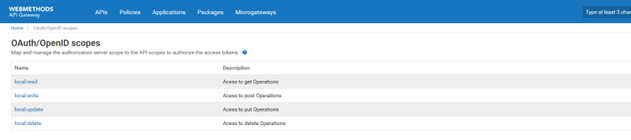
d. Click OAuth scopes to add scope. Add the following OAuth scopes read, write, modify, and delete and click Add.
e. Click Update.
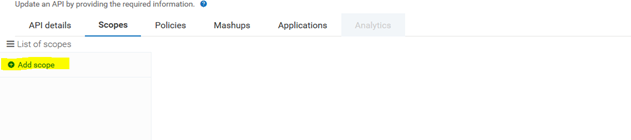
2. Create scopes for the API.
a. Navigate to APIs in the title navigation bar.
b. Click RestOps.
c. Click Scopes.
d. Click Edit.
e. Click Add Scope.
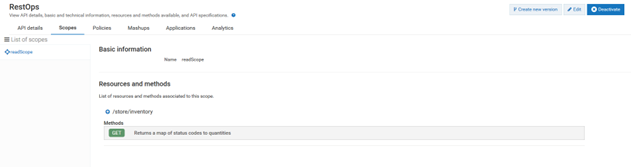
f. Provide the name: readScope
g. In Resources and methods select GET for /store/inventory method. You can select other GET methods as well.
h. Click Save.
i. Click Edit.
j. Click Add Scope.
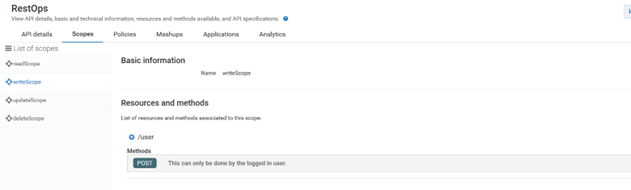
k. Provide name: writeScope and select POST in /user method.
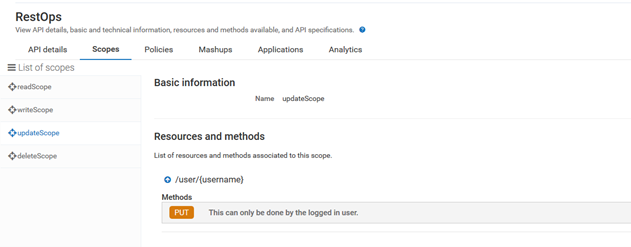
l. Create scopes updateScope and select PUT in /user/{username}
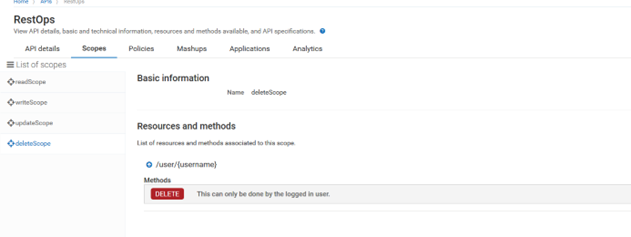
m. Create scope deleteScope and select DELETE in /user/{username}
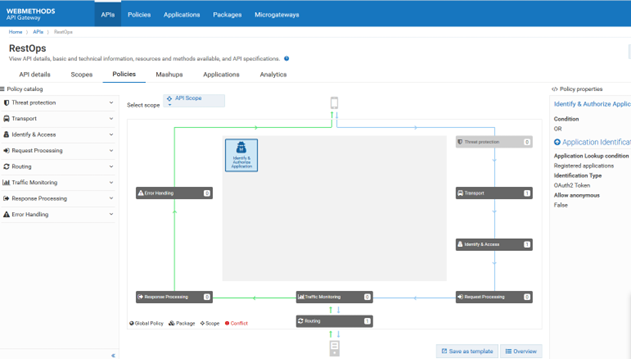
3. Enforce OAuth2 policy on the API RestOps with the required scope.
This policy ascertains that a OAuth token is required to access this API.
a. Click API in the title navigation bar.
b. Click RestOps.
c. Click Policies.
d. Click Edit.
e. Click Identify & Access from the Policy catalog section .
f. Click Save.
4. Map the OAuth scope to the API-level scope.
Here, you map the OAuth scope that was defined in the local Authorization server with the API-level scope defined in the RestOps API.
a. Expand the menu options in the title bar and select OAuth/OpenID scopes.
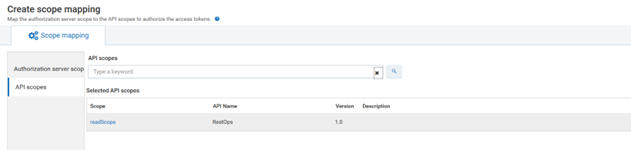
b. Click Map Scope, type read in select authorization server scope and select the listed authorization server scope from the search list populated.
c. Click API scopes.
d. Type Restops or readScope, which is to be linked to the authorization server, in API scopes search text box.
e. Save the changes. This maps the authorization server scope to the selected API scopes and lists the authorization scope in the scopes list.
f. Similarly Map
write OAuth Scope to
writeScope of API.
update OAuth Scope to
updateScope of API.
delete OAuth Scope to
delete Scope of API.
5. Configure application and strategy.
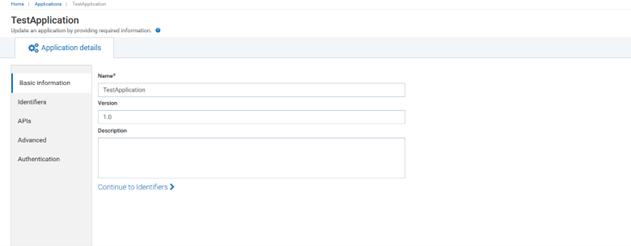
a. Click Applications in the title navigation bar.
b. Click Create application provide the Name: TestApplication.
c. Click Continue to Identifiers.
d. Click on Continue to APIs.
e. Type RestOps in the Find APIs text box. The API is listed in the drop down box.
f. Select the RestOps API.
g. Click Continue to Advanced. In the Advanced page, no input is required.
h. Click on Continue to Authentication.
i. Click Create Strategy. A strategy is a way to authenticate the incoming request and provides multiple authentication mechanisms or multiple authorization servers for a single authentication scheme. You can create multiple strategies authorized by an API for an application.
j. Provide the Name: TestStrategy
k. Enable the toggle button Generate credentials to dynamically generate the client in the authorization server. By enabling the toggle button client-id and client-secret are created automatically.
l. Select Confidential as application type.
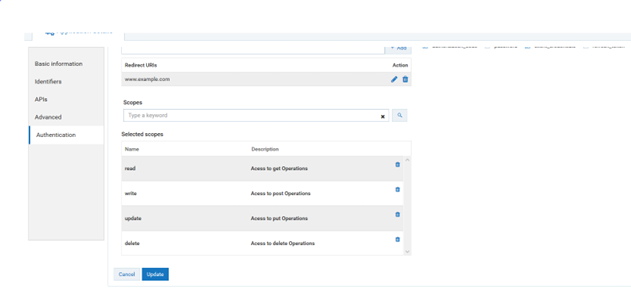
m. Specify the redirect URIs that the authorization server can use to redirect the resource owner's browser during the grant process. In this case, you are provided with www.example.com which is not a valid URL.
n. Select the required Grant types, authorization_code and client_credentials.
o. Provide the following scopes in the scope text box and click the search icon.
a. read, click Add
b. write, click Add
c. update, click Add
d. delete, click Add
p. Click Add to add the trsategy.
q. Click Save.
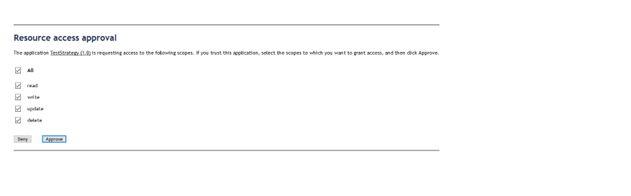
6. Get the authorization code.
You require the client_id and client_secret to get the authorization code.
a. Navigate to Applications in the title Menu.
b. Click on TestApplication .
c. Under Authentication, click TestStrategy strategy.
d. Copy the client id.
e. Invoke the following url to get the authorization code
http://<machinename>:4444/invoke/pub.oauth/authorize?client_id=01fc7b74-1f56-48d5-81fe-bcd6e895d40f&redirect_uri=www.example.com&response_type=code&state=121
f. If you select read, you get the authorization code only for read scope
Example http://<machinename>:4444/invoke/wm.server.oauth/www.example.com?code=4c4f499e6b894103972bd12c6e8e49d7&grant_type=authorization_code&redirect_uri=www.example.com&state=121&scope=read
g. If you select only write, you get the authorization code only for write scope
Example http://<machinename>:4444/invoke/wm.server.oauth/www.example.com?code=e295940d2daa4ac3887575400c81b78b&grant_type=authorization_code&redirect_uri=www.example.com&state=121&scope=write
h. If you select all, you will get the authorization code only for read+write+update+delete scope
Example http://<machinename>:4444/invoke/wm.server.oauth/www.example.com?code=3cbcfb3523624675a54925bd96b56bea&grant_type=authorization_code&redirect_uri=www.example.com&state=121&scope=read+write+update+delete