Securing APIs using OAuth 2.0 in API Gateway with Local Authorization Server
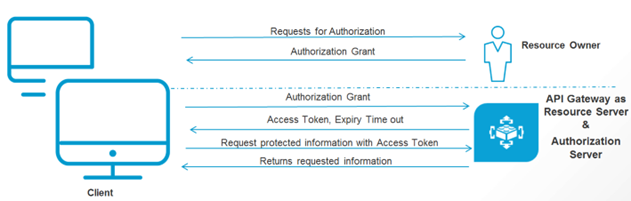
This use case explains, with a simple example, how to secure an API with OAuth2 authentication with API Gateway configured as both Resource Server and Authorization Server. The diagram illustrates the work flow for this use case.
Actors

Developers with basic knowledge about
webMethods API Gateway,
Integration Server, OAuth2 architecture
Customers with basic knowledge about
webMethods API Gateway,
Integration Server, OAuth2 architecture
Before you begin
Ensure that you have:
Installed
Integration Server with
API GatewayKnowledge about any REST Client
API Gateway up and running
Basic Flow
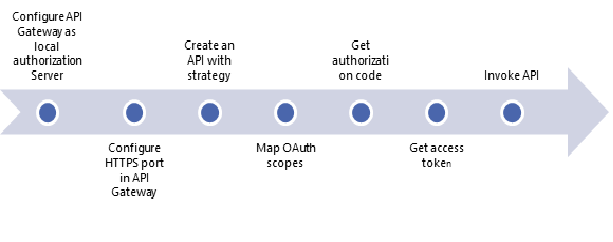
The following diagram depicts the high level steps of the basic flow for this use case.
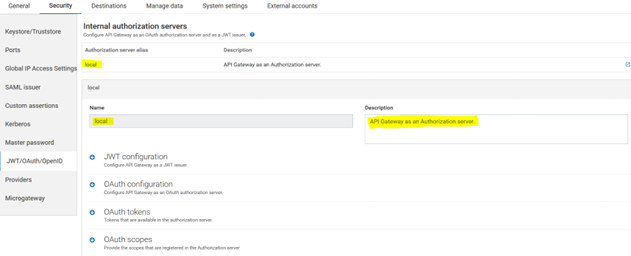
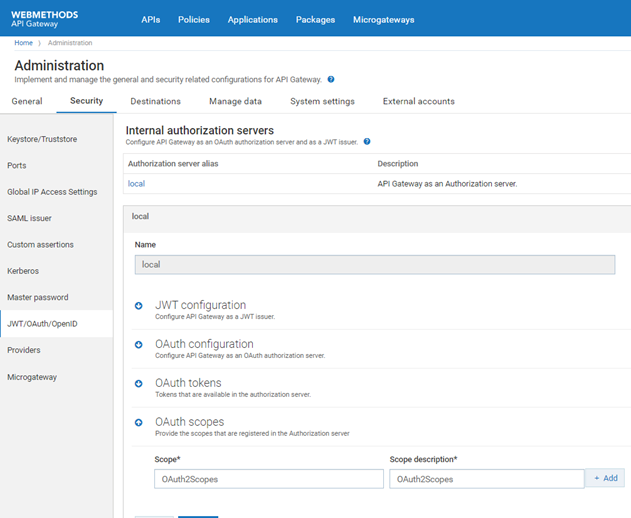
Step 1: Configure API Gateway as local Authorization Server
In API Gateway, by default the internal authorization server for JWT, OAuth, or OpenID is set as local. It means that API Gateway acts as an authorization server.
1. Expand the menu options in the title bar and select Administration.
2. Select Security > JWT/OAuth/OpenID. Click local. All configurable settings for the local authorization server appear.
3. Expand local.
4. Expand OAuth Configuration, OAuth tokens, and OAuth scope sections.
5. In this use case, retain the default values of Authorization code expiration interval (seconds) and Access token expiration interval (seconds) in the OAuth Configuration section. You can modify these values as required.
6. Create OAuth Scopes,
OAuth scopes allow you to limit the access level that is granted to an access token. In this use case, we define one OAuth Scope (OAuth2Scopes) to limit the resource usage.
a. Expand OAuth scopes to add scope.
b. Provide values in the following fields
Provide Scope:
OAuth2Scopes Scope description:
OAuth2Scopes c. Click Add.
d. Click Update. The OAuth scope is created.
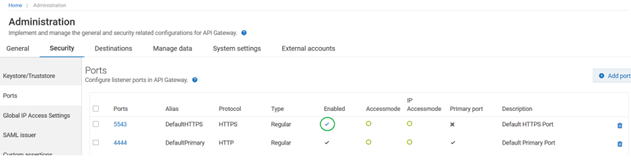
Step 2: Configure HTTPS port in API Gateway
In this example, authorization is through HTTPS. To enable API Gateway to accept request through https, define a new HTTPS port in API Gateway or use the default HTTPS port provided by API Gateway. The default HTTPS port is 5543 and it must be enabled from the Ports section of API Gateway.
1. Expand the menu options in the title bar and select Administration.
2. Select Security > Ports.
3. You can do one of the following:
Use the default HTTPS port
Click the Enable field next to the 5543 port and enable it. The port is enabled.
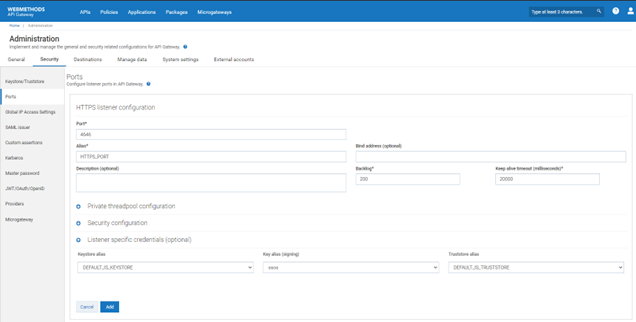
Add a new HTTPS port
1. Click Add ports on the Ports page.
2. Select HTTPS from the drop-down, and click Add.
3. Provide 4646 in the Ports field.
4. Provide HTTP_Port in the Alias field
5. Optional. Expand Listener specific credentials.
6. Select DEFAULT_IS_KEYSTORE from the Keystore drop-down list. The Key alias value appears automatically.
7. Select DEFAULT_IS_TRUSTSTORE from the Truststore drop-down list.
8. Click Add. The port appears on the Ports screen.
9. Click the Enable field next to the 4646 port to set the port to default.
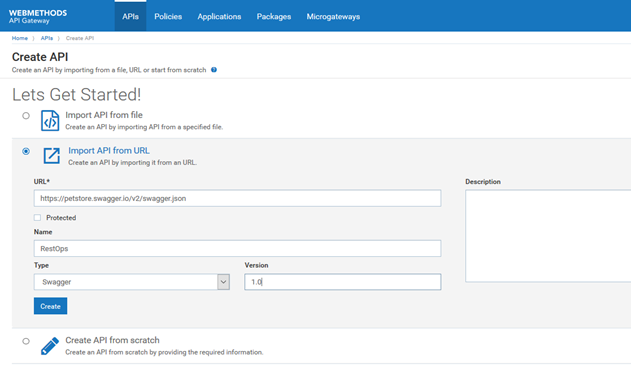
Step 3: Create an API with strategy
In this example you create an API by importing from the URL
https://petstore.swagger.io/v2/swagger.json.
1. In the APIs tab click Create API.
2. Select Import API from URL.
3. Provide the following details.
Name:
RestOps Type:
Swagger Version:
1.0 4. Click Create. The API is created and the API details page for the API appears.
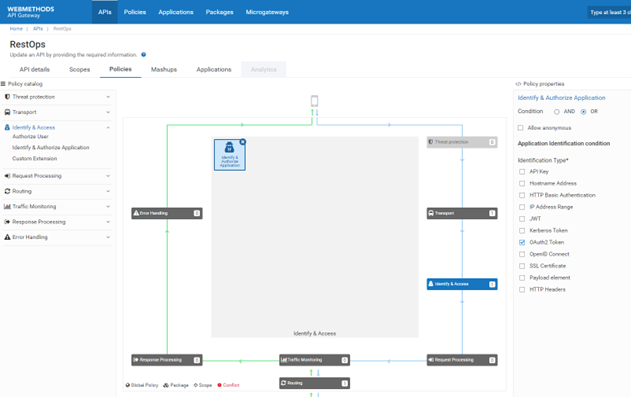
5. Enforce OAUTH2 policy on the API.
You enforce OAuth2 policy on the RestOps API. This policy ascertains that an OAuth token is required to access this API.
a. Click API in the title navigation panel.
b. Click RestOps.
c. Click the Policies tab.
d. Click Edit.
e. Click Identify & Access in the Policy catalog section.
f. Select the OAuth2 Token check box in the Identification Type field of the Application Identification section and save the changes.
g. Click Activate to activate the API on the API details page of the API.
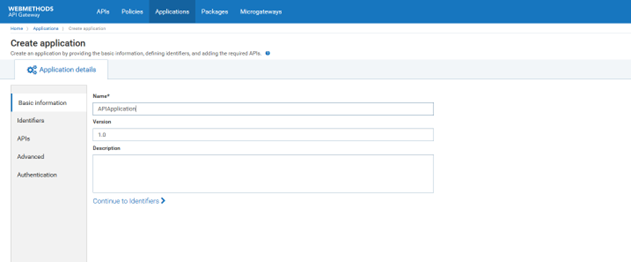
6. Create an application with strategy and register it to an API.
a. Click Applications in the title navigation bar.
b. Click Create application.
c. Provide the Name: APIApplication
d. Click Continue to Identifiers.
e. Click Continue to APIs.
f. Search the API RestOps, by typing RestOps in the Find APIs text box.
The RestOps API appears in the Selected APIs section.
g. Select the RestOpsAPI.
h. Click Continue to Advanced
i. Click Continue to Authentication.
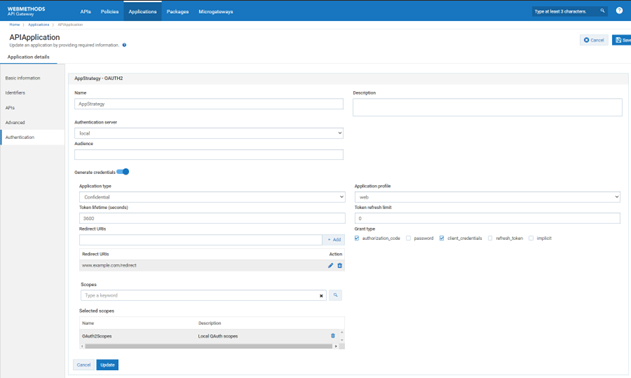
j. Click Create strategy.
A strategy is a way to authenticate the incoming request and provides multiple authentication mechanisms or multiple authorization servers for a single authentication scheme. You can create multiple strategies authorized by an API for an application.
k. Provide the Name as AppStrategy.
l. Enable the toggle button Generate credentials to generate the credentials dynamically in the authorization server. The client-id and client-secret get created automatically.
m. Select Confidential from the Application type drop-down list.
n. Specify the redirect URIs that the authorization server can use to redirect the resource owner's browser during the grant process. In this example, provide www.example.com, which is not a valid URL.
o. Select the required Grant types. In this example, the selected grant types are authorization_code and client_credentials.
p. Provide OAuth2Scopes in the Scope text box and click the search icon. The matching OAuth2Scopes appear.
q. Click the + icon next to the required scope to add the scope to the strategy.
r. Click Add to add the strategy.
s. Click Save. The application is registered.
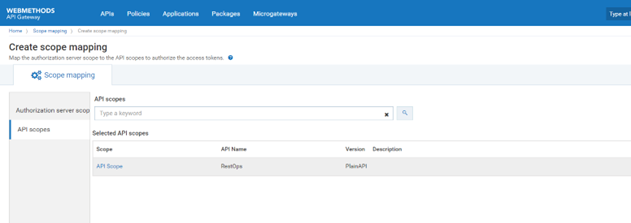
Step 4: Map OAuth scopes
After registering an application, you must map the scope defined in the Authorization server with the APIs in API Gateway to authorize the access tokens used to access the protected resources. You can map either a complete API or parts (resources or methods) of an API to the scope or can add the scope details and modify the scope details as required from the OAuth/OpenID scopes page. In this example you select the OAuth2Scopes scope.
1. Expand the menu options in the title bar and select OAuth/OpenID scopes.
2. Click Map scope.
3. Type OAuth2Scopes in Select authorization server scope and select the Authorization server scope from the search list.
4. Select API scopes in the left pane.
5. Type RestOps or API Scope, which is to be linked to the authorization server, in the API scopes text box.
6. Click Save.
The authorization server scope is mapped to the selected API scopes and the authorization scope appears in the in the scopes list.
Step 5: Get authorization code
1. In the title bar click Application.
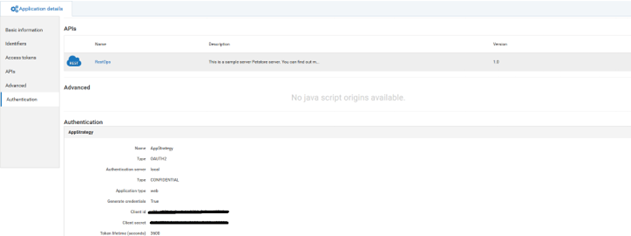
2. Click the application APIApplication.
3. Click AppStrategy. Note the Client id and Client secret values. You require these to get access token.
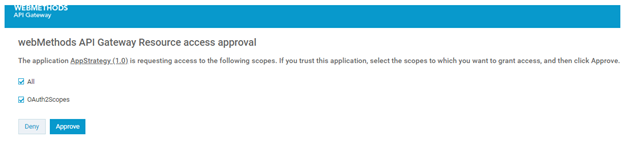
4. Access the Authorization code using the URL https://<machinename>:5555/invoke/pub.oauth/authorize?client_id=eedab424fde14e258b0ab5d572de152d&redirect_uri=http://example.com/redirect&response_type=code&state=121. Approve the approval page and provide Integration server credentials if it prompts with a login page.
5. Receive the Authorization code through URL.
You might get an error, but the authorization code is present in the URL as you are providing dummy redirect URI.
The output is as follows:
…www.example.com/redirect?code=25991916ad4343c5887cb03abcb04f1&grant_type=authorization_code&redirect_uri=http%253A%252F%252Fexample.com%252Fredirect&state=121&scope=View
Step 6: Get access token
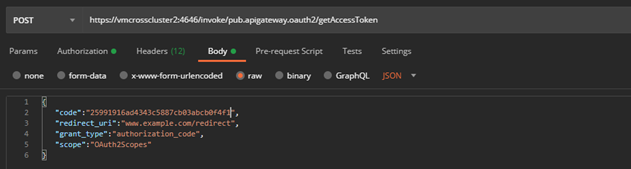
1. Open Postman or any other REST Client
2. Copy the authorization code received.
3. Make a POST call to the following URL, with the hostname of the system where API Gateway is installed in place of localhost and use external port instead of default port https://<machinename>:4646 /invoke/pub.apigateway.oauth2/getAccessToken
4. In the Body provide the following request payload
{
"code":"25991916ad4343c5887cb03abcb04f1",
"redirect_uri":"http://example.com/redirect",
"grant_type":"authorization_code",
"scope":"OAuth2Scopes"
}
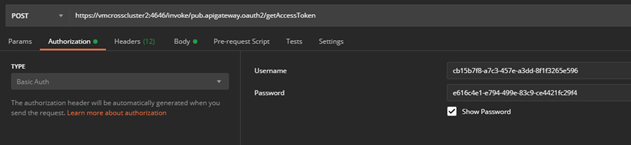
5. Provide the client id and client secret in Basic Auth.
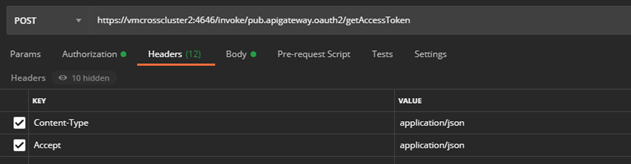
6. In Headers select Content-Type as application/json and Accept as application/json
7. The output gives the access token
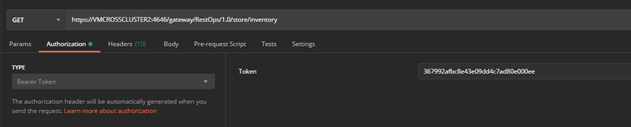
Step 7: Invoke API
Invoke the API with the access token
Alternative Steps
You can perform the same use case with Client Credentials as well. Acquire the access token through client credentials by providing the client_id and client_secret.
1. Open Postman or any other Rest Client.
2. Make a POST call to the following URL, with the hostname of the system where API Gateway is installed in place of localhost and use external port instead of default port. https://<machinename>:4646 /invoke/pub.apigateway.oauth2/getAccessToken
3. In Headers provide Content-Type as application/json (if not specified)
4. In the Body provide the following Request payload
{
“client_id”:”xxxxx”,
“client_secret”:”xxxxx”,
“ grant_type”:”client_credentials”
}