
This section describes how to create a unit test that accepts input and/or validations from a CSV file (file extension .csv). You can create a unit test once and then provide a data file containing different input or validations to run iterations of the test. The wizard creates a unit test file that accepts data from the CSV file.
The following topics are covered:
Note:
Similar to other unit tests, external data unit tests can be run
from the unit test Ant script. For information, see
Creating Ant
Scripts to Run Unit Tests.
 To create an external data unit test
Select for a project in the Project Explorer view.
Or:
Select in the Project Explorer view.
Or:
Select in the Project Explorer view.
The Define External Data Unit Test Details panel is displayed. For example:
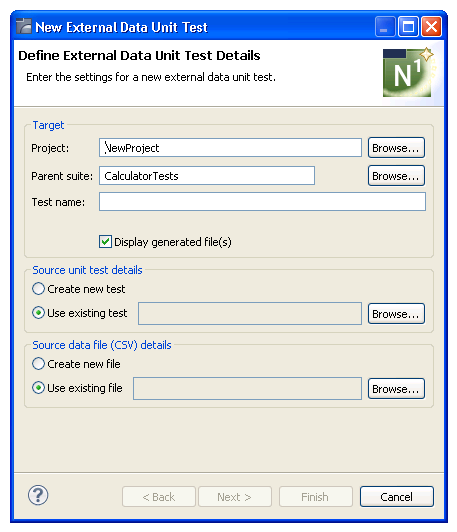
Using this panel, you can:
| Task | Procedure |
|---|---|
| Change the name of the project in which to create the external data unit test. | Type the name of the Natural
project in Project or select
to display a window listing the existing projects for selection.
Note: |
| Provide the name(s) of a subfolder(s) in which to save the external data unit test. If the folder does not currently exist, it will be created for you. | Type the name of the folder in
Parent suite or select to
display a window listing the available folders for selection.
By default, the unit test is stored in the Testing-Suites folder in the current project. If you specify a suite folder name, it becomes a subfolder in the Testing-Suites folder and the unit test will be stored in that folder. |
Type the name of the external data unit test in Test name.
Select an existing business service or Natural unit test in the Source unit test details section.
The selected unit test will be executed for each row in the data file. To display the available unit test files for selection, select for Use existing test. Optionally you can create a new business service or Natural unit test. For information, see Create a New Unit Test.
Select an existing data file in the Source data file (CSV) details section.
To display the available CSV data files for selection, select for Use existing file. Optionally you can create a new data file. For information, see Create a New Data File.
Note:
A wizard is available to record the sample data used to
test a business service or subprogram directly and then export the data to a
CSV file. For information, see
Export Test Data to
a CSV File.
Select .
The external data unit test file is generated into the Testing-Suites folder (or subfolder) and listed in the Project Explorer view.
The .exttst file is also displayed in the editor view.
Note:
The .csv file and/or the
.nattst/.bsrvtst files may also be
created.
Define the configuration settings for the unit test in the editor view.
For information, see Configure Column Mappings and Sample Data.
Select the Connection tab and define the connection settings for the unit test.
For information, see Define Connections.
Save the settings.
To create a new unit test
Select Create new test in the Source details section on the Define External Data Unit Test Details panel.
Select .
The Define New Unit Test Details panel is displayed. For example:
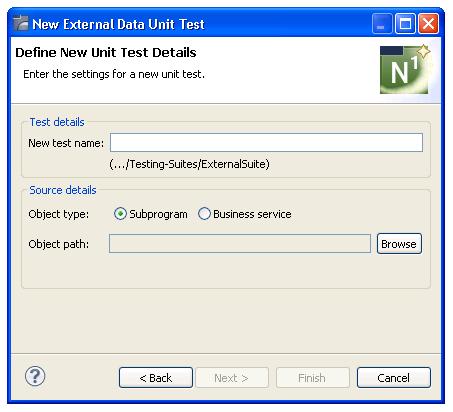
Type the name of the unit test in New test name.
Select the object type for the source unit test in Object type.
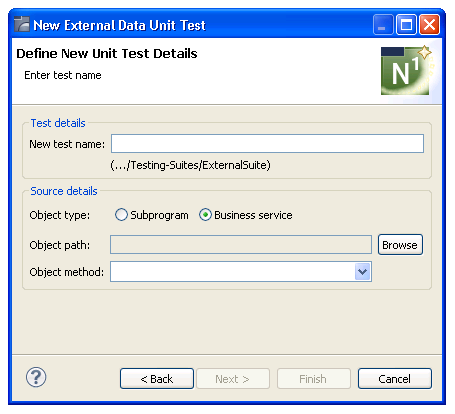
You can select either Subprogram (the default) or Business service. When Business service is selected, an additional field is added to the panel. For example:
Select in Object path.
A list of available business service or subprogram unit test files is displayed. Select the unit test to use for the external data unit test and select OK.
For a business service unit test, select the method to test in Object method.
Select to create the external data unit test and new unit test.
Or:
Select Next to create a new data
file.
Note:
This option is only available when Create new
file is selected on the Define External Data Unit Test
Details panel.
To create a new data file
Select Create new file in the Source data file (CSV) details section on the Define External Data Unit Test Details panel.
Select .
The Define New Data File Details panel is displayed. For example:
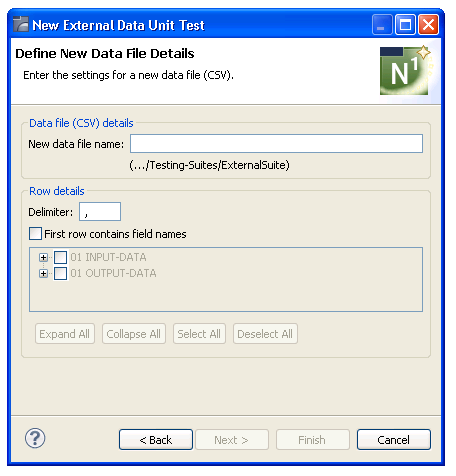
Note:
If Create new test on the
Define External Data Unit Test Details panel is also
selected, the Define New Unit Test Details panel is
displayed before this panel.
Type the name of the data file in New data file name.
Using this panel, you can:
| Task | Procedure |
|---|---|
| Change the character used to separate entries in the first row of the CSV file. | Type a new character in Delimiter. |
| Reserve the first row in the CSV file for the field names. | Select First row
contains field names. At runtime, the first row in the CSV file is
reserved for field names.
Note: |
| Display fields that can be selected for the first row of the CSV file. | Select . To close the tree view, select . |
| Select fields to be included in the first row of the CSV file. | Select and then deselect the fields you do not want to include in the CSV file. To deselect all fields, select . |
Select to create the external data unit test, a new data file, and optionally, a new unit test.
This section describes how to map columns in the CSV file (file extension .csv) to fields in the PDA used by the business service or subprogram unit test. The following CSV file was used for examples:
#FUNCTION,INPUT-DATA.#FIRST-NUM,INPUT-DATA.#SECOND-NUM,INPUT-DATA.#SUCCESS-CRITERIA,OUTPUT-DATA.#RESULT,OUTPUT-DATA.#SUCCESS
Add,1,2,3,3,FALSE
Add,1,9,10,10,TRUE
To configure column mappings and sample data
Select the Configuration tab in the editor for the external data unit test.
For example:
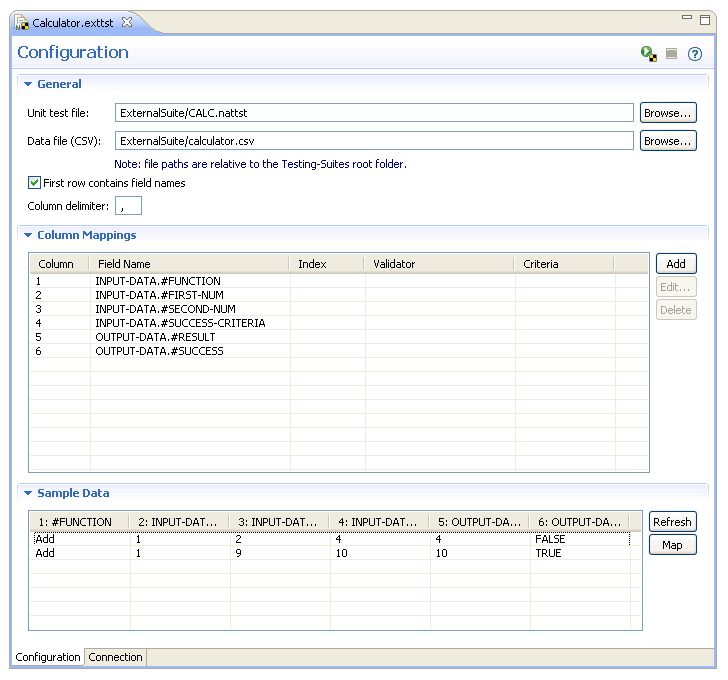
Select in the Column Mappings section.
The Edit Mapping window is displayed. For example:
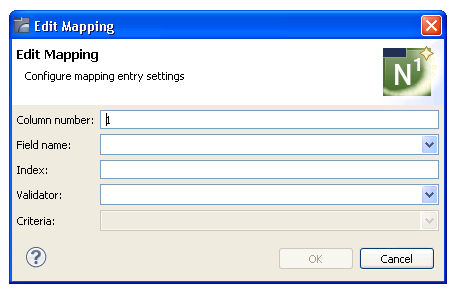
The number of the first unmapped column is displayed in Column number. You can change this number to define the mapping for another column.
Select the name of the field to use for this column in Field name.
Type the index position in Index (used when the field is an array).
Select the type of validator to use for the field in Validator.
The type of validator to use depends on the type of data in the field. The available validators are:
BooleanValidator
ByteValidator
ComparisonValidator (displays a combo box with the options: ">", "<", "=", "<=", ">=")
DateValidator
DecimalValidator
IntegerValidator
RegexValidator (creates regular expressions to validate the contents of a field)
StringValidator
TimeValidator
Select .
The new column mapping is added to the list of mappings on the Configuration tab.
Continue adding column mappings until all columns used for the test have been added.
To revise a mapping, select the mapping in Column Mappings and select . The Edit Mapping window is displayed to change the mapping.
To remove a mapping, select the mapping in Column Mappings and select . The mapping is removed from Column Mappings.
Optionally, you can use the Configuration tab to:
| Task | Procedure |
|---|---|
| Change the name and/or location of the unit test file used for the external data unit test. | Type the name of the unit test in
Unit test file or select to
display a window listing the existing unit test files for selection.
Note: |
| Change the name and/or location of the CSV file containing field names and input for the external data unit test. | Type the name of the CSV file in
Data file or select to
display a window listing the existing CSV files for selection.
Note: |
| Reserve the first row in the CSV file for the field names. | Select First row contains
field names. At runtime, the first row in the CSV file is reserved
for field names.
Note: |
| Change the delimiter character used to separate columns in the CSV file. | Type a new delimiter character in Column delimiter. |
| Retrieve sample data from the CSV file. | Select
in the Sample Data section.
The first 20 rows in the CSV file are retrieved.
Tip: |
| Map new sample data to the columns. | Select (enabled when the First row contains field names option is selected). A confirmation window is displayed, indicating that all current column mappings will be removed. Select to delete the old mappings and apply the new mappings. |
Save the configuration settings.