
This section describes how to test a business service or subprogram directly. It provides an easy way to run a business service or subprogram by analyzing the parameters, displaying them in a test editor (tester), and allowing you to change the input values. You can then run the test and verify the return values.
The following topics are covered:
This section describes how to test a business service directly. The following topics are covered:
Note:
The subprograms used for the service must be available locally.
If they are not available locally, download them from the server.
 To test a business service directly
Open the context menu for the business service in the Project Explorer view.
Select .
The testing options for business services are displayed.
Select .
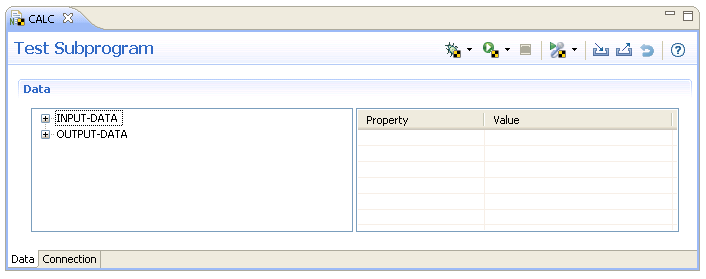
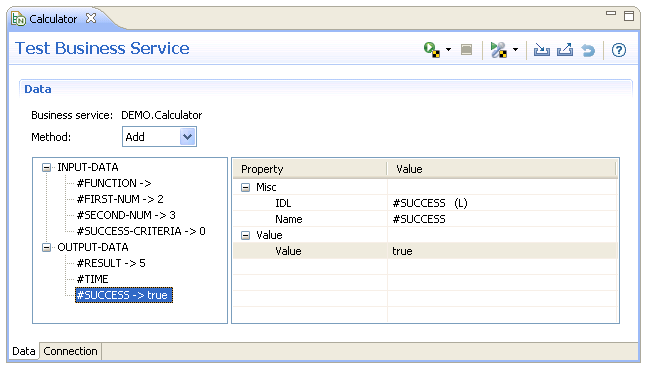
The business service is displayed in the editor view. For example:
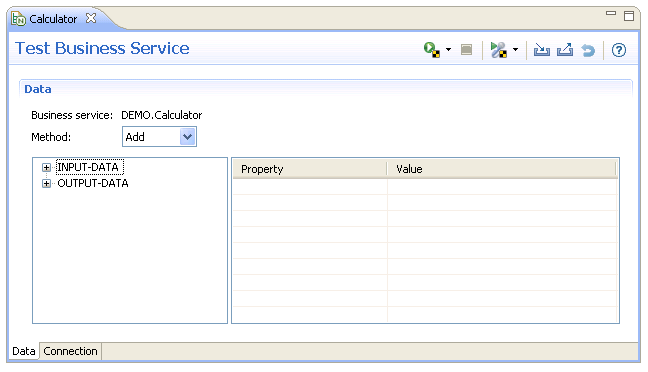
Note:
For information on using this editor, see
Features of the Test
Editors.
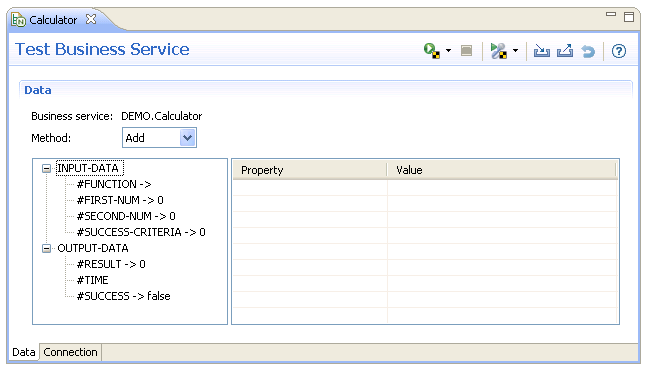
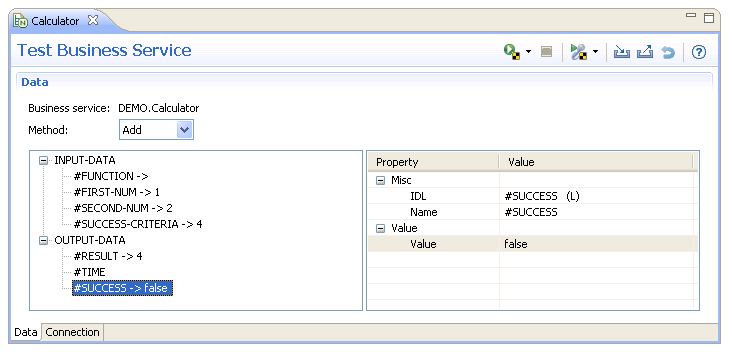
Expand the INPUT-DATA and OUTPUT-DATA nodes.
The Data tab displays the properties and values defined for each parameter used in the test. For example:
Select each input and output field to use in the test and
define the value for the Value property.
For example:
| Parameter | Value |
|---|---|
| FIRST-NUM | 2 |
| SECOND-NUM | 3 |
| RESULT | 5 |
| SUCCESS | true (select Value to change the value from false to true) |
Optionally, you can:
| Task | Procedure |
|---|---|
| Define test data for another method used by the business service. | Select the method in
Method.
Note: |
| Define input parameters for the test. | Expand the INPUT-DATA node and provide input values for each property in Property and Value. |
| Define output parameters for the test. | Expand the OUTPUT-DATA node and provide output values for each property in Property and Value. |
| Reset all data values and structures to their default values. | Select the Reset
Data toolbar icon. For example:
|
| Enter date and/or time details. | See Define Date and Time Details. |
| Run the test in another environment. | See Define Connections. |
| Interrupt a test that continues to run with no response. | Select the Stop
Test toolbar icon. For example:
|
| Export and import test data for business services and subprograms. | See Export/Import Test Data. |
| Record test data and then export it to a CSV file (file extension .csv). | See Export Test Data to a CSV File. |
Select
![]() to start the
test.
to start the
test.
When defining the value for a date and/or time field in a subprogram used by a business service, a window is displayed to enter details about the date or time. This section describes how to access and define details about a date or time field.
To define details about a date or time field
Select Value for a date or time field in the testing editor.
For example:
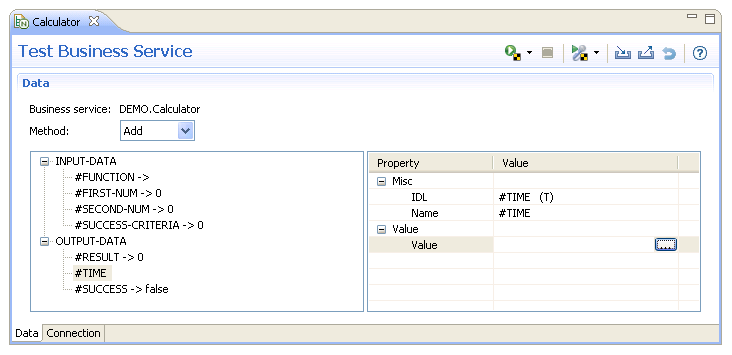
Select
 in the Value column.
The Enter Date/Time window is displayed. For example:
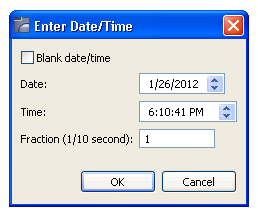
By default, the current date and time are displayed. Optionally, you can:
| Task | Procedure |
|---|---|
| Blank out date and time information when testing business services or subprograms. | Select Blank date/time. |
| Change the date used for the test. | To change the month, select the
up or down arrow for Date.
To change the day, select the day portion of Date and then select the up or down arrow. To change the year, select the year portion of Date and then select the up or down arrow. |
| Change the time used for the test. | To change the hour, select the up
or down arrow for Time.
To change the minute, select the minute portion of Time and then select the up or down arrow. To change the second, select the second portion of Time and then select the up or down arrow. |
| Use tenths of a second to define the time used for the test. | Enter the number of tenths of a second in Fraction. |
This section describes the Connection tab in the editor view. This tab is used to maintain information about the environment in which the test will run.
To define the connection settings
Select the Connection tab for the test.
For example:
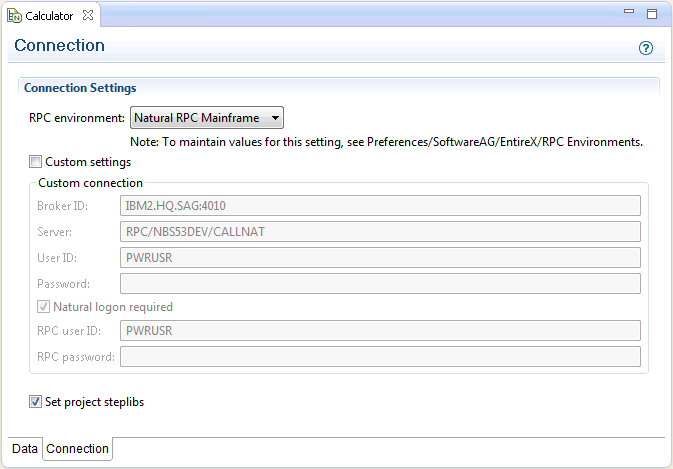
This tab shows the current connection settings for the RPC environment. For this example, the settings define a Natural RPC Mainframe environment derived directly from NaturalONE, as well as settings indicating how the RPC server will be started.
Select the environment in which to run the test in RPC environment.
This value defines the name of an EntireX RPC connection configured in Eclipse.
Note:
The list of environments is defined in the
Preferences window for RPC environments. For information
on adding additional environments to the list, see
Define Additional RPC
Environments.
Or:
Select Custom settings and define the
custom connection as follows:
| Setting | Description |
|---|---|
| Broker ID | Broker identifier. Each installation of EntireX is assigned a Broker ID. This number uniquely identifies EntireX to your network. If you do not know the Broker ID, ask the network administrator for your organization. |
| Server | Name of the Broker server used to logically describe a server (rather than the name of the program that implements the server). This allows you to change the program name without affecting the client programs that use the service. |
| User ID | User identifier the server will use to assign the corresponding fields in the EntireX control block when making calls using the EntireX ACI (Advanced Communication Interface). |
| Password | Password value the server will use to assign the corresponding fields in the EntireX control block. |
| Natural logon required | Determines whether a Natural logon is required. |
| RPC user ID | User identifier the EntireX RPC server will use to connect with the Natural server. |
| RPC password | Password value the EntireX RPC server will use to connect with the Natural server. |
Use the Set project steplibs check box to indicate whether the steplibs from the Natural project are set in the RPC server environment. If checked, the Natural Development Server is used. If not checked, only the RPC server environment is used, without Natural Development Server.
Note:
Keep in mind that the Natural Development Server used by
the project must always be accessible when the value is checked. The Natural
Development Server is accessed to check the development mode settings for the
steplib consolidation. These steplibs are then passed to the RPC server.
Save the connection settings.
You can define additional RPC environments. Once new environments have been added, they can be selected in RPC environment on the Connection tab.
To define additional RPC environments
Select on the menu. The Preferences window is displayed.
Expand the Software AG node.
Select EntireX > RPC Environments.
The RPC Environments settings are displayed. For example:
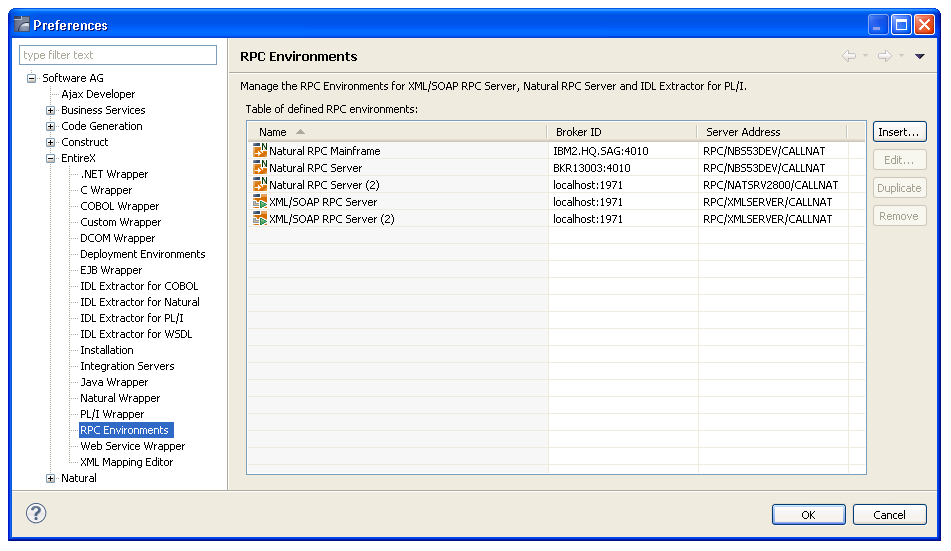
Select .
The New RPC Environment panel is displayed.
Select Natural RPC Server in Type.
The specification fields for this type of server are displayed. For example:
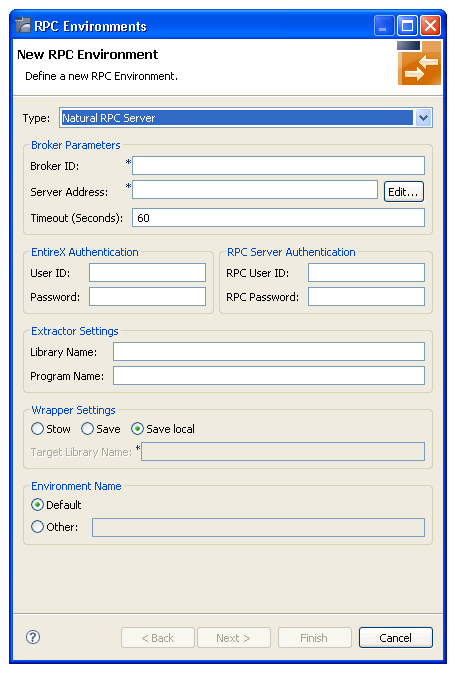
Provide the following details about the new environment:
| Section | Description |
|---|---|
| Broker parameters | Type the broker ID, server address, and default timeout values in the fields provided. |
| EntireX authentication | Type the user ID and password for EntireX in the fields provided. |
| RPC server authentication | Type the user ID and password for the RPC server in the fields provided. |
| Extractor settings | Type the name of the library and program from which to extract data in the fields provided. |
| Wrapper settings | If the new environment is not a local environment, select Stow or Save and provide the name of the library in which to stow or save wrapper subprograms in Target library name. |
| Environment name | After entering the Broker parameters, the default name of the new environment is displayed in this section. If you do not want to use the default name, select Other and provide a new name. |
For more information about the settings on this panel, refer to the EntireX documentation.
Select .
After defining the input and output parameters for the test, you can save it as a business service unit test.
To save the test as a business service unit test
Select on the menu.
The Define Business Service Unit Test Details panel is displayed. For example:
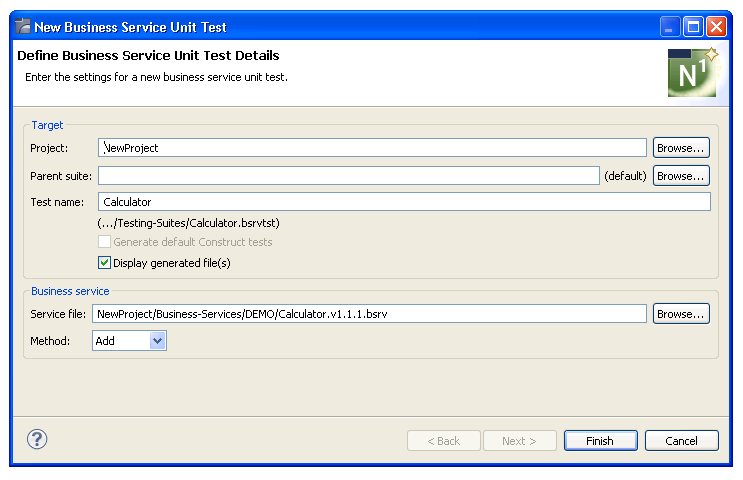
Provide details for the unit test.
For information, see Create a Unit Test for a Business Service.
Note:
You can create Ant scripts to run unit tests (file
extension .bsrvtst, .exttst,
.nattst, and .seqtst). For
information, see Creating Ant Scripts
to Run Unit Tests.
This section describes how to test a subprogram directly. The following topics are covered:
Note:
The subprogram must be available locally. If the subprogram is
not available locally, download it from the server.
To access the function to test a subprogram directly
Open the context menu for the subprogram in the Project Explorer view.
Or:
Open the context menu for the subprogram in the editor
view.
Or:
Open the context menu for the subprogram in the
Dependencies view.
Select .
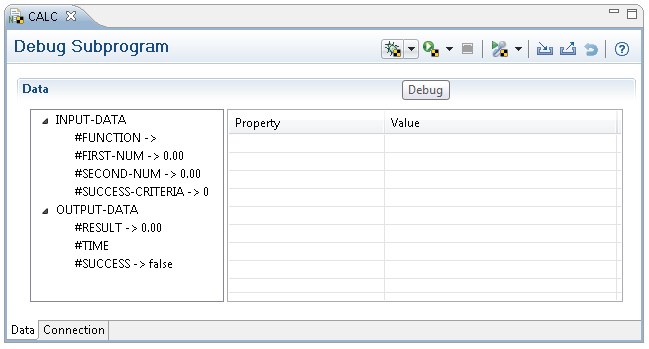
The subprogram is displayed in the editor view. For example:
This editor functions in the same way as the Test Business Service editor. The differences between this editor and the Test Business Service editor is that this editor includes the Debug toolbar icon and the business service editor has an option to select the method (which can change which subprogram is tested internally).
Note:
For information on using this editor, see
Features of the Test
Editors and
Test a Business
Service Directly.
This section describes how to access the Debug option from the Test Subprogram editor.
Note:
To activate the Debug function, the Use debug attach
server option must be selected in the Eclipse Preferences
> Software AG > Natural > Debug Attach Settings
window.
To access the Debug function
Open the context menu for the subprogram in the Project Explorer view.
Or:
Open the context menu for the subprogram in the editor
view.
Or:
Open the context menu for the subprogram in the
Dependencies view.
Select .
The subprogram is displayed in the editor view.
Select
![]() on the
editor toolbar to debug the subprogram using the values currently defined in
the editor.
on the
editor toolbar to debug the subprogram using the values currently defined in
the editor.
When a breakpoint is reached, the Debug perspective is displayed. For more information, see Debug a Subprogram Directly.
After defining the input and output parameters for the test, you can save it as a Natural unit test.
To save the test as a Natural unit test
Select on the menu.
The Define Natural Unit Test Details panel is displayed. For example:
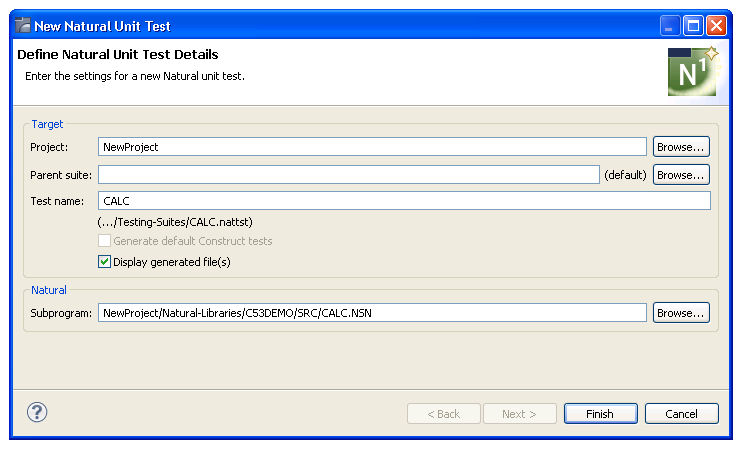
Provide details for the unit test.
For information, see Create a Unit Test for a Subprogram.
Note:
You can create Ant scripts to run unit tests (file
extension .bsrvtst, .exttst,
.nattst, and .seqtst). For
information, see Creating Ant Scripts
to Run Unit Tests.
This section describes how to debug a subprogram via RPC using the NaturalONE debugger and the values currently defined in the editor.
Note:
To activate the context menu, the
Use debug attach server option must be selected in the
Eclipse Preferences > Software AG > Natural > Debug Attach
Settings window.
To debug a subprogram
Open the context menu for the subprogram in the Project Explorer view.
Select .
The subprogram is displayed in the editor view. For example:
This editor functions in the same way as the Test Subprogram editor.
Select the down arrow for
![]() to
select the environment in which to debug the current file using the values
defined in the editor.
to
select the environment in which to debug the current file using the values
defined in the editor.
For example:
![]()
Select
![]() to
debug the current file using the values defined in the editor.
to
debug the current file using the values defined in the editor.
When a breakpoint is reached, the Debug perspective is displayed.
Tip:
If you receive a WAIT timeout occurred error message, try
increasing the timeout value for the selected RPC connection in the Eclipse
Preferences > Software AG > EntireX > RPC
Environments window. You can continue debugging in the Debug
perspective when the editor receives the WAIT timeout error.
Notes:
This section describes how to export and import test data for a business service and subprogram, which allows you to populate the test data quickly without re-entering each field name. These options are:
Export test data (field names and values) from the test editor data tree to a new or existing test data file (extension .tstdata) in the workspace.
Note:
The .tstdata files can be stored
anywhere in the workspace.
Import an existing test data file in the workspace to the test editor (matching field names in the imported file to field names in the editor).
This section covers the following topics:
To export test data to the workspace
Open the context menu for the business service (or subprogram) in the Project Explorer view.
The testing options are displayed.
Select (or ).
The business service (or subprogram) is displayed in the editor view.
Select
![]() on the editor
toolbar.
on the editor
toolbar.
The Define Details about the Test Data File window is displayed. For example:
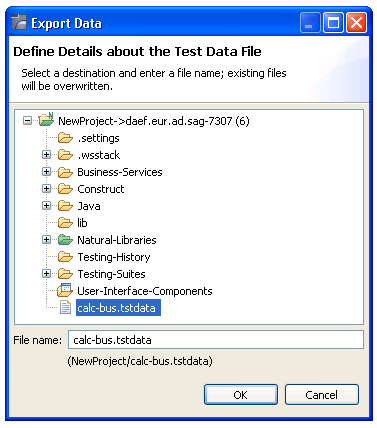
Select the location in which to export the test data file.
The last exported .tstdata file is selected.
Note:
To overwrite data, select an existing file.
Type the name of the test data file in File name.
By default, the ".tstdata" extension is added to the file name.
Select to export the test data file.
If the test data file currently exists (as shown in the example above), an overwrite confirmation dialog is displayed.
The following example shows sample input for a business service test:
After exporting the data, the following test data (.tstdata) file is created:
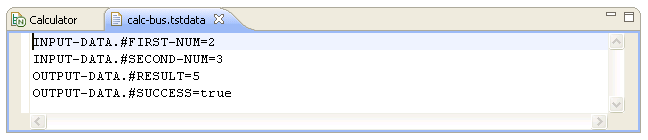
You can modify this file using key=value pairs (for example, FIELDA=value). If the key begins with a hash character (#), then the field name must be preceded by a \ character (for example, \#FIELDB=value) or the field will be skipped. All other hash characters (such as CUSTOMER.#NAME=value) do not require the \ character.
Tip:
Using this file as an example, you can create test data files
for all the functions, save the files using appropriate names, and then change
the values accordingly.
To import test data from the workspace
Open the context menu for the business service (or subprogram) in the Project Explorer view.
The testing options are displayed.
Select (or ).
The business service (or subprogram) is displayed in the editor view.
Select
![]() on the editor
toolbar.
on the editor
toolbar.
The Import Data window is displayed. For example:
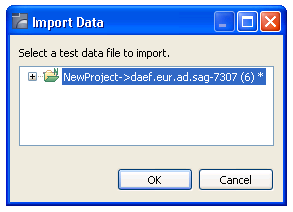
Select the test data file to import (only projects/folders containing test data files are listed).
Select to import the file.
Any field in the imported test data file that does not have a matching field in the test editor tree, or has a matching field containing an invalid value, will not be imported and will not stop the import process. If this situation occurs, an Error log warning is displayed showing problem fields.
This section describes how to record the data used to test a business service or subprogram directly and then export it to a CSV file (file extension .csv). You can then use this file as input to create an external data unit test. For information, see Create an External Data Unit Test.
To record the test data and export it to a CSV file
Open the context menu for the business service (or subprogram) in the Project Explorer view.
The testing options are displayed.
Select (or ).
The business service (or subprogram) is displayed in the editor view.
Select
![]() on the NaturalONE
toolbar to begin recording.
on the NaturalONE
toolbar to begin recording.
The Define External Test Details panel is displayed. For example:
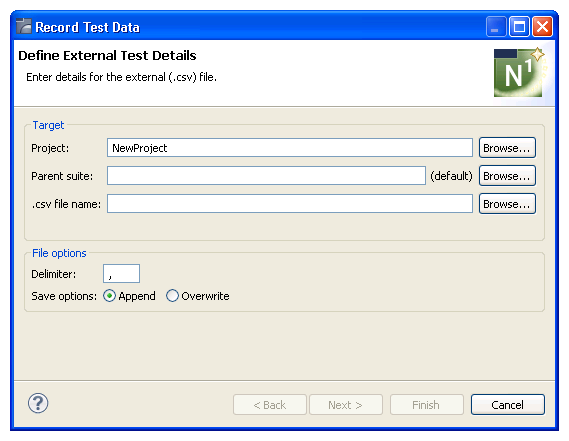
Type the name of the external data file in .csv file name or select to display a window listing the available files for selection.
Optionally, you can use the Define External Test Details panel to:
| Task | Procedure |
|---|---|
| Change the name of the project in which to create the external data file. | Type the name of the Natural
project in Project or select
to display a window listing the existing projects for selection.
Note: |
| Provide the name(s) of a subfolder(s) in which to save the external data file. If the folder does not currently exist, it will be created for you. | Type the name of the folder in
Parent suite or select to
display a window listing the available folders for selection.
By default, the external data file is stored in the Testing-Suites folder in the current project. If you specify a suite folder name, it becomes a subfolder in the Testing-Suites folder and the file will be stored in that folder. |
| Change the delimiter character used to separate input values in the external data file you are generating. | Type the character in Delimiter. |
| Replace test data in an existing CSV file (file extension .csv) with new data. | Select
"Overwrite" in Save options.
Note: |
Select .
The Select Data to Record panel is displayed. For example:
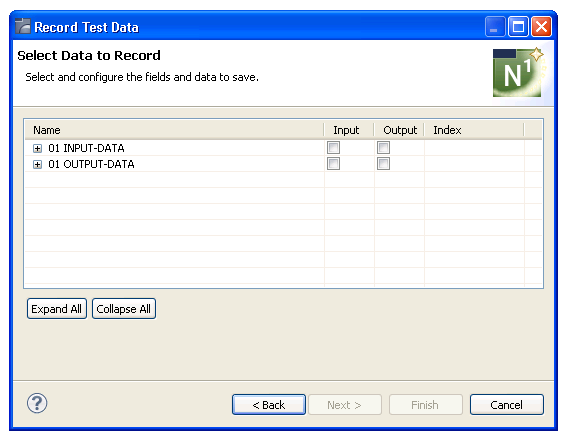
Select .
The level 1 fields are expanded to display the lower level fields. For example:

Note:
To collapse the fields, select .
Select Input and/or Output for each level 1 field you want to include in the recording.
Only the selected data for each field will be saved.
Provide index values in Index for any array fields.
Select to begin recording.
The Recording icon changes to
![]() on the
toolbar.
on the
toolbar.
Define the test data in the editor view.
For example:
Note:
For information on using this editor, see
Features of the Test
Editors and
Test a Business
Service Directly.
Select
![]() to run the
test.
to run the
test.
Repeat steps 10 and 11 for each test containing data you want to record.
Select
![]() to stop
recording.
to stop
recording.
The generated CSV file is displayed in the Testing-Suites node in the Project Explorer view.