
This document covers the following topics:
You can generate an external object from a documentation object.
 To generate an external object
Select the documentation object for which you want to generate an external object.
You can generate an external object from the following object types:
DB2 databases
dataspaces
files of many different types
programs of type database function and SQL procedure
storagespaces
verifications of type automatic
Invoke the context menu and choose .
The schema generation wizard appears.
Specify all required options. If available choose the button to proceed to the next page.
For detailed information on the object type-specific information that can be specified using this wizard, see Generation of External Objects in External Objects in Predict.
If all required information has been specified, choose the button to start generation.
When the generation process has completed, the last page of the wizard is shown. When the List option has been selected on a previous page of the wizard, a report is shown. If an error occurs during the generation process, an error report is shown.
This section describes the wizard that is used for schema incorporation.
The wizard provides several pages in which you have to specify information. The number of pages and the information on these pages depends on the object type that has been selected on the first page of the wizard.
For detailed information on the object type-specific information that can be specified using this wizard, see Incorporation in External Objects in Predict.
The wizard uses edit controls such as text boxes, check boxes or drop-down list boxes. For the description of check boxes, the reference documentation External Objects in Predict uses the abbreviations Y (yes) and N (no). Y means that the check box is selected, and N means that the check box is not selected.
To incorporate an external schema
In the view, choose .
Or:
In the Predict Description and
Generation view right-click on the root node and select
Schema Incorporation Wizard
The schema incorporation wizard appears, providing several pages.
Note:
If DB2 is not installed at your site, the incorporation
functions for DB2 objects are not available.
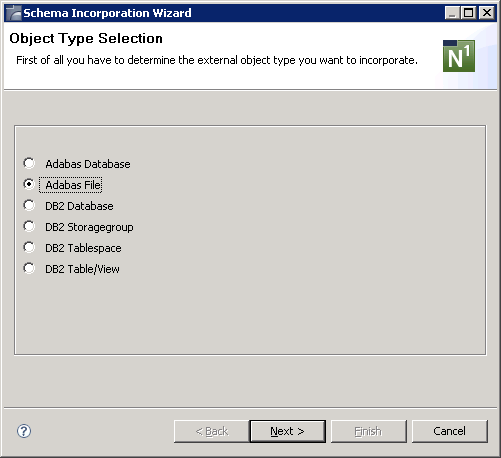
Select the option button for the type of external object that you want to incorporate.
Choose the button to proceed to the next page.
The information on the next pages depends on the object type that has been selected on the first page.
Example - incorporate Adabas file:
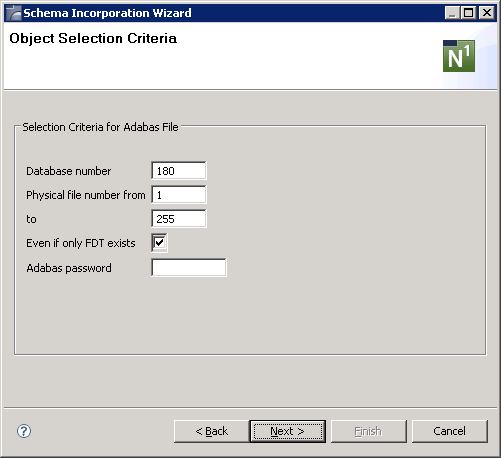
Specify the selection criteria and choose the button to proceed to the next page.
Example - incorporate Adabas file:
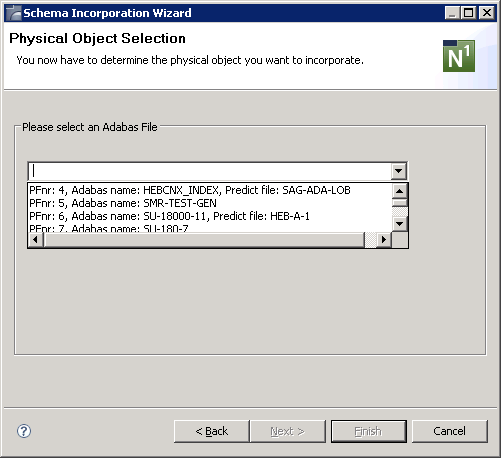
The incorporation functions that are available on this page depend on the object type that has been selected on the first page.
From the drop-down list box, select the object that you want to incorporate.
When an object has been selected, the option button(s) for the incorporation function(s) that can be executed for this object are visible.
For general information on these buttons, see Overview of Incorporation Options in External Objects in Predict.
Select the option button for the incorporation function that you want to execute (Incorporate, Connect or Test) and choose the button to proceed to the next page.
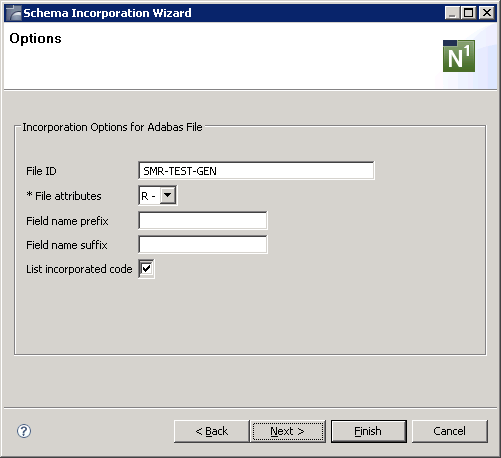
An additional page appears when you have selected the incorporation function Incorporate or Connect. You can then specify the incorporation or connect options.
Example - incorporation options for an Adabas file:
Note:
Different options or pages appear for the incorporation
functions Connect and Test.
Specify the required information and choose the button to proceed to the next page.
Example - incorporate Adabas file:
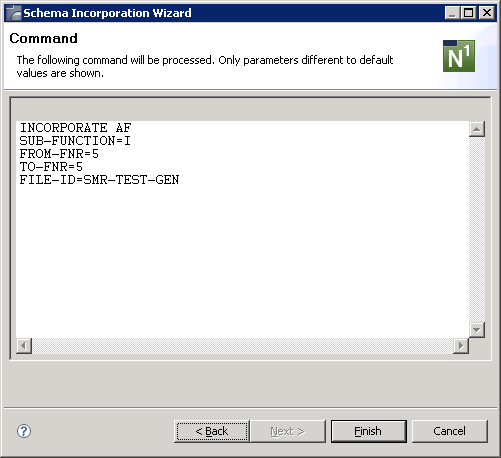
This page shows only the settings which have been modified on the previous pages.
If all required information has been specified, choose the button to start incorporation.
Note:
As long as you do not choose the
button, you can go back to the previous pages by
choosing the button.
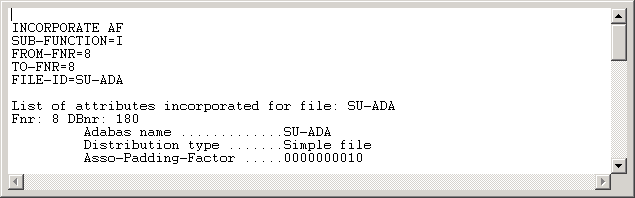
When the incorporation process has completed and the List incorporated code option has been selected previously, a report is shown in a separate Predict Report view. If this option has not been selected, a message box shows only the resulting message of the incorporation process.
However, if an error occurs during the generation process, an error report is shown in the Predict Report tab. The error report is always shown. The setting of the List incorporated code option is not considered in this case.
Example - incorporate Adabas file:
You can the report on a printer that is defined in your environment or it using the standard Eclipse functions of the menu .
You can refresh Adabas files and DB2 tables/views. When you refresh such an external object, you delete all of its contents.
See Administration of External Objects in External Objects in Predict.
Caution:
Do not confuse this type of refresh (this term is used with
Adabas) with the refresh function which
updates your display see Refreshing the
Tree.
To refresh an external object
Open the External Objects node containing the external object that you want to refresh.
Select the external object.
Invoke the context menu and choose .
Note:
When the refresh function is not available for the
selected external object, the
command is disabled.
A dialog box appears asking whether you really want to refresh the object.
To refresh the current object, choose the button.
When you disconnect an external object from its corresponding documentation objects, the implementation pointer from the documentation object to the external object is deleted, but the object itself remains intact.
See Administration of External Objects in External Objects in Predict.
To disconnect an external object
Open the External Objects node containing the external object that you want to disconnect.
Select the external object.
Invoke the context menu and choose .
A dialog box appears asking whether you really want to disconnect the object.
To disconnect the current object, choose the button.
Disconnected external objects are no longer shown in the External Objects node.
You can purge external objects using the command. When you purge an external object, it is disconnected and physically deleted.
See Administration of External Objects in External Objects in Predict.
To purge an external object
Open the External Objects node containing the external object that you want to purge.
Select the external object.
Invoke the context menu and choose .
A dialog box appears asking whether you really want to delete the object.
To confirm the deletion for the current object, choose the button.