
This document covers the following topics:
All controls that are contained inside the control library are rendered using a style sheet. Ajax Developer delivers a variety of predefined styles but also allows to you to create your own styles sheets.
The Style Sheet Editor simplifies the creation of your own style sheets: on the one hand, you can define the very basic style elements (main colors to be used), and on the other hand, you can change a controls' style definition on the lowest level.
For information on how to define a style sheet in the Layout Painter, see Defining a Style Sheet.
For further information on style sheets, see Adapting the Look & Feel in Special Development Topics, which is part of the Application Designer documentation.
Style sheets are part of your application's user interface and should therefore be maintained in a user interface component. When a user interface component is created, a subfolder named styles is automatically created in your user interface component. If you already have your own style sheets, copy them into this folder.
Remember to always use the Style Sheet Editor tool to modify the style. The file you need to check in into your version control systems is the *.info file. The *.css file is simply a build result of the *.info file.
Be sure to put your style sheet into this predefined folder styles. Then the styles will automatically be built when building your project and they will automatically be packaged with your application when creating a deployment file.
When you create and save a new style sheet, it is written to the styles subfolder of your user interface component.
Note:
By default, your pages are rendered with the
CIS_DEFAULT style sheet which is one of Ajax Developers'
predefined style sheets. Do not modify this style sheet because your
modifications would be lost when you update to a new version. Instead, create
your own style sheet as described below.
 To create a new style sheet using the wizard
Use the New Style Sheet wizard to create a new style sheet.
From the context menu of the UI component, chose > .
In the dialog of the wizard, enter a name for your style, for example "MyStyle" and click .
The Style Sheet Editor is opened with "MyStyle" as Variant name.
Click .
Modify the values on the tabs according to your requirements. See Changing a Style Sheet for information on the Style Details tab.
To save your changes, click the button.
Note:
Do not forget to click before
closing the Style Sheet Editor or clicking the Other
Variant button. Otherwise all changes will be lost without warning.
When you choose the Other Variant button, you can open
another style sheet or create another new style sheet. If you have not saved
your input previously, it is lost.
When you save a new style sheet for the first time, it is created in your style sheet directory with the extension .css.
To create a new style sheet manually, based on CIS_DEFAULT
Alternatively, a new style sheet can be created manually based on CIS_DEFAULT following these steps:
In the /styles folder of the ONE user interface component create a subfolder /images
From the file system, copy cisnatural/cis/styles/images/sag23*.* to <myoneui>/styles/images
From the file system, copy cisnatural/cis/styles/CIS_DEFAULT.info to <myoneui>/styles
Rename <myoneui>/styles/CIS_DEFAULT.info to, for instance, <myoneui>/styles/MYSTYLE.info
Open and edit MYSTYLE.info with the style sheet editor tool and edit to requirements
Click and close the style sheet editor tool
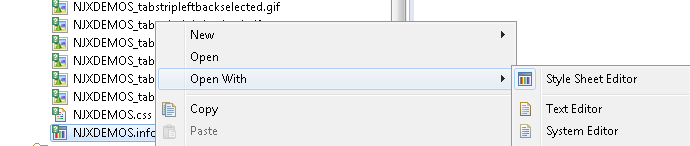
Right-click the *.info file in the style subfolder of your user interface component and open it with the Style Sheet Editor.
To open an existing style sheet
When the Style Sheet Editor is open you can also select a style name via the Variant drop-down list box. The style sheets of this user interface component and the central style sheets of the Natural Ajax framework are shown in the drop-down list.
Note:
In addition to the style sheet names, the drop-down list
box also shows the paths to the corresponding files in the file system.
Choose the button.
The dialog with the style sheet definitions appears.
Modify the values on the different tabs according to your requirements. See Changing a Style Sheet for information on the Style Details tab.
Note:
When you choose the Other Variant
button, the dialog is shown again which appears when you invoke the Style Sheet
Editor. You can then open another style sheet or create a new style sheet. Any
changes that you have applied after the last save are lost.
To save your changes, click the button.
Ajax Developer provides an internal style template in which all the default style information is kept. A newly created style sheet is identical to this template. All style updates that you apply to your style sheet are stored within a separate file which has the extension info. For example, if you named your style sheet "MyStyle", your style sheet folder contains the file MyStyle.info.
Note:
The style sheet folder also contains GIF files. They are
generated according to your specifications for background, font, border color,
etc. Each style sheet has thus individual GIF files. When you modify, for
example, a color setting, new GIF files are generated which overwrite the
previous GIF files.
When you edit a style sheet, you define the standard settings such
as the font size on the General tab. All of the settings
defined on the General tab are then assigned to individual
controls on the Style Details tab via the corresponding
variable (for example, @@FONTSIZE@@). See
Overview of
Variables.
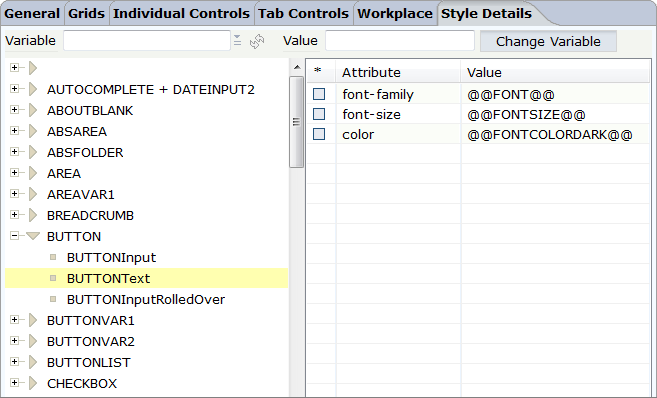
To change an attribute value in a single style sheet class
Go to the Style Details tab.
Expand the tree on the left and select the name of a style sheet class.
Or:
In the Variable field select a specific
variable from the list of variables.
The tree in the left pane will be rebuilt if a variable is selected from the list. The tree then shows only style sheet classes that contain the selected variable.
Expand the tree on the left and select the name of a style sheet class.
The attributes for the selected class are shown on the right.
Select the attribute that you want to change.
The line is marked as selected and the attribute name and value are now shown in the text boxes at the bottom.
Specify another value for the attribute in the text box at
the bottom. For example, if you want to define another color, you can define a
color value such as #FF0000 (instead of
@@FONTCOLORDARK@@).
You can also define a different name for a property. As soon
as you choose the button, a new entry is created
in the style sheet. This entry must be a valid CSS style sheet definition. For
example, when you change the attribute name from
color to
background-color, this is a valid definition.
When you specify an invalid attribute name, this will not have any effect. For
example, when you change the attribute name from
color to hello,
this will not have any effect even though the new entry hello
@@FONTCOLORDARK@@ will be created.
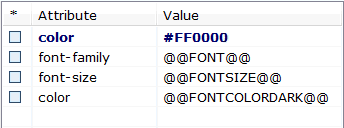
Choose the Update button.
When you have changed a default entry of the style template, the changed information is now shown in bold in an additional line. For example:
Notes:
To change an attribute value in multiple classes
Go to the Style Details tab.
In the Variable field select a specific variable from the list of variables.
The tree in the left pane will be rebuilt if a variable is selected from the list. The tree then shows only style sheet classes that contain the selected variable.
To end the variable search you can choose the blank entry in the variable list.
Enter a new value.
The currently used value of the selected variable is displayed in the Value field. You can change the value of the selected variable by entering a new value.
Choose the button to apply your changes.
The new attribute value will be applied to all style sheet classes using that variable
If a variable is updated by choosing the
button, the
 icon
(Refresh list) is activated to indicate that the search
result that is currently displayed can be refreshed to display the most current
results.
icon
(Refresh list) is activated to indicate that the search
result that is currently displayed can be refreshed to display the most current
results.
The following variables can be defined on the Style Details tab:
@@FONTCOLORDARK@@
@@FONTSIZE@@
@@FONT@@
@@LIGHTBACKGROUND@@
@@HEADLINEBACKGROUND@@
@@BORDERCOLOR@@
@@DARKBACKGROUND@@
@@TITLEBARBACKGROUND@@
@@FONTCOLORLIGHT@@
@@BUTTONHEIGHT@@
@@BUTTONIMAGE@@
@@BUTTONCOLOR@@
@@FONTCOLORINACTIVE@@
@@CONTROLERRORBACKGROUND@@
@@CONTROLEDITBACKGROUND@@
@@CONTROLDISPLAYBACKGROUND@@
@@LIGHTTITLEBARBACKGROUND@@
@@VARIANT@@
@@FIELDHEIGHT@@
@@FIELDBORDERCOLOR@@
@@CONTROLPOPUPINPUTONLYBACKGROUND@@
@@SHADEDDARKBACKGROUND@@
@@SELECTEDCELLBACKGROUND@@
@@SELECTEDBACKGROUND@@
@@EVENCELLBACKGROUND@@
@@ODDCELLBACKGROUND@@
@@TABAREALEFTPADDINGFIRST@@
@@TABAREALEFTPADDINGSECOND@@
@@EMPTYCELLBACKGROUND@@
@@SHADEDSELECTEDBACKGROUND@@
@@ODDCELLBACKGROUNDVAR1@@
@@EVENCELLBACKGROUNDVAR1@@
@@SELECTEDCELLBACKGROUNDVAR1@@
@@EMPTYCELLBACKGROUNDVAR1@@
@@ODDCELLBACKGROUNDVAR2@@
@@EVENCELLBACKGROUNDVAR2@@
@@SELECTEDCELLBACKGROUNDVAR2@@
@@EMPTYCELLBACKGROUNDVAR2@@
@@TITLEBARHEIGHT@@
@@COLORTOPIC1@@
@@COLORTOPIC2@@
@@COLORTOPIC3@@
@@COLORTOPIC4@@
@@COLORTOPIC5@@
@@COLORTOPIC6@@
@@COLORTOPIC7@@
@@COLORTOPIC8@@
@@COLORTOPIC9@@
@@COLORTOPIC10@@
There are three options when applying own stylesheets:
To do so, set the attribute defaultcss in the cisconfig.xml as described in Natural for Ajax > Client Configuration > Client Configuration > Central Class Path Extensions for Development.
To do so, set the property stylesheetfile in the NATPAGE tag as described in section Natural for Ajax > Natural for Ajax > Typical Page Layout > NATPAGE.
To do so, use the NJX:SESSIONPARAMS control as described in section Natural for Ajax > Natural for Ajax > Non-Visual Controls and Hot Keys > NJX:SESSIONPARAMS.
From release to release, new controls are added to the control library. As a consequence, the style sheet template is typically enhanced with every new control (for example, new style classes are added). As your style changes are kept in a separate file which has the extension info, your style sheet can easily include the enhancements. If your styles are located in a subfolder styles of one of your user interface components, you simply have to rebuild your project to regenerate the style.
If you want to manually regenerate your style without doing a "build all" on the project level, do the following:
To regenerate your own style sheet manually
Open your style sheet in the Style Sheet Editor as described above.
Choose the button.
The following command buttons are now shown: and .
Choose the button.
Note:
Choose the button if
you want to regenerate all existing style sheets.
If you want to secure your style sheets with a version control tool, it is sufficient to keep the files with the extension info under version control. The actual style sheet file (with the extension css) is just a generation result out of the INFO file.