
This section describes how to generate an Ajax page that takes advantage of the capabilities of a subprogram generated by an Object-Browse-Subp wizard (Object-Browse-N1 or Object-Browse-Subp) or an Object-Maint-Subp wizard (Object-Maint-N1 or Object-Maint-Subp). The following files are generated:
page layout (.xml extension)
adapter (.NS8 extension)
main program (.NSP extension)
This section covers the following topics:
This section describes how to generate an Ajax page for an Object-Browse subprogram. The following topics are covered:
The section describes how to access the Ajax Object-Browse Page wizard. Before accessing the wizard, the following conditions must be met:
The wizard must be started from a project that has been enabled for Ajax Developer.
A user interface component must be available locally.
Note:
For more information about the generated files and general
Ajax architecture, refer to the Natural for Ajax
documentation.
 To access the Ajax Object-Browse Page wizard
Open the context menu in the Project Explorer for a subprogram that was generated by either the Object-Browse-N1 or Object-Browse-Subp generator.
Select .
For example:
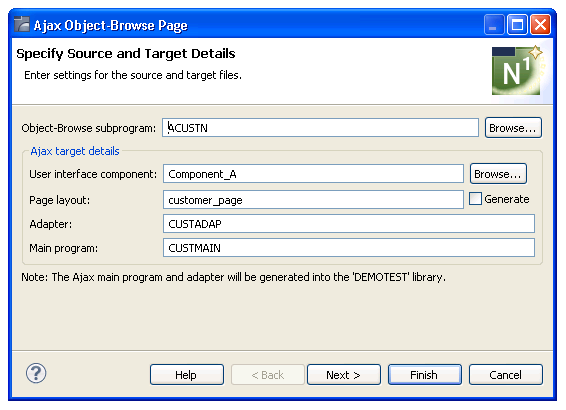
The Specify Source and Target Details panel is displayed. For example:
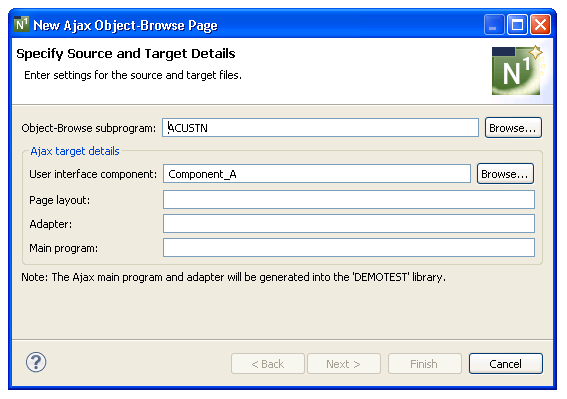
To specify source and target details
Define the following parameters:
| Parameter | Description |
|---|---|
| Object-Browse subprogram | Name of the Object-Browse-generated subprogram for which you are creating the page. To change the name of the subprogram, either type the name of a new subprogram in Object-Browse subprogram or select to display the available subprograms for selection. |
| User interface component | Name of the user interface component for the page. Either type the name of an existing component in User interface component or select to display the available components for selection. |
| Page layout | Name of the page layout file to
be generated. This name must follow standard xml naming conventions (do not
include the .xml extension).
Tip: |
| Adapter | Name of the adapter file to be generated. This name must follow standard Natural naming conventions (do not include the .NS8 extension). |
| Main program | Name of the main program file to be generated. This name must follow standard Natural naming conventions (do not include the .NSP extension). |
Select .
The page is generated using all fields in the PDA, as well as all default column headings and search keys.
Or:
Select .
The Configure Column Details panel is displayed. For example:
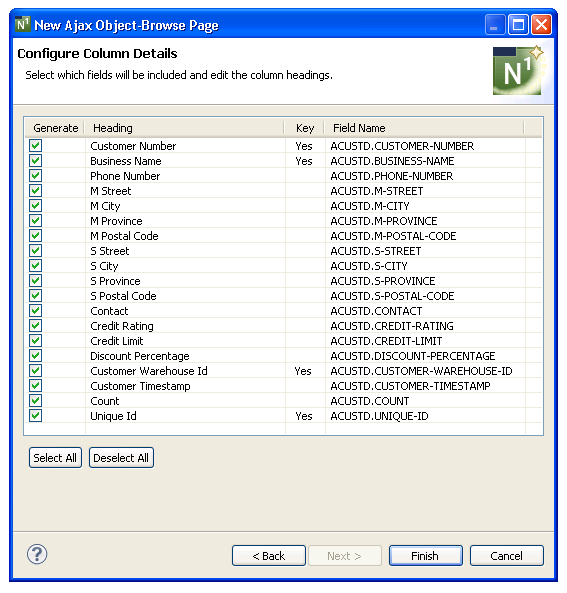
Note:
Array fields are not currently supported.
This panel allows you to select which fields are generated for the page and what column headings will be displayed. The Key and Field Name columns show parameters that are read-only. "Yes" in Key indicates that the corresponding field is used as a search key on the generated page; Field Name displays the fully qualified name of each field in the PDA.
To configure column details
Define the following parameters:
| Parameter | Description | Required/Optional/Conditional |
|---|---|---|
| Generate | Indicates whether the corresponding field is generated or not. To exclude a field, deselect Generate for that field. A minimum of one field must be selected. | Optional |
| Heading | Heading displayed on the generated page for the corresponding field. You can change this heading as desired. | Optional |
Select .
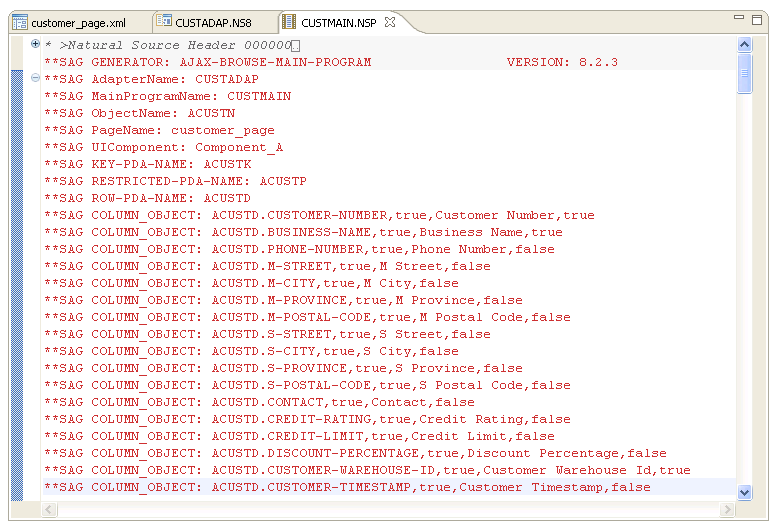
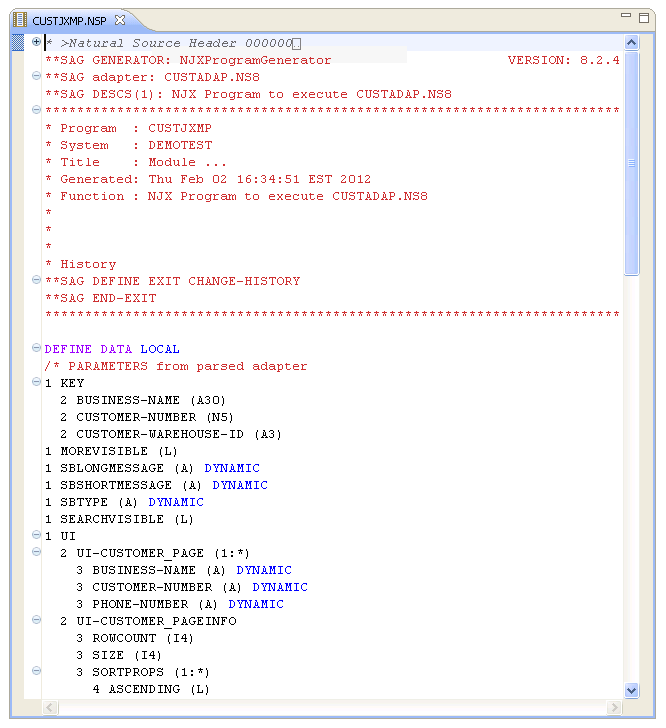
The page is generated using the selected fields, column headings and search keys. The generated main program (.NSP extension) file is displayed in the editor. For example:
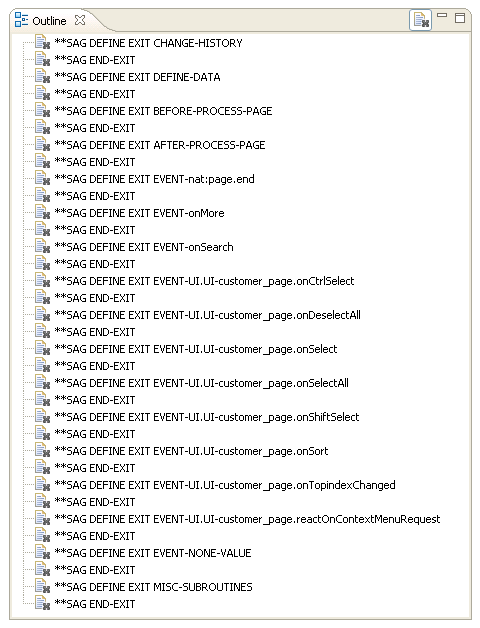
The available user exits are displayed in the Outline view. For example:
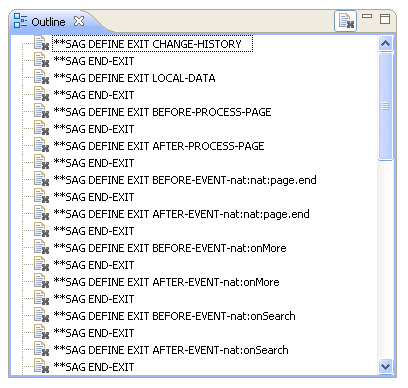
For every event in the page layout file, a BEFORE-EVENT and AFTER-EVENT user exit is generated (for example, "BEFORE-EVENT-nat:nat:page.end" above). When you add an event to the page layout file, a BEFORE-EVENT and AFTER-EVENT user exit is also generated. Code within these exits is preserved during regeneration.
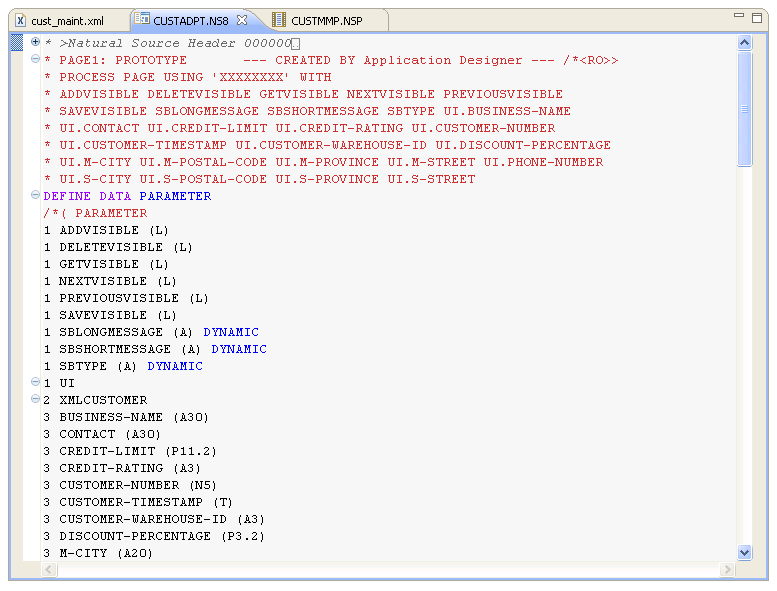
The generated adapter (.NS8 extension) and page layout (.xml extension) files are also displayed in the editor. For example:
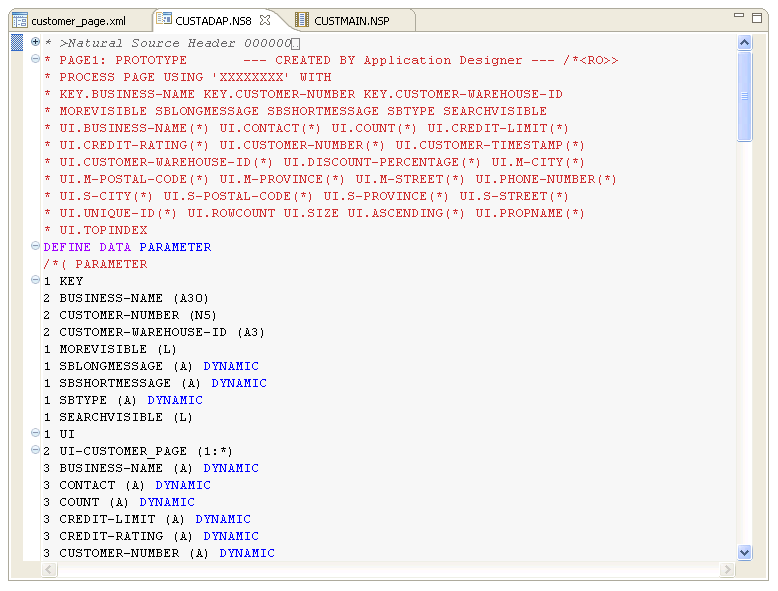
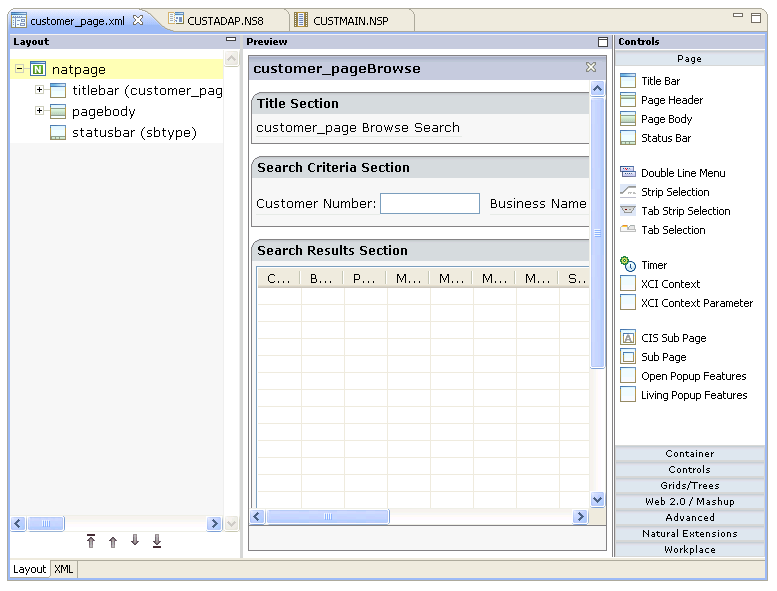
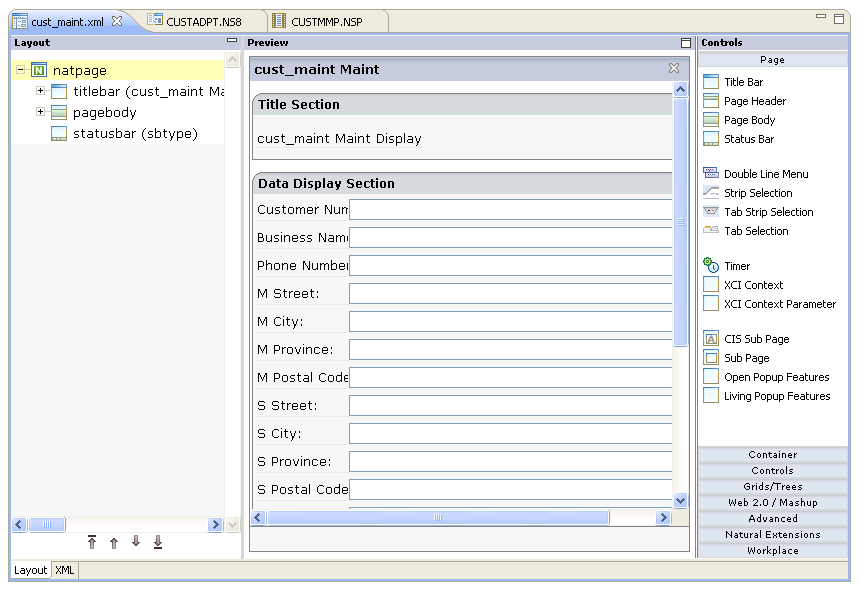
The following example shows the generated page layout file displayed in the Layout tab.
Note:
For more information about these files, refer to the
Natural for Ajax documentation.
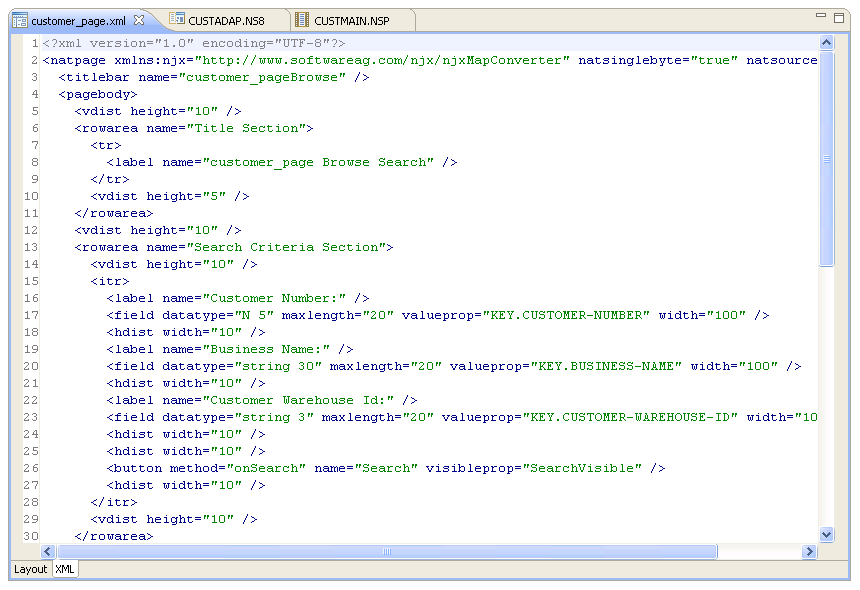
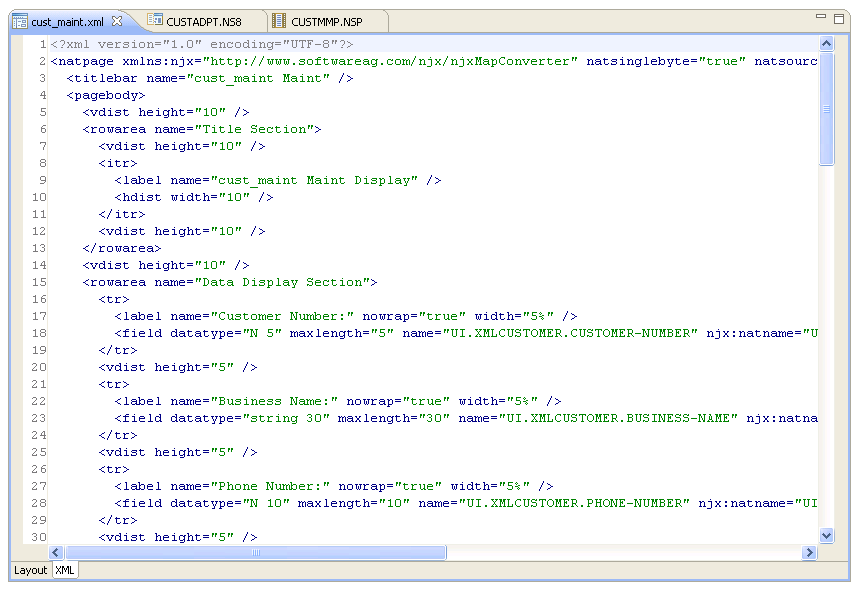
Select the XML tab to display the generated xml file. For example:
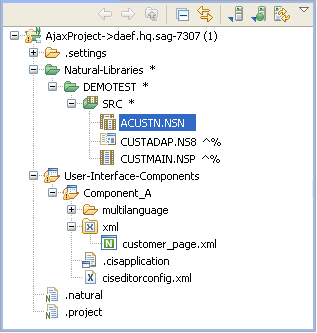
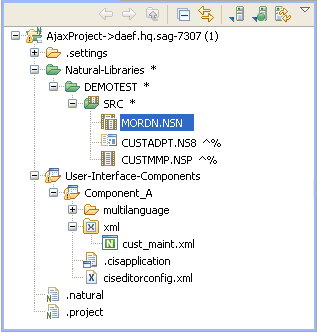
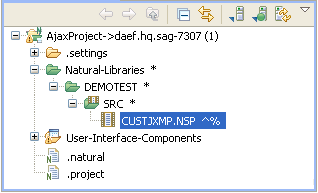
The generated files are displayed in the Project Explorer. For example:
Open the context menu in the Project Explorer for the generated main program and adapter files.
Select .
At this point, you can:
Test the main program. For information, see Test the Generated Main Program.
Define user exits. For information, see Defining User Exits.
This section describes how to generate an Ajax page for an object-maintenance subprogram. The following topics are covered:
The section describes how to access the Ajax Object-Maint Page wizard. Before accessing the wizard, the following conditions must be met:
The wizard must be started from a project that has been enabled for Ajax Developer.
A user interface component must be available locally.
Note:
For more information about the generated files and general
Ajax architecture, refer to the Natural for Ajax
documentation.
To access the Ajax Object-Maint Page wizard
Open the context menu for a subprogram that was generated by either the Object-Maint-N1 or Object-Maint-Subp generator.
Select .
The Specify Source and Target Details panel is displayed. For example:
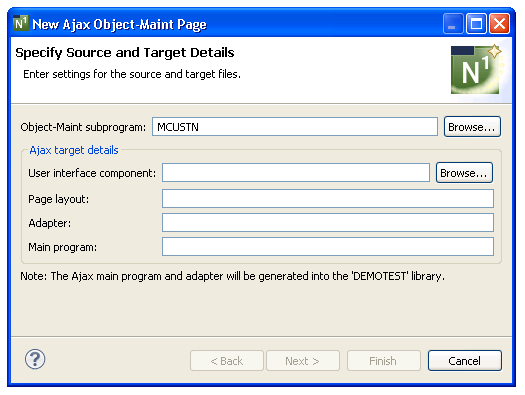
To specify source and target details
Define the following parameters:
| Parameter | Description | Required/Optional/Conditional |
|---|---|---|
| Object-Maint subprogram | Name of the Object-Maint-Subp-generated subprogram for which you are creating the page. To change the name of the subprogram, either type the name of a new subprogram in Object-Maint subprogram or select to display the available subprograms for selection. | Required |
| User interface component | Name of the user interface component for the page. Either type the name of an existing component in User interface component or select to display the available components for selection. | Required |
| Page layout | Name of the page layout file to
be generated. This name must follow standard xml naming conventions (do not
include the .xml extension).
Tip: |
Required |
| Adapter | Name of the adapter file to be generated. This name must follow standard Natural naming conventions (do not include the .NS8 extension). | Required |
| Main program | Name of the main program file to be generated. This name must follow standard Natural naming conventions (do not include the .NSP extension). | Required |
Select .
The page is generated using all fields in the PDA, as well as all default field labels.
Or:
Select .
The Configure Field Details panel is displayed. For example:
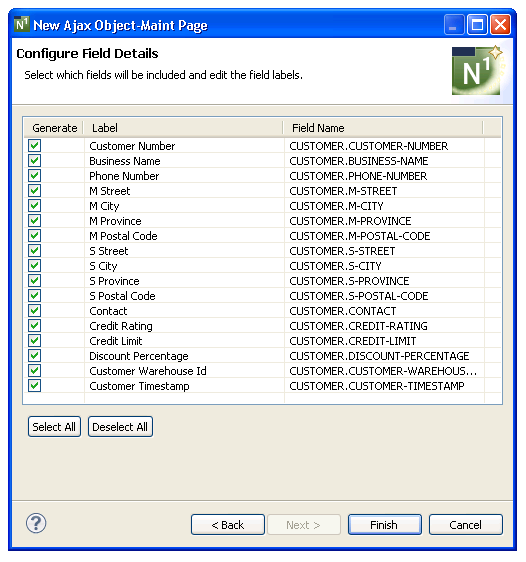
Note:
Array fields are not currently supported.
This panel allows you to select which fields are generated for the page and what labels will be displayed. The Field Name column displays the fully qualified name of each field in the PDA; these parameters are read-only.
To configure field details
Define the following parameters:
| Parameter | Description | Required/Optional/Conditional |
|---|---|---|
| Generate | Indicates whether the corresponding field is generated or not. To exclude a field, deselect Generate for that field. A minimum of one field must be selected. | Optional |
| Label | Label displayed on the generated page for the corresponding field. You can change this label as desired. | Optional |
Select .
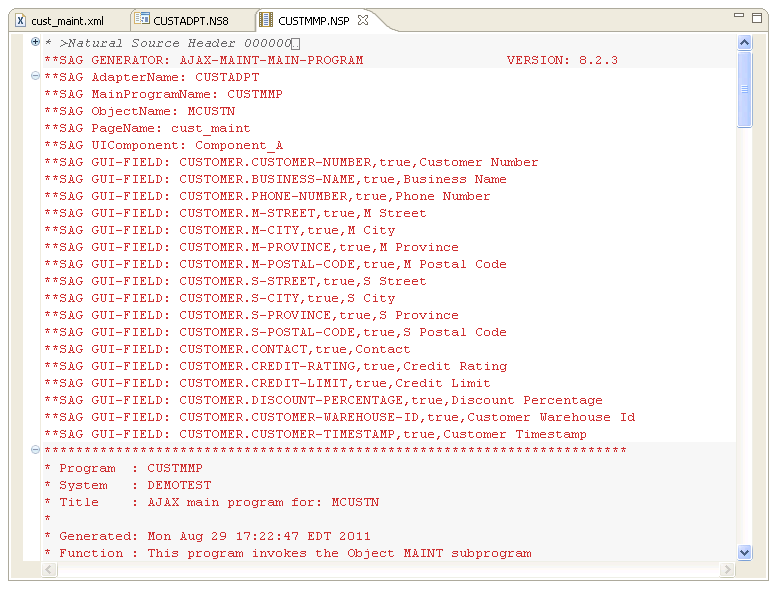
The page is generated using the selected fields, column headings and search keys. The generated main program (.NSP extension) file is displayed in the editor. For example:
The available user exits are displayed in the Outline view. For example:
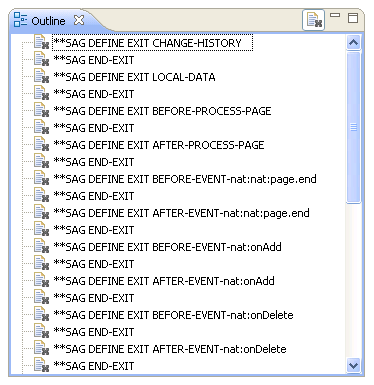
For every event in the page layout file, a BEFORE-EVENT and AFTER-EVENT user exit is generated (for example, "BEFORE-EVENT-nat:nat:page.end" above). When you add an event to the page layout file, a BEFORE-EVENT and AFTER-EVENT user exit is also generated. Code within these exits is preserved during regeneration.
The generated adapter (.NS8 extension) and page layout (.xml extension) files are also displayed in the editor. For example:
The following example shows the generated page layout file in the Layout tab.
Note:
For more information about these files, refer to the
Natural for Ajax documentation.
Select the XML tab to display the generated xml file. For example:
The generated files are displayed in the Project Explorer. For example:
Open the context menu in the Project Explorer for the generated main program and adapter files.
Select .
At this point, you can:
Test the main program. For information, see Test the Generated Main Program.
Define user exits. For information, see Defining User Exits.
There are two ways to create an Ajax main program:
Using standard Natural for Ajax functionality.
Using the Ajax Main Program wizard and an existing adapter file (.NS8 extension). This wizard creates a main program that is similar to the standard one, except it includes support for user exits (for protected code) and regeneration when the Ajax UI changes (which allows the fields on a page to be updated without overwriting the user interface logic).
This section describes how to use the Ajax Main Program wizard to generate a main program from an adapter file, as well as how to regenerate the generated program.
To generate an Ajax main program from an adapter file
Open the context menu for the adapter file in the Project Explorer.
Select Code Generation > Generate Ajax Main Program.
The Specify Ajax Program Details panel is displayed. For example:

Type the name of the main program in Name.
Optionally, you can:
| Task | Procedure |
|---|---|
| Select a folder in which to generate the program. | Type the name of the folder in
Folder or select to display
a window listing the existing folders for selection. The folder must currently
exist within the selected Ajax project.
Note: |
| Select a library in which to generate the program. | Type the name of the library in
Library or select to display
a window listing the existing libraries for selection. The library must
currently exist.
Note: |
Select to generate the main program.
The generated main program is displayed in the editor view. For example:
The available user exits are displayed in the Outline view. For example:
The generated program is also displayed in the Project Explorer. For example:
Open the context menu for the generated main program in the Project Explorer.
Select .
At this point, you can:
Test the main program. For information, see Test the Generated Main Program.
Define user exits. For information, see Defining User Exits.
This section describes how to regenerate the main program file (.NSP extension) that was generated using the Ajax Main Program wizard.
To regenerate the main program
Open the context menu for the program in the Project Explorer.
Select .
The Specify Ajax Program Details panel is displayed. After selecting , the main program is regenerated.
Or:
Select .
The main program is regenerated without displaying the wizard panel.
Note:
You can use standard selection techniques to select
more than one file.
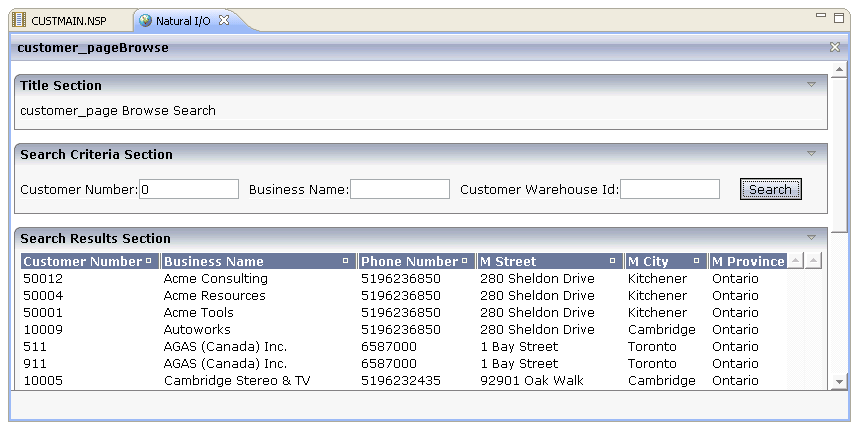
To test the generated main program
Open the context menu in the Project Explorer view for the generated main program file (.NSP extension).
Select .
The page is displayed in the editor. For example:
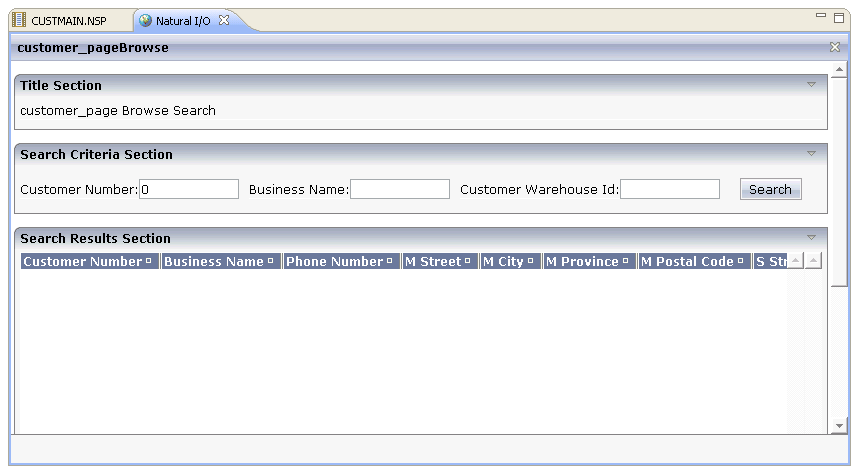
By default, the generated page displays row data in a table, where each field in the object (row) PDA is a column. All search key fields are displayed at the top of the page.
Select .
The results of the search are displayed. For example:
This section describes how to regenerate the main program file (.NSP extension).
To regenerate the main program
Open the context menu for the main program in the Project Explorer.
Select .
For information, see Regenerate Using Wizard.
Or:
Select .
For information, see Regenerate.
Use this option when you want to make changes to the wizard parameters before regenerating the Ajax page.
To regenerate using the wizard panel(s)
Select .
The first specification panel for the wizard is displayed. For example:
Edit the specifications as desired.
If the page layout file (.xml extension) has changed since the previous generation, you can select Generate to regenerate the page layout file as well.
Select to regenerate the main program, adapter and, optionally, the page layout files.
Open the context menu in the Project Explorer for the regenerated main program and adapter files.
Select .
Use this option when the object-browse or object-maintenance subprogram has changed and you want to incorporate the changes in the Ajax page.
To regenerate without using the wizard panels
Select .
Note:
You can use standard selection techniques to select
more than one file.
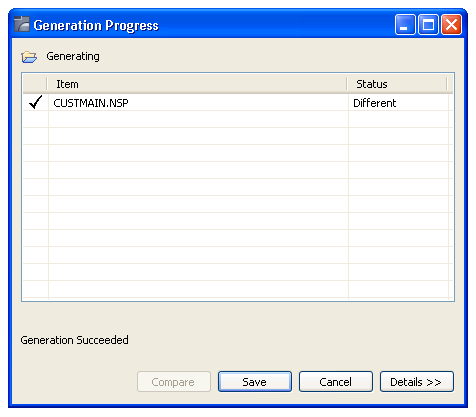
The main program (.NSP) file is regenerated without displaying the wizard panels and the Generation Progress window is displayed. For example:
Select to save the details.
Open the context menu in the Project Explorer for the regenerated file(s).
Select .