This section describes how to create a Natural unit test for a business service or subprogram. This allows you to specify a business service or subprogram to test, supply input values, and then provide validation criteria for the output of the call (for example, you can supply two numbers as the input values and a value for the result field as the validation criteria).
The following topics are covered:
Note:
You can create Ant scripts to run unit tests (file extension
.bsrvtst, .exttst,
.nattst, and .seqtst). For
information, see Creating Ant Scripts
to Run Unit Tests.
When you create a new unit test, the Natural project containing the test is automatically enabled for application testing. This will create the Testing-Suites folder in the Navigator view and provide warning markers on existing unit test files that are not in the Testing-Suites folder or its subfolders. This section describes how to manually enable a Natural project for application testing.
 To enable a Natural project for application testing
Open the context menu in the Navigator view for the Natural project containing the business service or subprogram you want to test.
Select .
For example:
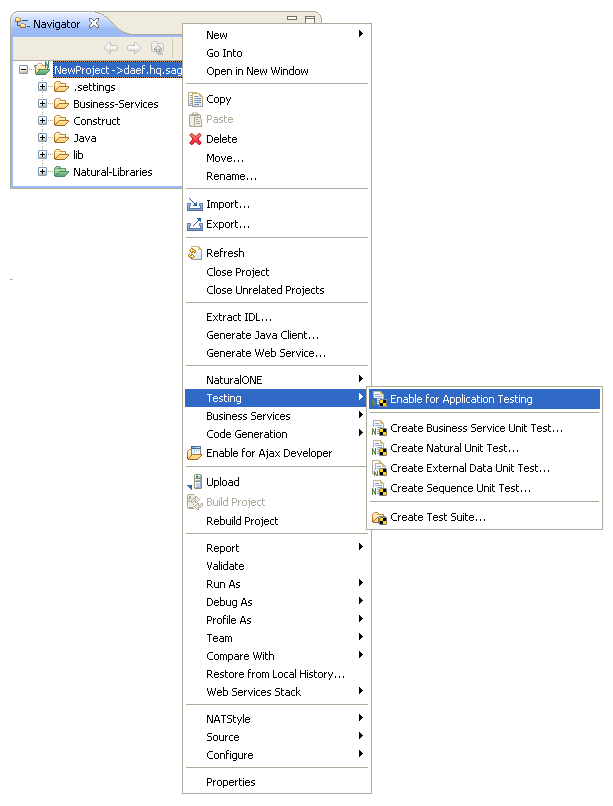
The Testing-Suites folder is added to the project. All new unit tests will be generated into this folder (or subfolder).
This section describes how to create a unit test for a business service. The following topics are covered:
To create a unit test for a business service
Open the context menu for the Natural project containing the business service in the Navigator view.
Or:
Open the context menu for the business service in the
Navigator view.
Select .
The test options for business services are displayed. For example:
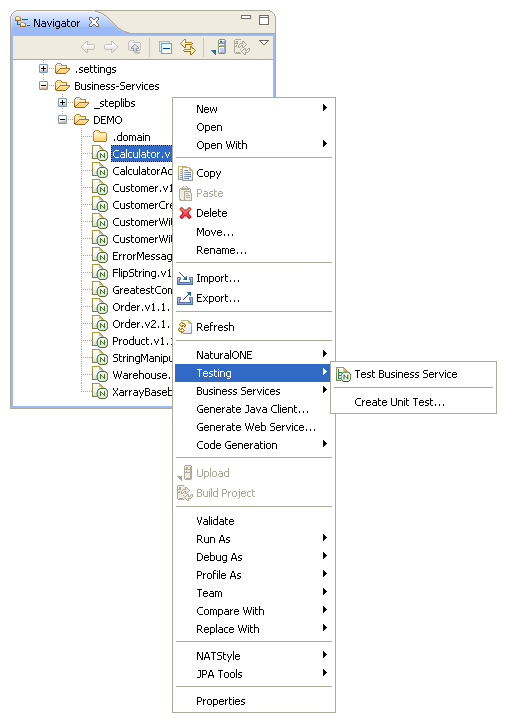
Select .
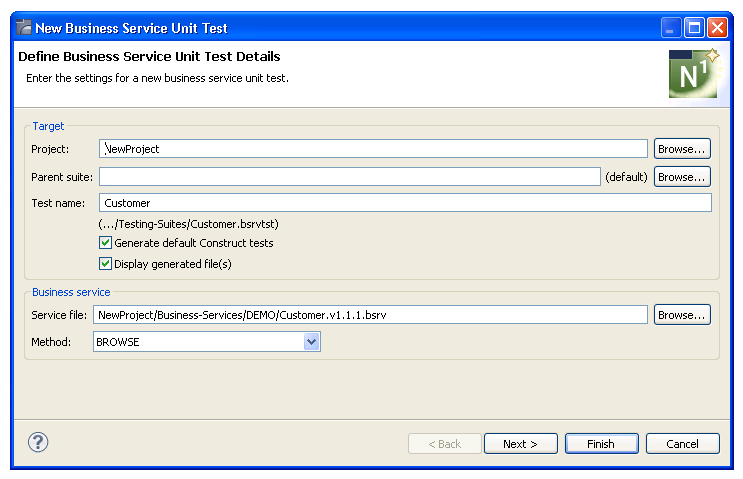
The Define Business Service Unit Test Details panel is displayed. For example:
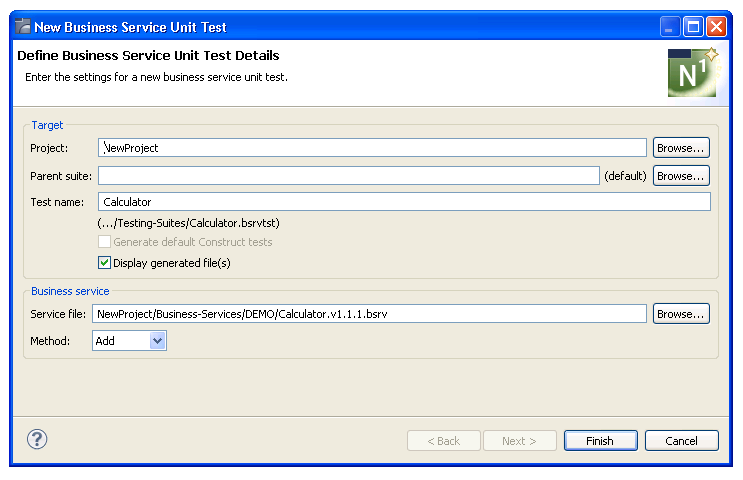
Using this panel, you can:
| Task | Procedure |
|---|---|
| Change the name of the project in which to create the unit test. | Type the name of the Natural
project in Project or select
to display a window listing the existing projects for selection.
Note: |
| Provide the name(s) of a subfolder(s) in which to save the unit test. If the folder does not currently exist, it will be created for you. | Type the name of the folder in
Parent suite or select to
display a window listing the available folders for selection.
By default, the unit test is stored in the Testing-Suites folder in the current project. If you specify a suite folder name, it becomes a subfolder in the Testing-Suites folder and the unit test will be stored in that folder. |
| Change the default name for the unit test. | Type a new name in Test name. File names are saved with the .bsrvtst extension. |
| Generate default unit tests for object-maintenance functions and/or object-browse keys defined for business service subprograms. | Select Generate default Construct tests. This option is enabled when the unit test will be created for a business service that uses Velocity or Construct-generated object-browse or object-maintenance subprograms. For information, see Generate Default Unit Tests. |
| Not display the generated files in the editor view after generation. | Deselect Display generated file(s). |
| Change the location of the folder containing the business service file. | Type or select a new folder in Service file. |
| Select a different method to test. | Select the method in Method. |
Select .
The unit test is displayed in the Testing-Suites folder in the Navigator view. For example:
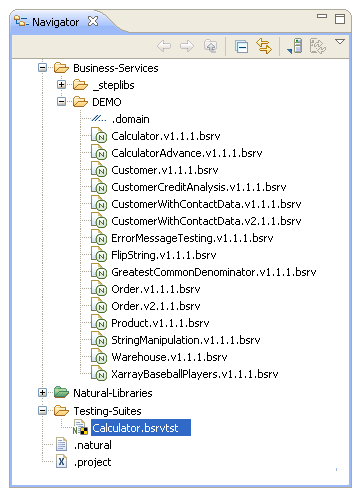
The test is also displayed in the editor view. For example:
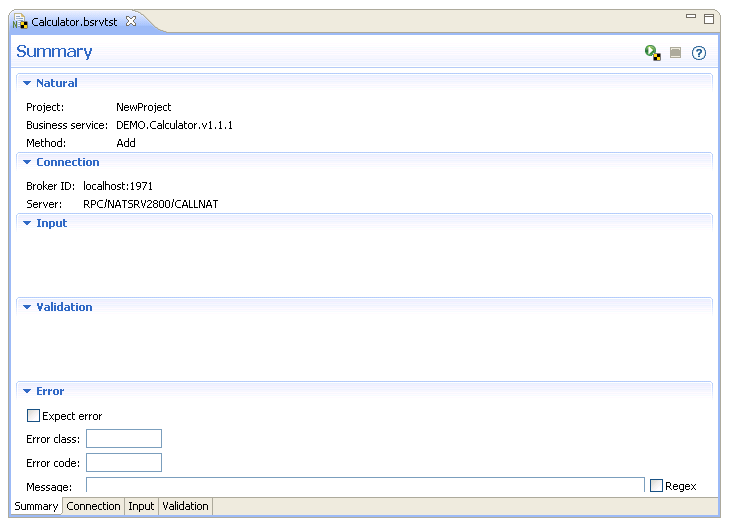
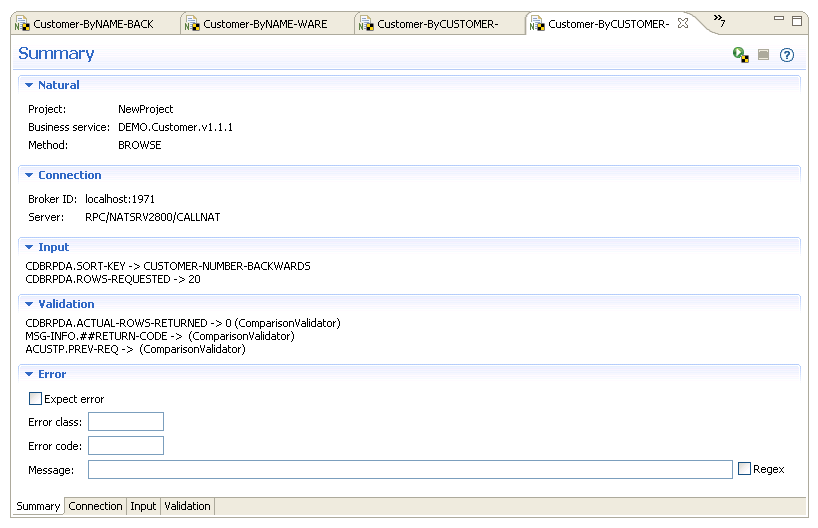
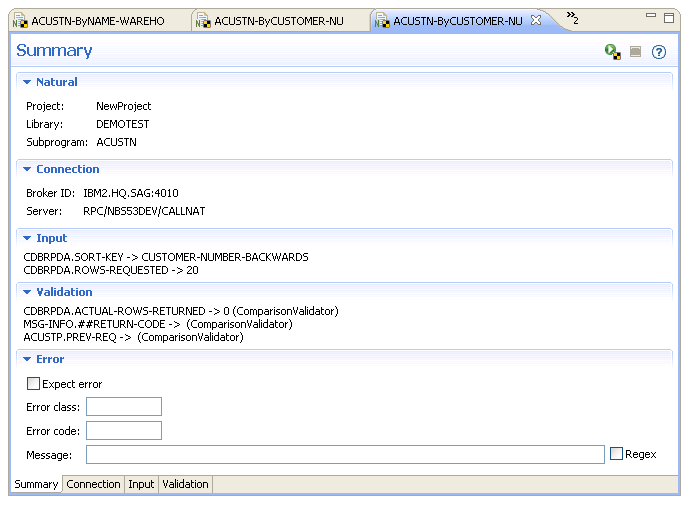
The Summary tab displays information about the test, such as the name of the project, business service, and method. It also displays the default connection settings. To define another connection in which to run the test, see Define Connections.
Note:
You can use this tab to define an expected error, which
allows a test to pass whenever the expected error occurs. You can also use the
tab to search for specified text in an error message. For information, see
Test for an Expected
Error.
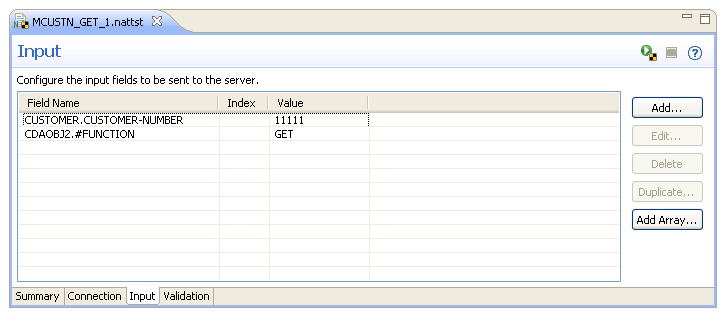
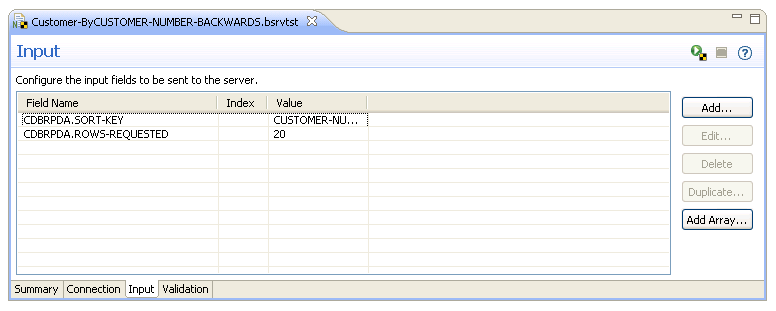
Select the Input tab and define which input parameters are sent to the server.
For information, see Configure Input Parameters.
Select the Validation tab and define which values must be returned for a successful test.
For information, see Define Validations.
Note:
You can create Ant scripts to run business service unit tests
(file extension .bsrvtst). For information, see
Creating Ant
Scripts to Run Unit Tests.
To configure the input parameters sent to the server
Select the Input tab in the unit test editor.
For example:
Select .
The Configure Input Field window is displayed. For example:
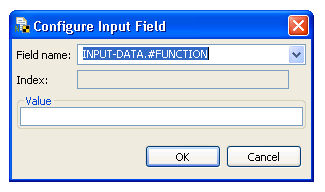
The list of available controls in Field name is based on the data type of the input field. If you selected a logical field, for example, two option buttons are displayed to select "true" or "false". If the field is an array, you can type the index for the array in Index.
Select the name of the input field in Field name.
Type the field value in Value.
Select .
The new field is added to the list of fields on the Input tab.
Optionally, you can use the Input tab to:
| Task | Procedure |
|---|---|
| Edit an input field. | See Edit an Input Field. |
| Remove one or more input fields. | Select one or more input fields in Field Name using standard selection techniques and select . The field(s) is removed from the list of fields and will not be sent to the server. |
| Duplicate an input field. | See Duplicate an Input Field. |
| Add multiple elements to an array field. | See Add Multiple Elements for an Array Field. This option is enabled when the PDA contains array fields. |
To edit an input field
Select the input field in Field Name on the Input tab.
Select .
The Configure Input Field window is displayed to edit the field information.
Select to save the changes.
Or:
Select the input field in Field Name
and edit the Value and/or Index
values within the table.
To duplicate an input field
Select the input field in Field Name on the Input tab.
Select .
The Configure Input Field window is displayed to edit the field information.
Select to save the duplicate field.
This section describes how to define a range of values for an array field.
Note:
The option does not support
byte array and date/time fields.
To add multiple elements to an array field at the same
time
Select .
The Define Array Element Details window is displayed. For example:
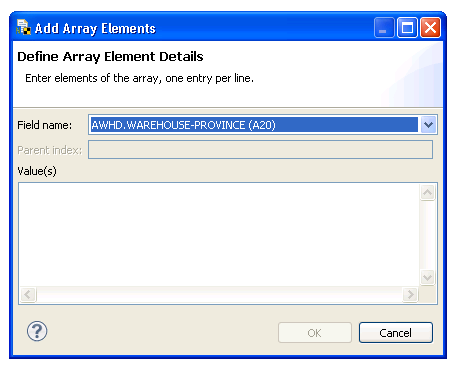
Type each element of the array in Value(s), one entry per line.
Select to save the array field.
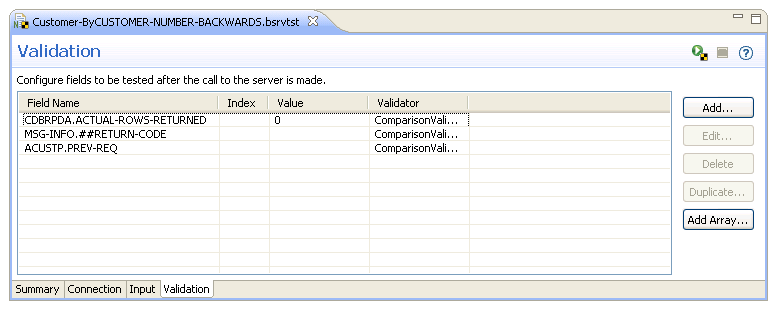
This section describes how to create unit test validations for Natural errors and data entry based on validator types (i.e., not restricted to characters in the data type).
To define validations
Select the Validation tab in the business service unit test editor.
For example:
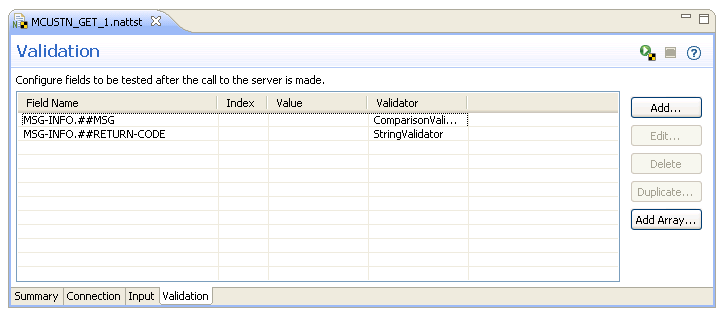
Select .
The Configure Field Validation window is displayed. For example:
The list of available controls in Field name is based on the data type of the input field. If you select a logical field, for example, two option buttons are displayed to select "true" or "false". If the field is an array, you can type the index for the array in Index.
Select the name of the input field in Field name.
Select the type of validator to use for the input field in Validator.
The type of validator to use depends on the type of data in the field. The available validators are:
BooleanValidator
ByteValidator
ComparisonValidator (displays a combo box with the options: ">", "<", "=", "<=", ">=")
DateValidator
DecimalValidator
IntegerValidator
RegexValidator (creates regular expressions to validate the contents of a field)
StringValidator
TimeValidator
Select .
The new field is added to the list of fields on the Validation tab.
Optionally, you can use the Validation tab to:
| Task | Procedure |
|---|---|
| Edit a field validation. | See Edit a Field Validation. |
| Remove one or more field validations. | Select one or more fields in Field Name using standard selection techniques and select . The field validation(s) is removed. |
| Duplicate a field validation. | See Duplicate a Field Validation. |
| Add multiple validations for an array field. | See Add Multiple Validations for an Array Field. This option is enabled when the PDA contains array fields. |
To edit a field validation
Select the field in Field Name on the Validation tab.
Select .
The Configure Field Validation window is displayed to edit the field information.
Select to save the changes.
Or:
Select the input field in Field Name
and edit the Value and/or Index
values within the table.
To duplicate a field validation
Select the input field in Field Name on the Input tab.
Select .
The Configure Field Validation window is displayed to edit the information.
Select to save the duplicate field validation.
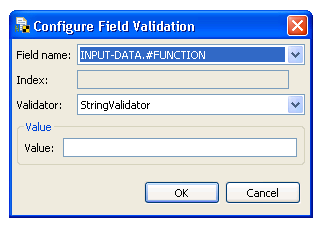
This section describes how to define validations for an array field.
Note:
The option does not support
byte array and date/time fields.
To add multiple validations to an array field
Select .
The Define Array Element Details window is displayed. For example:
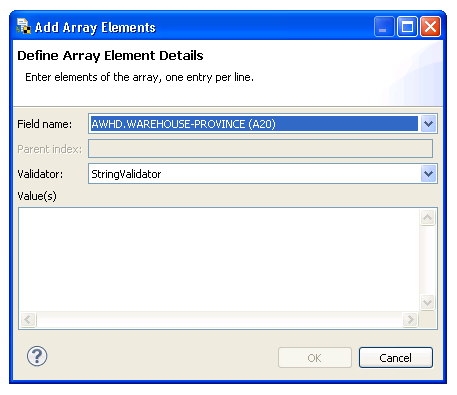
Type each element of the array in Value(s), one entry per line.
Select to save the array field.
This section describes how to run one or more unit tests. It includes information about the Natural Unit Test window.
Note:
You can create Ant scripts to run unit tests (file extension
.bsrvtst, .exttst,
.nattst, and .seqtst). For
information, see Creating Ant Scripts
to Run Unit Tests.
To run one or more unit tests
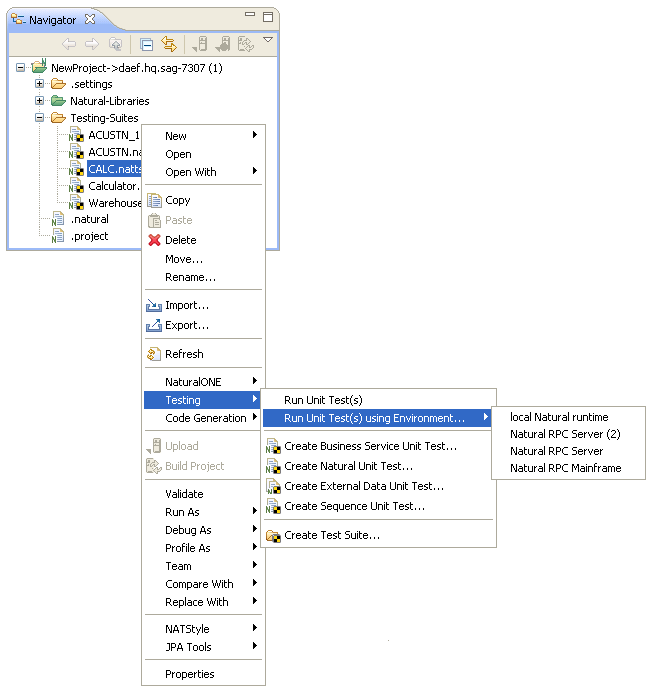
Open the context menu for one of the following items in the Navigator view.
A project containing the Testing-Suites folder.
The Testing-Suites folder or a subfolder within the folder.
One or more unit test files (file extension .nattst or .bsrvtst), regardless of where they exist. Use standard selection techniques to open the unit test(s). Any test files stored outside of the Testing-Suites folder display a warning marker in the Navigator view and an entry in the Problems view indicating that they are not in the proper place.
Select .
Note:
You can also use the context menu to change the
environment in which a test is run. For information, see
Run a Unit
Test in Another Environment.
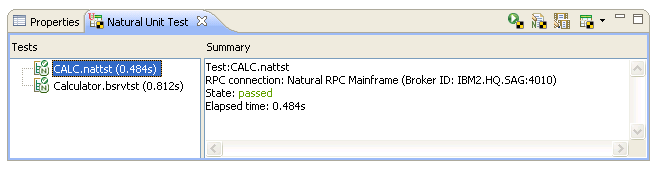
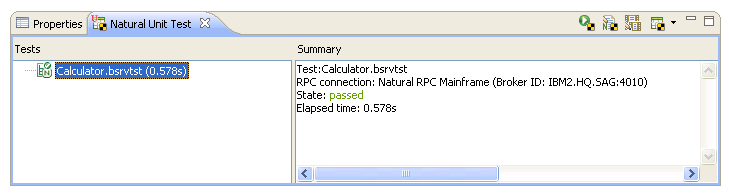
The selected tests are displayed in the editor view and the results of the test are displayed in the Natural Unit Test view. For example:
Note:
If the test did not pass, a red circle (![]() ) is displayed on the
test icon in the Tests section and State:
failed is displayed in the Summary
section.
) is displayed on the
test icon in the Tests section and State:
failed is displayed in the Summary
section.
The following table describes each of the options available on the toolbar for the Natural Unit Test view:
| Toolbar Icon | Description |
|---|---|
|
|
Runs the current unit test using
the values defined in the editor view.
Tip: |
|
|
Selects the current unit test in the editor view. |
|
|
Opens the business service or Natural subprogram used for the current unit test in the editor view. |
|
|
Displays the test history for the last 10 unit tests that were run during the current Eclipse session and allows you to select a previous test and load it into the editor. For information, see Open a Previous Unit Test. |
The Tests section in the Natural Unit Test view displays the name of each unit tests that have been run. You can use the context menu for a unit test in the Tests section to select more options. For example:
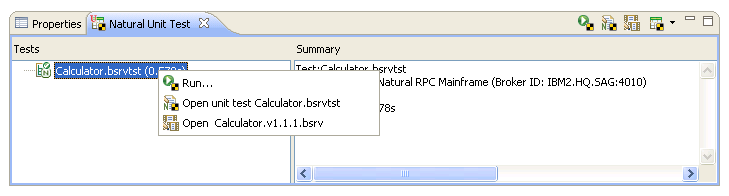
Using this menu, you can:
| Task | Procedure |
|---|---|
| Run the unit test. | Select . |
| Open the unit test file in the editor view. |
Select . The following file types are available for selection:
|
| Open the associated business service or Natural subprogram file in the editor view. | Select or
. The
following file types are available for selection:
Note: |
The Summary section in the Natural Unit Test view displays:
Name of the test
Name of the RPC connection
Whether the test passed or failed
Length of time in seconds that the unit test executed before completing
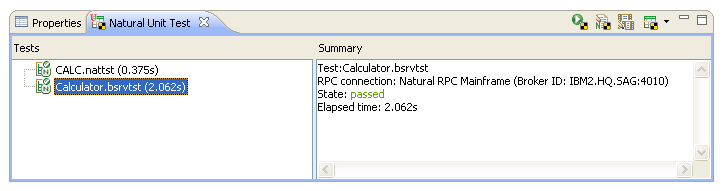
To see the results of another test, select the test in the Tests section and the results are displayed in the Summary section. For example:
To open a previous unit test
Select
![]() on the
toolbar in the Natural Unit Test view.
on the
toolbar in the Natural Unit Test view.
A list of the last 10 tests run during the current Eclipse session is displayed with a message indicating the success of each test. For example:
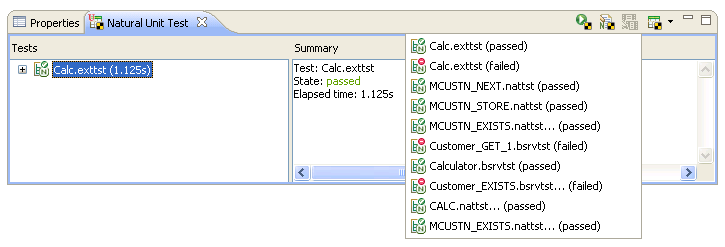
In this example, seven tests passed and three tests failed.
Select the test you want to open.
The test is displayed in the Natural Unit Test view. For example:
Open the context menu for the test.
Select the unit test file in .
The following unit test file types are available:
business service (file extension .bsrvtst)
external data (file extension .exttst)
Natural unit test (file extension .nattst)
sequence (file extension .seqtst)
You can run any unit test in another environment.
To run a unit test in another environment
Open the context menu for one of the following items in the Navigator view.
A project containing the Testing-Suites folder.
The Testing-Suites folder or a subfolder within the folder.
One or more unit test files (file extension .bsrvtst, .exttst, .nattst, and .seqtst), regardless of where they exist.
Select .
For example:
Select the environment in which you want to run the test.
The results of the test are displayed in the Natural Unit Test view.
Note:
The list of environments is defined in the
Preferences window for RPC environments. For information
on adding additional environments to the list, see
Define Additional RPC
Environments.
To allow a test to pass with an expected error, define information about the error in the Error section of the Summary tab. For example:

This will allow a test to fail only if it encounters an unexpected error.
To test for an expected error
Select Expect error.
Type the error class in Error class.
For Natural errors, the error class is 1014.
Type the error code in Error code.
You can also use the Error section to search the message text for a specific string.
To search the message text for a specified string
Type the string in Message.
Select Regex.
If you specify ".* division by zero.*", for example, Regex will search for "division by zero" anywhere in the error message.
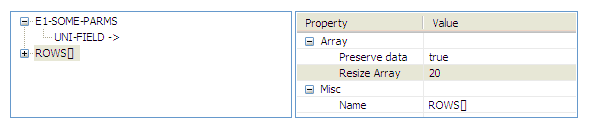
You can expand or reduce an X-array using the
Resize Array property. For example:
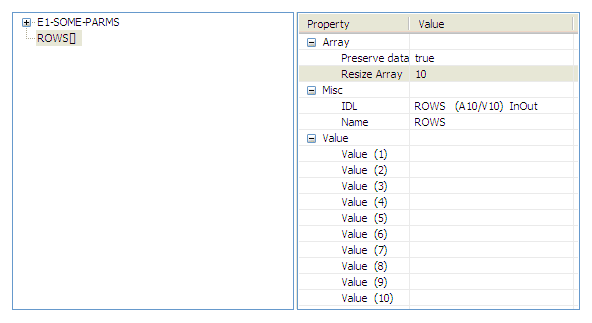
For some arrays, all values are displayed. For example:
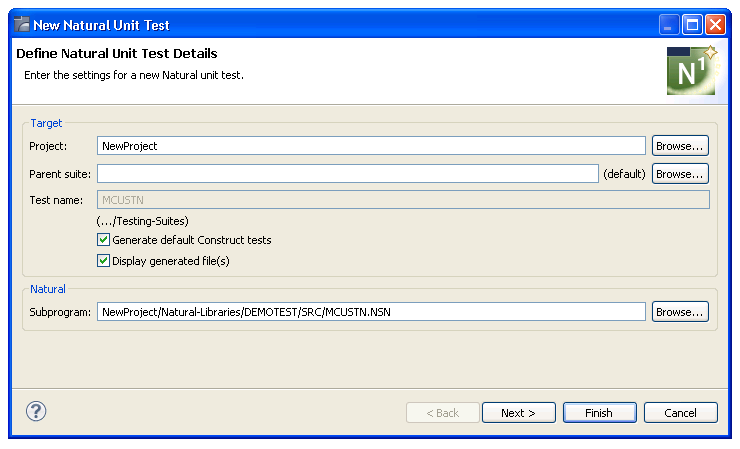
To create a unit test for a subprogram
Open the context menu for the Natural project containing the subprogram in the Navigator view.
Or:
Open the context menu for the subprogram in the
Navigator view.
Select .
The test options for subprograms are displayed.
Select .
The Define Natural Unit Test Details panel is displayed. For example:
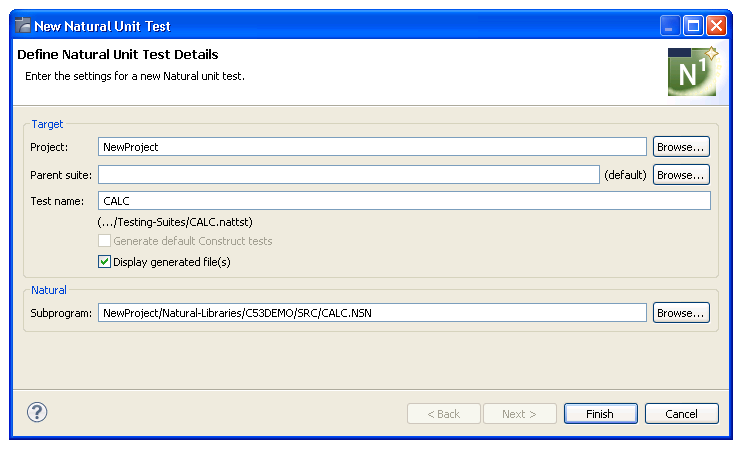
Using this panel, you can:
| Task | Procedure |
|---|---|
| Change the name of the project in which to create the unit test. | Type the name of the Natural
project in Project or select
to display a window listing the existing projects for selection.
Note: |
| Provide the name(s) of a subfolder(s) in which to save the unit test. If the folder does not currently exist, it will be created for you. | Type the name of the folder in
Parent suite or select to
display a window listing the available folders for selection.
By default, the unit test is stored in the Testing-Suites folder in the current project. If you specify a suite folder name, it becomes a subfolder in the Testing-Suites folder and the unit test will be stored in that folder. |
| Change the default name for the unit test. | Type a new name in Test name. File names are saved with the .bsrvtst extension. |
| Generate default unit tests for object-maintenance functions and/or object-browse keys defined for Natural subprograms. | Select Generate default Construct tests. This option is enabled when the unit test will be created for Velocity or Construct-generated object-browse or object-maintenance subprograms. For information, see Generate Default Unit Tests. |
| Not display the generated files in the editor view after generation. | Deselect Display generated file(s). |
| Change the location of the folder containing the subprogram file. | Type or select a new folder in Subprogram. |
Select .
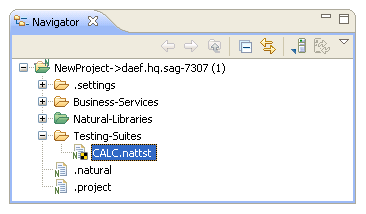
The unit test is displayed in the Testing-Suites folder in the Navigator view. For example:
The test is also displayed in the editor view. For example:

The Summary tab displays information about the test, such as the name of the project, library, and subprogram. It also displays the default connection settings. To define another connection in which to run the test, see Define Connections.
Note:
You can use this tab to define an expected error, which
allows a test to pass when the expected error occurs. You can also use the tab
to search for specified text in an error message. For information, see
Test for an Expected
Error.
Select the Input tab and define which input parameters are sent to the server.
For information, see Configure Input Parameters.
Select the Validation tab and define which values must be returned for a successful test.
For information, see Define Validations.
Run the test.
For information, see Run the Unit Test.
Note:
You can create Ant scripts to run Natural unit tests (file
extension .nattst). For information, see
Creating Ant
Scripts to Run Unit Tests.
This section describes how to generate default unit tests for browse keys and maintenance functions (for example, GET, NEXT, etc.) defined for Velocity or Construct-generated object-browse or object-maintenance subprograms. If a business service uses both object-browse and object-maintenance subprograms, default tests can be generated for both the browse keys and the maintenance functions.
This section covers the following topics:
To generate default unit tests for a business service
Select from the context menu for the business service in the Navigator view.
The Define Business Service Unit Test Details panel is displayed.
Select Generate default Construct tests.
For example:
Note:
This option is only available when the business service
uses one or more subprograms that were generated by an Object-Browse and/or
Object-Maint wizard (either Velocity-based or Construct).
Select .
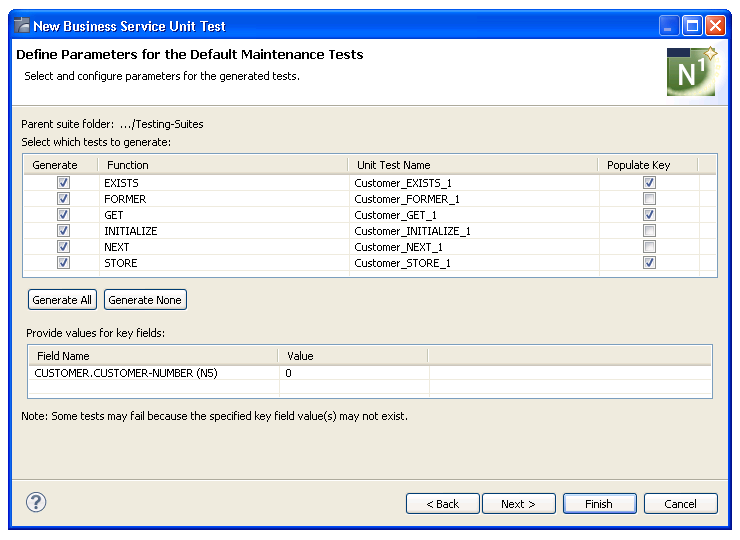
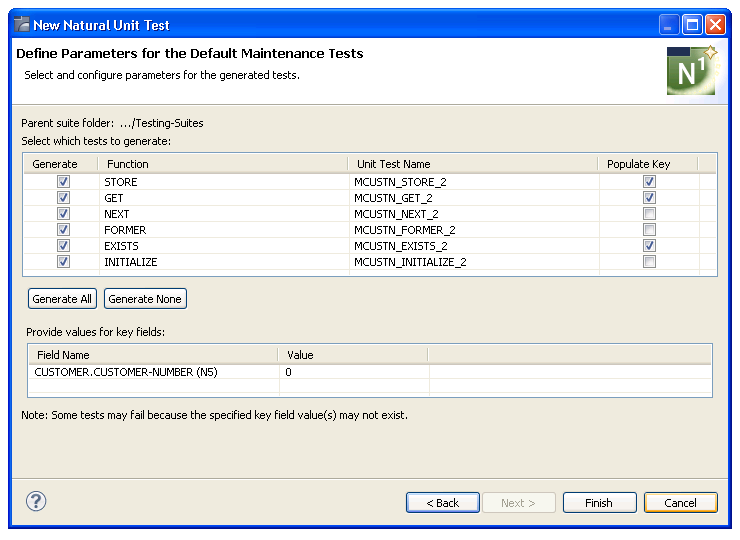
The Define Parameters for the Default Maintenance Tests panel is displayed. For example:
Note:
If the business service does not use any
object-maintenance subprograms, the Define Parameters for the Default
Browse Tests is displayed.
This panel displays the functions defined for all object-maintenance subprograms used by the business service, as well as the key fields. Using this panel, you can:
| Task | Procedure |
|---|---|
| Limit the generation of one or more default tests. | Deselect Generate for the unit test(s) you do not want to have generated. To generate unit tests for all functions, select . |
| Limit the generation of all default tests. | Select . |
| Change the default population of key fields. | Select or deselect Populate Key for the default unit test(s). When selected, the test for the corresponding function will populate the key field with the value specified in Value. |
| Provide a value for a key field. | Select Value for the key field and type the value. For example, you can provide a customer number for the Customer number field. |
| Enter details for a date/time field (when defining details for a date or time field). | See Define Date and Time Details. |
Default tests can be created for each function defined for the subprogram that does not require an existing record to be on hold. These functions are:
STORE
GET
NEXT
FORMER
EXISTS
INITIALIZE
Note:
As the DELETE and UPDATE functions require an existing
record to be held, default tests are not generated for these functions.
Specify a key value in Value for each function.
The tests are designed with the assumption that this value exists (i.e., the test will pass when the value exists). The following assumptions are also made:
| Function | Assumption |
|---|---|
| STORE | Assumes the specified key value exists and expects an error from the subprogram saying the value already exists. |
| FORMER | Assumes a key value is not entered and expects a message from the subprogram saying the beginning of file condition has occurred. |
| NEXT | Assumes that the end of file condition has not occurred and expects a message from the subprogram saying the next record was retrieved successfully. |
The key components are those listed in the object PDA for the object-maintenance subprogram as elementary fields under STRUCTURE. For example, MCUSTN, an object-maintenance subprogram used by the Customer business service (located in the SYSBIZDE library), uses the MCUSTA PDA:
     1 MCUSTA-ID                        N          5 /* Object identifier
  R  1 MCUSTA-ID                                     /* REDEF. BEGIN : MCUSTA-I
     2 STRUCTURE                                     /* To allow MOVE BY NAME
     3 CUSTOMER-NUMBER                  N          5
In this example, CUSTOMER-NUMBER will be used as the key.
Select .
Unit tests are created for all available browse keys and any object-maintenance subprogram functions selected on the Define Parameters for the Default Maintenance Tests panel.
Or:
Select .
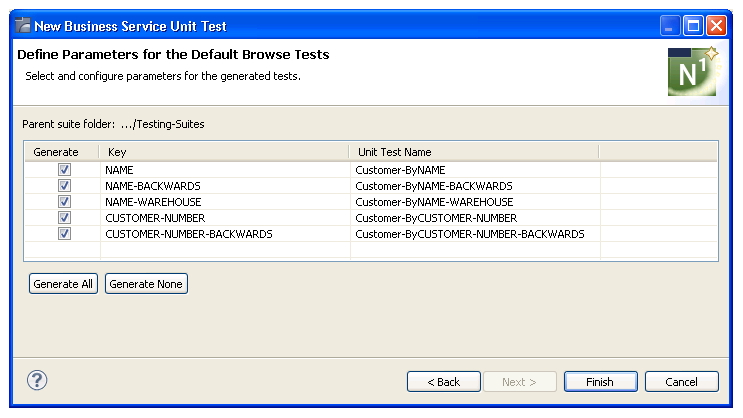
The Define Parameters for the Default Browse Tests panel is displayed. For example:
Note:
If the business service does not use any object-browse
subprograms, is not available on the
Define Parameters for the Default Maintenance Tests
panel.
This panel displays the key fields defined for all object-browse subprograms used by the business service. Using this panel, you can:
| Task | Procedure |
|---|---|
| Limit the generation of one or more default tests. | Deselect Generate for the unit test(s) you do not want to have generated. To generate unit tests for all keys, select . |
| Change the name of a default unit test. | Type the new name for the unit test on the corresponding line in Unit Test Name. |
| Limit the generation of all default tests. | Select . |
Default tests can be created for each browse key defined for the subprogram. These tests include default validations for items like rows returned and error codes. For a HISTOGRAM key, key value totals can be verified.
Select .
The default unit tests are displayed in the Testing-Suites folder in the Navigator view. For example:
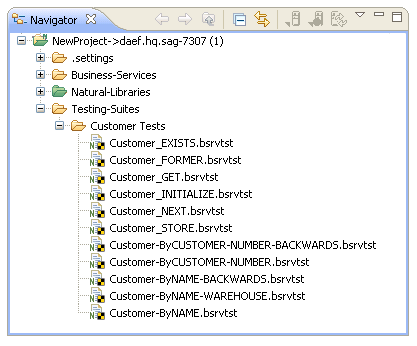
The tests are also displayed in the editor view. For example:
Default input values and validations are created for each unit test. You can change the default values by selecting the appropriate tab. For example, select the Input tab to change the input values generated for the test:
Note:
For more information, see
Configure Input
Parameters.
Select the Validation tab to change the validations generated for the test. For example:
Notes:
To generate default unit tests for a Natural subprogram
Select from the context menu for the subprogram in the Navigator view.
The Define Natural Unit Test Details panel is displayed.
Select Generate default Construct tests.
For example:
Note:
This option is only available when the subprogram was
generated by an Object-Browse or Object-Maint wizard (either Velocity-based or
Construct).
Select .
If the subprogram was generated by an Object-Maint wizard, the Define Parameters for the Default Maintenance Tests panel is displayed. For example:
This panel is similar to the Define Parameters for the Default Maintenance Tests panel for a business service unit test. For a description of this panel, see Generate Tests for a Business Service.
Or:
If the subprogram was generated by an Object-Browse wizard,
the Define Parameters for the Default Browse Tests is
displayed. For example:

This panel is similar to the Define Parameters for the Default Browse Tests panel for a business service unit test. For a description of this panel, see Generate Tests for a Business Service.
Select .
The default unit tests are displayed in the Testing-Suites folder in the Navigator view. For example:
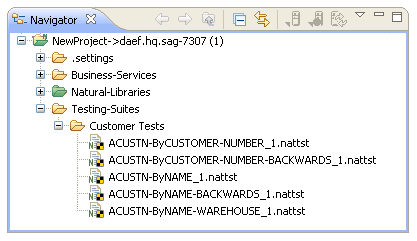
The tests are also displayed in the editor view. For example:
This editor is similar to the editor for a business service unit test. For a description of the editor, see Generate Tests for a Business Service.
This section describes how to create a new unit test suite to organize and store your Natural and business service unit tests (file extension .bsrvtst, .exttst, .nattst, and .seqtst). The tests are generated into the Testing-Suites folder or subfolder within a specified Natural project.
Note:
Ant scripts for Natural unit tests may contain unit test files
existing outside of the Testing-Suites folder or
subfolder.
To create a new unit test suite
Select for a project in the Navigator view.
Or:
Select in the Navigator view.
Or:
Select
in the Navigator view.
The Define Test Suite Details panel is displayed. For example:
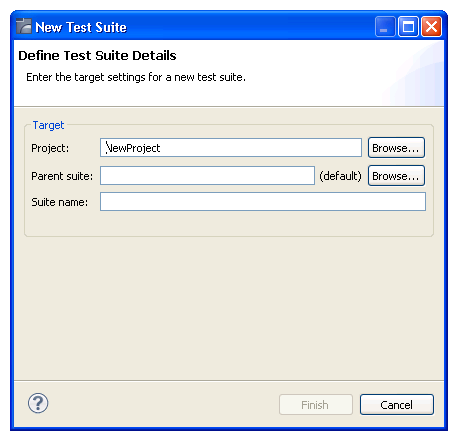
Using this panel, you can:
| Task | Procedure |
|---|---|
| Change the name of the project in which to create the test suite. | Type the name of the Natural
project in Project or select
to display a window listing the existing projects for selection.
Note: |
| Provide the name(s) of a subfolder(s) in which to save the unit test. If the folder does not currently exist, it will be created for you. | Type the name of the folder in
Parent suite or select to
display a window listing the available folders for selection.
By default, the unit test is stored in the Testing-Suites folder in the current project. If you specify a suite folder name, it becomes a subfolder in the Testing-Suites folder and the unit test will be stored in that folder. |
Type the name of the test suite in Suite name.
Select .
The test suite is generated into the Testing-Suites folder or subfolder.
This section describes how to create unit test log files and then use the log files to create summary reports. Log files can be created for any subprogram and business service unit test executed within a NaturalONE project.
This section covers the following topics:
A unit test history log file can be created to save the results of a unit test whenever it is executed (for example, the test name, test status, date/time completed, error messages, etc.). To create these files, you must select the option in the Preferences window for Testing. For information, see Set Logging Preferences for Unit Tests.
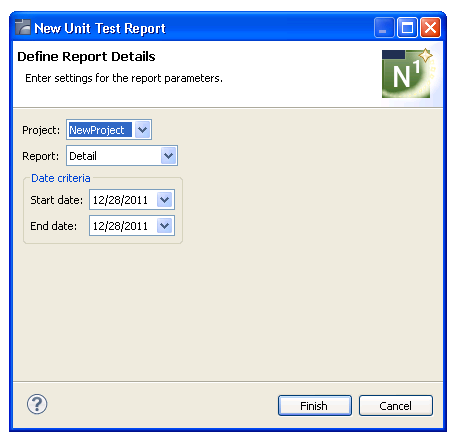
To generate a report
Select for a project in the Navigator view.
Or:
Select Testing-History > Testing > Create
Unit Test Report in the Navigator view.
The Define Report Details panel is displayed. For example:
Note:
To change the name of the Natural project, type the name
of the project in Project or select
to display a window listing the existing projects
for selection.
Type or select the name of the report in Report.
The report types are Detail, Daily summary, History chart and Weekly summary (see below for an example of each report).
Select the range of dates for the report in Date criteria.
Select Finish.
The report types are:
Detail

This report shows:
Name project containing the tests, as well as the range of dates included in the report
Name of each test
User ID of the person who executed the unit test (or Unknown if the user ID cannot be determined)
Whether the test passed (true) or failed (false)
Elapsed time (in seconds) that the test took to run
Error message for tests that failed
Total number of tests that passed or failed
Date and time the report was created
Daily Summary
This report calculates and displays a daily Pass/Fail summary from every unit test executed within a selected range of dates.
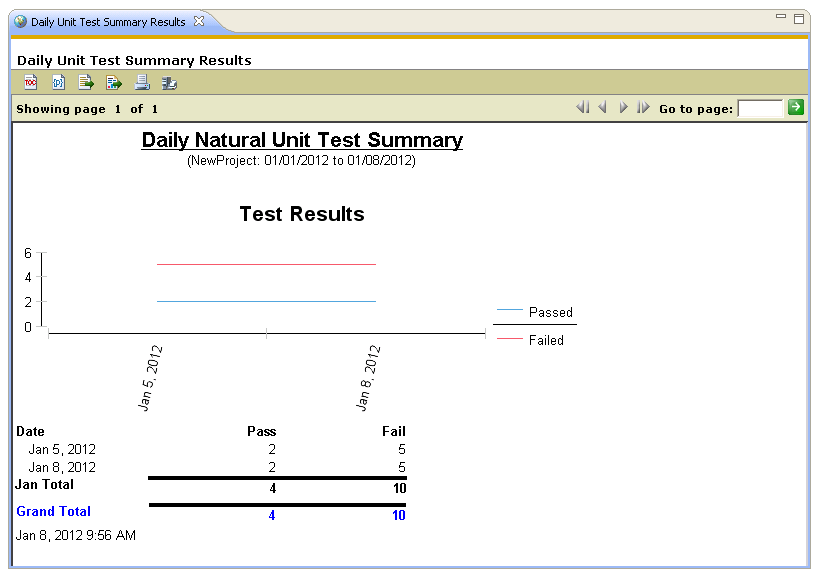
History Chart
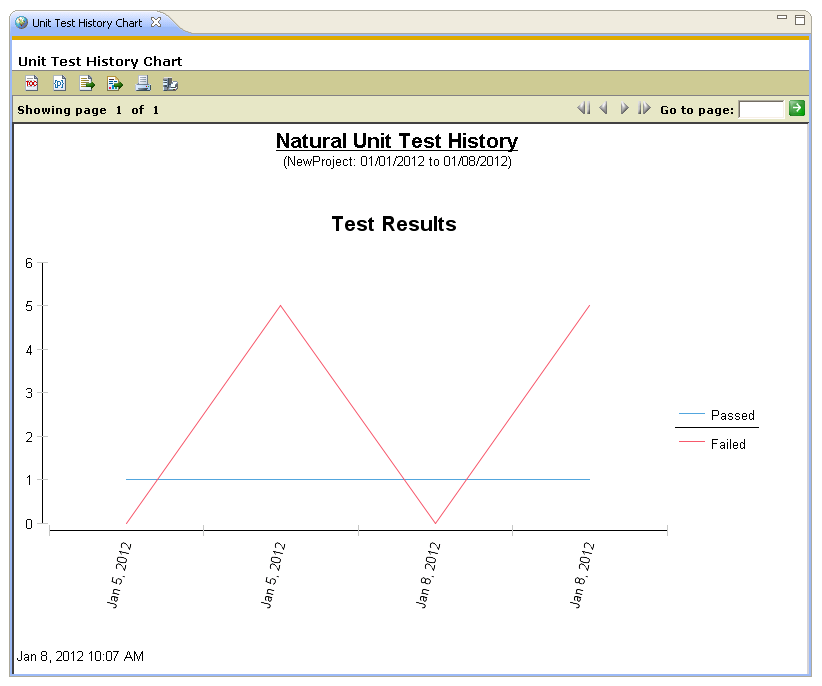
This report provides a graph of the Pass/Fail count for each Testing-History log file created within a selected range of dates.
Weekly Summary

This report calculates and displays a weekly Pass/Fail summary from every unit test executed within a selected range of dates.
When a generated module is open in the editor view, the Dependencies view displays dependencies between business service and Natural unit tests and the business services and Natural subprograms they execute. This section describes the nodes contributed to the view for these resources. The following topics are covered:
Notes:
When a business service unit test is open in the editor view, the
root node displays the name of the business service unit test. In caller mode
(![]() ), no child nodes are
displayed because no other Dependencies view objects
depend on this business service unit test file. For example:
), no child nodes are
displayed because no other Dependencies view objects
depend on this business service unit test file. For example:
In callee mode (![]() ), the child nodes display the name of the
business service that the unit test executes, along with the names of the
supporting business service resources and the names of the libraries and
projects in which they are located. For example:
), the child nodes display the name of the
business service that the unit test executes, along with the names of the
supporting business service resources and the names of the libraries and
projects in which they are located. For example:

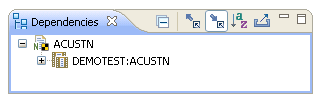
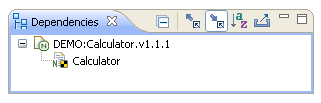
When a Natural subprogram unit test is open in the editor view,
the root node displays the name of the unit test. In caller mode
(![]() ), no child nodes are
displayed because no other Dependencies view objects
depend on a unit test file; in callee mode (
), no child nodes are
displayed because no other Dependencies view objects
depend on a unit test file; in callee mode (![]() ), the child node displays the name of the
Natural subprogram that the unit test executes, along with the names of the
supporting Natural resources and the names of the libraries and projects in
which they are located. For example:
), the child node displays the name of the
Natural subprogram that the unit test executes, along with the names of the
supporting Natural resources and the names of the libraries and projects in
which they are located. For example: