Checking Objects In and Out
When checking objects in and out as described in this document, a migration event is created which is automatically authorized and submitted. It is also possible to perform these steps separately; this is described later in Managing Migration Events.
The migration event is added to the list of migration events. Its processing state is "Completed". For information on how to invoke the list of migration events, see Finding a Migration Event.
The commands for checking objects in and out rely on data that have been defined in the migration path (which is defined with PAC on the mainframe).
Notes:
- If you have missing privileges to check the selected objects in or out, you have to change the authorization settings in PAC. You must have the authorization and submit privileges for the determined migration path.
- When working under Natural Security, Natural Security groups can be defined as authorizers. The user must then be a member of the specified group.
This document covers the following topics:
-
Transferring Natural Objects to the PAC Environment (Check In)
-
Transferring Versioned Objects to Another Status (Check Out)
Transferring Natural Objects to the PAC Environment (Check In)
Using the command, you can transfer Natural objects to the PAC environment.
An object can only be checked in if its library is defined in an application status of type
-
incorporate,
-
development, or
-
maintenance.
In addition, a migration path starting from this status must exist.
![]() To transfer a Natural object to the PAC environment
To transfer a Natural object to the PAC environment
-
In the library workspace or application workspace, select the object that you want to check in. This can be either a single Natural object or the contents of an entire library. When working in a list view window (which is invoked with the command), it is also possible to select several Natural objects at the same time.
-
Invoke the context menu and choose .
When the system detects that none of the above status types has been defined or if no status is available at all, the corresponding message appears.
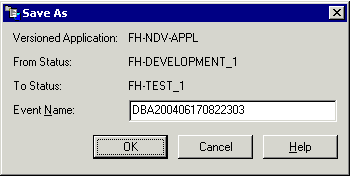
When the selected object is in an appropriate From status and the migration path can uniquely be determined, the Save As dialog box appears.

An event name is automatically proposed, consisting of your user name and the current time stamp.
Note:
Additional dialog boxes may appear when the migration path cannot uniquely be determined. These dialog boxes appear prior to the Save As dialog box. For example, a dialog box may appear in which you have to select a versioned application. Or a dialog box may appear in which you have to define the To or From status. -
Specify an event name and choose the button.
The migration event is now created. A dialog box appears, informing you that the event has been added, authorized and submitted. You are also asked whether you want to view the report.
-
To view the report, choose the button.
The Event window appears. The report is shown on the Report tab. For detailed information on the Event window, see Creating a Migration Event.
Transferring Versioned Objects to Another Status (Check Out)
Using the command, you can transfer a versioned object to a development or maintenance status.
An object can only be checked out if a migration path is defined from its current status to a status of type
-
development, or
-
maintenance.
![]() To transfer a versioned object to another status
To transfer a versioned object to another status
-
Invoke one of the following windows:
-
the Object Versioning window (see Invoking a Tree View Window with All Versioned Applications), or
-
the Show Versions window (see Showing the Different Versions of a Natural Object), or
-
a list view window containing versioned objects (this can be invoked from the above windows using the command); in this case, it is possible to select several objects at the same time.
-
-
Select the object(s) that you want to check out.
-
Invoke the context menu and choose .
When the system detects that no appropriate migration path is defined, the corresponding message appears.
When the appropriate migration path can uniquely be determined, the Save As dialog box appears. An event name is automatically proposed, consisting of your user name and the current time stamp.
Note:
Additional dialog boxes may appear when the migration path cannot uniquely be determined. These dialog boxes appear prior to the Save As dialog box. For example, a dialog box may appear in which you have to select a versioned application. Or a dialog box may appear in which you have to define the To or From status. -
Specify an event name and choose the button.
The migration event is now created. A dialog box appears, informing you that the event has been added, authorized and submitted. You are also asked whether you want to view the report.
-
To view the report, choose the button.
The Event window appears. The report is shown on the Report tab. For detailed information on the Event window, see Creating a Migration Event.