Listing and Filtering Objects
This document covers the following topics:
Listing an Object
When you display a list of objects (either in the object workspace or list view window), a default filter is often applied automatically. In many cases, this is the ID that you have used to log on. This causes that only those objects are shown where the names start with your user ID.
This section provides a brief overview on how to list objects so that they are shown in the list view window. For information on how to list a specific type of object, see the appropriate section later in this documentation.
The following topics are covered below:
Opening the List View Window
The list view window provides detailed information about an object.
In the list view window, it is possible to select several objects at the same time (which is not possible in the object workspace). This is helpful, for example, if you want to open several editor windows at the same time.
When a filter has been applied to an object (see Filtering an Object), only the entries which satisfy the filter criteria are shown in the list view window.
![]() To open the list view window
To open the list view window
-
Select an object in the object workspace.
-
Invoke the context menu and choose .
Or:
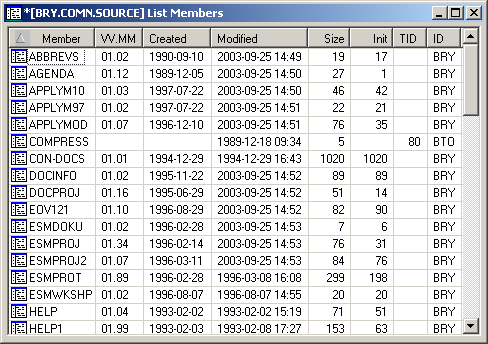
Press F8.The list view window appears in the content pane. It shows a list of the subobjects contained in the selected object. The following example shows a list of PDS members which appears when you have selected a z/OS dataset:
You can select an entry in the list view window and invoke a context menu containing the commands which can be used with this entry.
Defining a Different View
By default, the content of a list view window is shown in details view. You can also define another view (for example, large icons).
![]() To define a different view
To define a different view
-
Activate the list view window.
-
Invoke the context menu and choose one of the following commands from the menu: , , or .
The type of view which is currently active is always indicated by a check mark.
Activating the Automatic Refresh
By default, the automatic refresh is not active.
When the automatic refresh is active, the content of the active list view window is refreshed according to the specified time interval.
Note:
Each list view window has its own auto refresh settings.
![]() To activate the automatic refresh
To activate the automatic refresh
-
Activate the list view window.
-
Invoke the context menu and choose .
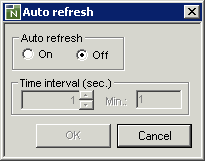
The following dialog box appears:
-
Select the On option button to activate automatic refresh.
-
In the Time interval spin box, specify the interval in seconds after which the list view window is to be refreshed.
-
Choose the button.
Sorting a Column
In details view, you can use the mouse to sort the columns in ascending or descending order.
![]() To sort a column
To sort a column
-
Click the header of a column.
An arrow in the header indicates the sort direction. With each click on the same header, the column in sorted in the opposite direction.
Resizing a Column
In details view, you can use the mouse to change the width of each column. This change is only valid as long as the list view window is open.
You can also resize a column in such a way that it is not longer visible. If you want to redisplay the column, close the list view window and then open it once more. Or if you still know at which position the column is hidden, move the mouse pointer to this position in the header and resize it as described below.
![]() To resize or hide a column
To resize or hide a column
-
Move the mouse pointer to the line in the header which separates two columns.
The pointer changes, showing two arrows pointing into opposite directions.
-
Use the mouse to drag the column until it has the desired width or until it is no longer visible.
Filtering an Object
This section provides a brief overview on how to filter objects. For information on how to filter a specific type of object, see the appropriate section later in this documentation.
Before listing the objects contained in a specific folder, you might want to employ a filter in order to reduce the number of shown objects. Only the objects which satisfy the filter criteria will then be listed.
The filter criteria last entered are used the next time you invoke the corresponding list view window or when you expand the corresponding folder in the tree. These filter criteria are retained even after the session has ended and will be used the next time you start Mainframe Navigation.
When specifying filter criteria, you can use the following wildcard characters:
-
Asterisk
An asterisk (*) selects object names with any character string. For example, when you specify "FSM*6", all object names are selected which start with "FSM" and end with "6" ("FSM006" or "FSM016"). If "6" is located at an unknown position within the name, you specify the name as "FSM*6*" in order to also select names such as "FSM600" or "FSM061". -
Underscore
An underscore (_) selects object names with one character in the place of each underscore. For example, when you specify "FSM_6", object names such as "FSM06" or "FSM16" are selected.Take care, when an object name contains dots as delimiters. It is not possible to use an underscore instead of a dot. For example, it is possible to specify "KO_._B*", but is not possible to specify "KO___B*". As a rule, underscores should only be used with for objects with names. It is not possible to use them for volumes which are offline.
When a filter has been applied to a folder or when a folder is not available, this is reflected in the folder icon that is shown in the tree view of the object workspace:
|
|
A filter has been applied. This means that the number of items in this folder has been reduced according to specific filter criteria. Different filters can be defined for the different types of folders. For further information, see the appropriate sections later in this documentation. |
|
|
The folder is not available. This is due to the security settings in your mainframe environment. |
![]() To define a filter
To define a filter
-
Select the appropriate object (either in the object workspace or list view window).
-
Invoke the context menu and choose .
Or:
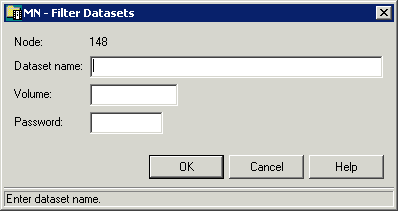
Press F3.A dialog box appears. The filter criteria that can be defined in this dialog box depend on the object which has been selected. The following example shows the dialog box which appears when have selected the folder which contains the z/OS datasets.
When a filter has already been defined for the selected object, the filter criteria are shown in this dialog box.
Note:
For several objects, a command is also available. See the appropriate section later in this documentation for information on the resulting dialog box. -
Enter the filter criteria. For example, in the above dialog box, enter a dataset name such as the following:
JWO.COMM.*
-
Choose the button.
The filter is immediately reflected in the object workspace.
When the command has been invoked from the list view window, the change is also immediately reflected in this window.