Elements of the Application Window
This document covers the following topics:
General Information
When you start Entire Systems Management, the following application window appears:

The Entire Systems Management application window may offer information for one or more of the following applications:
-
Output Management GUI Client
-
Entire Operations GUI Client
-
Mainframe Navigation
When an application is installed, the corresponding folder is shown in the application window. If you are not authorized to use an application, the icon which is shown for this application contains an X (meaning, this application is crossed out).
Note:
Output Management GUI Client and Entire Operations GUI Client can only
be used in an RPC environment. Mainframe Navigation can be used either in an
RPC environment or in a SPoD environment. When working in a SPoD environment,
the folders for Output Management GUI Client and Entire Operations GUI Client
are crossed out, which indicates that you cannot work with them.
The application window contains the
object workspace
on the left and the content
pane on the right. To modify the size of such an area, move the
mouse pointer over the border separating the two areas until the pointer
changes, showing two arrows pointing in opposite directions (![]() ). Then drag the border using the mouse until the areas
have the desired size.
). Then drag the border using the mouse until the areas
have the desired size.
More information on the elements of the application window is provided in the topics below.
Menu Bar
The following menus are available:
| Menu | Description |
|---|---|
|
The commands in this menu change according to the object which is currently selected in the object workspace. Some of these commands are also available in the context menu which appears when you select an object in the object workspace. This menu also contains commands for saving changes in an editor window, for closing the active window in the content pane, for defining the page setup for printing, and for exiting Entire Systems Management. |
|
|
Using the commands in this menu, you can show or hide different elements of the application window (for example, the object workspace or status bar). |
|
|
Using the commands in this menu, you can choose whether to use the English or German language. You can define the refresh mode (see Refreshing the Display) and specify trace options (see Tracing). The following restriction applies for Mainframe Navigation: when you choose the German language, only the menus and the menu commands are shown German; the Mainframe Navigation dialog boxes and messages are always shown in English, regardless of the chosen language. |
|
|
Using the commands in this menu, you can activate the next or previous inactive window in the content pane. Or you can close all windows in the content pane. When the changes in a window have not yet been saved, a dialog box appears, asking whether you want to save the changes. A list of open windows is shown at the bottom of the menu. The window which is currently active is indicated by a check mark. To activate another window, choose the corresponding entry in the menu. |
|
|
Using the commands in this menu, you can invoke the online documentation or display information about an application. The current selection in the object workspace is important in this case. For example, when Mainframe Navigation (or one of its nodes) is currently selected, you can invoke help for Mainframe Navigation or you can display, for example, the version number of the installed version. |
Note:
The following menus can also be shown: the
menu which is shown when an editor window is active, and the
menu which is shown when a browse window is
active.
Toolbar
You can execute several functions using a toolbar button. When you move the mouse pointer over a toolbar, a brief description for the button is shown in the status bar. In addition, tooltips appear for the buttons.
The available toolbar buttons may differ depending on the current context. For example, there are toolbar buttons which are only available when an editor is active. If a toolbar button is greyed-out, the command is not available for the selected object.
Object Workspace
The object workspace on the left side of the application window contains a tree view. All objects that can be managed with Entire Operations GUI Client, Output Management GUI Client and/or Mainframe Navigation are available in the corresponding folders of the tree.
You can expand or collapse a folder in the tree by clicking the plus or minus sign in front of a folder. A folder preceded by a minus sign has been fully expanded.
When using the keyboard, you can navigate in the tree using the following keys:
| Key | Description |
|---|---|
| UP-ARROW | Move the selection up in the tree view. |
| DOWN-ARROW | Move the selection down in the tree view. |
| RIGHT-ARROW | Expand an object in the tree view. |
| LEFT-ARROW | Collapse an object in the tree view. |
| HOME | Selects the first object within the tree view. This also works in a list view window. |
| END | Selects the last object within the tree view. This also works in a list view window. |
| ENTER | Corresponds to double-clicking an object. Collapses or expands an object, depending on its current state. When an object cannot be expanded any further and when the command is available for this object, its content is shown in a browse window. |
![]() To show or hide the object workspace
To show or hide the object workspace
-
From the menu, choose .
When the object workspace is shown in the application window, a check mark is shown next to this menu command.
Content Pane
The content pane is shown on the right side of the application window. When you invoke a command for an object, the corresponding list view window, editor window, diagram or dialog box appears here.
Context Menus
Context menus provide for selection commands that are valid in the current context (that is, for the item that is currently selected). The content of a context menu depends, for example, on the object which is currently selected in the object workspace or which is active in the content pane.
Commands that are greyed-out are not available for the selected item.
![]() To invoke a context menu
To invoke a context menu
-
Select the item for which you want to invoke a context menu (either in the object workspace or in the content pane).
-
Click the right mouse button.
Or:
Press SHIFT+F10.The context menu appears and you can now choose the required command.
Result View
Only supported by Output Management GUI Client and Entire Operations GUI Client.
The result view is shown at the bottom of the application window. It contains hints, errors and warnings which occur during the session.
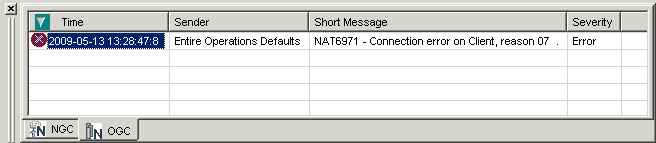
Using the context menu, you can display detailed information for a specific entry, or you can delete the selected or all messages in the result view.
![]() To show or hide the result view
To show or hide the result view
-
From the menu, choose .
When the result view is shown in the application window, a check mark is shown next to this menu command.
Command Line
The command line is only supported by Output Management GUI Client and Entire Operations GUI Client. See also the information on direct commands in the Output Management GUI Client documentation and in the Entire Operations GUI Client documentation.
![]()
Each command that you enter in the command line is saved for the current session. The drop-down list box contains your last entries (history).
![]() To show or hide the command line
To show or hide the command line
-
From the menu, choose .
When the command line is shown in the application window, a check mark is shown next to this menu command.
![]() To issue a command in the command line
To issue a command in the command line
-
Make sure that an item in the Entire Operations folder is currently selected.
-
Type the command in the text box of the Command drop-down list box.
Or:
When the mouse pointer is positioned on the Command drop-down list box, you can also use the right mouse button to invoke a context menu. Using the commands from this context menu, you can, for example, paste a text string into the command line.Note:
In addition to the standard Windows editing commands such as and , the context menu may also contain Windows commands for Unicode. See your Windows documentation for further information. -
Press ENTER to execute the command.
![]() To issue a command using the command line history
To issue a command using the command line history
-
Open the Command drop-down list box and select an entry.
Or:
Enter the first character of a command that you have previously entered in the text box of the Command drop-down list box. The corresponding command automatically appears in the text box. When you have previously entered several commands which start with the same letter(s), the command that has been entered last appears in the text box. -
Press ENTER to execute the command once more.
Status Bar
The status bar is the horizontal information line at the bottom of the application window.
On its left side, the status bar shows short help texts for the commands in the menu bar and context menu. When data are currently received from the server, this information is also shown.
On its right side, the status bar shows the login user ID, the server name and the server node. For Mainframe Navigation, this information is only shown when working in an RPC environment.
![]() To show or hide the status bar
To show or hide the status bar
-
From the menu, choose .
When the status bar is shown in the application window, a check mark is shown next to this menu command.
Dockable Windows
The following elements of the application window are dockable windows:
-
toolbar
-
object workspace
-
result view
Using the mouse, you can drag a dockable window to another position so that it is shown
-
at another position within the application window, or
-
in a window of its own.
You can move the window freely on your screen. You can move it back to the application window (for example, back to its original position) so that it is no longer shown in a window. This process is called "docking".
![]() To undock/dock a window
To undock/dock a window
-
Double-click the two lines which are shown for the docked window. For example:

Or:
Double-click the title bar of an undocked window.When the window is currently docked, it is undocked. When the window is currently undocked, it is docked at its previous position.
![]() To drag a docked window to another position
To drag a docked window to another position
-
Move the mouse pointer to the two lines which are shown for the docked window.
-
Press the mouse button and drag the window to another position.
An outline of the window is shown. The outline indicates the position at which the window can be docked.
-
If you want to prevent docking (that is, if you want to undock the window), press CTRL while dragging the window.
-
Release the mouse button.
![]() To drag an undocked window back to the application window
To drag an undocked window back to the application window
-
Move the mouse pointer to title bar of an undocked window.
-
Press the mouse button and drag the window to the position at which you want to dock it.
An outline of the window is shown. The outline indicates the position at which the window can be docked.
-
Release the mouse button.
Note:
The commands in the menu do not apply to
dockable windows.
Refreshing the Display
You can refresh the contents of a folder in the object workspace. Or you can refresh the content of a list view window. The most current information from the server is then shown. The amount of information that is refreshed depends on the refresh mode that has been defined.
![]() To refresh the display
To refresh the display
-
Select a folder or one of its subfolders in the object workspace.
Or:
Activate the list view window that is to be refreshed. -
Press F5 to refresh the display.
![]() To define the refresh mode for the object workspace
To define the refresh mode for the object workspace
-
From the menu, choose , where mode is one of the following commands:
-
Refreshes only the folder which is currently selected in the tree. -
Refreshes the folder which is currently selected in the tree and all of its subfolders.
-
Note:
Entire Operations GUI Client provides an functionality for certain list view windows. This can be
defined in the user settings.
Tracing
In case of problems, you can enable tracing and thus write the trace information to a log file. Due to performance issues, this should only be done when requested by Software AG support.
The log file is created in the directory which is defined by the
environment variable %TEMP%. The name of the log
file depends on the trace option, see below.
![]() To activate tracing
To activate tracing
-
From the menu, choose , where option is one of the following commands: through .
The higher the trace level, the more information is written to the log file.
![]() To deactivate tracing
To deactivate tracing
-
From the menu, choose .
![]() To specify the destination file for the log information
To specify the destination file for the log information
-
From the menu, choose , where option is one of the following commands:
-
The content of the log file is always overwritten. The name of the log file is estrace.log. -
The content of the old log file is not overwritten. A new log file is created instead. The name of the new log file is estrace_<date>_<time>.log, where date has the format yymmdd, and time has the format hhmmss.
-