You can specify communication parameters for the following session types:
The Communication dialog boxes for the different session types appear when you choose the button in the Session Properties dialog box or in the Host Printer Session dialog box.
The following property pages are provided:
See also: TN3270(E) in the Installation section.
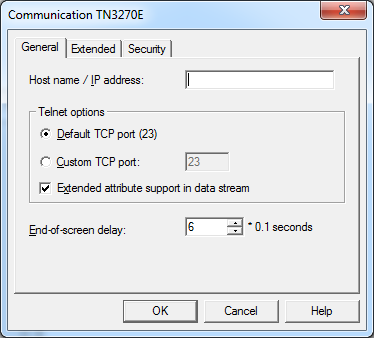
Specify the name of the host to which you want to connect.
Alternatively (for example, if a name server is not installed in your network), you can specify the TCP/IP address of the host. You can specify the address in either of the following formats:
Internet Protocol Version 4 (IPv4)
The TCP/IP address format is w.x.y.z, where w, x, y and z are
numbers which can have 1 to 3 digits. Example: 23.218.4.90.
Internet Protocol Version 6 (IPv6)
The TCP/IP address format is s:t:u:v:w:x:y:z, where s, t, u,
v, w, x, y and z are hexadecimal numbers which can have 1 to 4 digits. An
address is thus 128 bits long and consists of eight 16-bit hexadecimal values,
separated by colons. Example: 2010:4711:0000:0000:0000:0000:000B:0010.
Select this option button, if you want to use the default TCP port (23).
Select this option button, if you want to use another TCP port. Specify the desired port ID in the corresponding text box. The TCP/IP port ID must be the same as the Telnet port ID defined on the host.
If this check box selected, this session supports extended attribute bytes (EABs).
This option only applies to line mode. It determines the length of time in tenths of a second that Entire Connection will delay before assuming that the screen is complete (end-of-screen). Valid input ranges from 0 to 30. This timer is reset each time data is transmitted from the mainframe. It is used to detect a logical end-of-screen, since no physical data signals the end-of-screen.
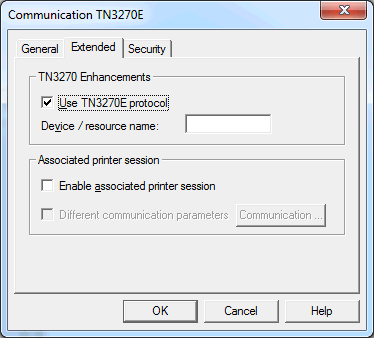
When this check box selected, TN3270E is used for communication. A prerequisite is that the Telnet server is capable of processing TN3270E. Otherwise, the TN3270 protocol is used.
Only available when the Use TN3270E check box is selected. Specify one of the following:
Display LU name
When a display LU has been specified, it is used when the
terminal application of Entire Connection tries to open a session. If this LU
is already used, an error message is shown.
Resource name
When a resource (e.g. an LU pool) has been specified, the
terminal application of Entire Connection tries to open any LU from the
specified LU pool.
When you specify a name, a "specific" session is created. Sessions that have been defined as specific on the Telnet server are only available for those sessions for which you have defined a display LU or resource name.
When you leave this text box empty, a "generic" session is created. In this case, any generic display LU of the Telnet server is used. A prerequisite is that at least one generic session has been defined on the Telnet server.
This function can only be used when Host Printer LU Support has been selected during installation. This feature can only be installed with the setup type Custom. However, it is possible to install this feature at a later point in time.
This function is only available for TN3270E servers. When you attempt to use this function on a TN3270 server, an error message appears when the display session is opened.
This check box is available to the administrator (default name: SYSTEM) when the Use TN3270E check box is selected. It is not available to other users (it is always dimmed in this case).
When this check box is selected, associated printing is enabled for this session. In this case, the Session Properties dialog box contains an additional property page: Printer LU. See the description of this property page for further information.
When associated printing is enabled, a TN3270E printer session is
automatically started when a display session is opened. The printer session
uses the communication parameters that have been defined for the display
session, i.e. host address (host name or IP address) and port. The display LU,
which is returned when connecting to the display session on the Telnet server,
is used to open a print LU. The print LU is opened using the
ASSOCIATE command (see TN3270E for Printer Sessions).
The actual association of printer sessions and display sessions must be
configured on the Telnet server.
An associated printer session is automatically closed when the display session is closed.
Only available when the Enable associated printer session check box is selected.
When this check box is selected, you can define different communication parameters for your associated printer session (for example, another port number or different security settings). To do so, choose the command button next to this check box. The resulting dialog box is the same as for a regular printer session (see TN3270E for Printer Sessions) with the following exceptions: The host name cannot be edited; this text box always contains the name of the display session. The connection type cannot be edited; it is always "Associate terminal device".
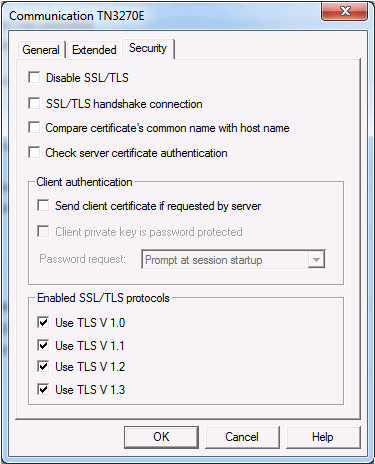
When this check box is selected, SSL/TLS is disabled. The other options on this page are not available in this case. When SSL/TLS is disabled, a connection with Telnet negociated security (see below) is not possible.
For an SSL/TLS handshake connection, this check box must be selected. This session is then defined as a secure session. You need to have a certificate on the TN3270 server. The port of the session to which you are connecting should be defined as secure.
For a connection without SSL/TLS or a for a connection with Telnet negociated security, this check box must not be selected.
For further information, see TN3270 SSL/TLS Support in the Installation section.
When this check box is selected, the value in the Host name / IP address text box of the General property page is compared with the common name (CN) value of the certificate.
When this check box is selected, the server certificate is checked on the client (that is, server authentication is enabled). When server authentication is enabled, you have to make sure that the certificates on the clients are correctly installed. See Checking Server Certificates in Entire Connection the Installation section for further information.
When this check box is not selected, the server certificate is not checked on the client (that is, server authentication is disabled).
When this check box is selected, client authentication is enabled. This is only necessary, if your TN3270 server wants to check the identity of the users connecting to it. See Client Authentication in the Installation section for further information.
Only available when the Send client certificate if requested by server check box has been selected.
Select this check box when the private key of the client is protected with a password. This protection is defined when generating the private key of the client. See also the document keys.txt in the certs folder.
Only available when the Client private key is password protected check box has been selected.
The following options are available from this drop-down list box:
Prompt at session
startup
When the session is opened in the Terminal application, a
dialog box will appear and you have to enter the password for the private key.
User password
The password that has been defined on the
Parameters 1 property page of the user properties will be
used. The user password and the password for the private key must be identical.
See the description of the Parameters 1 property
page for further information.
User password 1-4
One of the passwords that has been defined on the
Procedure property page of the user properties will be
used. The user password and the password for the private key must be identical.
See the description of the Procedure property
page, option Define other user IDs, for further
information.
When one of the user passwords has been defined, the dialog box in which you have to enter the password for the private key does not appear. Security is still guaranteed since the private key of the client is protected by the Entire Connection password.
When a wrong password is provided, the session is not opened and an error message appears, indicating that the private key could not be loaded. This can mean either that the password is wrong, or that the private key is invalid or not known to the server.
You can define the SSL/TLS protocols that are allowed during the initial handshake between the TN3270 server and Entire Connection. By default, all supported TLS protocols are activated.
The following protocols can be activated:
TLS V 1.0
TLS V 1.1
TLS V 1.2
TLS V 1.3
The following property pages are provided:
See also: TN3270(E) in the Installation section.
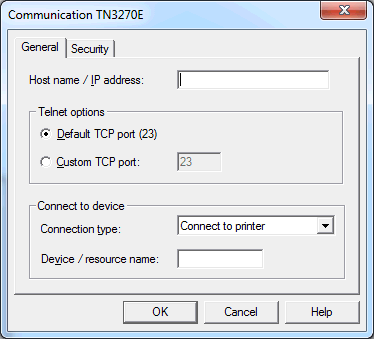
The communication parameters for printer sessions are the same as for TN3270(E) for display sessions. With printer sessions, however, the check box End-of-screen delay and the property page Extended are not available. The following drop-down list box is shown instead:
Select one of the following:
Connect to printer
This option is also known as the
CONNECT command. When you select this option, you
can define a specific or generic session as described above for the
Device/resource name text box for
TN3270(E) for display
sessions.
Associate terminal
device
This option is also known as the
ASSOCIATE command. When you select this option, you
must specify the name of a display LU in the Device/resource
name text box. On the Telnet server, a printer LU must be associated
with the display LU that you specify.
The communication parameters for printer sessions are the same as for TN3270(E) for display sessions. With printer sessions, however, the option Prompt at session startup is not available in the Password request drop-down list box.
The following property pages are provided:
See also: Telnet VTxxx in the Installation section.
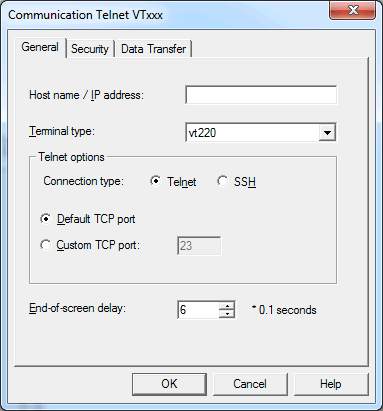
Specify the name of the host to which you want to connect.
Alternatively (for example, if a name server is not installed in your network), you can specify the TCP/IP address of the host. You can specify the address in either of the following formats:
Internet Protocol Version 4 (IPv4)
The TCP/IP address format is w.x.y.z, where w, x, y and z are
numbers which can have 1 to 3 digits. Example: 23.218.4.90.
Internet Protocol Version 6 (IPv6)
The TCP/IP address format is s:t:u:v:w:x:y:z, where s, t, u,
v, w, x, y and z are hexadecimal numbers which can have 1 to 4 digits. An
address is thus 128 bits long and consists of eight 16-bit hexadecimal values,
separated by colons. Example: 2010:4711:0000:0000:0000:0000:000B:0010.
Specify the terminal type for terminal emulation. This can be one of the following: VT100, VT220 or VT320.
Select the Telnet option button, if you want to use normal Telnet connections. Select the SSH option button, if you want to use secure connections.
Select this option button, if you want to use the default TCP port. The default port for Telnet is 23. The default port for SSH is 22.
Select this option button, if you want to use another TCP port. Specify the desired port ID in the corresponding text box. The TCP/IP port ID must be the same as the Telnet port ID defined on the host.
This option determines the length of time in tenths of a second that Entire Connection will delay before assuming that the screen is complete (end-of-screen). Valid input ranges from 0 to 30. This timer is reset each time data is transmitted from the mainframe. It is used to detect a logical end-of-screen, since no physical data signals the end-of-screen.
The options on this property page are only enabled when the connection type SSH has been selected on the General page.
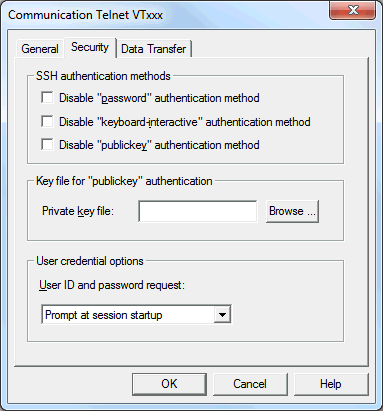
The settings on this property page are used for SSH authentication. For further information, see Telnet SSH Support in the Installation documentation.
Depending on your SSH host configuration, one or more authentication methods are offered from the host. If you do not want to use an authentication method (for example, if priority is to be given to another method), you can select the corresponding check box. The following check boxes are available:
Disable "password" authentication method
Disable "keyboard-interactive" authentication method
Disable "publickey" authentication method
It is recommended that you leave these check boxes with their default values, that is, all authentication methods are enabled. In case of doubt, ask your SSH administrator.
The "publickey" authentication method is the preferred method. It will be used when a private key file has been specified (see below).
The text box Private key file is only available when the Disable "publickey" authentication method check box is not selected.
The private key file must be located in the \Software AG\Entire Connection\certs folder of the user's local appdata folder. When you enter the file name, you need not enter a path since Entire Connection searches for the key file in the above-mentioned certs folder.
You can also choose the button to select the key file from a dialog box.
Normally, the user password is the password that is used to log on to the UNIX machine. If the "publickey" authentication method is used, however, the password is the pass phrase for the private key.
The following options are available from this drop-down list box:
Prompt at session
startup
When the session is opened in the Terminal application, a
dialog box will appear and you have to enter the user ID and password.
User ID and password
The user ID and password that has been defined on the
Parameters 1 property page of the user properties will be
used. See the description of the Parameters 1 property
page for further information.
User ID and password
1-4
One of the user IDs and passwords that has been defined on
the Procedure property page of the user properties will be
used. If a password or pass phrase is not required for the SSH logon, it is
possible to use the password "NIL" for the passwords
1-4. See the description of the Procedure property
page, option Define other user IDs, for further
information.
When one of the user ID and password combinations has been defined, the dialog box in which you have to enter the user ID and password does not appear.
When a wrong user ID or password is provided, the session is not opened and an error message appears.
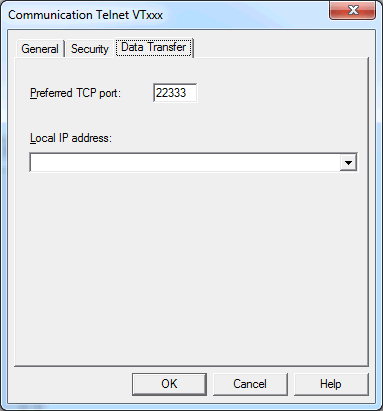
The communication for the data transfer with Natural for UNIX is done using an additional port. When running the data transfer, a second connection will be established from Natural to the client PC. To complete the data transfer successfully, the new connection must be considered in the configuration (for example, firewalls). If the port number is already in use, the data transfer searches for the next free port number by incrementing the preferred port number one by one.
The default port number when creating a new session is 22333.
The range of valid preferred TCP port numbers is from 1024 to 65535. This is because the ports that are numbered from 0 to 1023 are reserved for privileged system-level services and are designated as "Well Known Ports".
When two or more TCP/IP addresses are defined for your PC (for example, one for an Ethernet card and another for a VPN connection), you can select the TCP/IP address that you want to use for data transfer with Natural for UNIX. This drop-down list box provides for selection the available TCP/IP addresses and their friendly names together with the adapter description.
If no local IP address is selected, the default TCP/IP address of your PC is used.
The following property pages are provided:
See also: BS2000 TCP/IP in the Installation section.
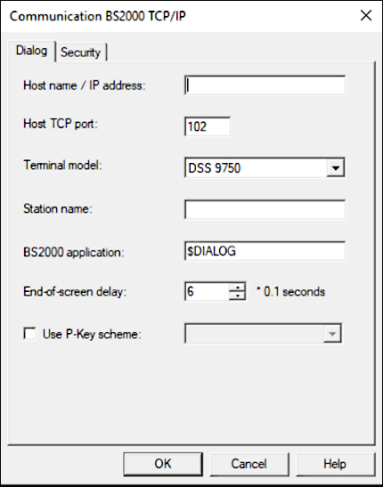
Specify the name of the host to which you want to connect.
Alternatively (for example, if a name server is not installed in your network), you can specify the TCP/IP address of the host. You can specify the address in either of the following formats:
Internet Protocol Version 4 (IPv4)
The TCP/IP address format is w.x.y.z, where w, x, y and z are
numbers which can have 1 to 3 digits. Example: 23.218.4.90.
Internet Protocol Version 6 (IPv6)
The TCP/IP address format is s:t:u:v:w:x:y:z, where s, t, u,
v, w, x, y and z are hexadecimal numbers which can have 1 to 4 digits. An
address is thus 128 bits long and consists of eight 16-bit hexadecimal values,
separated by colons. Example: 2010:4711:0000:0000:0000:0000:000B:0010.
Specify the desired port ID. The TCP/IP port ID must be the same as the port ID defined on the host.
Select the terminal model you want to use. The selected terminal model must be defined or provided by the host system.
If you do not specify a station name, Entire Connection automatically creates an internal name (e.g. STN1, STN2 etc.) when this session is opened. This is recommended if you want to establish several connections to the BS2000 host using the same host session.
Optional. You can also specify the name of the station which is used to connect to the host. The station name may include the following characters: A to Z, 0 to 9, $, # and @. The first character must not be a number. The name can be up to 8 characters long. When you specify a station name, only one host session with this name can be active. If this host session is opened once more, the previously opened host session is automatically closed.
When using station names, you should create several host sessions with different station names.
Specify the name of the application on the BS2000 host to which you want to connect. $DIALOG is provided as the default name. The name can be up to 8 characters long. The connection will be established using an "open" command with no parameters.
If this field is empty, you are prompted for a BS2000 application
name when you open the host session. You can then enter the "open"
command followed by the application name (for example o $DIALOG).
This is helpful if you want to use different BS2000 applications.
This option only applies to unformatted screens. It determines the length of time in tenths of a second that Entire Connection will delay before assuming that the screen is complete (end-of-screen). Valid input ranges from 0 to 30. This timer is reset each time data is transmitted from the mainframe. It is used to detect a logical end-of-screen, since no physical data signals the end-of-screen.
When this check box is selected, you can select a P-key scheme from the drop-down list box. The drop-down list box provides for selection all currently defined P-key schemes. The selected scheme will then be used as the default P-key scheme for this session, i.e. when the session is opened, the contents of the P-keys is automatically loaded into the terminal application.
The options for the security sessions are identical to the options provided for TN3270(E).
See section TN3270(E) for Display Sessions > Security for all details.