
Entire Connection supports TN3270 SSL/TLS. This allows a secure connection between Entire Connection and a Telnet TN3270 server. In an SSL/TLS session, all data is encrypted before it is sent to the Telnet server. Encrypted data received from the server is decrypted before it is processed.
A prerequisite is that you have a Telnet TN3270 server with an SSL-/TLS-enabled port. To use SSL/TLS, the server must have a private key and an associated server certificate.
This document covers the following topics:
Note:
This product includes software developed by the OpenSSL Project
for use in the OpenSSL Toolkit (https://www.openssl.org/).
In Entire Connection, SSL/TLS support is available for TN3270 display sessions and for TN3270 printer sessions. The following SSL/TLS options are supported:
Server authentication
Server authentication is used to identify the server to the
client. Server authentication can be enabled or disabled for an encrypted
SSL/TLS session. It can be used with or without client authentication.
Before the session is established, the client (Entire Connection) checks the server certificate which is associated with the server's private key.
Host name check
The name of the host to which the client (Entire Connection)
connects is compared with the common name (CN) value of the server certificate.
This option strengthens the server authentication.
Client authentication
Client authentication is used to identify the client to the
server.
SSL/TLS client authentication provides additional authentication and access control by checking client certificates on the server. This support prevents a client from obtaining a connection without an installation-approved certificate.
There are two ways to establish an SSL/TLS TN3270 session.
One way is to directly open an SSL/TLS connection with an SSL/TLS handshake. This means that the client connects to an SSL/TLS-enabled port of the Telnet TN3270 server and that the SSL/TLS protocol is used from the beginning.
Another way is negotiated Telnet security. In this case, a normal
Telnet connection is opened between the client and the Telnet TN3270 server.
Then the Telnet server sends a special command (IAC DO
START_TLS) to the client to check whether it wants to start
SSL/TLS negotiation. If a positive response is received, the server continues
with the SSL/TLS handshake. If no positive response is received, then,
depending on the server configuration, a normal Telnet session is used or the
connection is dropped.
The following folder contains several server certificate files from different Certification Authorities (CAs):
\ProgramData\Software AG\Entire Connection\certs
When server authentication has been enabled, check whether the server certificate you have for your Telnet SSL/TLS server is already contained in the folder certs. If your server certificate is from a different Certificate Authority, or if you use a self-signed certificate, then you have to add it to the certs folder and to the CAList.pem file in this folder. See Checking Server Certificates in Entire Connection for detailed information.
Use Entire Connections's Configuration Manager to create a host session (display session) of type TN3270. In the resulting Session Properties dialog box, specify a session name and choose the button. Specify all required information on the General property page of the resulting Communication dialog box. Specify the number of a port which is able to support SSL/TLS. Display the Security property page and make sure that SSL/TLS is enabled. You will now check whether the basic SSL/TLS connection works correctly. Either enable the SSL/TLS handshake connection check box if you want to establish a handshake connection or disable this check box if you want to establish a session with Telnet negociated security. Do not yet activate any other option on this property page. For detailed information on the communication parameters, see TN3270(E) for Display Sessions in the Overview of Object Properties.
Use Entire Connection's terminal application to test the session you have created in the previous step.
When the basic SSL/TLS connection works correctly, you can activate and test the remaining options on the Security property page:
Host name check
You can only use this SSL/TLS option if the common name (CN)
value in the server certificate is the same as the host name that is used on
the General property page of the
Communication dialog box.
To use this SSL/TLS option, activate the option Compare certificate's common name with host name on the Security property page of the Communication dialog box.
Client authentication
Your server must be set up to use client authentication. You
need a client private key and a certificate for this key. This key and
certificate must be added to your server installation. The private key and the
certificate must also be added to the Entire Connection installation. See
Client
Authentication for detailed information.
To use this SSL/TLS option, activate the option Send certificate if requested by server on the Security property page of the Communication dialog box.
Repeat the above steps to create a host printer session of type TN3270E. For detailed information on the communication parameters, see TN3270E for Printer Sessions in the Overview of Object Properties.
This section applies when server authentication has been enabled. It describes how to set up a basic SSL/TLS connection with server authentication. This means Entire Connection connects to an SSL/TLS connection and checks the certificate of the TN3270 server. If the server certificate is not valid, the connection will be stopped.
When starting a TN3270 SSL/TLS connection, Entire Connection checks the server certificate against the certificates in the file CAList.pem. This file contains the (root) certificates of the Certification Authorities (CAs) that you trust. A Certification Authority is a company that signs certificate requests. One example of such a company is Verisign (see http://www.verisign.com/).
The CAList.pem file that is provided with Entire Connection contains several certificates from well known Certification Authorities. If you have a self-signed certificate for your server, or if you want to add a certificate to the list of trusted certificates, proceed as described below.
 To add a certificate to the CAList.pem file
Go to Entire Connection's certs folder.
This folder contains several certificate files (.crt) and the file CAList.pem which is a summary of the crt files. The batch file create-calist.bat is used to create the file CAList.pem. It contains a command line for each of the certificate files to be added to CAList.pem.
Copy your crt file (for example, a self-signed certificate or a new certificate from a Certification Authority) to the certs folder.
Edit the batch file create-calist.bat and add a command line for the certificate you want to add.
For example, if you want to add the certificate in mycert.crt, you have to add the following command line:
%OPENSSL% x509 -text -in mycert.crt >>
                           					 %OUTFILE%
Make sure that the variable
OPENSSL in the first line of the batch file is set
correctly for your installation. It must point to
OpenSSL.exe which is provided in Entire Connection's root
directory.
Execute the file create-calist.bat. The file CAList.pem is now regenerated with the new certificate file.
With client authentication, the Telnet server can check the identity of the client. The server cannot only check whether the certificate is issued by a trusted Certification Authority (lowest level security), it is also possible to register the client's certificate against an internal database (for example, RACF) and make sure that the client is connected from a defined TCP/IP address and port. Client authentication is optional.
For client authentication, it is necessary to generate a private key for each user. To generate a private key, use the program OpenSSL.exe which is provided in Entire Connection's root directory.
For information on how to generate a private key, see the document keys.txt in the certs folder.
Your private key should have the name clientprivkey.pem.
To create a 2048 bit RSA key (example)
Open a Command Prompt window.
Change to Entire Connection's certs folder.
Enter the following command at the command prompt:
"\Program Files\Software AG\Entire
                           					 Connection\OpenSSL.exe" genrsa -des3 -out testkey.pem 2048
When you specify "-des3", you are prompted for a password while the private key is being generated.
Important:
For reasons of security, it is recommended that you
generate a private key with a password. Then the private key cannot be used
without a password which is important if an unauthorized person gets hold of
the private key.
You also have to create a certificate based on the client key. For this purpose, you also use the program OpenSSL.exe which is provided in Entire Connection's root directory.
See the document certificates.txt in the certs folder for further information.
Your certificate should be named clientcert.crt.
To create a self-signed certificate using the configuration file
openssl.cnf (example)
Open a Command Prompt window.
Change to Entire Connection's certs folder.
Enter the following command at the command prompt:
"\Program Files\Software AG\Entire
                           					 Connection\OpenSSL.exe" req -new -x509 -key clientprivkey.pem -out
                           					 clientcert.crt -days 1095 -config openssl.cnf
Note that you have to configure your TN3270 server to use client authentication and also "install" the client key and the certificate in the server.
It is possible to export trusted certificates from Microsoft Internet Explorer.
To export certificates
This description applies to Internet Explorer 9.
From the Tools menu, choose Internet options.
Go to the Content tab.
Choose the button.
Go to the Trusted Root Certification Authorities tab.
Select the certificate that you want to export.
Choose the button.
The Certificate Export Wizard appears.
Choose the button.
Select the Base-64 Encoded X.509 (.CER) option.
Choose the button.
Specify the name of the file into which the certificate is to be exported.
Choose the button.
On the last page of the wizard, choose the button.
It is also possible to download the root certificate directly from the web site of the Certification Authority (CA). The certificate may not be in the correct format (Entire Connection requires Base-64). To check whether the certificate is in Base-64 format, open it in an ASCII editor (for example, Notepad). If you see a "BEGIN CERTIFICATE" line in the beginning and a "END CERTIFICATE" line at the bottom, the format is already in Base-64 and you can just use it as it is.
If the certificate is not in base-64 format, you have to proceed as described below.
To change the certificate to base-64 format
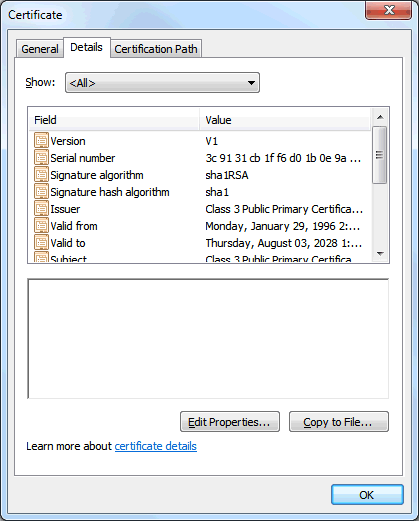
Open the certificate and display the Details property sheet. Example:
Choose the button to invoke the Certificate Export Wizard.
Choose the button to proceed to the next page.
Select the option button Base-64 encoded X.509 (.CER).
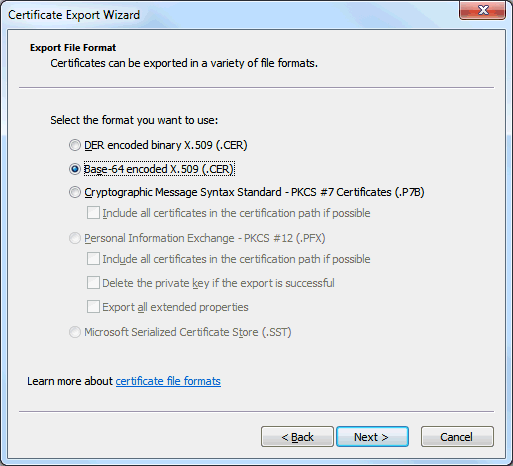
Choose the button to proceed to the next page.
Specify the name of the file to which you want to export the modified certificate.
Choose the button to proceed to the next page.
Choose the button.