
This document covers the following topics:
If you do not specify otherwise during installation, an Entire Connection folder automatically appears in the folder of the Start menu after Entire Connection has been installed. It contains the shortcuts for the Entire Connection components, including the Format Converter.
 To start the Format Converter
From the Start menu, choose .
The Entire Connection Format Converter window appears:
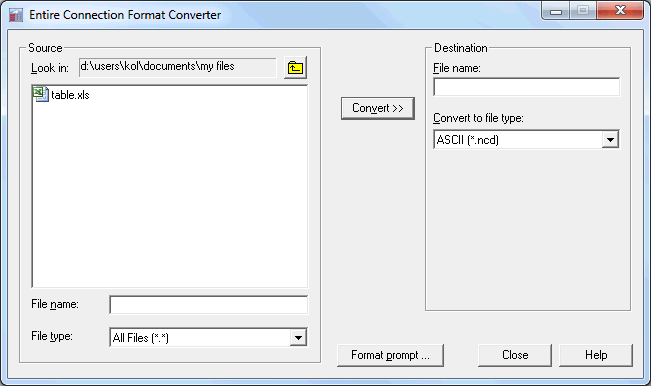
You can now create a format file or convert a file as described below.
A format file must exist for each file you want to convert. It contains information about the fields in the file to be converted and their lengths (see Format Files in the Data Transfer section).
The format file must be stored in the same directory as the file to be converted and must have the same name as the file for which is is created. The extension of a format file is always "ncf".
When downloading data, a format file is automatically created.
A format file does not exist in the following cases:
A format file was not created at download time because the Create format file check box in the user properties was not marked.
The file was not created via download.
The format file has been deleted.
Data were downloaded directly to Excel.
You can modify an existing format file or create a new format file. When you create a format file, it is always created in the new format. When you modify an old format file, it remains in its old format. See also Format Files in the section Terminal Emulation.
To create or modify a format file
In the Entire Connection Format Converter window, choose the button.
The Open dialog box appears.
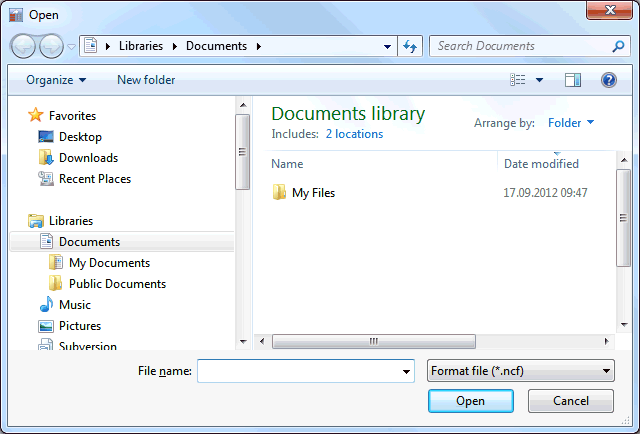
Select the required directory and enter the name for the new format file in the text box. You need not specify an extension since it is automatically provided.
Or:
Select the format file that you want to modify in the dialog box.
Choose the button.
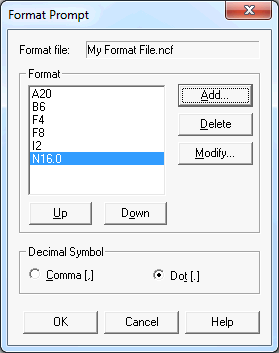
The Format Prompt dialog box appears.

Choose the option button for the decimal symbol that is to be used (comma or dot).
The following command buttons are provided (in addition to the standard buttons):
| Add a field. | |
| Delete the selected field. | |
| Modify the selected field. You can also double-click a field to modify it. | |
| Move the selected field up. | |
| Move the selected field down. |
You can now define all required fields as described below. The fields must correspond to the fields in the file for which you create the format file.
To define the fields
To add a field, choose the button.
The Define Format dialog box appears:
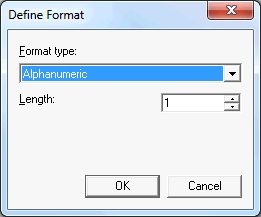
From the Format type drop-down list box, select the desired format type.
In the Length spin box, specify the desired field length (except for a logical field).
For a numeric field, you have to enter the number of digits before and after the decimal symbol.
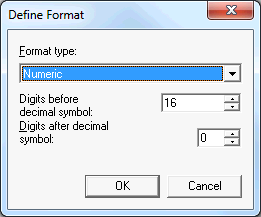
Choose the button.
The field definition is now shown in the Format Prompt dialog box.
Repeat the above steps to add all required fields.
Optionally: to delete, modify or move the selected field, choose the corresponding command button.
The Format Prompt dialog box may now look as follows:
Choose the button to save the format file.
When a format file exists, you can convert a file as described below.
To convert a file
On the left side of the Entire Connection Format Converter window, select the file to be converted.
Using the File type drop-down list box, you can specify that only files with a specific extension are shown (for example, you can limit the display to Excel files with the extension "xls").
In the Destination group box, enter the name for the target file in the text box.
You need not specify an extension. It is automatically provided depending on the file type you select from the Convert to file type drop-down list box.
If you do not specify a path with the name, the target file is created in the current directory.
From the Convert to file type drop-down list box, select the desired format.
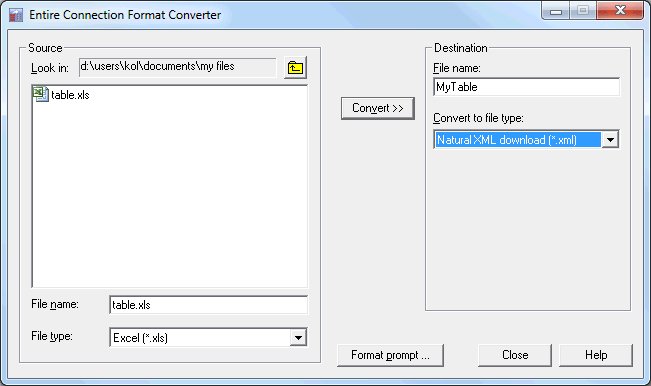
Choose the button.
If a file with the name you have just specified exists, a dialog box appears. If you want to overwrite the existing file, choose the button.
A message indicating that conversion is in progress is shown. The target file is created in the specified directory.
If a format file does not exist, an error message appears. In this case, you must first create a format file and then repeat conversion.
To quit the Format Converter, choose the button.
The Format Converter is started by invoking Pccconvert.exe.
If you create a shortcut for Pccconvert.exe, you can modify its properties in order to define the language with which the Format Converter is to be started.
Note:
This information applies only to shortcuts on your desktop (it does
not apply to the shortcut in the menu or a copy of
it).
The syntax for invoking the Format Converter with an English user interface is the following:
[drive:\path\]Pccconvert.exe /US
The syntax for invoking the Format Converter with a German user interface is the following:
[drive:\path\]Pccconvert.exe /GR
When a language is not defined, English is used by default.