
This document covers the following topics:
The format of a file is determined by its extension.
You can download data to a file, a printer or directly to Excel.
If you download data to a file and no file name has been associated with the work file number used in a Natural program, a dialog box prompts you for a file name at execution time. The Natural work file number is shown in brackets in the title bar.

 To download data to a file
Make sure that the download destination File is selected.
In the File name text box, enter the name of the file in which the data are to be stored on the PC.
If you do not specify a path, the file is stored in the current directory.
Choose the desired file type from the Save as type drop-down list box.
Specify the format that is to be used.
If the Use DOS (OEM) download format check box is not marked, the ANSI character set is used. This character set is used by all Windows applications.
If this check box is marked, the DOS character set is used. This character set is used by most MS-DOS applications.
Choose the button.
The data are downloaded to the specified file.
To download data to a printer
Leave the File name text box empty.
Select the Printer option button.
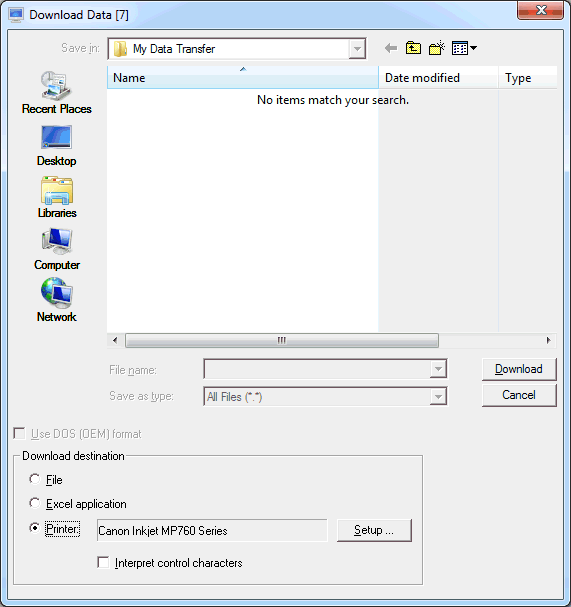
Optionally: choose the button to select another printer or define another orientation (e.g. landscape).
Mark the Interpret control characters check box, if you want to download a Natural report containing control characters. Valid control characters are:
| Control Character | Function |
|---|---|
| 1 | New page |
| blank | Single blank line |
| 0 | Double blank line |
| - | Triple blank line |
Choose the button.
The data are downloaded to the specified printer.
To download data directly to Excel
Leave the File name text box empty.
Select the Excel application option button.
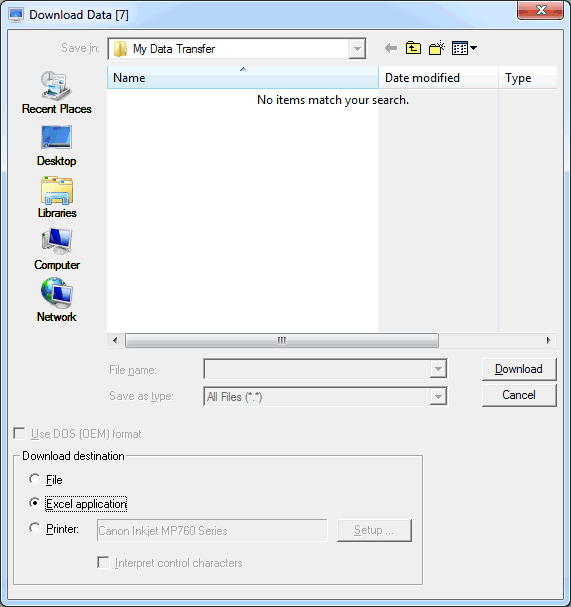
Choose the button.
When download is complete, Excel is automatically started and the data are shown in an untitled Excel workbook.
Save the downloaded data in Excel.
Note:
A format file (extension ncf) is
not created in this case.
If no file name has been associated with the work file number used in a Natural program, a dialog box prompts you for a file name at execution time. The Natural work file number is shown in brackets in the title bar.
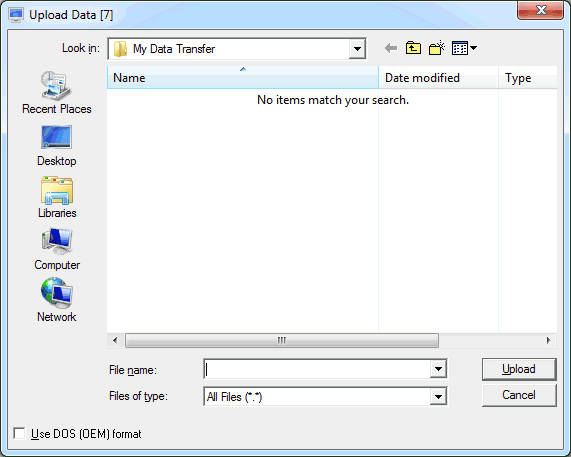
To upload data to a file
In the Upload Data dialog box, select the file to be uploaded.
Specify the upload format that is to be used.
If the Use DOS (OEM) download format check box is not marked, the ANSI character set is used. This character set is used by all Windows applications.
If this check box is marked, the DOS character set is used. This character set is used by most MS-DOS applications.
Choose the button.
Natural programs download or upload data by referring to the number of a work file or printer file. This number must be an integer between 1 and 32. You can define up to 32 work files and up to 31 printer files.
A file name can be associated with several numbers for work files and printer files. The number of a work file or printer file, however, can only be associated with one file name.
To associate a file name with the number of a work file or
printer file
Issue the SET command
using the following syntax:
SET PCFILE x DOWN DATA filename
SET PCFILE x UP DATA filename
SET PCFILE y DOWN REPORT filename
where x is a valid work file number, y is a valid printer file number, and filename is a valid file name. There is no warning if a file with that name already exists.
filename can be specified either with or without the path to the file. For example:
SET PCFILE 7 DOWN DATA C:\test\mydata.ncd
filename can also contain the name of an existing environment variable. The environment variable must be enclosed in percent signs (%). The environment variable may contain only a file name, only a path without a file name, both path and file name, or any part of filename. For example:
SET PCFILE 7 DOWN DATA %TEMP%\mydata.ncd
When the current value of the environment variable
TEMP in the above example is
"C:\Users\Jack\AppData\Local\Temp", the path and
file name for the download is set to
"C:\Users\Jack\AppData\Local\Temp\mydata.ncd". When
the environment variable contains only a path (as in the above example), make
sure to specify a backslash (\) before the file name.
If an environment variable with the given name is not found,
the name including the percent signs remains as specified. For example,
SET PCFILE 7 DOWN DATA %UNKNOWN%\mydata.ncd would set the path and
file name for this download to
"%UNKNOWN%\mydata.ncd".
When you download data directly to your local printer, you must specify PRN, LPT1, LPT2 or LPT3 as the file name. If the first character in the downloaded data is to be interpreted as a printer control character, you must specify *PRN, *LPT1, *LPT2 or *LPT3 as the file name.
The file name remains associated with the specified work
file number until you leave Entire Connection or until the
SET command is issued to reset the work file.
Note:
To associate a file name with a printer file number, use
DOWN REPORT.
To reset the work file or printer file
Issue the SET command
without specifying a file name.
The following commands reset the file numbers defined above:
SET PCFILE x DOWN DATA
SET PCFILE x UP DATA
SET PCFILE y DOWN REPORT
where x is a valid work file number, and y is a valid printer file number.
To specify an XSL style sheet type and name for download to
XML
Issue the SET command
using the following syntax:
SET PCFILE x DOWN CONVERT stylesheet-type stylesheet-name
where x is a valid work file number, stylesheet-type is the type of the style sheet (for example, "text/xsl") and stylesheet-name is a valid file name. There is no warning if a file with that name does not exist.
Example:
SET PCFILE 7 DOWN CONVERT text/xsl employ.xsl
This inserts the following the style sheet definition in all downloaded XML files:
<?xml-stylesheet type="text/xsl" href="employ.xsl"?>
The style sheet type and name remain associated with the
specified work file number until you leave Entire Connection or until the
SET command is issued to reset the work file.
To reset the XSL style sheet type and name for download to
XML
Issue the SET command
without specifying a style sheet type and name:
SET PCFILE x DOWN CONVERT
where x is a valid work file number.
You can instruct Entire Connection to dynamically create a file name at download time. In this case, the file name consists of the date and time the file was created. The format is DDHHMMSS (DD = day, HH = hour, MM = minute, SS = second).
To create a file name dynamically
Issue the following command:
SET PCFILE x DOWN DATA ~~RANDOM.ext
You can specify an extension (optional). You must not specify a drive or directory.