
Instead of using function codes, you can issue direct commands from any screen in the PAC system to bypass menus and access the particular screens directly.
Direct commands are either Natural (N) commands or commands that are specific to PAC (P). The ADMIN and MENU commands are both Natural and PAC commands.
This document covers the following topics:
The direct commands in this section are used to execute SYSPAC functions. These commands may be issued either when SYSPAC is invoked or from a menu screen.
Direct commands are issued in either interactive or batch mode.
![]() To issue commands in interactive mode
To issue commands in interactive mode
from any library, enter SYSPAC followed by a direct command string.
After the direct command is issued, you are usually returned to the library from which you issued the command.
Or:
from library SYSPAC, enter MENU followed by a direct command
string.
Or:
from a SYSPAC menu screen, enter a direct command string.
![]() To issue commands in batch mode
To issue commands in batch mode
from any library, enter SYSPAC followed by a direct command string.
Or:
from library SYSPAC, enter MENU followed by a direct command
string.
Notes:
This section covers the following topics:
The generalized syntax for SYSPAC direct commands is as follows:

The command and entity-type arguments are always entered in capital letters. A space or a delimiter (the default is a comma) separates the arguments. The delimiter must be used for batch commands.
The arguments enclosed in square brackets in the syntax statement are optional for most commands, but when used, their values are restricted by the first set of arguments.
The characters underlined in each command's syntax statement may be used alone to represent the command and entity-type.
The operator argument is optional, but if the operator is specified, the correct operator for the selected command must be used.
Only certain entity-types are valid for a particular command. Valid values for each argument are discussed for each command in the following sections. The entity-name must correspond to the associated entity-type designation.
The possible entity-types for PAC commands are as follows:
APPLICATION
EVENT
JOB
KEYWORD
OBJECT
REQUEST
STATUS
Note:
Direct commands are not currently available for the entity-type
keyword.
The format for the entity-names of each of the entity-types is A32 meaning the name is alphanumeric and can consist of up to 32 characters.
Most direct commands can be issued from the command line of any PAC screen by entering the desired command in accordance with the syntax described in this section.
The command bypasses the PAC menus and takes you directly to the desired function screen. For example, if you wish to display an application status link from the Migration Event Menu, enter the following direct command on the command line:
DISPLAY STATUS development FOR APPLICATION ord-exam
If the entity name is not found, the maintenance menu of the specified entity type (application, event, job, keyword, request, status) is displayed with a message at the bottom of the screen stating that the entity name specified was not found. From this screen, you may request a list of valid entity names by entering one of the following in the relevant entity type field:
An asterisk (*);
A range of valid entity names;
The first one or two characters of an entity name followed immediately by the asterisk notation (for example, "ord*").
Refer to the PAC User's Guide, section Using Range Notation in section Navigating in PAC for more information.

Valid entity-types for the ADD command include the following:
| entity-type1 | entity-type2 | |
|---|---|---|
|
|
||
| APPLICATION | STATUS | |
| EVENT | - | |
| JOB | - | |
| KEYWORD | - | |
| REQUEST | - | |
| STATUS | APPLICATION | |
The following syntax is used to add (link) an application to a status:
ADD APPLICATION application-name [TO][STATUS]status-name
The following syntax is used to add (link) a status to an application:
ADD STATUS status-name [TO][APPLICATION]application-name
The remaining valid values for entity-type1 are not used with a TO-clause.
ADD APPLICATION ord-exam
ADD APPLICATION ord-exam TO STATUS user-test
ADD APPLICATION ord-exam STATUS user-test
ADD APPLICATION ord-exam user-test
ADD EVENT ord-dc-01
ADD JOB os-export-jcl
ADD KEYWORD project1
ADD REQUEST fix-01
ADD STATUS user-test
ADD STATUS user-test TO APPLICATION ord-exam
ADD STATUS user-test APPLICATION ord-exam
ADD STATUS user-test ord-exam
The command syntax for adding a migration event in batch is as follows:
ADD,EVENT,event-name,[FOR] application-name,[FROM] origin-status,
  [TO] destination-status
  [,SCHEDULED,yy-mm-dd,[AT] hh:ii:ss]
  [,MREQ,maintenance-request]
  [,ARCEVENT,archive-event-name]
  [,GENTYPE,C/I/M/P/R/S/U/L]
  [,SET identifiers required for GENTYPE C or S]
  [,WITH clause optional for GENTYPE P]
The values for the optional keywords are described in the following table:
| Keyword | Value | |
|---|---|---|
|
|
||
| FOR | name of the application | |
| FROM | name of the origin status | |
| TO | name of the destination status | |
| SCHEDULED | date (yy-mm-dd format) and time (hh:ii:ss format) that the application is to become active in production. | |
| REPLACE | replace existing object(s) with the version being migrated. | |
| MREQ | name of the maintenance request associated with the migration event (if applicable). | |
| ARCEVENT | used if you are restoring archived objects to PAC. ARCEVENT is the name of the archive event that initially archived the objects. | |
| GENTYPE | one-character code (C, I, M, P, R, S, U, L) for the type of
object list to be generated. Refer to the following GENTYPE Option sections for
more information. Note: You must specify a GENTYPE option to generate the object list. Otherwise, you must create the object list manually. |
|
The object list is generated from a Predict Case set. The SETUID (user ID of the set; up to eight characters) and SETNAME (name of the set; up to 20 characters) are required when GENTYPE C is specified.

The set identified must be defined on the application status link with an origin status of maintenance or development; it must be valid for the current NTFILE definition for Predict Case in the Natural parameter modules.
The object list or list of URLs (denoting the objects to be transferred into PAC) is read from instream input with the GENTYPE I option. The following example shows how this facility may be used.
Work file 1 (CMWKF01) is not used; the data read for creating the object list is contained in the primary input file (CMSYNIN).
The format of the input data must be as follows:

The data fields must be separated with a comma (,). The end of the list must be designated with a period (.). If the version number is omitted, the most recent version of the object will be included on the object list.
For example, CMSYNIN contains the following commands and data:
LOGON SYSPAC
MENU
ADD,EVENT,MAY10-01,FOR,ORDERS,FROM,CONTROL,TO,PRODUCTION,%
GENTYPE,I
ORD-COPY,C,2
ORD-CUST,N,1
ORD-GLOB,G,3
ORD-MAP,M,3
ORD-MAIN,P,1
.
FIN
The percent sign (%) indicates the end of input for the current line and that the remainder of the command is continued on the next line.
The above example creates a migration event MAY10-01 for the application ORDERS from the status CONTROL to the status PRODUCTION with the resulting object list:
ORD-COPY,C,0002
ORD-CUST,N,0001
ORD-END,N,0003
ORD-GLOB,G,0003
ORD-MAP,M,0003
ORD-MAIN,P,0001
//@USER JOB @ACCOUNT,CLASS=A
//EVENT EXEC PACBATCH
//CMSYNIN DD *
LOGON SYSPAC
MENU
ADD,EVENT,new-event@GEN,FOR,application,%
FROM,development,TO,user-test,%
GENTYPE,I
program1,P
program2,P
program3,P
program4,P
program5,P
The object list will be built from a maintenance request. If MREQ is not specified, the object list will be built from the maintenance request associated with the event name. The object list is built from objects previously checked-out of PAC to a maintenance status. PAC selects checked-out objects with the same maintenance request ID, application, and check-out library (of the From/origin status path) as the event.
For a maintenance request with multiple applications: When adding an event in batch, or generating a list from a maintenance request that was used to check out objects for more than one application, you may add one event for each application in use by the maintenance request using the "@GEN" string for the event name and an asterisk (*) for the application name. If a fixed name is used for the application, then an event for only that application is created. If the "@GEN" string is not used in the event name, then an event is created for the first application only.
Note:
This is valid only if origin status is neither of type
Incorporation nor of type Archive.
The object list will be built based on the objects currently in the origin status compared with objects in the destination status of the various types of events:
Development, Maintenance or Incorporation
An object is
considered in the list only if the object does not exit for the same
application. In the case of Development or Maintenance, objects with sources in
the original location are taken into consideration. In the case of
Incorporation, objects with sources and/or loadables in the original location
are taken into consideration.
Restoration
Object list is generated only if an archiving
event in the Archive Event field is also specified.
Control
A versioned object will be placed in the list if
the object has not already been migrated, overwritten or retired. This is valid
for all destination statuses except Archive.
Archive
If the event is one of archiving, the Natural
objects in the compartment whose archiving with removal from the compartment
(archiving with finalization) is allowed by the application's Retention
Parameters (described in subsection Retention Parameters) are put on the
list.
Retirement
Objects which were never overwritten or
retired from a test, maintenance or production environment will be placed on
the list.
De-Archiving
Object list is generated if an archiving
event in the Archive Event field is also specified.
Retirement from CONTROL
If the event is one of retirement
from CONTROL, the objects whose retirements are allowed by the application's
Retention Parameters (described in subsection Retention Parameters) are put on
the list.
Alignment
Highest numbered Natural object versions are
placed on the list.
False Migration
Objects migrated to the environment
defined in the application (origin status link) and have not been overwritten
nor retired are placed on the list.
For an origin status of an Archive status type, the Archive event used to archive the objects should be specified.
When you specify P, you may optionally add the following WITH clause to specify selection criteria for the object list:
NAME includes only the objects in the specified range.
USER includes only the objects saved by a user in the NAME range.
TYPE is a single character designation for any valid Natural object type except error message.
Dates and times must be entered in the formats given. Only objects compiled since the FM (from) date and time and before the TO date and time will be included in the list.
For dates
yy is the last two digits of the year (e.g., 97 for 1997), mm is the month (e.g., 02 for February), and dd is the day of the month.
If left blank, the year default is 00; the month default is 01; and the day default is 01.
For times
hh is the hour of the day using a 24-hour clock; ii is the minutes of an hour (from 01-60); and ss is the seconds of a minute (01-60).
If left blank, the hour default is 00; the minute default is 01; and the second default is 01.
You may use the ADD EVENT command in batch to read object lists or list of URLs (denoting the objects to be transferred into PAC) from external input. For example, objects placed in a work file (Work File 1) may become the object list.
The maximum length for the URL-NAME is 250 and must start with
http:// or https://.
The following example shows how this facility may be used.
Work File 1 (label CMWKF01) is required and contains the data from which the object list will be generated.
The format of the data of Work File 1 (CMWKF01) must be as follows:
The data fields must be separated with the specified input delimiter, in this case, the comma (,). If the version number is omitted, the most recent version of the object will be included in the object list. For example:
ORD-COPY,C,2
ORD-CUST,N,1
ORD-END,N,3
ORD-GLOB,G,3
ORD-MAP,M,3
ORD-MAIN,P,1
The primary input file (label CMSYNIN) contains the following commands:
LOGON SYSPAC
MENU
ADD,EVENT,MAY10-01,FOR,ORDERS,FROM,CONTROL,TO,PRODUCTION,%
GENTYPE,R
The percent sign (%) tells the user to put the input command to PAC over two lines.
The above example creates a migration event MAY10-01 for the application ORDERS to be migrated from the status CONTROL to the status PRODUCTION with the resulting object list:
ORD-COPY,C,0002
ORD-CUST,N,0001
ORD-END,N,0003
ORD-GLOB,G,0003
ORD-MAP,M,0003
ORD-MAIN,P,0001
With GENTYPE S, the object list is built from a Predict set identified by user ID (SETUID), set number (SETNUM), and file number (SETLOC).
SETLOC is the location of Predict cross-reference data. For objects from the Control status, the location is always local (that is, the set is stored within PAC). Otherwise, the set location is always remote (that is, the set is stored in the Predict file specified by the application status link).
With GENTYPE U, the object list is built from a URL specifying a source in a repository of an external version control software. This option is used similarily to the SEL U command with the exception that you can not expand a specific node residing below a certain root URL any further. Instead, all content below the specified URL is taken as input for the object list. However, specifying a certain pattern (file name and or extension), a certain date or time or a period of time is also possible.
The following batch parameters can be used:
| Parameter | Explanation |
|---|---|
| URL-PART-1 | The first part of the URL. The number of
characters allowed for a URL is 250. However, since the number of characters
per parameter is limited to 32 plus a delimiter character (a %
sign), you can specify up to eight URL-PART parameters (URL-PART-1 to
URL-PART-8) with each parameter containing a part of the complete URL and the
delimiter character.
|
| FILE-PATTERN | This parameter can contain a file name or part of the file name with an asterisk as wildcard character. |
| EXT-PATTERN | This parameter can contain a file extension or part of the file extension with an asterisk as wildcard character. |
PAC V26,DNAT1
MENU
ADD,EVENT,HEA-&GEN,FOR,NAT_TEST,FROM,NAT_EXT %
TO,CONTROL %
GENTYPE,U %
NAME,SVN-L* %
URL-PART-1, http://natcvs/repos/pac/ %
URL-PART-2, test/NAT-FUSER/NAT-APIT/SRC/ %
FILE-PATTERN, ABC*
EXT-PATTERN, NSN
FIN
This option generates a migration list consisting of one entry for each locked entity, or, for short, 'lock', of the specified type and pertaining to the relevant application. There are five lock types to choose from:
| Type | Explanation |
|---|---|
| O | object records |
| N | new object - status links |
| H | historical object - status links corresponding to objects just superseded |
| R | historical object - status links corresponding to objects just retired from non-ACF locations |
| S | all object - status links |
The syntax for the direct command is as follows:
<OBJECT NAME,<OBJECT TYPE>
or
<OBJECT NAME>,<OBJECT TYPE>,<VERSION NUMBER>
depending on whether the generation is "without version" or with, respectively.
Note:
The migration event must be in a Pending or Validated state. The
authorization request will take a Pending event through the Validated state
automatically.
The AUTHORIZE EVENT direct command may be used to authorize migration events in batch.
The syntax for the direct command is as follows:
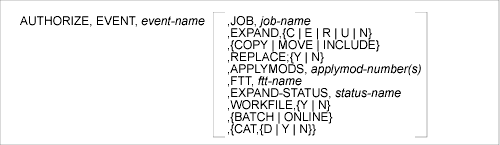
AUTHORIZE EVENT Batch Command Example:
LOGON SYSPAC
MENU
AUTHORIZE,EVENT,ord dc 02,JOB,natural migrate workfile,EXPAND,C
AUTHORIZE,EVENT,ord dc 03,MOVE,REPLACE,Y,APPLYMODS,4,5
The BACKOUT EVENT direct command may be used to back out a migration event in batch.
The syntax for the direct command is as follows:

BACKOUT EVENT Batch Command Example:
//@USER   JOB @ACCOUNT,CLASS=A,MSGLCASSS=X,REGION=2M
//BACKOUT EXEC PACBATCH
//CMSYNIN DD *
LOGON SYSPAC
MENU
BACKOUT,EVENT,ord_dc_02
FIN
/*

Valid entity-types for the COPY command include the following:
| entity-type 1 |
|---|
|
|
| EVENT |
| JOB |
| KEYWORD |
| REQUEST |
The COPY command requires a TO-clause, which consists of just an entity-name, with or without the TO operator. The corresponding entity type is always entity-type1.
Examples:
COPY EVENT ord-dc-01 TO ord-dc-02
COPY JOB os-export-jcl new-export-jcl
COPY KEYWORD project1 TO project2
COPY REQUEST fix-01 fix-02
Note:
Refer to the following section for information about the DISPLAY
OBJECT command.

Valid entity-types for the DISPLAY command include the following:
| entity-type1 | entity-type2 | |
|---|---|---|
|
|
||
| APPLICATION | STATUS | |
| EVENT | - | |
| JOB | - | |
| KEYWORD | - | |
| REQUEST | - | |
| STATUS | APPLICATION | |
The following syntax is used to display an application linked to a status:
DISPLAY APPLICATION application-name [FOR][STATUS]status-name
The following syntax is used to display a status linked to an application:
DISPLAY STATUS status-name [FOR ][APPLICATION]application-name
The remaining valid values for entity-type1 are not used with a FOR-clause.
Examples:
DISPLAY APPLICATION ord-exam
DISPLAY APPLICATION ord-exam FOR STATUS user-test
DISPLAY APPLICATION ord-exam STATUS user-test
DISPLAY APPLICATION ord-exam user-test
DISPLAY EVENT ord-dc-01
DISPLAY JOB os-export-jcl
DISPLAY KEYWORD project1
DISPLAY REQUEST fix-01
DISPLAY STATUS user-test
DISPLAY STATUS user-test FOR APPLICATION ord-exam
DISPLAY STATUS user-test APPLICATION ord-exam
DISPLAY STATUS user-test ord-exam

The only valid entity-types for this particular DISPLAY command are as follows:
| entity-type1 | entity-type2 | |
|---|---|---|
|
|
||
| OBJECT | APPLICATION | |
Note that a specific version of the object may be specified for display. You may also, or alternatively, specify the status for which you want the object version(s) displayed.
Examples:
DISPLAY OBJECT ord-exam
DISPLAY OBJECT ord-main 0001
DISPLAY OBJECT ord-main user-test
DISPLAY OBJECT ord-main 0001 user-test
DISPLAY OBJECT ord-main FOR APPLICATION ord-exam
DISPLAY OBJECT ord-main APPLICATION ord-exam
DISPLAY OBJECT ord-main ord-exam
DISPLAY OBJECT ord-main 0001 FOR APPLICATION ord-exam
DISPLAY OBJECT ord-main 0001 APPLICATION ord-exam
DISPLAY OBJECT ord-main 0001 ord-exam
DISPLAY OBJECT ord-main user-test FOR APPLICATION ord-exam
DISPLAY OBJECT ord-main user-test APPLICATION ord-exam
DISPLAY OBJECT ord-main user-test ord-exam
You may display the most current version of an object, or the next to most current version of a specified object:

where - n is the most current version minus the number of versions.
Examples:
DISPLAY OBJECT ord-main LAST APPLICATION ord-exam
DISPLAY OBJECT ord-main LAST - 1 APPLICATION ord-exam
You may use the GENLIST EVENT batch command to create the object list for an existing migration event and to import lists of URLs (denoting the objects to be transferred into PAC) either instream (option I of GENTYPE) or by means of a workfile (option R of GENTYPE).
The GENTYPE options available are the same as those for the ADD EVENT command.
If an object list already exists for the event, it will be replaced.
The syntax for the GENLIST EVENT command is as follows:
GENLIST,EVENT,event-nameGENTYPE,C/I/M/P/R/S/U/W/L
  [,MREQ,maintenance-request]
  [,ARCEVENT,archive-event-name]
  [,SET identifiers required for GENTYPE C or S]
  [,WITH clause optional for GENTYPE P]
The values for the optional keywords are described in the following table:
| Keyword | Description | |
|---|---|---|
|
|
||
| GENTYPE | one-character code (C, I, M, P, R, S, U, W, L) for the type of
object list to be generated. Refer to the GENTYPE Option sections associated
with the ADD EVENT command. In addition, the GENLIST command provides the
GENTYPE W (Write to Output File) option. Use this code to write the object list
of an existing event to an external output file (Work File 1 is required and
must be a minimum length of 72 bytes per record). Note: You must specify a GENTYPE option to generate the object list. |
|
| MREQ | name of the maintenance request associated with the migration event (if applicable). | |
| ARCEVENT | used if you are restoring archived objects to PAC. ARCEVENT is the name of the archive event that initially archived the objects. | |
Example:
LOGON SYSPAC
MENU
GENLIST,EVENT,batch-add-d-ut,GENTYPE,R

The LINK command is used to link applications and statuses. Valid entity-types for the LINK command include the following:
| entity-type1 | entity-type2 | |
|---|---|---|
|
|
||
| APPLICATION | STATUS | |
| STATUS | APPLICATION | |
At least the entity-name argument of the TO-clause is required.
The following syntax is used to link an application to a status:
LINK APPLICATION application-name [TO][STATUS]status-name
The following syntax is used to link a status to an application:
LINK STATUS status-name [TO][APPLICATION]application-name
Examples:
LINK APPLICATION ord-exam TO STATUS user-test
LINK APPLICATION ord-exam STATUS user-test
LINK APPLICATION ord-exam user-test
LINK STATUS user-test TO APPLICATION ord-exam
LINK STATUS user-test APPLICATION ord-exam
LINK STATUS user-test ord-exam

Valid entity-types for the MODIFY command include the following:
| entity-type1 | entity-type2 | |
|---|---|---|
|
|
||
| APPLICATION | STATUS | |
| EVENT | - | |
| JOB | - | |
| KEYWORD | - | |
| REQUEST | - | |
| STATUS | APPLICATION | |
The following syntax is used to modify an application linked to a status:
MODIFY APPLICATION application-name [FOR ][STATUS]status-name
The following syntax is used to modify a status linked to an application:
MODIFY STATUS status-name [FOR ][APPLICATION]application-name
The remaining valid values for entity-type1 are not used with a FOR-clause.
Examples:
MODIFY APPLICATION ord-exam
MODIFY APPLICATION ord-exam FOR STATUS user-test
MODIFY APPLICATION ord-exam STATUS user-test
MODIFY APPLICATION ord-exam user-test
MODIFY EVENT ord-dc-01
MODIFY JOB os-export-jcl
MODIFY KEYWORD project1
MODIFY REQUEST fix-01
MODIFY STATUS user-test
MODIFY STATUS user-test FOR APPLICATION ord-exam
MODIFY STATUS user-test APPLICATION ord-exam
MODIFY STATUS user-test ord-exam

Valid entity-types for the PURGE command include the following:
| entity-type1 | entity-type2 | |
|---|---|---|
|
|
||
| APPLICATION | STATUS | |
| EVENT | - | |
| JOB | - | |
| KEYWORD | - | |
| REQUEST | - | |
| STATUS | APPLICATION | |
The following syntax is used to purge an application linked to a status:
PURGE APPLICATION application-name [FOR ][STATUS]status-name
The following syntax is used to purge a status linked to an application:
PURGE STATUS status-name [FOR ][APPLICATION]application-name
The remaining valid values for entity-type1 are not used with a FOR-clause.
Examples:
PURGE APPLICATION ord-exam
PURGE APPLICATION ord-exam FOR STATUS user-test
PURGE APPLICATION ord-exam STATUS user-test
PURGE APPLICATION ord-exam user-test
PURGE EVENT ord-dc-01
PURGE JOB os-export-jcl
PURGE KEYWORD project1
PURGE REQUEST fix-01
PURGE STATUS user-test
PURGE STATUS user-test FOR APPLICATION ord-exam
PURGE STATUS user-test APPLICATION ord-exam
PURGE STATUS user-test ord-exam
The RELEASE EVENT direct command may be used to back out a migration event in batch.
This command performs the same functionality as the BACKOUT command. It is intended to remove the BACKOUT command in a future release of the product.
The syntax for the direct command is as follows:

RELEASE EVENT Batch Command Example:
//@USER   JOB @ACCOUNT,CLASS=A,MSGLCASSS=X,REGION=2M
//RELEASE EXEC PACBATCH
//CMSYNIN DD *
LOGON SYSPAC
MENU
RELEASE,EVENT,ord_dc_02
FIN
/*

Valid entity-types for the RENAME command include the following:
Valid entity-types for the COPY command include the following:
| entity-type1 |
|---|
|
|
| JOB |
| KEYWORD |
The RENAME command requires a TO-clause, which consists of just an entity-name, with or without the TO operator. The corresponding entity type is always entity-type1.
Examples:
RENAME JOB os-export-jcl new-export-jcl
RENAME KEYWORD project1 TO project2
The RESET EVENT direct command may be used to back out a migration event in batch.
This command does what the online RESET command does. When a migration event is reset, the following occurs:
The step number of the event is reset to 1.
The audit report is deleted.
The syntax for the direct command is as follows:

RESET EVENT Batch Command Example:
//@USER   JOB @ACCOUNT,CLASS=A,MSGLCASSS=X,REGION=2M
//RESET EXEC PACBATCH
//CMSYNIN DD *
LOGON SYSPAC
MENU
RESET,EVENT,ord_dc_02
FIN
/*

Valid entity-types for the SELECT command include the following:
| entity-type1 | entity-type2 | |
|---|---|---|
|
|
||
| APPLICATION | STATUS | |
| EVENT | - | |
| JOB | - | |
| KEYWORD | - | |
| REQUEST | - | |
| STATUS | APPLICATION | |
The following syntax is used to select an application linked to a status:
SELECT APPLICATION application-name [FOR ][STATUS ]status-name
The following syntax is used to select a status linked to an application:
SELECT STATUS status-name [FOR ][APPLICATION ]application-name
The remaining valid values for entity-type1 are not used with a FOR-clause.
Examples:
SELECT APPLICATION ord-exam
SELECT APPLICATION ord-exam FOR STATUS user-test
SELECT APPLICATION ord-exam STATUS user-test
SELECT APPLICATION ord-exam user-test
SELECT EVENT ord-dc-01
SELECT JOB os-export-jcl
SELECT KEYWORD project1
SELECT REQUEST fix-01
SELECT STATUS user-test
SELECT STATUS user-test FOR APPLICATION ord-exam
SELECT STATUS user-test APPLICATION ord-exam
SELECT STATUS user-test ord-exam
The SUBMIT EVENT direct command may be used to submit a migration event in batch only in the z/OS environment. If you are using Natural 2.1, you must copy the module NATRJET from the Natural 2.1 distribution load library into a library in your current steplib concatenation as module NATRJE.
The syntax for the SUBMIT EVENT command is as follows:

Note the following when submitting a migration in batch using direct commands:
You may submit a migration event in batch using direct commands only in the z/OS environment.
The migration event must be in an Authorized or Started state.
If you are using Natural 2.1, you must copy the module NATRJET from the Natural 2.1 distribution load library into a library in your current steplib concatenation as module NATRJE.
A group event may be resubmitted in order to submit the next member event.
Example
//@USER   JOB @ACCOUNT,CLASS=A,MSGLCASSS=X,REGION=2M
//SUBMIT  EXEC PACBATCH
//CMSYNIN DD *
LOGON SYSPAC
MENU
SUBMIT,EVENT,ord_dc_02
FIN
/*
The TRY EVENT direct command lists the objects whose retirement or the finalisation of whose archiving would be refused if the retirement were to be submitted or the archiving finalised at the time when the command is issued.
There can be five reasons for such refusals: four application defaults' settings and the setting (OFF) of applymod 23.
The objects get messages, but the retirement or finalisation of archiving goes on. This provides a way of knowing before the submission of the retirement or archiving event whether he was likely to run into any such refusal.
TRY,EVENT, event-name
The UNDO EVENT direct command may be used to back out a migration event in batch.
This command is applicable to emigrations to test or production and to retirements from test or production, provided the events have reached stage 6 and have not been unlocked.
The syntax for the direct command is as follows:

UNDO EVENT Batch Command Example:
//@USER   JOB @ACCOUNT,CLASS=A,MSGLCASSS=X,REGION=2M
//UNDO  EXEC PACBATCH
//CMSYNIN DD *
LOGON SYSPAC
MENU
UNDO ,EVENT,ord_dc_02
FIN
/*
This section covers the following topics:
Note:
In the following paragraphs, N represents a Natural command; P
represents a PAC command. ADMIN and MENU are both Natural and PAC
commands.
Entered from the SYSPAC library screen. ADMIN provides access to the PAC administrator functions if the user is authorized for those functions.
The DEACTIVATE command is used when you are displaying a specific object version and you need to deactivate and remove a Natural object from the PCF system file. Only the PAC administrator may use the DEACTIVATE command.
Entered from the Logon Accepted screen to access the PAC Main Menu.
The PACADJST command is entered from the SYSPACA library screen to invoke the File Adjust Function used to renumber PAC files without losing the integrity of the PAC system.
The REFRESH direct command is valid for completed and backed-out events. It refreshes the current event to Pending state. The following information is removed from the refreshed event:
Audit Report
Authorization information
Job information
Schedule date
A refreshed event can be reused. PAC returns the message "PAC7337: (A) Migration event has been refreshed".
The REFRESH command may be used only on the Display Migration Event screen and by authorized users as per their User Profile settings.
Entered at the NEXT prompt on the Natural system library screen to access the PAC system. SYSPAC may alternatively be preceded by LOGON:
LOGON SYSPAC
Entered at the NEXT prompt on the Natural system library screen. The only object in SYSPACA is the menu object that logs the user on to SYSPAC and executes ADMIN. The SYSPACA object is provided for security reasons. ADMIN monitors whether the user is authorized to use SYSPACA.
The UNLOCK command invokes a screen for unlocking PAC data that was locked by a user or by a user's batch user ID. This is a PAC administrator function.
The Natural Editor PROFILE command is available from the PAC command line. This enables you to utilize the majority of the editor profile functionality. Please refer to the Natural user documentation for more information.
Direct commands may be issued to SYSPAC or to Natural using the character string "//" as a prefix. These commands may be entered on the command line and issued from most PAC screens.
The following table lists and describes the special commands that may be issued to SYSPAC to set ON/OFF SYSPAC options and parameters:
| Command | Explanation |
|---|---|
| SET ON TRACK 9 SET OFF TRACK |
This tool provides you with display checkpoints
in order to aid in the debugging process. To start it, enter SET ON TRACK 9. To stop it, enter SET OFF TRACK. |
The Natural program editor is used to edit various Natural objects.
This sectioncovers the following topics:
| Cmd | Position . . . | |
|---|---|---|
|
|
||
| +P, -P | forwards or backwards one page. | |
| +, - | forwards or backwards one page. | |
| +H, -H | forwards or backwards half a page. | |
| T, -- | to top of program. | |
| B, ++ | to bottom of program. | |
| +nnnn | forwards "nnnn" lines (maximum 4 digits). | |
| -nnnn | backward "nnnn" lines (maximum 4 digits). | |
| nnnn | to line "nnnn". | |
| X, Y | to the page containing the line marked with "X" or "Y". | |
| Command | Description | |
|---|---|---|
|
|
||
| ADD [(n)] | Adds "n" empty lines. If "n" is not specified, 9 lines (4 in split screen mode) will be added. | |
| CHANGE | Scans for the value entered as "scandata" and replaces each such value with the value entered as "replacedata". The syntax for this command is: CHANGE `scandata'replacedata' Any special character which is not valid within a Natural variable name may be used as the delimiter character with the restriction that the same character must be used within any given command. | |
| CLEAR | Clears the edit source work area. | |
| DX | Deletes the X-marked line. | |
| DY | Deletes the Y-marked line. | |
| DX-Y | Deletes the block of lines delimited by X and Y. | |
| EX | Deletes source lines from the top of the source area to, but not including, the X-marked line. | |
| EY | Deletes source lines from the source line following the Y-marked line to the bottom of the source area. | |
| EX-Y | Deletes all source lines in the source area excluding the block of lines delimited by X and Y. | |
| POINT | Causes the line in which the ".N" line command was entered to be positioned to the top of the current screen. See also the line command ".P". | |
| RESET | Deletes the current X and Y line markers and any marker previously set with the line command ".N". | |
| SCAN | Scans for data in the source area. SCAN (without parameter) will cause | |
| [`scanvalue'] | the SCAN menu to be produced. SCAN `scanvalue' will result in a scan for scan value. If the scan value is entered without delimiter characters, the entire character string which follows the keyword SCAN will be used as the scan value. | |
| SCAN = | Causes a scan for the next occurrence of the scan value. The direction for a given scan command may also be explicitly specified by entering "SCAN =+" or "SCAN =-" prior to command execution. The first line which contains the scanned value is positioned to the top line after each SCAN= or SCAN+ command. Each line in which the scanned value is found will be marked with an "S". | |
| SET ABS | "SET ABS ON" causes the SCAN and CHANGE commands to operate | |
| [ON|OFF] | in absolute mode, i.e., the value to be scanned/changed need not be delimited by blanks or special characters. "SET ABS OFF" (default) causes the SCAN and CHANGE commands to operate in non-absolute mode, i.e., the value to be scanned/changed must be delimited by blanks or special characters. | |
| SET NUL [ON|OFF] | "SET NUL ON" causes the value scanned with a SCAN command to be replaced by a null value. Default is OFF. | |
| SHIFT [-|+nn] | Shifts each source line delimited by the X and Y markers to the left or right. "nn" represents the number of characters the source line is to be shifted. Comment lines are not shifted. | |
| SHIFT -- | Shifts each source line delimited by the X and Y markers to the leftmost position. Comment lines are not shifted. | |
| SHIFT ++ | Shifts each source line delimited by the X and Y markers to the rightmost position (maximum 99 positions). Comment lines are not shifted. | |
| * | Displays the edit command most recently entered. | |
| *= | Causes the last command entered in the command line to be executed. | |
The notation "(nnnn)" indicates a repetition factor. The default repetition value is 1.
| Command | Description | |
|---|---|---|
|
|
||
| .C(nnnn) | Copies the line in which the command was entered. | |
| .CX(nnnn) | Copies the X-marked line. | |
| .CY(nnnn) | Copies the Y-marked line. | |
| .CX-Y(nnnn) | Copies the block of lines delimited by the X and Y markers. | |
| .D(nnnn) | Delete line(s). The default is 1 line. | |
| .I(n) | Adds "n" empty lines. "n" may be 1-9. If "n" is not specified, 9 lines (4 in split screen mode) will be added. | |
| .J | Joins the current line with the next line. If the resulting line length is greater than the length of the editor screen line, the line will be marked with "L" and then must be separated again using the ".S" command before it can be modified. | |
| .L | Will undo all modifications to the line since the last time was pressed. | |
| .MX | Moves the X-marked line. | |
| MY | Moves the Y-marked line. | |
| .MX-Y | Moves the block of lines delimited by the X and Y markers. | |
| .N | Marks a line as reference for the edit command POINT. | |
| .P | Causes the line marked by this command to be positioned to the top of the screen. | |
| .S | Splits the line at the position marked by the cursor. | |
| .X | Marks the beginning of a block of lines to be processed. | |
| .Y | Marks the end of a block of lines to be processed. | |