
This section describes Natural Report Manager. Each screen available in Natural Report Manager is described. The sections Navigating Within Natural Report Manager and Navigating Between the Layout Editor Screens tell you how to navigate between the main screens.
This section covers the following topics:
Natural Report Manager is a tool which is available within Super Natural for editing the layout of reports.
You can create and edit the following layout elements:
Preface
Title
Header
List
Groups
Appendix
Footer
Natural Report Manager generates a default layout for every Super Natural report. The type and number of layout elements generated by default depend on the entries you have made on the Worksheet and on the transaction mode. For example, when you define control breaks, a layout element of the type group is generated for each one and when you are using reporting mode Destination WORK FILE, only a title is generated. If you change the transaction modes of a transaction which already has a layout, the elements not relevant to the new mode can only be displayed not edited.
A standard Title element is supplied with Super
Natural which contains the system variables
TIMX, DATX,
PROGRAM and
PAGE-NUMBER but your administrator may change
this.
Natural Report Manager is structured as shown in the following diagram:

When you invoke Natural Report Manager from within a report, a default layout is automatically generated.
The default layout for reporting transactions always contains the layout element Title and can contain other elements according to the current transaction mode.
If you delete default layout elements, they are generated again when you next invoke Natural Report Manager with the following exceptions:
The Title element is not regenerated unless it is the only default layout element.
If you delete either the Header element or the List element (not both) from a default layout containing both, the element is not regenerated.
Note:
Deleted default layout elements are also regenerated when you save or
run the transaction.
Entries made in the Layout Editor override those made in the Sequence column in the Worksheet. When you return to the Worksheet, you cannot use the Sequence column until you delete the elements list and header. Fields which have been used in the Layout Editor are marked with an "L".
If you add a transaction without invoking Natural Report Manager, a default layout is still generated but not until you save or run the transaction. The Sequence column of the Worksheet is not effected if you do not invoke Natural Report Manager.
You can invoke Natural Report Manager from any point within a transaction you are creating or modifying.
 To invoke Natural Report Manager
Issue the LAYOUT command.
The Layout Overview screen appears.
Note:
Your administrator may change your user profile so that the Layout
Editor takes the place of the Layout Overview screen
in the diagram. The Layout Editor is then the first screen to appear when you
invoke Natural Report Manager.
There are three ways of issuing commands in Natural Report Manager.
You can enter commands directly in the command line.
To issue a command directly
Type the command in the command line.
Press Enter.
In the Layout Overview screen, the Layout Editor split-screen with information sections and the Layout Editor editor area you can issue commands using the command line and cursor position.
To issue a command using the command line and cursor position
Type the command in the command line.
Position the cursor in the layout element box or section you want the command to act on.
Press Enter.
In the Layout Overview screen, the Layout Editor split-screen with information sections and the Layout Editor editor area you can issue commands using the cursor position and a PF key.
To issue a command using the cursor position and a PF key
Position the cursor in the layout element box or section you want the command to act on.
Press the relevant PF key.
The following diagram shows the commands needed for navigation within Natural Report Manager:
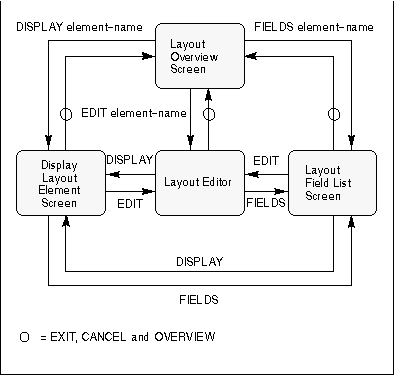
The OVERVIEW command invokes the
Layout Overview screen from the Display
Layout Element screen, Layout Editor and Layout Field
List screens.
The EXIT and
CANCEL commands function as described in the section
PF keys in the section Using Super
Natural.
However, you should note the following:
If you issue the CANCEL command from the
Layout Overview screen, you leave Natural Report
Manager and return to Super Natural. The layout is
returned to the version which existed before you invoked Natural Report Manager
and you lose any changes made since.
If you issue the EXIT command from the
Layout Overview screen, you leave Natural Report
Manager and return to Super Natural. When you keep,
save or run the transaction, the current version of the layout is kept or
saved.
The DISPLAY, EDIT
and FIELDS commands invoke the Display
Layout Element screen, Layout Editor and Layout Field
List screens respectively for the layout element you specify or
for the layout element you are working with.
If you want to work with a layout element, you can issue the
DISPLAY, EDIT and
FIELDS commands with an element name.
To process a layout element
Issue one of the following commands from the Display Layout Element screen, Layout Editor or Layout Field List screen:
DISPLAY element-name
EDIT element-name
FIELDS element-name
Once you are working with a layout element, the commands
DISPLAY, EDIT and
FIELDS act upon it until otherwise specified.
The ALL keyword allows you to process all the elements of a layout together.
To process all the elements of a layout together
Issue one of the following commands:
DISPLAY ALL
EDIT ALL
FIELDS ALL
Note:
You cannot issue the FIELDS ALL and
EDIT ALL commands if one or more layout elements are
protected.
When you have all elements in the editor area, all elements are affected by the line and field commands you then issue.
Asterisk (*) List
Function
The Asterisk List function provides you with
a list of elements available with a certain command.
To invoke a selection list of elements, which you can display, edit
or see the field list for
Issue one of the following commands:
DISPLAY *
EDIT *
FIELDS *
The following table shows the default PF key allocation in Natural Report Manager. These PF key allocations are additional to the standard allocations described in the section Using Super Natural earlier in this documentation.
| PF Key | Allocation | Section Documented |
|---|---|---|
| PF2 | SETTINGS | Layout Settings |
| PF4 | FIELDS | Navigating Within Natural Report Manager |
| PF5 | EDIT | Navigating Within Natural Report Manager |
| PF13 | TEST | Testing Layouts |
| PF14 | DISPLAY | Navigating Within Natural Report Manager |
| PF16 | SECTION | The Layout Editor Screens |
| PF17 | SHOW | The Layout Editor Screens |
| PF18 | FULL | The Layout Editor Screens |
The Layout Overview screen shows which elements are already present in the layout.
If an element is outlined with a dotted line, you may not edit it.
In the example below, the element types for a simple report are present.
 12:34                   *** NATURAL REPORT MANAGER ***              07.Dec.1992
 NRMPAGE                       - Layout Overview -                        Monday

                     +------------------------------------+
                     I                Title               I
                     +------------------------------------+
                     +------------------------------------+
                     I               Header               I
                     I                                    I
                     +------------------------------------+
                     +------------------------------------+
                     I                List                I
                     I                                    I
                     I                                    I
                     I                                    I
                     I                                    I
                     I                                    I
                     I                                    I
                     I                                    I
                     +------------------------------------+

 Command ===>
 Enter-PF1---PF2---PF3---PF4---PF5---PF6---PF7---PF8---PF9---PF10--PF11--PF12---
       Help  Set   Exit  Field Edit  Flip              Tech              Canc
|
To display, edit or invoke the field list for an element
Issue a direct command as described in the section Navigating within Natural Report Manager.
To delete a layout element
Issue the DELETE
element-name command.
The ALL parameter allows you to delete all the
elements of a layout at once.
To delete all the elements of a layout at once
Issue the DELETE
ALL command.
The Confirm Multiple Delete window appears where you can select between confirming each deletion, deleting without confirmation or cancelling the deletion.
Note:
The DELETE ALL command is not available
if an element in the layout is protected.
Asterisk (*) List
Function
The Asterisk List function provides you with
a list of the elements available with a certain command.
To invoke a selection list of elements which you can delete
Issue the DELETE * command.
To create a new layout element
Issue the EDIT
element-name command.
The Select Function window displays a selection list of the functions available from the Layout Overview screen.
To invoke the Select Function window
Position the cursor in the layout element you want to process.
Press Enter.
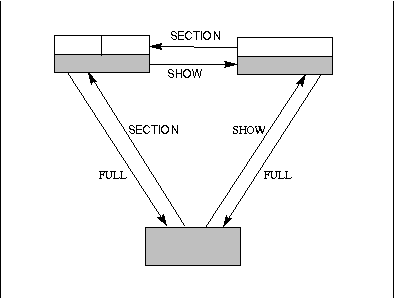
There are three ways of displaying the Layout Editor.
Editor area with information sections
Editor area with show area
Editor area with full screen
The following diagram shows the commands you need to navigate within the Layout Editor:
When you invoke the Layout Editor from the Layout Overview screen for the first time, it consists of three sections as shown in the diagram below:
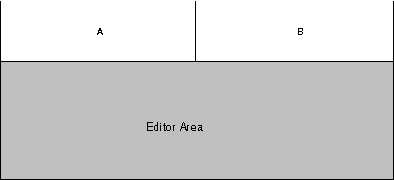
Section A and section B display information about the transaction fields and field delimiters you can use. You can decide which information you want to be displayed in which information section. The editor area is where you edit layout elements and is described later in this section.
To invoke the editor area with information sections
Transaction field information lists the fields in the file or files you chose when creating the transaction. Transaction field information also lists any system variables and user fields used in the transaction.
Every field which you can use in the Layout Editor has a qualifier (number). Fields which you cannot use, for example group fields and phonetic descriptors are marked with a period (.).
Note:
You cannot use superdescriptors, subdescriptors or phonetic
descriptors in the Layout Editor if you are using a DL/1 file.
The format of each field is shown to the right of the transaction field list. You can shift the field format information further to the right until it is no longer visible. This is useful, if for example, the field names are truncated.
To shift the field format information to the right
Position the cursor in the section displaying transaction field information.
Issue the > or
RIGHT command until the information becomes
invisible.
To shift the field format information to the left
Position the cursor in the section displaying transaction field information.
Issue the < or
LEFT command until the information becomes
visible.
Delimiter information lists the field delimiters available. Field delimiters are symbols which represent a combination of field class, field attributes and field color. You use field delimiters to determine what kind of fields are used and how they are displayed.
The delimiter information contains four columns:
| Column | Description | |
|---|---|---|
|
|
||
| Delimiter | The character which indicates a certain delimiter. | |
| Class | There are two classes of field: text fields and output fields. You enter the content of text fields in the Layout Editor. The contents of output fields are supplied dynamically when the transaction is run. | |
| Attrib. | The field attributes govern the type of text used when a field is displayed e.g., blinking (for screen output only), intensified. | |
| Color | Field color is indicated here. | |
You can create your own field delimiter definitions or modify existing ones. For further information, see Layout Settings in Working with Natural Report Manager.
The escape character for field and line commands is part of the delimiter information and is displayed next to the header character.
The header character is part of the delimiter information and is displayed next to the escape character. You use the header character to generate the header text defined in Super Natural for a field.
When a header layout element is first created, the header texts defined for the fields used in the editor are generated and underlined. If no header text is defined, the field name is generated. However, when you position subsequent fields in the Layout Editor, header text is not automatically generated. You can either type in a header as text or use the header character to generate it.
To generate header text for a field
Type in the header character and qualifier for the field.
You can additionally use a text delimiter between header character and qualifier.
Press Enter.
The header text defined for the field in Super Natural is generated. No underline is generated.
You can use the header character to generate header text in any layout element.
You can choose whether you want to display transaction field and delimiter information in section A or in section B.
If you have long lists of transaction fields or of delimiters, it can be useful to use both A and B to display different parts of the same list.
To change the information in section A or B
Issue the section-name information-type
command
where section-name is
A or B and
information-type is
TRANSACTION or
DELIMITER as shown below:

To page in section A or section B
Enter the section-name paging-command
command where section-name is
A or B and
paging-command is one of the Super Natural paging
commands or one of those listed below:
| Command | Description | |
|---|---|---|
|
|
||
| + n | Pages forward n lines | |
| - n | Pages backwards n lines | |
| LINE n | Pages to the line number specified | |
| SCAN fieldname | Pages to the field named (only for the section displaying transaction fields) | |
![]()
You can also issue the paging commands by positioning the cursor in the section you want to page in and using a PF key.
Instead of the sections A and B, you can display a layout element in the top half of the Layout Editor as shown in the following diagram:
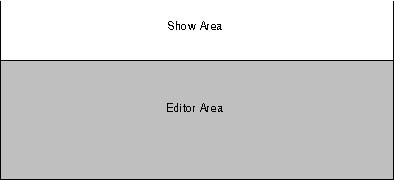
To invoke the show area with the editor area
Issue the SHOW command from
within the Layout Editor.
A screen similar to the following appears:
 12:35                   *** NATURAL REPORT MANAGER ***              07.Dec.1992
 NRMEDIT                        - Layout Editor -                         Monday
                                                                   More:       >
 All   ---010---+----+----+---030-- ( Title ) +---050---+----+----+---070--- Cmd
 (XXXXXXXX _SSSSSSSSSSSSSSSSSSSSSSSSSSSSSSSSSSSSSSSSSSSSSSSSSSSSSSSSSSSS(XXX ___
 (XXXXXXXX _SSSSSSSSSSSSSSSSSSSSSSSSSSSSSSSSSSSSSSSSSSSSSSSSSSSSSSSSSSSS(999 ___
           _SSSSSSSSSSSSSSSSSSSSSSSSSSSSSSSSSSSSSSSSSSSSSSSSSSSSSSSSSSSS     ___
                                                                             ___
                                                                             ___
                                                                             ___
 All   ---010---+----+----+---030--- ( List ) +---050---+----+----+---070--- Typ
 )X)XXXXXX)XXXXXXXXXXXXXXX)00000000)00000000)0000                            Lst
                                                                             ___
                                                                             ___
                                                                             ___
                                                                             ___
                                                                             ___
                                                                             ___
                                                                             ___
                                                                             ___

 Command ===>
 Enter-PF1---PF2---PF3---PF4---PF5---PF6---PF7---PF8---PF9---PF10--PF11--PF12---
       Help  Set   Exit  Field Edit  Flip  -     +     Tech  <     >     Canc
|
You can perform the following two commands on lines displayed in the show area by entering them in the command column:
| Command | Description | |
|---|---|---|
|
|
||
| ..R (text constants only) | Copies text constants from the show area to the cursor position in the editor area | |
| ..M (only if layout may be edited | Moves lines from the show area to the cursor position in the editor area | |
Note:
You can copy or move a range of lines by entering the relevant line
command in the first line and in the last line.
Apart from using the ..R and
..M commands, you cannot edit the element displayed
in the show area.
You can use the Super Natural Shift functions, Paging functions or one of the commands listed below for positioning within the layout element displayed in the show area:
| Command | Description | |
|---|---|---|
|
|
||
| >> | Positions to far right of layout | |
| << | Positions to far left of layout | |
To display another layout element
Issue the SHOW
element-name command.
You can also choose to display the editor area only as shown in the diagram below:

To invoke the editor area only
Issue the FULL command from
within the Layout Editor.
A screen similar to the following appears:
 )X)XXXXXX)XXXXXXXXXXXXXXX)00000000)00000000)0000                            Lst
                                                                             ___
                                                                             ___
                                                                             ___
                                                                             ___
                                                                             ___
                                                                             ___
                                                                             ___
                                                                             ___
                                                                             ___
                                                                             ___
                                                                             ___
                                                                             ___
                                                                             ___
                                                                             ___
                                                                             ___
                                                                             ___
                                                                             ___
                                                                             ___
                                                                             ___
 All   ---010---+----+----+---030--- ( List ) +---050---+----+----+---070--- Typ
 Command ===>
 Enter-PF1---PF2---PF3---PF4---PF5---PF6---PF7---PF8---PF9---PF10--PF11--PF12---
       Help  Set   Exit  Field Edit  Flip  -     +     Tech  <     >     Canc
|
You can use the Layout Editor editor area to position and edit transaction fields and text constants within layout elements either directly or using line commands, field commands and direct commands.
Reports can be up to 250 columns wide and 250 lines long. The editor area is 75 columns wide, 20 lines long in the full-screen Layout Editor screen and 9 lines long in the split-screen Layout Editor screen.
If your report is wider than the editor area, you can use one of the Super Natural Shift functions or one of the commands listed below to position to the right or left in the layout element(s) displayed:
| Command | Description | |
|---|---|---|
|
|
||
| >> | Positions to far right of layout | |
| << | Positions to far left of layout | |
If your report is longer than the editor area, you can use the Super Natural paging commands to page within the layout element(s) displayed.
The scale is a line either at the top or the bottom of the editor area which displays information about the element(s) you are editing.
In the two split-screen Layout Editor screens, the information line separates the editor area from the rest of the screen. In the full-screen Layout Editor screen, the information line is in the message line and is overwritten if a message is displayed.
The scale displays the following information:
Line position information shows the number of the first line you can see in the editor area. The information ALL (when you can see the whole element), TOP and BOTTOM appear as appropriate.
The scale displays the name of the element you are editing or the text All Elements'.
The scale also shows which columns are displayed. The columns are identified by a three-figure number at intervals of 20 columns. The column itself is underneath the second figure of the number.
The Type (Typ) column contains a three-letter abbreviation showing the layout element type of each line used in the editor area. Blank lines in an element are also marked.
To move the Type column to the other side of the screen
Issue the TYPE command.
The paging information shown after the More: prompt always refers to the editor area when the editor area is displayed.
Each transaction field qualifier must be preceded by a delimiter of the class OUTPUT.
For further information on delimiters, see Delimiter Information.
To position a transaction field in a layout element
Position the cursor one position to the left of the column in which you want the field to be displayed.
Type in a field delimiter of class OUTPUT.
Type the field qualifier (number allocated to the field in the information section) after the field delimiter.
Press Enter.
For right-justified fields of numeric (N), integer (I) or packed numeric (P) format, the figure nine (9) appears to represent the full length of the field. For example, if you choose a field of the format N12, twelve 9's appear.
For left-justified fields of numeric (N), integer (I) or packed numeric (P) format, the figure zero (0) appears to represent the full length of the field. For example, if you choose a field of the format N12, twelve 0's appear.
For fields of alphanumeric (A), floating (F), Date (D), time (T) or binary (B) format, the letter X appears to represent the full length of the field. For example, if you choose a field of the format A12, twelve X's appear.
Fields of any type with an edit mask are represented by the letter M.
To alter the position of transaction fields already present in a
layout element
Use the field commands and line commands described later in this section.
A text constant is piece of text which always appears in a layout element. You can enter text constants directly into the editor area.
Each text constant must be preceded by a delimiter of the class TEXT.
Note:
The default delimiter for text constants is blank ( ).
To alter the position of text constants already present in a layout
element
Use the field commands and line commands described later in this section.
The first column of the editor area is only for delimiters or commands. You may not position text constants in it.
Line commands influence the editor lines and are structured as follows:
![]()
The escape character of a line command is entered in the first position of an editor line. You may only enter escape characters or delimiters in this position.
When all elements are in the editor area, all elements are effected by the line and field commands you issue.
The first two characters of each line command are the escape character. The default escape character is a period (.). The escape character defined for you is shown in the Delimiter information which you can invoke in one of the information sections of the split-screen Layout Editor.
You can use some line command characters in combination with a repetition factor or with a marker.
Entering a blank at the end of each line command prevents the editor from trying to interpret any other information in the editor line as part of the line command.
To issue a line command
Type the first escape character at the first position of an editor line.
Type the second escape character at the second position of the editor line.
Type the line command character immediately after the second escape character.
Type a blank.
Press Enter.
Do not leave a blank between the second escape character and the line command character.
The following is an example of a correctly-positioned line command:
The line commands available in the Layout Editor editor area are listed in the following section.
Note:
The notation "n" indicates a repetition factor. The default
repetition factor is 1. You can enclose the repetition factor in parentheses if
you wish.
Note:
The line in which you enter the command is referred to as the
current line.
| Line Command | Description | |
|---|---|---|
|
|
||
..C |
Centers the
current line. If you type two ..C commands and press
Enter, the current line is centered. The rest of the lines delimited by the
commands are moved the same distance to the right or left as the current line
but are not centered.
|
|
..Cn |
Centers the current line and moves the n-1 lines below it the same distance to the right or left but does not center them. | |
..C* |
Centers the current line and moves all lines below it the same distance to the right or left but does not center them. | |
..D |
Deletes the
current line. Two ..D commands entered on the same
screen delete the block of lines between them.
|
|
..Dn |
Deletes the current line and the n-1 lines below it. | |
..D* |
Deletes the current line and all lines below it. If the delete operation affects array elements the array is deleted in total. | |
..E |
Invokes the
Layout Field List screen for all the fields contained
in the line. You can then perform extended field editing on the fields
displayed. If you type two ..E commands and press
Enter, the Layout Field List screen appears for all
fields within the range of lines delimited by the commands.
|
|
..En |
Invokes the Layout Field List screen for the current line and the n-1 lines below it. You can then perform extended field editing on the fields displayed. | |
..E* |
Invokes the Layout Field List screen for the current line and all lines below it. You can then perform extended field editing on the fields displayed. For further information on extended field editing, see Extended Field Editing Window. | |
..Fc |
Fills the blank spaces of the current line with the character c. | |
..I |
Inserts a single line below the current line. | |
..In |
Inserts n lines below the current line. | |
..J |
Joins the
current line with the line below it. If you type two
..J commands and press Enter, the range of lines
delimited by the commands are joined.
|
|
..Jn |
Joins the current line with the n-1 lines below it. | |
..J* |
Joins the current line with all lines below it. If a join operation results in a line being too long, the characters which don't fit are written to the beginning of the next line. | |
..M |
Moves the
current line to the line below the line in which the cursor is positioned when
you press Enter. If two ..M commands are entered on
the same screen, the block of lines delimited by the commands is moved below
the line marked with the cursor.
|
|
..Mn |
Moves the line and the n-1 lines below it to the line below the line in which the cursor is positioned when you press Enter. | |
..M* |
Moves the current line and all lines below it to the line below the line in which the cursor is positioned when you press Enter. This command is only practical if the line marked with the cursor is above the current line. | |
..R |
Repeats
(copies) all the text constants in the current line and writes them to the line
indicated by the cursor position. Transaction fields are not copied. If you
copy a line which only contains transaction fields, the line is copied but it
is blank. Two ..R commands entered on the same
screen repeat the text constants within the block of lines delimited by the
commands.
|
|
..Rn |
Repeats (copies) all text constants on the current and the n-1 following lines to the cursor position. If the cursor is located in the current line, the same text is repeated ntimes. | |
..R* |
Repeats (copies) all the text constants in the current line and the lines below to the cursor position. This command is only practical if the line marked with the cursor is above the current line. | |
..S |
Splits the
current line at the cursor position. The content of the current line after the
cursor position is written into a new line which is created below the current
line. If you type in two ..S commands and press
Enter, the block of lines delimited by the commands is split at the cursor
position. The part of the block after the cursor position is written into a new
line which is created below the current line.
|
|
..Sn |
Splits the current line and the n-1 lines below it at the cursor position. | |
..S* |
Splits the current line and all the lines below it at the cursor position. | |
Field commands influence the field in which you enter them and are structured as follows:
![]()
You can apply field commands to a range of fields or constants. You can specify a range as follows:
With two or more of the same field commands on the same screen. The column range (horizontal range) and the line range (vertical range) are determined by the positions of the commands.
With the repetition factors "n" (where "n" is a number) or asterisk (*). With the repetition factor "n", the command is applied to the designated field and to the fields in the n-1 lines below it. The repetition factor asterisk (*), causes repetition until the bottom of the element is reached.
Field commands are entered in the first position of a field. The escape character of the field command is entered in the same position as the delimiter of the field.
When all elements are in the editor area, all elements are effected by the line and field commands you then issue.
The first character of each field command is the escape character. The default escape character is a period (.). The escape character defined for you is shown in the Delimiter information which you can invoke in one of the information sections of the split-screen Layout Editor.
You can use some field command characters in combination with a repetition factor as described above.
Entering a blank at the end of each field command prevents the editor from trying to interpret any other information in the line as part of the field command.
To issue a field command
Type the escape character at the first position of a field (the same position as the field delimiter).
Type the field command character immediately after the escape character.
Type a blank.
Press Enter.
Do not leave a blank between the escape character and the field command character.
The following is an example of a correctly-positioned field command:
The field commands available in the Layout Editor editor area are listed in the following section.
Note:
The notation n indicates a repetition factor. The
default repetition factor is 1. You can enclose the repetition factor in
parentheses if you wish.
Note:
The line in which you enter the command is referred to as the
current line.
| Field Command | Description | |
|---|---|---|
|
|
||
.A |
Invokes the
Array Editing window in which you can determine how multiple-value and periodic
group fields are displayed. This command may be applied to a single field only
and not to a range of fields. The resulting array is positioned with its left
upper corner at the position where the .A command
was entered. You can redefine an array by applying the
.A command to one of its elements. For further
information, see Array Editing
Window.
|
|
.C |
Centers a
field or range of fields between adjacent fields. To center a single field,
enter .C in the field to be centered. To center a
range of fields, enter .C in the first and last
field to be centered, or enter .Cin the first field
and position the cursor to the last field to be centered. If an adjoining field
or fields are not present, the column boundaries in effect for the layout
definition are used instead.
|
|
.D |
Deletes a
field or range of fields. To delete a single field, enter
.D in the field to be deleted. To delete a range of
fields, enter the .D command in the first and last
field to be deleted. The field range to be deleted may extend beyond a single
line. If one array element is deleted, the entire array will be
deleted.
|
|
.E |
Invokes the Extended Field Editing window for a field. You may not apply this command to a range of fields. For further information, see Extended Field Editing Window. | |
.J |
Joins fields
located on consecutive lines.The left boundary of the join operation
corresponds to where the .J command is entered and
the right boundary corresponds to the cursor position.
|
|
.M |
Moves a field
or range of fields. To move a single field, enter the
.M command in the field to be moved and place the
cursor at the target position. To move a range of fields, enter the
.M command in the first and last field to be moved
and place the cursor at the target position.
|
|
.R |
Repeats
(copies) a text constant or range of text constants. To copy a single text
constant, enter the.R command in the text constant
to be copied and place the cursor at the target position. To copy a range of
text constants, enter the .R command in the first
and last text constant to be copied and place the cursor at the target
position. Text constants and ranges of text constants are repeated downwards
and from left to right.
|
|
.S |
Splits a line
or a range of lines. Enter the .S command in the
field at which splitting is to begin and place the cursor at the target
position. The line is divided at the position where the
.S command was entered. The right portion is then
moved to the cursor position.
|
|
.T |
Truncates
(deletes) a line from the field in which you enter the
.T command to the end. If this function is used to
truncate (delete) an array element, the entire array is deleted.
|
|
When executing a line or field command would result in fields being overwritten or the margins of the report being exceeded, an error message is displayed which indicates overlapping. The command is not executed.
The Display Layout Element screen displays a layout element or elements. You can display elements which you are not allowed to edit.
 12:03                   *** NATURAL REPORT MANAGER ***              07.Dec.1992
 NRMSHOW                   - Display Layout Element -                     Monday
                                                                   More:       >
 All   ---010---+----+----+---030--- ( List ) +---050---+----+----+---070--- Typ
 )X)XXXXXX)XXXXXXXXXXXXXXX)00000000)00000000)0000                            Lst


 Command ===>
 Enter-PF1---PF2---PF3---PF4---PF5---PF6---PF7---PF8---PF9---PF10--PF11--PF12---
       Help  Set   Exit  Field Edit  Flip  -     +     Tech  <     >     Canc
|
For information on the scale, see Layout Editor Editor Area.
To display a layout element
Issue the DISPLAY
element-name command from the Display Layout
Element screen, Layout Editor or Layout Field
List screen.
The element named is displayed in the Display Layout Element screen.
To display all layout elements
Issue the DISPLAY ALL command from the
Display Layout Element screen, Layout Editor or
Layout Field List screen.
All elements are displayed in the Display Layout Element screen.
The Layout Field List screen lists the fields in the layout element specified.
  12:00                   *** NATURAL REPORT MANAGER ***             07.Dec.1992
  NRMVARL                     - Layout Field List -                       Monday
                                                                   More: <
 ------------------------------------ List -------------------------------------
 Cmd  Field Name (Truncated)                           Format Field Type
  __  SAG-TOURS-E-PERSON.SKIPPER-SAILING-INSTRUCTOR___ A1     Primary
  __  SAG-TOURS-E-PERSON.AREA-CODE____________________ A6     Primary Array
  __  SAG-TOURS-E-PERSON.PHONE-NUMBER_________________ A15    Primary Array
  __  SAG-TOURS-E-PERSON.PERSON-ID____________________ N8     Primary
  __  SAG-TOURS-E-PERSON.BIRTH-DATE___________________ N8     Primary
  __  YEAR-OF-BIRTH___________________________________ N4     User
  __  ________________________________________________
  __  ________________________________________________
  __  ________________________________________________
  __  ________________________________________________
  __  ________________________________________________
  __  ________________________________________________
  __  ________________________________________________
  __  ________________________________________________
 Available field commands: EDIT ARRAY DELETE

 Command ===>
 Enter-PF1---PF2---PF3---PF4---PF5---PF6---PF7---PF8---PF9---PF10--PF11--PF12---
       Help  Set   Exit        Edit  Flip  -     +     Tech  <     >     Canc
|
You can perform the following commands on fields displayed in the Layout Field List screen by entering the command abbreviation in the command column:
| Command | Description | |
|---|---|---|
|
|
||
DELETE |
The field is deleted from the layout. | |
EDIT |
The Extended Field Editing window appears. | |
ARRAY |
The Array Editing window appears. | |
The Extended Field Editing window and the Array Editing window are described later in this section.
You can use the Extended Field Editing window to edit fields individually. For example, you may want to have the field NAME shown twice in a list, in pink at the top and in blue at the bottom.
To invoke the Extended Field Editing window
Enter the field command .E in
the first position of the field.
Or:
Enter ED in the command column next to the
field in the Layout Field List screen.
Note:
You can also issue the EDIT command
using the cursor position as described earlier in this section.
The following example shows the version of the Extended Field Editing window which appears for numeric fields:
 17:50                   *** NATURAL REPORT MANAGER ***               1993-05-07
 Layout LCRUISE1               - Layout Editor -                          NRMVAR
                                                                   More:       >
 +-------------------------Extended Field Editing (1)--------------------------+
 !  Field Name                                          (Field Type: Primary ) !
 !    SAG-TOURS-E-CRUISE.START-DATE____________________________________        !
 !                           ________         Identical Suppress..  ON _ OFF _ !
 !  Format ................. N8___            Output Length .......... 8____   !
 !  Attributes ............. IL______         Numeric Sign ON ........ _       !
 !  Colors ................. ________         Zero Print ON .......... _       !
 +More:   +--------------------------------------------------------------------+
 (XXXXXXXX _SSSSSSSSSSSSSSSSSSSSSSSSSSSSSSSSSSSSSSSSSSSSSSSSSSSSSSSSSSSS(XXX Ttl
 (XXXXXXXX _SSSSSSSSSSSSSSSSSSSSSSSSSSSSSSSSSSSSSSSSSSSSSSSSSSSSSSSSSSSS(999 Ttl
           _SSSSSSSSSSSSSSSSSSSSSSSSSSSSSSSSSSSSSSSSSSSSSSSSSSSSSSSSSSSS     Ttl
                                                                             Ttl
           Starting Date:  E9999999                                          Ttl
|
The Extended Field Editing window contains the following fields:
| Field | Description | |
|---|---|---|
|
|
||
| Field Name | For information only. You cannot change the field name | |
| Field Type | For information only. The
following information is displayed as appropriate: Primary field: contained in primary file Secondary field: contained in secondary file Lookup: n field is contained in the nth lookup file User: user fieldSystem: system variable Array: field is a multiple-value field or a periodic group |
|
| Identical Suppress | If you specify ON, identical values for the field are suppressed. If you specify OFF, identical values for the field are not suppressed. If you specify neither ON nor OFF, the setting specified in your transaction options is valid. | |
| System Function (fields in Group only) | You
can define a system function to be performed on the field. For further
information on system functions, see Function (Func) Column in
Working with the Worksheet. The
OLD system function is only available in Natural
Report Manager. This function displays the value of the field prior to a
control break.
|
|
| Format | For information only. | |
| Output Length | You can change the length of the field for display purposes. | |
| Attributes | You can change the field
attributes. The following representation attributes are available:B: Blinking C: Italic/Cursive D: Normal (default) I: Intensified N: Not displayed (for passwords etc.) U: Underlined V: Reverse video The following alignment attributes are available: Z: Numeric field right-justified with leading zeros L: Left-justified R: Right-justified |
|
| Numeric Sign ON (numeric fields only) | If you mark this field, negative values are preceded by a minus (-) sign. | |
| Colors | You can change the field's color. The following colors are available: Neutral, Blue, Green, Red, Pink, Yellow, Turquoise | |
| Zero Print ON (numeric fields only) | If you mark this field, zeros (0) are printed for fields which have that value. Otherwise, the field is left blank. | |
| Edit Mask | You can enter an edit mask here. For further information on edit masks, see Edit Masks. | |
| Dynamic Attribute (alphanumeric fields only) | You can determine the attributes of parts of an alphanumeric field according to its content as described below. | |
If you know that the contents of a field is always structured in a certain way, you may want to draw attention to part of the field by giving it different attributes.
To determine the attributes of parts of an alphanumeric field
according to its content
Type the character after which you want the field attributes to change in the Dynamic Attributes field of the Extended Field Editing (2)window.
You can enter either a special character or the hexadecimal value for any other character. The field help will help you with the required notation.
This character will not be displayed in the report.
Type one of the following two-character abbreviations for color (optional if new dynamic attribute defined):
BL (Blue)
GR (Green)
NE (Neutral)
PI (Pink)
RE (Red)
TU (Turquoise)
YE (Yellow)
Type one of the following abbreviations for a dynamic attribute (optional if new color defined):
B Blinking
C Italic/Cursive
D Normal (default)
I Intensified
N Not displayed (for passwords etc.)
U Underlined
V Reverse video
Type in a final special character.
The final special character is the character after which the dynamic field attributes revert to the original attributes.
For example, if the field NAME is always structured as follows:
Mr.surname,firstname
you could decide to have the surname displayed differently to the rest of the field. To have the surname displayed in red and blinking, you would enter the following in the Dynamic Attributes field:
'4BREB,
where '4B represents the special character period (.) in EBCDIC code. The special character period (.) is not displayed in the report.
Note:
You can also enter special characters directly.
You can use the Array Editing window to determine how the occurrences of multiple-value fields and periodic groups are displayed.
Before you perform array processing, the following applies:
For fields numbered in the Sequence column of the Worksheet, the number of occurrences defined in your user profile for multiple-value fields and periodic groups are displayed.
For fields not numbered in the Sequence column of the Worksheet, only the first occurrence is displayed.
To invoke the Array Editing window
Enter the field command .A in the first
position of the field in the Layout Editor.
Or:
Enter AR in the command column next to the
field in the Layout Field List screen.
 09:52                   *** NATURAL REPORT MANAGER ***               1993-05-10
 Layout LCRUISE1               - Layout Editor -                          NRMARR
                                                                   More:       >
 +--------------------------------Array Editing--------------------------------+
 !  Field Name                                   (Field Type: Primary Array )  !
 !    SAG-TOURS-E-CRUISE.LANGUAGES                                             !
 !  Upper Bounds   Output       Occurrences   Starting from   Spacing          !
 !     99___       Vertical__       1__          ________     0_ Lines         !
 !     191__       Horizontal       1__          ________     1_ Columns       !
 !     1____       __________       1__          ________      0               !
 +-----------------------------------------------------------------------------+
 )XXXXXXXXXXXXXXXXXXXXXXXXXXXXXX  )S000.00 )S00000000  AXX                   Lst
|
The Array Editing window contains the following columns as well as showing field name and field type:
| Column | Description | |
|---|---|---|
|
|
||
| Upper Bounds | For information only. Displays the maximum number of occurrences which can be displayed. | |
| Output | You can display the array vertically or horizontally. | |
| Occurrences | You can change the number of occurrences to be displayed. | |
| Starting From | You can change the number of the first occurrence to be displayed. | |
| Line/Column Spacing | You can change the number of lines to be left between occurrences with horizontal output and the number of spaces to be left between occurrences with vertical output. | |
To invoke the Layout Settings (General) window
The Layout Settings (General) window appears. You can page forward to change newpage, format and delimiter settings as described below:
| Setting | Description | |
|---|---|---|
|
|
||
| Layout Name | Information only. The layout name is the same as the transaction name except for that it has the prefix for layouts. | |
| Description | You can add or modify a description for the layout. | |
| Profile Name | Information only. The ID of the user who created the layout. | |
| Decimal Character | Information only. | |
If you specify no condition, a new page is always started before or after an element type as defined. If you specify a condition, a new page is only started if the condition is fulfilled.
| Setting | Description | |
|---|---|---|
|
|
||
| Before | Mark this field next to an element type if you want it to start on a new page. | |
| Condition | Enter the maximum number of lines of the element which can be displayed on one page before a new page is started. For example, if you enter 10, and there is only room for 8 lines of the element to be displayed on a page, the element is displayed starting on the next page. | |
| After | Mark this field next to an element type if you want a page break to occur after it. | |
| Condition | Enter the maximum number of lines which can be blank after the element. | |
Note:
If you are using a transaction generated in a previous version of
Super Natural (Version 2.4 or below), the line
numbers for existing page breaks are shown. You can change the line numbers or
just mark Before and/or After as described above. Once you have deleted all the
numbers, you cannot enter line numbers again.
| Setting | Description | |
|---|---|---|
|
|
||
| Pagesize | You can change the number of lines which are to appear on a page. The page size must be within the range 12-250 lines. | |
| Linesize | You can change the number of characters (columns) to appear in each line. The line size must be within the range 80-249 characters. | |
| Zero Print ON | If you mark this field, zeros (0) are printed for fields which have that value. Otherwise, the field is left blank. | |
| Left Justified | If you mark this field, numeric values are displayed starting at the left-hand side of the field. | |
| Mark to apply changes only to new fields | If you mark this field, your changes are only be applied to fields you use in the Layout Editor subsequently. | |
| Setting | Description | |
|---|---|---|
|
|
||
| Class | The following classes are offered: Text, Output Only. | |
| Attribute | The following attributes are offered: Italic/Cursive, Normal (default), Intensified, Not displayed (for passwords etc.), Underlined, Reverse video, Dynamic (not available). | |
| Color | The following colors are offered: NE (Neutral), BL (Blue), GR (Green), RE (Red), PI (Pink), YE (Yellow), TU (Turquoise). | |
| Delimiter | Use special characters as delimiters to represent the combinations of class, attribute and color you have specified. | |
| Mark to apply changes new fields | If you mark this field, your changes are only applied only to fields you use in the Layout Editor subsequently. | |
When you test a layout, you are shown how the report data would be presented if you ran the transaction you are working on using Report Destination SCREEN, PRINTER, CON-NECT or EDITOR. The test report is filled with dummy data.
To test a layout
The Layout Editor does not allow you to create a title as long as or longer than the page. If you are also using a header and footer, the Layout Editor makes sure that there is room for the report data.
The elements in the Layout Editor editor area are sorted (or not)
according to the defaults set by the administrator. You can use the
SORT command to sort the elements into the following
order:
Title
Preface
Header
List
Groups 1 - 10
Footer
Appendix
When you run a transaction, the layout elements always appear in a logical order. Title and footer (if defined) appear on every page and the other elements appear in the order listed above.
A default Title element is generated for all reports at your site. You can edit the default Title element like any other element.
The following shows the default Title element supplied with Super Natural:
The standard default Title element supplied with
Super Natural contains the system variables
TIMX, DATX,
PROGRAM and
PAGE-NUMBER but your administrator may change
this.
For further information on system variables, see System Variables.
The Super Natural administrator provides a default Title element to fit the needs at your site. For example, he may want the name of the company to appear at the top of all reports.
The S lines are a placeholder for up to 5 lines of selection criteria. Each S line contains 60 Ss. If you either add or erase Ss from the S lines, the Ss are interpreted as text. You can edit the S lines if you wish. For example, you can move the S lines two lines down and enter text above them.
If you use dynamic input fields in the first 5 lines of your selection criteria, the current value of the field does not appear in the standard title when the transaction is run.
To display the current value of a dynamic input field in the title
when the transaction is run
Edit the Title element.
Position the dynamic input field in the editor area as described in the section Positioning Transaction Fields in a Layout Element earlier in this section.
The current value of the dynamic input field is supplied in the title when the transaction is run.
